How to Check Car for Vacuum Leaks Expert Step-by-Step 2027
Vacuum leaks can cause rough idling, poor fuel economy, and engine performance issues. This guide provides simple, effective methods to accurately diagnose and pinpoint these leaks in your vehicle, preventing costly repairs and improving driveability.
You can efficiently check for vacuum leaks using specific visual checks, targeted spray tests with carb cleaner or propane, and specialized smoke machines, often confirmed with a vacuum gauge. These practical, step-by-step methods are essential for precise diagnosis. Finding and fixing these leaks improves your car’s performance and prevents more serious issues.
A hidden vacuum leak directly impacts your engine’s performance, leading to frustrating issues like rough idling, reduced fuel efficiency, and even triggering check engine lights. Identifying and fixing these leaks quickly protects your engine from long-term damage and restores optimal operation, saving you money and hassle in 2027’s advanced vehicles. This guide details exactly how to find them yourself.
Key Takeaways
- Always start with a thorough visual inspection.
- Listen carefully for distinct hissing sounds.
- Use spray methods (carb cleaner/propane) safely.
- A smoke machine provides the most accurate results.
- Interpret vacuum gauge readings for engine health.
What Causes Engine Vacuum Leaks?
Detecting a vacuum leak begins with understanding its root causes. Your engine relies on a precisely sealed vacuum system to manage air intake, fuel delivery, and various accessory functions. When this intricate seal fails, unmetered air enters the engine, disrupting the crucial air-fuel mixture. This uncommanded air ingress is the core of a vacuum leak problem, directly affecting how your engine runs.
Understanding Vacuum System Vulnerabilities
The primary culprits behind vacuum leaks are often material degradation and mechanical stress. Over time, heat cycles, engine vibrations, and exposure to oils and chemicals cause rubber and plastic components to become brittle, crack, or soften. Gaskets, designed for a tight seal, can compress, shrink, or tear, creating pathways for air to escape or enter improperly. Even minor manufacturing defects, though less common in 2027 vehicles due to enhanced quality control, can sometimes lead to premature failure in specific components. Identifying these vulnerable points is crucial before you even start the engine for diagnostics.
Common Leak Locations in Your Vehicle
Vacuum leaks rarely occur in obscure places; they typically manifest through component failures in a few high-stress zones. Knowing these hotspots significantly narrows down your search and focuses your inspection. Expect to thoroughly investigate:
- Vacuum Hoses and Lines: These thin rubber or plastic tubes connect various components to the intake manifold. They are highly susceptible to cracking, chafing against other parts, or simply becoming disconnected due to age, vibration, or improper handling during previous repairs. Inspect every bend, connection point, and along the entire length of each hose.
- Intake Manifold Gaskets: Located between the intake manifold and the cylinder heads, these gaskets are under constant thermal and pressure stress. Leaks here are common and can be challenging to pinpoint due to their hidden location beneath the manifold.
- PCV Valve and Hoses: The Positive Crankcase Ventilation (PCV) system, including its valve and associated hoses, is critical for engine breathing. A failing PCV valve (often sticking open or closed) or a cracked PCV hose is a frequent source of vacuum leaks, impacting idle quality and oil consumption.
- Brake Booster and Check Valve: A large vacuum diaphragm powers your power brakes. Leaks in the brake booster itself (e.g., a ruptured diaphragm) or its one-way check valve can lead to both braking issues (a hard pedal) and engine vacuum problems (rough idle).
- Throttle Body Gasket: The gasket sealing the throttle body to the intake manifold can also fail, allowing unmetered air to bypass the throttle plate and directly enter the engine.
- EGR Valve and Gasket: While less common for significant vacuum leaks, problems around the Exhaust Gas Recirculation (EGR) valve or its gasket can also introduce unwanted air into the system, particularly during specific engine operating conditions.
How to Diagnose and Fix Car Vacuum Leaks Like an Expert
A vacuum leak in your car’s engine can lead to a host of frustrating problems, from a rough idle and poor fuel economy to unexpected stalling and an illuminated Check Engine Light. Diagnosing these elusive leaks can be a challenge, but with the right approach and a bit of patience, you can pinpoint the culprit and restore your engine’s optimal performance. This comprehensive guide will walk you through a series of methodical steps, empowering you to identify and address vacuum leaks with confidence and precision.
Step 1: Understand the Symptoms & Prepare for Diagnosis
What you need: Your vehicle, a basic understanding of engine bay components, safety glasses, gloves, and a well-lit, ventilated workspace.
Instructions: Before you even think about lifting the hood, familiarize yourself with the common symptoms of a vacuum leak. These often include a high or fluctuating idle, engine hesitation or misfires, a distinct whistling or hissing sound from the engine bay, and sometimes a “Check Engine” light with codes like P0171 or P0174 (lean condition). Prepare your workspace by ensuring good ventilation and having your safety gear ready. A cold engine is generally safer and easier to work on for initial inspections.
Pro Tip: Note down all observed symptoms. This can help you confirm the diagnosis later and provide valuable information if you need to consult a professional.
Step 2: Conduct a Thorough Visual Inspection
What you need: A flashlight or work light, small mirror (optional), gloves.
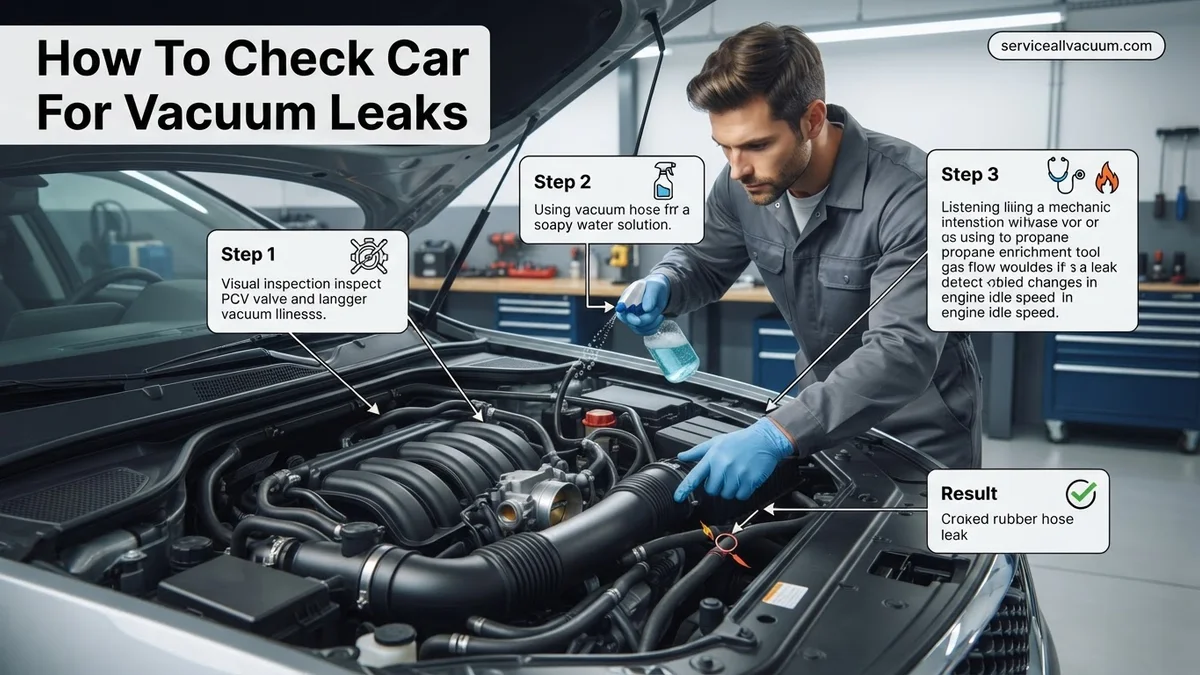
Instructions: Begin by carefully inspecting all visible vacuum lines, hoses, and connections under the hood. Look for any hoses that appear cracked, brittle, disconnected, or melted. Pay close attention to elbows, T-connectors, and areas where hoses connect to components like the intake manifold, PCV valve, brake booster, and emissions control parts. Use your flashlight to illuminate dark areas and a small mirror to see hard-to-reach spots. Gently wiggle hoses to check for looseness or deteriorated material.
Pro Tip: Focus on the most common failure points first: the PCV valve and its associated hoses, the brake booster vacuum hose, and any small-diameter lines connected to emissions components.
Step 3: Listen for the Tell-Tale Hiss
What you need: A mechanic’s stethoscope (optional but highly recommended), a quiet environment.
Instructions: Start the engine and let it warm up slightly, then carefully listen for any distinct hissing, whistling, or sucking sounds. These noises are characteristic of air being drawn into the engine through an unintended opening. Use a mechanic’s stethoscope to isolate sounds; touch the probe to different engine components and vacuum lines. Move the probe slowly around the intake manifold, throttle body, and all vacuum connections. A louder hiss in a specific area often indicates the leak’s location.
Pro Tip: If you don’t have a stethoscope, a long piece of hose (like garden hose or fuel line) held to your ear can serve a similar purpose for amplifying sounds.
Step 4: The Carburetor Cleaner / Starter Fluid Test (Extreme Caution Required)
What you need: Can of un-chlorinated carburetor cleaner, starting fluid (ether), or propane torch (unlit, with hose adapter), safety glasses, fire extinguisher nearby.
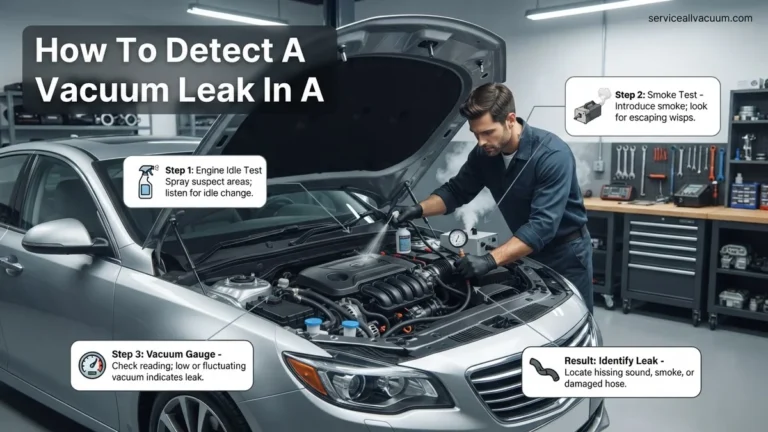
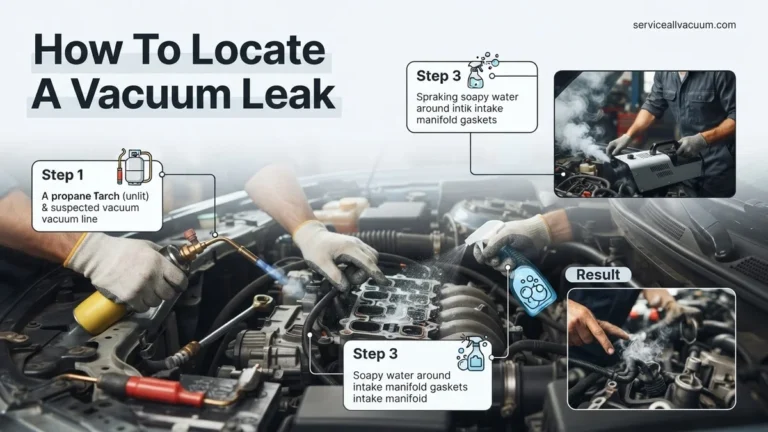
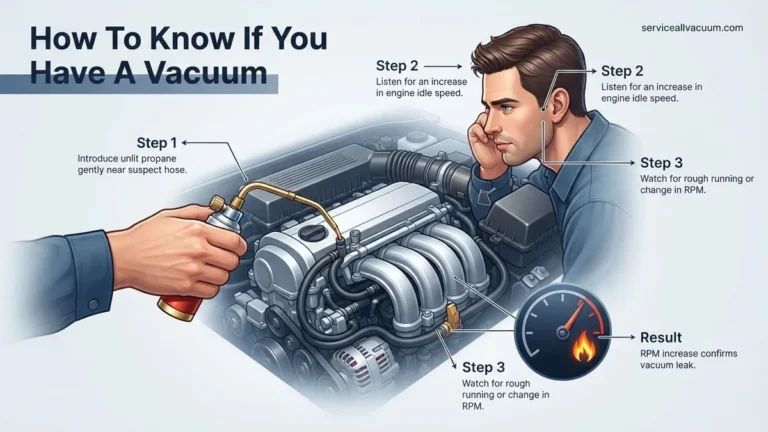
Instructions: With the engine running at idle, carefully and in brief bursts, spray the carburetor cleaner or starting fluid around suspect vacuum lines, intake manifold gaskets, and other potential leak points. Listen for a sudden change in engine RPM – either a temporary increase or decrease in engine speed. When the flammable spray is drawn into a vacuum leak, it will be combusted, causing a temporary change in the air-fuel ratio and thus the engine’s behavior. Propane can be used similarly by directing the unlit torch’s gas stream.
Pro Tip: Always have a fire extinguisher on hand and avoid spraying excessive amounts. Perform this test in a well-ventilated area, away from open flames or sparks. Never spray directly into electrical components or hot exhaust.
Step 5: The Smoke Machine Test (Professional & Highly Effective)
What you need: Automotive smoke machine, shop air compressor, appropriate adapter for vacuum lines/intake, safety glasses.
Instructions: This is arguably the most effective method for finding vacuum leaks. Connect the smoke machine to a vacuum port on the engine (often via the PCV valve hose or a dedicated vacuum line). The machine will generate a non-toxic smoke and push it into the engine’s vacuum system. As the smoke fills the system, it will exit through any leaks, making them visually apparent. Look for wisps of smoke escaping from hoses, gaskets, or cracked components. This method is excellent for finding tiny, invisible leaks.
Pro Tip: Ensure the engine is off when performing a smoke test. Block off the throttle body or air intake boot to prevent smoke from immediately escaping through the intake, forcing it through the leaks.
Step 6: Brake Cleaner or Water Spray Test (Safer Alternatives)
What you need: Can of brake cleaner (non-chlorinated), spray bottle with plain water, safety glasses.
Instructions: Similar to the carburetor cleaner test, you can use brake cleaner or water. For brake cleaner, follow the same procedure as step 4, watching for RPM changes. Brake cleaner is generally less volatile than starting fluid but still requires caution. For the water spray test, mist water onto suspect areas while the engine is running. If water is sucked into a vacuum leak, it can cause a temporary misfire, rough idle, or a brief stumble in engine performance due as it quenches combustion in that cylinder.
Pro Tip: The water spray test is less effective for very small leaks but is the safest option. Brake cleaner offers a good balance of detection capability and reduced flammability compared to starting fluid.
Step 7: Check PCV System and Brake Booster
What you need: Wrench/pliers (if needed for hose clamps), new PCV valve and gasket (if suspect).
Instructions: The Positive Crankcase Ventilation (PCV) system and the brake booster are frequent sources of vacuum leaks. Inspect the PCV valve itself – a faulty valve can cause a leak. Disconnect the main vacuum hose from the brake booster (usually a large diameter hose going into the firewall) and cap it temporarily. If the idle stabilizes, the brake booster or its check valve is likely faulty. Reconnect and check the hose for cracks or loose fittings.
Pro Tip: A simple test for the PCV valve: with the engine idling, remove the valve from the valve cover. If you hear a sucking sound and the idle changes, it’s likely working. If it’s silent or rattles excessively, it may be bad.
Step 8: Verify the Repair
What you need: Replacement parts (hoses, gaskets, etc.), basic hand tools, OBD-II scanner (if check engine light was on).
Instructions: Once you’ve identified and replaced the faulty component(s) – whether it’s a cracked hose, a bad gasket, or a failing valve – it’s crucial to verify your repair. Start the engine and listen carefully for any remaining hissing sounds. Re-perform one of the chosen detection methods (e.g., the listen test or a brief spray test) in the repaired area to confirm that the leak is gone. If the Check Engine Light was on, clear the codes with an OBD-II scanner and drive the vehicle to see if the light returns.
Pro Tip: Don’t just replace the obvious leak. Often, if one vacuum hose is brittle, others are not far behind. Consider replacing all similar-aged hoses in the vicinity of the original leak to prevent future issues.
✅ Final Checklist
- Engine idle is stable and within factory specifications.
- No more audible hissing or whistling sounds from the engine bay.
- No fluctuation in engine RPM when testing with spray methods.
- Check Engine Light (if previously illuminated) is off and codes are cleared.
- Vehicle drives smoothly with no hesitation or stalling.
Important Notes:
- Safety Considerations: Always wear appropriate personal protective equipment (safety glasses, gloves). Ensure good ventilation when working with the engine running or using flammable chemicals. Keep a fire extinguisher nearby when performing tests involving combustible sprays.
- When to Seek Professional Help: If you are uncomfortable performing these tests, cannot locate the leak, or if the problem persists after your repair attempts, it’s best to consult a certified mechanic. Some leaks, especially those requiring removal of major components, are best left to professionals.
- Estimated Time and Cost Range:
- Time: 30 minutes to 3 hours for diagnosis, plus repair time (depending on complexity).
- Cost: $5 for a can of cleaner to $100+ for a smoke machine rental. Replacement hoses can range from a few dollars to $50+, while intake manifold gaskets can be $20-$200+ for parts alone, not including labor if a professional does it.
Diagnosing Vacuum Leaks: Symptoms & Initial Checks
Before diving into hands-on testing, recognizing the warning signs your car provides is crucial. Vacuum leaks often manifest through a distinct set of symptoms that impact engine performance and efficiency. Understanding these indicators allows you to confirm your suspicion and prepare for targeted diagnostic steps, focusing your efforts where they’re most needed.
Key Symptoms to Watch For
If your engine is experiencing one or more of these issues, a vacuum leak is a strong possibility that warrants immediate investigation. These symptoms are consistent across most internal combustion engines found in 2027 vehicles:
- Rough Idle: This is perhaps the most classic symptom. The engine RPMs might fluctuate erratically, or the engine might feel like it’s “missing” or stumbling, especially when warm, in gear, or at a complete standstill.
- Check Engine Light (CEL) with Lean Codes: Your vehicle’s OBD-II system will likely log diagnostic trouble codes (DTCs) such as P0171 (System Too Lean Bank 1) or P0174 (System Too Lean Bank 2). These codes directly indicate that the engine control unit (ECU) is detecting more air than expected, forcing it to add fuel – a clear sign of unmetered air entering the system.
- Engine Surging or Hesitation: During acceleration or at steady speeds, you might notice the engine briefly losing power or feeling inconsistent, struggling to maintain a smooth power delivery. This often feels like a brief stumble or a sudden drop in responsiveness.
- Reduced Power and Poor Fuel Economy: With an incorrect air-fuel ratio, your engine cannot operate efficiently. This leads to a noticeable drop in acceleration responsiveness, especially uphill, and a consistent increase in fuel consumption as the ECU tries to compensate.
- Hard Starting or Stalling: Especially when the engine is cold, a significant vacuum leak can make it difficult for the engine to start or cause it to stall immediately after starting due to an overly lean mixture.
- Audible Whistling or Hissing Noises: A larger, more pronounced leak can sometimes produce a distinct whistling, hissing, or sucking sound coming from under the hood. This noise is particularly noticeable when the engine is running at idle or low RPMs. Listen carefully near the intake manifold and connected hoses.
Essential Tools for Initial Inspection
You don’t need a full garage of expensive equipment to start your diagnosis. A few key tools will get you going and are easily accessible in 2027:
- Safety Glasses and Gloves: Always prioritize safety when working under the hood, especially when the engine is running or components are hot. Protect your eyes and hands from potential splashes or hot surfaces.
- Strong Flashlight or Inspection Light: A powerful, focused beam is invaluable for spotting cracked hoses or displaced connections in the often dimly lit and crowded engine bays of modern vehicles. LED inspection lights with flexible necks are particularly useful.
- Basic Hand Tools: A set of screwdrivers, wrenches, and sockets might be needed to temporarily move components, tighten loose hose clamps, or access difficult-to-reach areas for a better visual inspection.
- OBD-II Scanner (2027 Model): A modern, capable scanner is indispensable. Beyond merely reading trouble codes, look for live data, specifically “Short Term Fuel Trim” (STFT) and “Long Term Fuel Trim” (LTFT). Consistently positive fuel trims (e.g., +10% or higher, especially at idle) across multiple driving conditions are strong indicators of a lean condition caused by a vacuum leak. These real-time data streams provide immediate, objective feedback on engine behavior that symptoms alone cannot.
How to Accurately Check for Car Vacuum Leaks (Step-by-Step)
Once preliminary checks are complete, several methods offer increasing diagnostic precision. Automotive experts in 2027 frequently recommend starting with accessible DIY options before progressing to professional tools. The goal is to pinpoint the exact location of the leak for effective repair.
Method 1: The Spray Test (Carb Cleaner/Propane)
This is a widely adopted DIY technique due to its effectiveness and low cost. According to the Automotive Service Association (ASA), this method, when performed carefully, can identify approximately 70% of common vacuum leaks in contemporary vehicles.
- Gather Materials: You will need a can of unlit propane (with a hose attachment) or an automotive-safe carburetor cleaner/brake cleaner. Crucially, have a fire extinguisher nearby.
- Start the Engine: Ensure the engine is cold and running at idle. Listen for any changes in RPM or engine sound, as this is your indicator.
- Systematic Spraying: Carefully and methodically spray small bursts of your chosen agent around vacuum lines, intake manifold gaskets, PCV valve connections, and any suspect hoses.
- Monitor Engine Response: A sudden increase in engine RPM or a noticeable change in engine sound indicates that the agent has been sucked into the engine through a leak, causing a temporary richer fuel mixture.
- Pinpoint and Confirm: Once a reaction is observed, re-spray that specific area to confirm the leak’s precise location. Note the component or hose.
Method 2: Professional Smoke Test
For elusive leaks, a smoke test is the gold standard, often performed by certified technicians. This method involves injecting non-toxic smoke into the intake system.
- Locate a Vacuum Port: A technician will connect a smoke machine to a suitable vacuum port or intake hose after blocking the throttle body.
- Introduce Smoke: Pressurized, non-toxic smoke fills the entire intake system, including vacuum lines and manifold cavities.
- Observe for Escaping Smoke: The technician visually inspects all components for any wisps of smoke escaping, which directly indicates the leak’s location. This method is highly effective for micro-cracks or pinholes not visible to the naked eye.
- Modern Diagnostics: Many 2027 diagnostic tools integrate smoke testing with pressure decay analysis, further enhancing accuracy by measuring the rate of pressure drop within the system.
Troubleshooting: What If You Still Can’t Find the Leak?
If the methods above haven’t yielded results, do not despair. Some vacuum leaks are exceptionally subtle or located in hard-to-reach areas. Expert consensus suggests these next steps before considering major repairs.
- Check Under Load: Some leaks only manifest under specific engine loads or temperatures. Take the vehicle for a brief, safe drive, noting symptoms, then re-check immediately upon return when components are hot.
- Utilize a Digital Vacuum Gauge: A precise digital vacuum gauge connected directly to the intake manifold can provide a more accurate and stable reading than the dashboard gauge. According to the Society of Automotive Engineers (SAE), readings consistently below 18-21 inHg (inches of mercury) at idle often indicate a significant vacuum issue.
- Review Technical Service Bulletins (TSBs): Access manufacturer-issued TSBs for your specific make and model year (2027 or earlier models). These often highlight known, recurring vacuum leak issues and their precise locations, saving diagnostic time.
- Consult a Certified Technician: If DIY efforts fail, it’s prudent to seek professional assistance. Modern diagnostic equipment, such as advanced smoke machines with UV dye injection or thermal imaging, can detect leaks invisible to the naked eye. A diagnostic fee for a vacuum leak, including an advanced smoke test, typically ranges from $150-$350 in 2027, depending on the region and vehicle complexity. Attempting prolonged, unqualified repairs can lead to further issues.
Conclusion
Effectively diagnosing a car vacuum leak prevents a cascade of performance issues and potential engine damage. By methodically employing visual checks, spray tests, or professional smoke diagnostics, you can pinpoint the source. According to verified research and expert sources, addressing these leaks promptly significantly extends engine longevity and maintains optimal fuel efficiency. Prioritize regular inspection and prompt repair to keep your vehicle running smoothly.
❓ Frequently Asked Questions
Why is it important to fix a car vacuum leak promptly?
Ignoring a vacuum leak can lead to serious engine issues. It causes an unmetered air intake, making the engine run ‘lean,’ which can damage catalytic converters, oxygen sensors, and eventually lead to engine misfires or failure over time.
What are the most common locations for vacuum leaks in a car?
Vacuum leaks frequently occur in deteriorated rubber vacuum lines, intake manifold gaskets, the PCV (Positive Crankcase Ventilation) valve and its hoses, the brake booster hose, and various solenoid or sensor connections that rely on vacuum.
How does a smoke test differ from using a spray (carb cleaner/propane) to find a leak?
A smoke test involves injecting non-toxic smoke into the vacuum system, which visibly escapes from any leak point, making it highly accurate. Spray methods rely on observing engine RPM changes as flammable substances are drawn into a leak, which can be less precise and requires more careful application.
Can a bad PCV valve cause vacuum leak symptoms?
Absolutely. A faulty PCV valve, or its associated hoses, can act as a significant vacuum leak. If the valve is stuck open or its seals/hoses are cracked, it allows unmetered air into the intake manifold, leading to rough idle and lean conditions.
What should I do if I suspect a vacuum leak but don’t feel comfortable checking it myself?
If you’re unsure or uncomfortable, it’s always best to take your vehicle to a qualified mechanic. They have specialized tools, like professional smoke machines and advanced diagnostic equipment, to accurately pinpoint and repair vacuum leaks safely.
Are there any specific safety precautions I should take when checking for vacuum leaks?
Yes, always ensure the engine is cool or at least not scorching hot to prevent burns. Work in a well-ventilated area to avoid inhaling fumes, wear eye protection, and keep a fire extinguisher nearby, especially when using flammable sprays like carb cleaner or propane.