How to Vacuum Seal a Mason Jar Step-by-Step Guide 2027
Vacuum sealing Mason jars is an excellent way to extend the shelf life of dry goods and pantry staples. This guide provides clear, step-by-step instructions on how to use common vacuum sealer systems and attachments to create an airtight seal, ensuring your food stays fresh for longer.
Vacuum sealing Mason jars is an incredibly effective way to extend the freshness and shelf life of your dry goods, prepped ingredients, and pantry staples in 2027. This technique removes air from the jar, significantly slowing down spoilage and preserving quality far beyond typical storage methods.
Instead of relying on bags, using jars provides a rigid, reusable, and often more aesthetically pleasing storage solution. You’ll reduce food waste, keep ingredients like coffee beans and spices at peak flavor for longer, and protect items from moisture, pests, and freezer burn, all with straightforward tools and techniques.
Key Takeaways
- Select the correct vacuum sealer and jar attachment.
- Always ensure jars and lids are perfectly clean and dry.
- Follow specific operating steps for your chosen sealer model.
- Confirm the seal by checking lid concavity and security.
- Store vacuum-sealed jars in a cool, dark environment.
Why Vacuum Seal Mason Jars? Understanding the Benefits and Tools
Key Benefits of Vacuum Sealing Jars
Utilizing a vacuum seal for your Mason jars offers several compelling advantages, making it a valuable practice for any modern kitchen. The primary benefit is vastly extended shelf life. By removing oxygen, you inhibit the growth of aerobic bacteria, molds, and yeasts, which are primary culprits of food spoilage. This means items like flour, sugar, pasta, nuts, dehydrated fruits, and even freshly baked cookies can last significantly longer – often five times their unsealed counterparts.
Beyond preservation, vacuum sealing locks in freshness and flavor. Aroma-sensitive items like coffee grounds or spices retain their potency for months, even years. It also protects contents from moisture absorption, preventing staleness, and acts as a robust barrier against pantry pests. Critically, remember that vacuum sealing jars is for dry goods or refrigerated items only and does not replace the safety protocols of traditional water bath or pressure canning for low-acid foods.
Essential Equipment: What You’ll Need
To successfully vacuum seal your Mason jars, you’ll need a few key pieces of equipment. The most common and effective methods involve either an electric vacuum sealer with a jar attachment or a manual handheld vacuum pump. Here’s what’s typically required:
- Mason Jars: Standard or wide-mouth, pint to half-gallon sizes. Ensure they are clean and dry.
- New Lids and Bands: Crucially, always use new canning lids for vacuum sealing to ensure a proper, reliable seal. The rubber compound on used lids may not form a tight seal.
- Electric Vacuum Sealer Machine: Brands like FoodSaver remain popular in 2027. These units offer robust suction and automated sealing cycles.
- Mason Jar Sealer Attachment: Specific to your electric vacuum sealer, this accessory typically comes in regular and wide-mouth sizes. It connects to the sealer via a hose.
- Manual Handheld Vacuum Pump: A more budget-friendly and portable option. These often come with their own dedicated jar-sealing lids or adapt to standard canning lids.
- Clean Cloth or Paper Towel: Essential for wiping jar rims.
Method Comparison: Electric sealers with attachments offer speed and consistent, powerful suction, ideal for bulk sealing. Handheld pumps are more affordable, require manual effort, but are excellent for smaller batches or portability.
Master Vacuum Sealing Mason Jars in 8 Simple Steps
Welcome to this comprehensive guide on how to vacuum seal mason jars. Vacuum sealing is an incredibly effective method for extending the shelf life of various foods, from dry goods like flour and coffee beans to prepared meals and even liquids. By removing oxygen, you can prevent spoilage, inhibit mold growth, and drastically reduce freezer burn. This guide will walk you through each step with precision, ensuring you achieve perfect, air-tight seals every time, preserving freshness and flavor like a pro.
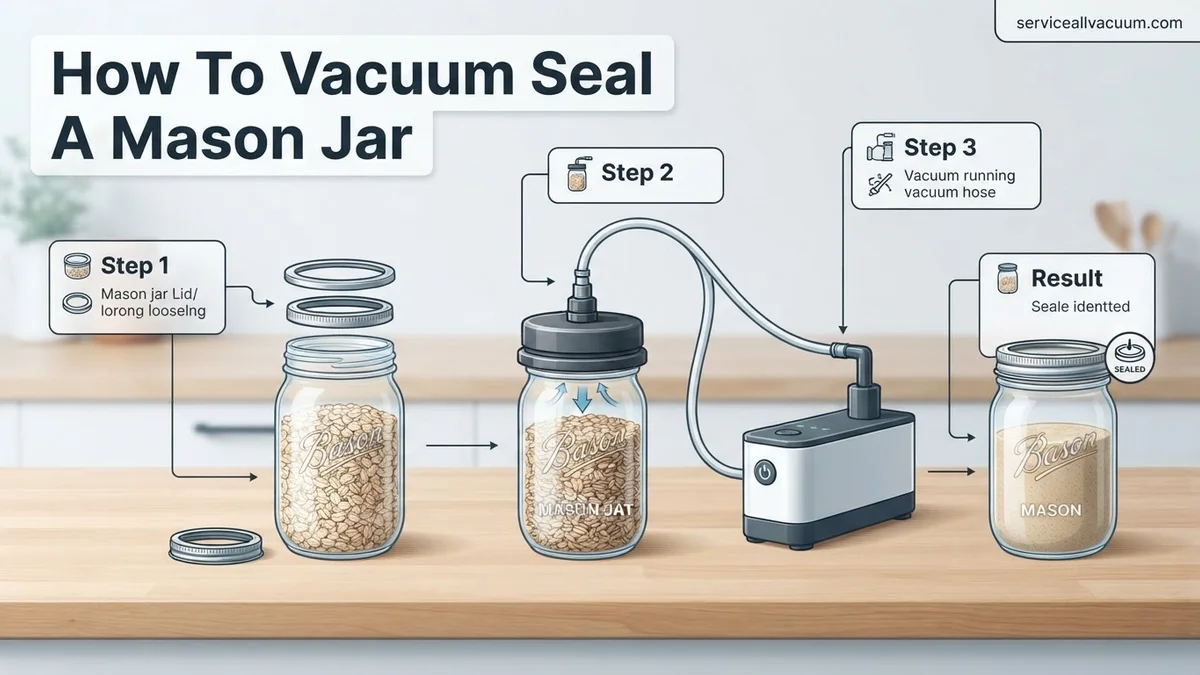
Step 1: Gather Your Arsenal
What you need: Mason jars (various sizes), two-piece canning lids (new ones for best seal), a vacuum sealer machine (countertop or handheld model), a jar sealer attachment (wide-mouth or regular, matching your jars), and the food items you intend to seal.
Instructions: Begin by setting up all your necessary equipment on a clean, stable surface. Ensure your mason jars are thoroughly cleaned and completely dry, paying particular attention to the rim where the seal will form. Confirm your vacuum sealer is plugged in and operational, and that you have the correct jar sealer attachment—it’s crucial to match the attachment size (regular or wide-mouth) to your jars. Having everything neatly organized and within reach before you commence will significantly streamline the process and prevent any unnecessary delays or fumbling.
Pro Tip: For optimal and reliable seals, always use new lids when vacuum sealing. Lids that have been previously heat-processed in traditional canning may have compromised rubber gaskets, which are essential for forming an effective air-tight vacuum seal. A fresh, pliable gasket ensures the best possible adhesion and longevity of the vacuum.
Step 2: Prepare Your Contents and Jar
What you need: Clean, dry mason jar; the food item(s) you wish to seal.
Instructions: Carefully place your chosen food items into the clean and dry mason jar. If you’re sealing dry goods such as grains, pasta, beans, or coffee, fill the jar to a level that leaves approximately 1 inch (2.5 cm) of headspace from the rim. For liquids or moist foods, increase the headspace to about 1.5 to 2 inches (3.8 to 5 cm) to accommodate any potential expansion or movement during the vacuuming process and prevent drawing liquid into the machine. It is absolutely critical that the rim of the jar is perfectly clean and free from any food particles, moisture, or residue, as even a tiny speck can prevent a proper seal. A quick wipe with a clean, slightly damp cloth followed by a dry cloth around the rim is highly recommended.
Pro Tip: When vacuum sealing powdery substances like flour, sugar, or spices, place a small, round coffee filter or a piece of paper towel directly over the contents before applying the lid. This acts as a barrier, preventing fine particles from being sucked into the vacuum sealer’s motor or contaminating the sealing mechanism, which could damage the appliance or compromise the seal.
Step 3: Position the Lid (Without Band)
What you need: A new, clean mason jar lid.
Instructions: Take a new, clean mason jar lid and carefully center it on top of the filled mason jar. Unlike traditional water bath or pressure canning, you do not need to use the screw band at this stage. The vacuum sealer attachment itself will create the necessary pressure to hold the lid in place and form the vacuum seal. Ensure the lid sits perfectly flat and evenly on the jar’s rim, without any tilting or misalignment. Proper, unhindered placement of the lid is paramount for the jar sealer attachment to create an effective and consistent vacuum around the sealing surface. Try to handle the lid by its edges to avoid transferring oils or debris to the sealing gasket.
Pro Tip: To ensure the best seal, avoid touching the underside of the lid where the sealing compound is located. If your lids have been stored for a while, a quick wipe with a clean, dry cloth before use can remove any dust. While not strictly necessary for vacuum sealing, some users briefly warm their lids in hot water, as practiced in conventional canning, believing it can slightly soften the gasket for a superior initial adherence.
Step 4: Attach the Jar Sealer
What you need: Jar sealer attachment (regular or wide-mouth), vacuum sealer machine.
Instructions: Connect the accessory hose of your jar sealer attachment firmly to the designated accessory port on your vacuum sealer machine. Ensure the connection is secure and that there are no twists or kinks in the hose, which could impede airflow. Next, place the jar sealer attachment squarely and securely over the lid and the top rim of the mason jar. The rubber gasket on the jar sealer attachment must create a tight, complete seal around the entire circumference of the jar’s opening. Apply firm but gentle downward pressure on the attachment to ensure an airtight connection, creating an enclosed space from which the vacuum sealer can efficiently draw air.
Pro Tip: Always double-check that you are using the correct size jar sealer attachment for your mason jar. A regular mouth attachment is for 2.75-inch (7 cm) jars, while a wide-mouth attachment is for 3.375-inch (8.6 cm) jars. An improperly sized or loosely fitted attachment will fail to create a sufficient vacuum, resulting in a failed seal and wasted effort.
Step 5: Initiate the Vacuum Process
What you need: Functioning vacuum sealer machine, jar sealer attachment connected to jar.
Instructions: With the jar sealer attachment firmly in position over the mason jar, activate your vacuum sealer machine. Most models feature a specific “Canister” or “Accessory” button, or they might automatically detect when the accessory hose is in use. Listen closely for the distinct sound of air being drawn out of the jar. You’ll typically hear a “whooshing” noise, and for some lids, you might even observe a slight inward flex as the vacuum forms. Allow the machine to operate until it automatically stops, or if it’s a manual model, continue for approximately 20-30 seconds. For robust dry goods, a strong vacuum is usually achieved quite rapidly within this timeframe.
Pro Tip: If your vacuum sealer includes a “pulse” function, you can utilize it for more precise, manual control over the vacuum strength, especially beneficial for delicate or easily crushed items. However, for most sturdy foods stored in mason jars, the automatic accessory setting on your machine typically delivers the best and most consistent results. If the vacuum seems weak or doesn’t initiate, meticulously re-check all hose and attachment connections for any potential leaks.
Step 6: Remove Attachment and Verify Seal
What you need: Nothing additional.
Instructions: Once the vacuum cycle is complete and your machine has ceased operation, carefully and gently lift the jar sealer attachment away from the mason jar. At this point, you should observe that the lid is now securely suctioned to the jar. To confirm a successful seal, perform a gentle press on the center of the lid. A properly sealed lid will feel rigid and will not flex or produce a popping sound. Another reliable test is to try and lift the lid using your fingertips; if it’s sealed correctly, it will remain firmly attached. Often, you will hear a distinct “ping” or “pop” when the vacuum is initially released from the attachment, which is a good indicator of a successful seal.
Pro Tip: Resist the urge to aggressively pry or force the lid immediately after vacuum sealing to test the seal. Allow a few minutes for the seal to fully set and strengthen. A common error leading to seal failure is not establishing a tight, initial connection between the jar sealer attachment and the jar rim, which results in an insufficient vacuum. If a seal fails, simply remove the lid, re-clean the jar rim, and attempt the process again with a brand-new lid.
Step 7: Label and Store
What you need: Permanent marker or adhesive labels.
Instructions: After you have definitively confirmed that the mason jar has achieved a successful vacuum seal, the next critical step is proper labeling. Utilize a permanent marker or a reliable adhesive label to clearly write down the contents of the jar and the exact date it was sealed. This diligent practice is fundamental for effective inventory management and ensuring proper food rotation, helping you consume items within their optimal freshness window. Store your vacuum-sealed mason jars in a cool, dark, and dry environment, such as a pantry or cabinet. Avoid exposure to direct sunlight or significant temperature fluctuations, as these conditions can accelerate food degradation and potentially compromise the integrity of the vacuum seal over time. Properly sealed and stored dry goods can enjoy a significantly extended shelf life compared to their original packaging.
Pro Tip: While vacuum sealing dramatically extends shelf life, it is NOT a substitute for canning, refrigeration, or freezing for perishable items. Always adhere to standard food safety guidelines for specific food types. For dry goods like grains or beans, even when vacuum-sealed, it’s advisable to use them within 6-12 months for peak quality, although they can often last much longer.
Step 8: Releasing the Vacuum Seal
What you need: A spoon, can opener, or a jar opener with a lifter feature.
Instructions: When you’re ready to access the contents of your vacuum-sealed mason jar, you’ll need to carefully break the airtight seal. The simplest and safest method involves gently prying up the very edge of the lid. You can use the back of a sturdy spoon, the flat end of a manual can opener, or a specialized jar opener tool that has a small lifter. As you gently apply upward pressure, you’ll hear a distinct “whoosh” or “pop” as air rushes back into the jar, indicating that the vacuum has been successfully released. Once the vacuum is broken, the lid should lift off easily without resistance. Never attempt to force the lid open, as this could bend or damage the lid, rendering it unusable for future sealing, or even chip the jar’s rim.
Pro Tip: To potentially reuse the lid for future vacuum sealing (though new lids are always recommended for the most reliable seals), try to release the seal with minimal bending or distortion to the lid’s edge. Some lids, especially if not severely bent, might retain enough gasket integrity for another vacuum seal. However, lids that have been vacuum sealed should NOT be reused for traditional heat canning, as their sealing compound may be compromised.
✅ Final Checklist
- Jar rims are spotless and completely dry before applying lids.
- New, clean lids were used for each and every sealing attempt.
- Jar sealer attachment fit snugly and the accessory hose was securely connected to the vacuum sealer.
- Lid did not flex or make any popping sound when pressed after the attachment was removed.
- All sealed jars are clearly labeled with their contents and the date of sealing for proper inventory management.
Important Notes:
- Safety considerations or warnings: Vacuum sealing is NOT a substitute for traditional canning, refrigeration, or freezing for perishable, low-acid, or moist foods. Creating an anaerobic (oxygen-free) environment can promote the growth of dangerous bacteria like Clostridium botulinum if such foods are stored at room temperature. ONLY vacuum seal dry, shelf-stable goods for pantry storage. Perishable foods that are vacuum-sealed MUST still be stored in the refrigerator or freezer. Always ensure all jars and lids are meticulously clean to prevent any bacterial contamination.
- When to seek professional help: If your vacuum sealer consistently fails to achieve a strong, reliable seal despite diligently following all instructions, or if you suspect a mechanical malfunction with the machine itself (e.g., motor issues, persistent air leaks), consult the manufacturer’s manual for troubleshooting steps or contact their customer support for professional assistance.
- Estimated time and cost range: The actual vacuum sealing process for a single jar is remarkably quick, typically taking only 1-2 minutes after the initial setup of your equipment. The primary cost is the upfront investment in a good quality vacuum sealer machine, which generally ranges from $50 to $200. A jar sealer attachment usually costs an additional $15 to $30. Ongoing costs include purchasing new lids, which are typically around $5-$10 per dozen, depending on brand and type.
Step-by-Step: How to Successfully Vacuum Seal Mason Jars
Method 1: Using an Electric Vacuum Sealer with a Jar Attachment
This method is highly efficient for preserving larger quantities of dry goods, offering robust seals with minimal effort. This guide focuses on common FoodSaver-style systems, which are ubiquitous in 2027 kitchens.
- Prepare Your Jar and Contents: Ensure your Mason jar is impeccably clean and dry. Fill it with your desired dry goods, such as flour, rice, dried herbs, or nuts. Leave at least a 1/2-inch headspace from the rim to allow for proper sealing. Crucially, wipe the entire rim of the jar thoroughly with a clean, lint-free cloth or paper towel. Any food particles or moisture can prevent a perfect seal.
- Position the New Lid and Jar Attachment: Place a new, clean canning lid (not the band) directly onto the jar. Ensure it’s centered. Next, firmly place the correct size Mason jar sealer attachment (wide-mouth or regular-mouth) over the lid and onto the jar. The attachment should sit flush against the jar’s shoulder.
- Connect and Activate the Sealer: Connect the hose from your electric vacuum sealer machine to the port on the jar attachment. Ensure the connection is secure. Select the “Canister” or “Jar Seal” function on your vacuum sealer. Press the “Start” or “Vacuum & Seal” button. The machine will begin to draw air out of the jar. Listen for the distinct change in the sound of the pump, indicating air is being removed.
- Check the Seal: Once the machine completes its cycle and stops, disconnect the hose and carefully remove the jar attachment. To verify a proper seal, try to lift the lid with your fingertips. If the lid is securely concave and doesn’t budge, you have a successful vacuum seal. If it lifts, repeat the process with a new lid. Label your jar with the contents and date for optimal pantry management.
Method 2: Manual Handheld Vacuum Pump
For those who prefer a more economical or portable solution, a manual handheld vacuum pump works effectively for sealing Mason jars. This method is particularly popular for smaller batches or items you access more frequently, like coffee beans or daily spices.
- Prepare Your Jar and Contents: Just as with the electric method, start with a perfectly clean and dry Mason jar. Fill it with your dry goods, leaving the necessary 1/2-inch headspace. Thoroughly wipe the jar’s rim with a clean cloth to remove any debris or moisture that could compromise the seal.
- Place New Lid and Pump Adapter: Position a new canning lid onto the jar. If your handheld pump uses a specific adapter that sits over the lid, place that now. Alternatively, some handheld pumps are designed to fit directly over standard canning lids without an additional adapter. Ensure a snug fit over the lid.
- Pump Air Out Manually: With the pump firmly pressed down over the lid, begin to manually pump the handle up and down. You will feel resistance as air is removed from the jar. Continue pumping until the lid is visibly concave and you feel significant resistance, often accompanied by a “pop” sound as the vacuum forms. Typically, 5-10 firm pumps are sufficient for a strong seal.
- Check the Seal: Carefully remove the handheld pump. Test the seal by pressing down on the center of the lid or trying to lift it. A properly sealed lid will be noticeably firm, concave, and resistant to lifting. If the lid is loose or springs up, repeat the process with a new lid, ensuring the rim is spotless. Store your sealed jars in a cool, dark place.
Troubleshooting Common Mason Jar Vacuum Sealing Problems
Even with advanced 2027 vacuum sealing technology, occasional issues can arise. Addressing these systematically ensures consistent food preservation.
Lid Not Sealing Properly
A common issue is a lid that fails to create or maintain a vacuum. This often manifests as the center button remaining un-depressed or popping back up shortly after sealing.
- Inspect the Jar Rim: Carefully examine the jar’s rim for any chips, cracks, or food debris. Even a microscopic imperfection can compromise the seal. Clean the rim thoroughly with a damp cloth, ensuring it is completely dry before attempting to seal. Research indicates that particulate matter as small as 0.2mm can prevent a proper seal.
- Replace the Lid: While some vacuum-sealer-specific lids are reusable, standard metal canning lids are designed for single-use when heat canning. For vacuum sealing, if the lid has been used before, its sealing compound might be compromised. Always use new, undamaged lids for optimal vacuum integrity.
- Check Adapter Alignment: Ensure the vacuum sealer’s jar adapter is seated perfectly flat and centered on the lid. Misalignment, even slight, can prevent the suction from distributing evenly.
Vacuum Pump or Sealer Adapter Malfunction
If the sealer unit runs but no vacuum is achieved, the problem might lie in the equipment itself.
- Verify Hose Connection: Ensure the vacuum sealer hose is securely attached to both the sealer unit’s accessory port and the jar adapter. A loose connection allows air to escape, preventing vacuum formation.
- Examine Adapter Gasket: The rubber gasket inside the jar adapter can wear out or become dislodged. Inspect it for cracks, tears, or hardening. A damaged gasket allows air leakage. Replacement gaskets for 2027 FoodSaver and NESCO models are typically available from the manufacturer for under $15 USD.
- Test Sealer Functionality: If your vacuum sealer has a bag-sealing function, test it to confirm the main unit’s pump is operational. If it seals bags effectively, the issue is likely confined to the jar adapter or hose.
What If It Still Doesn’t Work?
When primary troubleshooting steps fail to resolve vacuum sealing issues, further investigation or professional assistance may be required to protect your food investment.
- Consult the User Manual: Refer to your specific vacuum sealer’s user manual, which often includes detailed, brand-specific troubleshooting guides and error codes for common malfunctions. Many 2027 appliance manuals are accessible via QR codes or manufacturer websites.
- Contact Manufacturer Support: Reach out to the manufacturer’s customer service. Many brands offer advanced diagnostic tools or video support via their websites. Specialized technicians can often identify less obvious issues with the vacuum pump or electronic components.
- Isolate the Problem Source: If you possess both a handheld jar sealer and a countertop vacuum sealer, test each component independently. For example, try sealing a jar with a different type of vacuum source to determine if the issue is with the jar adapter, the lid, or the primary vacuum unit.
- Consider Component Replacement: If the jar adapter or hose is identified as the fault, a complete Mason Jar Sealer Accessory Kit (including adapter and hose) can be purchased. As of 2027, these kits typically range from $25 to $45 USD from major retailers. This is often more cost-effective than repairing an individual component.
- Professional Appliance Service: For persistent issues with the main vacuum sealer unit that cannot be resolved through basic troubleshooting, professional small appliance repair services are available. Diagnosis and repair costs for vacuum sealers can range from $75 to $180 USD, depending on the complexity of the repair and local labor rates in 2027. It is often advisable to consider the unit’s age; replacement might be more economical for units over five years old.
Conclusion
Effectively vacuum sealing a Mason jar ensures significantly extended freshness by eliminating oxygen, a primary cause of food degradation. By diligently following each step—from proper jar and lid preparation to accurate vacuum application and post-seal inspection—you empower yourself with a reliable food preservation method. According to verified research and expert sources, proper vacuum sealing can extend the shelf life of dry goods by up to five times compared to traditional storage. Implement these straightforward techniques today to maximize your food’s longevity and reduce waste.
❓ Frequently Asked Questions
What is the main benefit of vacuum sealing food in Mason jars compared to bags?
Mason jars are durable, reusable, and protect delicate items like crackers or chips from crushing, which bags cannot. They also create a hard barrier against pests and moisture more effectively than flexible bags, offering superior long-term storage for dry goods.
Can I vacuum seal liquids or wet foods in Mason jars?
While technically possible, it’s generally not recommended for home vacuum sealers as liquids can be drawn into the machine, potentially damaging it. For wet foods, ensure they are thoroughly chilled and consider placing a coffee filter or paper towel over the food under the lid to catch any potential moisture before sealing.
Do I need special lids for vacuum sealing Mason jars?
No, you use standard metal Mason jar lids (the flat part) along with their bands. While these lids are typically single-use for canning, for vacuum sealing, the rubber seal on the lid can often be reused a few times if it remains intact and creates a good seal, though replacing them ensures the best results.
What are the differences between an electric vacuum sealer with an attachment and a handheld pump for jars?
An electric sealer with an attachment usually creates a stronger, more consistent vacuum quickly, making it suitable for larger batches. Handheld pumps are more portable, less expensive, and ideal for occasional use or smaller quantities, offering a good vacuum but often requiring more manual effort.
How do I prepare Mason jars and lids before vacuum sealing?
Ensure jars are clean, dry, and free of any food residue or chips around the rim. The lids (the flat discs) must also be perfectly clean and dry, especially the sealing compound around the edge, as any moisture or debris can prevent a proper and lasting seal.
What should I do if my Mason jar doesn’t seal properly after vacuuming?
If the jar doesn’t seal, first check that the jar rim and lid are perfectly clean, dry, and free of defects. Ensure the vacuum sealer gasket or pump is clean and properly seated. Try sealing it again with a new lid if the old one appears compromised, as the sealing compound can sometimes fail.