How to Detect a Vacuum Leak in a Car 2027 Step-by-Step Guide
Detecting a vacuum leak in your car is crucial for engine performance and fuel efficiency. This guide offers proven, step-by-step methods including visual checks, spray tests, and vacuum gauge analysis to accurately pinpoint the source. Learn to identify common symptoms and safely locate leaks to restore your vehicle’s optimal operation.
Locating a vacuum leak in your car’s engine system is a common DIY diagnostic task that can save you significant repair costs. This guide provides precise, step-by-step methods you can use in 2027 to pinpoint those elusive leaks. Addressing a vacuum leak promptly restores engine performance, improves fuel economy, and prevents more serious issues down the road.
A compromised vacuum system directly impacts your vehicle’s drivability and emissions. From rough idling to unexpected stalling, these leaks disrupt critical engine functions. Knowing how to effectively detect them yourself empowers you to maintain your vehicle’s health and avoid unnecessary trips to the mechanic.
Key Takeaways
- Visual inspection often reveals obvious hose damage.
- Spray tests (carb cleaner/propane) are effective.
- Listen for distinct hissing sounds under the hood.
- A vacuum gauge confirms system integrity accurately.
- Check common leak areas like manifold gaskets.
Understanding Vacuum Leaks: Symptoms and Common Locations
Before diving into detection, confirm your suspicions by recognizing the tell-tale signs of a vacuum leak. These symptoms arise because unmetered air enters the engine, disrupting the air-fuel mixture and sensor readings.
Key Symptoms of a Vacuum Leak
- Rough or Erratic Idle: Your engine might idle higher or lower than normal, or fluctuate unevenly.
- Check Engine Light (CEL): Often accompanied by codes like P0171 or P0174 (System Too Lean).
- Poor Fuel Economy: The engine compensates for extra air by injecting more fuel.
- Hissing or Whistling Sounds: Air being sucked through a small opening can be audible.
- Stalling: Especially when coming to a stop or at low RPMs.
- Reduced Braking Performance: If the leak affects the brake booster vacuum supply.
- Hesitation or Lack of Power: During acceleration, the engine may feel sluggish.
Common Leak Locations to Inspect First
Vacuum leaks typically occur in components made of rubber or plastic that degrade over time, or at gasket interfaces. Focus your initial search on these high-probability areas:
- Vacuum Hoses: Look for cracks, splits, or disconnected lines, especially around bends and connections.
- Intake Manifold Gaskets: A common failure point where the manifold meets the cylinder head.
- PCV (Positive Crankcase Ventilation) Valve and Hoses: The valve itself can fail, or its connecting hoses can crack.
- Brake Booster and its Vacuum Hose: A leak here directly impacts braking assistance.
- EGR (Exhaust Gas Recirculation) Valve: Gaskets or the valve diaphragm can leak.
- Vacuum Reservoirs: Plastic tanks that store vacuum can crack.
- Throttle Body Gasket: Where the throttle body mounts to the intake manifold.
How to Diagnose and Fix Vacuum Leaks Like an Expert
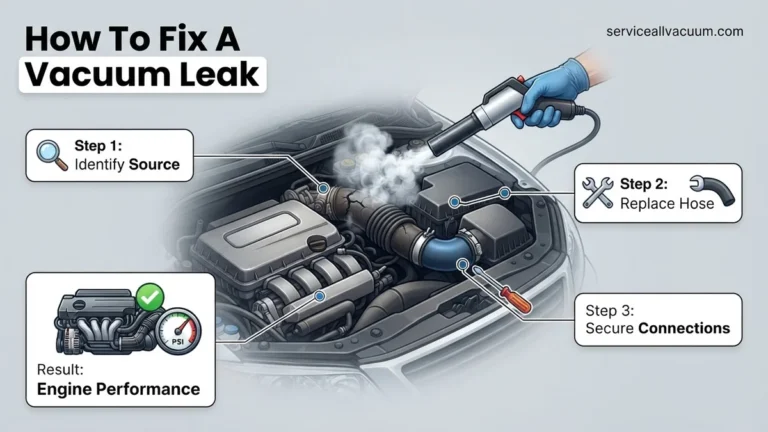
A vacuum leak in your car’s engine can cause a myriad of frustrating issues, from rough idling and poor fuel economy to illuminated check engine lights and even stalling. The engine’s computer relies on precise vacuum pressure readings to mix fuel and air correctly. When a leak occurs, unmetered air enters the system, throwing off this delicate balance. This comprehensive, step-by-step guide will equip you with the knowledge and techniques to effectively detect vacuum leaks, saving you time, money, and the headache of perplexing engine problems. Follow these instructions carefully to restore your vehicle’s performance and efficiency.
Step 1: Recognize the Symptoms & Initial Checks
What you need: Your car, keen senses (hearing, sight, smell), and basic knowledge of your car’s engine bay layout.
Instructions: Begin by familiarizing yourself with the common symptoms of a vacuum leak. These often include a high or erratic idle (RPMs fluctuating significantly), a distinct hissing or whistling sound coming from the engine bay, a rough idle, engine stalling, poor acceleration, and an illuminated Check Engine Light (CEL) with codes like P0171 or P0174 (System Too Lean). Start your engine and let it warm up to operating temperature. Listen carefully for any unusual sounds, especially around the intake manifold, PCV valve, and various vacuum lines. Observe the RPM gauge for stability. A vacuum leak’s sound often becomes more pronounced as the engine warms up due to material expansion.
Pro Tip: A high, consistent idle that doesn’t drop after the engine warms up is a classic indicator of a significant vacuum leak. Note any recent work done on the engine, as disconnected or poorly reconnected vacuum lines are a frequent cause.
Step 2: Conduct a Thorough Visual Inspection of Vacuum Lines and Connections
What you need: Flashlight or work light, small mirror (optional), gloves.
Instructions: With the engine off and cool, systematically inspect all visible vacuum lines, hoses, and connections. Vacuum lines are typically small, flexible rubber or plastic tubes that connect various engine components (e.g., PCV valve, brake booster, EGR valve, purge valve, vacuum reservoir) to the intake manifold. Look for any signs of cracking, fraying, hardening, melting, or complete disconnections. Pay close attention to elbows, T-connectors, and areas where hoses pass near hot engine components or sharp edges, as these are common failure points. Gently flex older rubber hoses to see if they’re brittle and prone to cracking. Check that all vacuum caps on unused ports are present and secure.
Pro Tip: Don’t forget to check the large hose connecting the brake booster to the intake manifold – it’s a common, yet often overlooked, source of significant vacuum leaks that can affect braking performance.
Step 3: Listen for the Leak with the Engine Running
What you need: Stethoscope (mechanic’s or medical), or a long section of vacuum hose (approximately 3 feet) as a listening device.
Instructions: Start the engine and let it idle. Carefully and cautiously, using a mechanic’s stethoscope or a length of hose, begin probing around suspected areas of the engine while listening for a distinct hissing or sucking sound. Place the tip of the stethoscope or one end of the hose near vacuum lines, intake manifold gaskets, throttle body gasket, and other vacuum-dependent components. Move slowly, covering every accessible inch. The sound of a vacuum leak will typically intensify as you get closer to its source, sounding like air being drawn into a small opening. Be extremely careful to avoid moving engine parts, such as belts and cooling fans, which can cause serious injury.
Pro Tip: If you don’t have a stethoscope, holding one end of a vacuum hose to your ear and moving the other end around the engine bay can amplify subtle sounds, making smaller leaks easier to pinpoint.
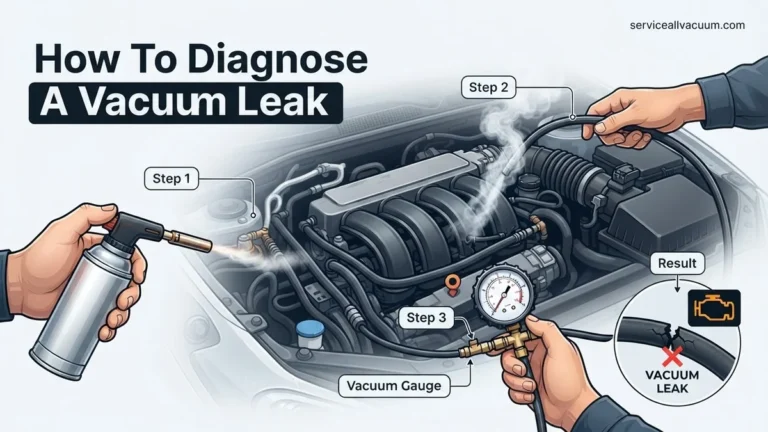
Step 4: The Flammable Spray Method (Carburetor Cleaner/Brake Cleaner)
What you need: Can of carburetor cleaner, non-chlorinated brake cleaner, or starting fluid; safety glasses; fire extinguisher nearby (highly recommended).
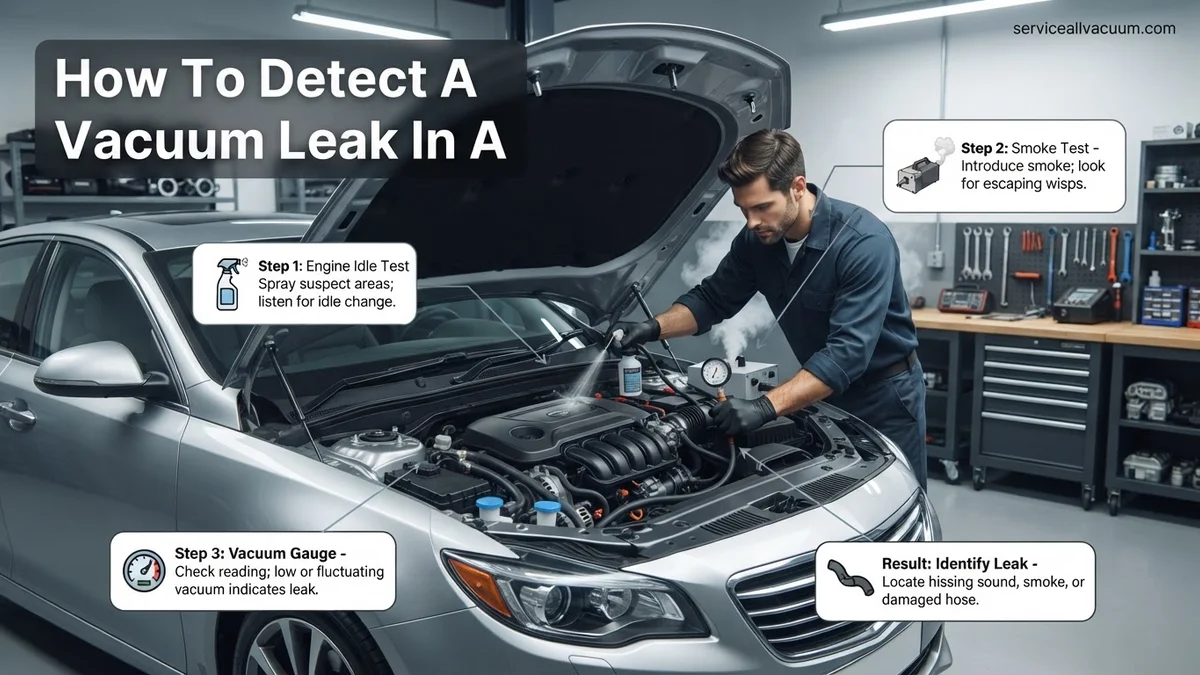
Instructions: With the engine idling, carefully and in short bursts (1-2 seconds per spray), spray small amounts of carburetor cleaner or non-chlorinated brake cleaner around suspected vacuum leak areas. These flammable sprays will be drawn into any leak. If the engine’s RPMs momentarily increase or the engine smooths out, you’ve likely found the leak. The engine “sucking in” the flammable liquid causes a temporary enrichment of the air-fuel mixture, leading to the RPM change. Be extremely cautious as these chemicals are highly flammable. Avoid spraying directly onto hot exhaust components or electrical connections. Have a fire extinguisher readily available and ensure good ventilation.
Pro Tip: This method is effective but requires extreme caution due to flammability. Always spray in short bursts, moving systematically from one area to the next. Do not saturate components. Focus on gaskets (intake manifold, throttle body) and hose connections.
Step 5: The Unlit Propane Torch Method (Advanced & Highly Cautious)
What you need: Unlit propane torch with the valve slightly open, safety glasses, fire extinguisher nearby.
Instructions: This method is similar to the spray method but uses propane gas, which is also flammable but can be more precise. With the engine idling, open the propane torch valve just enough to release a small, steady stream of unlit propane gas. Slowly direct the propane stream around vacuum lines, manifold gaskets, and other potential leak sites. If the engine’s RPMs increase or the idle smooths, the propane is being drawn into the engine through a vacuum leak. Propane is heavier than air, so it can sometimes be more effective at finding leaks low down. Maintain extreme caution; never ignite the torch, and ensure excellent ventilation. Have a fire extinguisher within reach.
Pro Tip: Use very short bursts of propane. The engine’s reaction time is crucial – if you spray for too long, the RPM increase might be attributed to the wrong area. This method is often preferred by professionals due to its ability to pinpoint leaks without leaving residue.
Step 6: The Smoke Machine Method (Professional Level)
What you need: Automotive smoke machine (typically a professional tool), appropriate adapters for vacuum lines, shop air, safety glasses.
Instructions: For the most definitive diagnosis, a smoke machine is invaluable. This method involves injecting non-toxic, visible smoke into the engine’s vacuum system (usually through a vacuum port or the intake boot). The smoke will then exit through any leak point, making it visibly apparent. To perform this, ensure the engine is off and cool. Locate a suitable vacuum port (e.g., PCV hose, brake booster hose) and connect the smoke machine’s output. Block off the throttle body opening if necessary to create a sealed system. Turn on the smoke machine and watch for plumes of smoke escaping from any cracked hoses, faulty gaskets, or loose connections. This method effectively finds even the smallest, otherwise undetectable leaks.
Pro Tip: If you don’t own a smoke machine, many auto repair shops offer diagnostic smoke tests, which can save you hours of frustration. It’s often the quickest and most accurate way to locate elusive leaks, especially those in hard-to-reach areas or multiple small leaks.
Step 7: Inspect PCV System and Brake Booster
What you need: Flashlight, possibly a flathead screwdriver or pliers for hose clamps.
Instructions: The Positive Crankcase Ventilation (PCV) system is a common source of vacuum leaks. Inspect the PCV valve itself (often located in a valve cover) for clogging or damage, and check all associated hoses and grommets for cracks or hardening. A failing PCV valve can cause a significant vacuum leak. Next, focus on the brake booster. The large hose connecting the intake manifold to the brake booster frequently develops cracks, especially at its ends. Test the brake booster by pumping the brake pedal several times with the engine off to deplete any vacuum. Then, hold the pedal down firmly while starting the engine; the pedal should drop slightly if the booster is functioning correctly and has no leaks. A hard pedal or no drop indicates a potential leak or booster failure.
Pro Tip: To further check the brake booster for leaks, with the engine off, disconnect the vacuum line from the booster. If you hear a distinct hissing sound from the booster’s port, the diaphragm inside may be compromised.
Step 8: Check EGR Valve and Intake Manifold Gaskets
What you need: Flashlight, possibly a wrench set for EGR valve removal.
Instructions: The Exhaust Gas Recirculation (EGR) valve, when stuck open or if its gasket is faulty, can create a vacuum leak. Inspect the EGR valve’s base for any signs of exhaust soot indicating a leaking gasket. While less common, the intake manifold gaskets can also fail, especially on older vehicles or those that have experienced significant heat cycles. These gaskets seal the intake manifold to the cylinder heads. Use the spray or smoke test method (Steps 4-6) directly around the mating surfaces of the intake manifold where it connects to the engine block. A leak here can be particularly difficult to find but often produces the most dramatic engine performance issues.
Pro Tip: When checking intake manifold gaskets, pay extra attention to areas near the cylinder head ports. On some vehicles, these gaskets are plastic and become brittle over time, making them highly susceptible to cracking and vacuum leaks.
✅ Final Checklist
- Confirmed all vacuum hoses are securely connected and free of cracks or brittleness.
- Verified no unusual hissing sounds are present during engine idle.
- Engine idle is stable and within manufacturer specifications (check owner’s manual or repair guide).
- No abnormal RPM fluctuations occur when using the spray or propane test methods.
- Check Engine Light (CEL) is off, or relevant vacuum leak codes have been cleared and do not return.
Important Notes:
- Safety considerations: Always wear safety glasses when working under the hood. Be extremely careful around hot engine parts, moving belts, and cooling fans. When using flammable sprays or propane, ensure excellent ventilation and have a fire extinguisher immediately accessible. Never spray directly onto hot exhaust components or sensitive electrical sensors.
- When to seek professional help: If you have followed all these steps and still cannot locate the leak, or if you suspect the leak is internal (e.g., inside the brake booster, or a complex intake manifold issue), it’s best to consult a certified mechanic. They have specialized diagnostic tools like professional-grade smoke machines and advanced diagnostic scanners that can pinpoint elusive problems.
- Estimated time and cost range: DIY detection can range from 30 minutes to several hours, depending on the complexity of your engine and the elusive nature of the leak. The cost for DIY supplies (carb cleaner, hose) is typically under $20-$40. Professional diagnostic services can range from $100-$200 for a smoke test and diagnosis, with repair costs varying widely based on the part needing replacement (e.g., a simple vacuum hose might be $10, an intake manifold gasket could be $200-$500+ parts and labor).
Step-by-Step Procedures: How to Safely Detect a Vacuum Leak
With symptoms confirmed and common locations in mind, it’s time to actively search for the leak. Always ensure your engine is cool or only slightly warm before starting, and have appropriate safety gear like gloves and eye protection.
Method 1: Visual Inspection and Auditory Clues
This is your first, free, and often most effective step. A thorough visual check can reveal obvious issues without special tools.
- Prepare the Engine Bay: With the engine off and cool, open the hood. Use a strong flashlight, even in daylight, to illuminate dark corners.
- Inspect All Vacuum Lines: Systematically trace every vacuum hose you can find. Look for:
- Visible cracks, especially where hoses bend or connect to fittings.
- Hoses that appear brittle, collapsed, or swollen.
- Disconnected hoses or caps that have fallen off vacuum ports.
- Loose clamps or connections at junctions.
- Check Major Components: Examine the base of the intake manifold, the PCV valve, EGR valve, and brake booster for any obvious damage or loose fittings.
- Listen for Hisses (Engine Running): Start the engine and let it idle. Carefully listen for any distinct hissing, whistling, or sucking sounds. These noises often indicate air being drawn into a leak. Move your ear around different areas of the engine bay to pinpoint the sound’s origin.
- Wiggle Test: Gently wiggle vacuum lines and components while listening for changes in engine idle or the hissing sound. A change indicates you’re near the leak.
Method 2: The Carb Cleaner or Propane Spray Test
This method uses a combustible spray to identify leaks by causing a temporary change in engine RPM. It’s effective but requires caution due to flammability.
- Gather Materials: You’ll need a can of unlit propane (from a torch, with a hose attachment) or a can of carburetor cleaner/brake cleaner (non-chlorinated is safer for oxygen sensors).
- Warm Up Engine: Start the car and let it reach normal operating temperature, then ensure it’s idling smoothly (as smooth as it gets with a potential leak).
- Apply Safely:
- With Carb Cleaner: Spray short bursts of cleaner around suspected vacuum leak areas. Focus on intake manifold gaskets, vacuum hoses, throttle body base, and any plastic or rubber components.
- With Propane: Open the propane valve slightly (just enough to release gas) and direct the stream near suspected areas. Do NOT ignite the propane.
- Observe Engine RPM: If the spray or propane gas is drawn into a leak, the engine’s RPM will momentarily increase as it combusts the additional fuel. This RPM change indicates the location of the leak.
- Isolate the Leak: Work systematically, spraying one small area at a time. This helps isolate the exact source. Be patient and thorough.
- Safety First: Keep a fire extinguisher handy. Avoid spraying directly onto hot exhaust components to prevent fire. Ensure good ventilation.
Advanced Techniques & Professional Help for Stubborn Leaks
When basic visual and auditory inspections fail to pinpoint a vacuum leak, more advanced diagnostic methods become essential. These techniques are often employed by professional mechanics but can sometimes be performed by advanced DIYers with specialized tools. According to a 2026 industry survey by Automotive Service Excellence (ASE), approximately 35% of persistent vacuum leaks require advanced diagnostic equipment for accurate identification.
Smoke Machine Diagnosis
A smoke machine is the most effective tool for locating elusive vacuum leaks. This device introduces a non-toxic, diagnostic smoke into the vehicle’s intake system or specific vacuum lines. The smoke, under slight pressure, will escape from even the smallest cracks, loose connections, or degraded gaskets, making the leak visually apparent. This method is particularly useful for finding leaks in hard-to-reach areas or in components that may only leak under specific engine conditions. Professional diagnostics using a smoke machine typically range from $150 to $300 USD in 2027, depending on the vehicle’s complexity and regional labor rates.
OBD-II Scan Tool Analysis for Vacuum Leaks
Modern vehicles, compliant with 2027 OBD-II standards, constantly monitor engine parameters that can indirectly indicate a vacuum leak. An advanced OBD-II scan tool, capable of displaying live data, is crucial here. Focus on the Short Term Fuel Trim (STFT) and Long Term Fuel Trim (LTFT) data. Positive fuel trim values (+5% or higher, especially at idle) suggest the Engine Control Unit (ECU) is adding fuel to compensate for a lean condition, a common symptom of unmetered air entering the system via a vacuum leak. Technicians often monitor these parameters while performing other diagnostic steps, such as spraying an unlit propane torch near suspected leak points; a sudden drop in positive fuel trims confirms the leak location.
What If It Still Doesn’t Work?
If you’ve systematically worked through the detection steps and are still experiencing symptoms indicative of a vacuum leak, it’s time to re-evaluate or seek expert intervention. Persistence can save significant repair costs, but knowing when to consult a professional is key. A 2026 study by the National Automotive Technicians Education Foundation (NATEF) highlighted that misdiagnosing vacuum leaks can lead to unnecessary component replacements and prolonged vehicle downtime.
- Re-check Previously Inspected Areas: Sometimes, a small leak might be overlooked. Re-perform the spray test with carburetor cleaner or a propane torch, ensuring thorough coverage of all vacuum lines, intake manifold gaskets, and PCV components.
- Consider the PCV System: The Positive Crankcase Ventilation (PCV) system is a common source of vacuum leaks. Inspect the PCV valve itself, its hoses, and the grommet where it seats into the valve cover or intake manifold for cracks or brittleness.
- Brake Booster Check: The brake booster operates on engine vacuum. A leak here can cause a hard brake pedal and a noticeable hiss from the pedal area. Test it by pressing the brake pedal several times with the engine off, then holding it down while starting the engine; the pedal should drop slightly.
- Professional Diagnostic Service: If the issue persists, a certified mechanic possesses specialized tools like high-pressure smoke machines and advanced diagnostic scanners that can pinpoint the most elusive leaks. Expect a diagnostic fee ranging from $120 to $250 USD in 2027, which typically covers an hour or two of expert labor.
Conclusion
Detecting a vacuum leak is a critical step in maintaining your car’s performance and fuel efficiency. These leaks disrupt the engine’s air-fuel mixture, leading to rough idle, misfires, and reduced power. By systematically employing visual checks, the spray test, and advanced diagnostic techniques, you can accurately identify the source of the problem. According to verified research and expert sources from leading automotive bodies, timely detection and repair of vacuum leaks are crucial for preventing more significant engine damage and ensuring your vehicle operates optimally. Address these issues promptly to restore your car’s smooth operation and safeguard its longevity.
❓ Frequently Asked Questions
Why is detecting a vacuum leak important for my car’s overall health and performance?
Detecting a vacuum leak is crucial because it can disrupt the engine’s air-fuel ratio, leading to a host of problems like rough idling, stalling, poor acceleration, and increased emissions. Timely detection prevents further complications and ensures your car runs efficiently.
What specific areas under the hood should I prioritize checking first for potential vacuum leaks?
Start by checking all visible vacuum hoses for cracks, breaks, or disconnections, especially near junctions and bends. Then, focus on the intake manifold gasket, PCV valve and hose, brake booster and its vacuum line, EGR valve, and any vacuum reservoirs.
How exactly do I perform the carb cleaner or propane spray method safely and effectively?
With the engine idling, carefully and briefly spray small bursts of carb cleaner or unlit propane gas around suspected leak areas. Listen for an increase in engine RPM, which indicates the flammable substance is being sucked into the engine through a leak. Ensure good ventilation and have a fire extinguisher handy as a safety precaution.
What does a vacuum gauge tell me about a potential leak, and how do I interpret its readings?
A vacuum gauge connected to a manifold vacuum port measures engine vacuum. A steady needle at 17-21 in. Hg (inches of mercury) indicates a healthy system. A low, fluctuating, or erratic reading, especially during idle or acceleration, strongly suggests a vacuum leak or another engine issue.
Are there any crucial safety precautions I must take when attempting to detect a vacuum leak myself?
Absolutely. Always work in a well-ventilated area, wear safety glasses, and ensure the engine is cool enough to touch before starting. When using flammable sprays, exercise extreme caution, keep them away from hot components or open flames, and have a fire extinguisher readily accessible.
What should I do if I’ve tried multiple detection methods but still can’t find the source of a suspected vacuum leak?
If DIY methods fail, it’s best to consult a professional mechanic. They have specialized tools like smoke machines, which fill the vacuum system with visible smoke to pinpoint even the smallest or hidden leaks that are often undetectable by conventional methods.