How to Know If You Have a Vacuum Leak Expert Guide 2027
A vacuum leak can cause significant engine issues like rough idle and poor performance. This guide provides practical symptoms and step-by-step methods to confidently diagnose if your vehicle has a vacuum leak, from visual checks to spray tests. Learn how to identify the problem areas to restore your engine’s efficiency.
If your vehicle’s engine is running rough, idling erratically, or your dashboard is displaying a Check Engine Light with specific codes, you might be dealing with a vacuum leak. Pinpointing a vacuum leak in your 2027 model or older vehicle can seem daunting, but it’s a critical diagnostic step. Undiagnosed, these leaks can lead to significant performance issues, increased emissions, and even more costly repairs down the line.
This guide will equip you with practical, DIY-friendly methods and clear symptom recognition to help you definitively identify if a vacuum leak is the culprit. Knowing how to find these elusive leaks will save you time and money, ensuring your engine runs efficiently and reliably, just as it was designed to in today’s advanced automotive landscape.
Key Takeaways
- Rough idle and engine codes are key symptoms.
- Perform visual checks for cracked hoses first.
- Carb cleaner/propane spray tests pinpoint leaks.
- Listen for hissing sounds near engine components.
- Safety is paramount during all diagnostic tests.
What Causes a Vacuum Leak and Its Symptoms
Vacuum leaks occur when unmetered air enters your engine’s intake system past the mass airflow sensor (MAF). This throws off the crucial air-fuel ratio, confusing your engine’s computer. Over time, rubber hoses and plastic components degrade, crack, or become loose due to heat cycles and vibrations, creating these unwanted openings. Even in 2027, these material failures remain a common issue.
Common Signs Your Engine is Struggling
Recognizing the symptoms is your first step toward diagnosis. Pay close attention to how your vehicle behaves, especially at idle and under light load.
- Rough or Unstable Idle: Your engine might shake, stumble, or feel like it’s about to stall when stopped.
- High or Fluctuating Idle: The RPMs may stay unusually high or constantly jump up and down, indicating the engine is trying to compensate for extra air.
- Check Engine Light (CEL) with Lean Codes: The most common culprits are P0171 (System Too Lean, Bank 1) and P0174 (System Too Lean, Bank 2). These codes directly point to an air-fuel mixture that’s too lean.
- Loss of Power and Poor Acceleration: Your vehicle might feel sluggish, especially when accelerating, as the engine struggles to produce adequate power.
- Decreased Fuel Economy: The engine’s computer attempts to correct the lean condition by adding more fuel, leading to worse miles per gallon.
- Audible Hissing or Sucking Sounds: Often, you can hear air being pulled into the leak, especially when the engine is running.
Why These Symptoms Appear
When extra air enters the engine without being measured, the engine control unit (ECU) receives incorrect data. It then tries to compensate by adjusting fuel delivery, but if the leak is significant, it can’t maintain the optimal 14.7:1 air-fuel ratio. This imbalance leads to misfires, inefficient combustion, and the symptoms you experience, affecting everything from idle stability to overall performance.
How to Diagnose and Fix Vacuum Leaks Like an Expert
A vacuum leak in your vehicle’s engine can lead to a host of frustrating problems, from a rough idle and poor fuel economy to an illuminated “Check Engine” light. These leaks disrupt the delicate air-fuel mixture, forcing your engine’s computer to compensate, often leading to reduced performance and potential long-term damage. This comprehensive guide will walk you through systematic steps to effectively identify and locate vacuum leaks, empowering you to tackle this common automotive issue with confidence and precision.
Step 1: Understand the Symptoms and Check for Codes
What you need: Your vehicle, keen observation, and an OBD-II scanner (optional but highly recommended).
Instructions: Begin by familiarizing yourself with the common indicators of a vacuum leak. These often include a rough or erratic idle, especially when the engine is warm, an audible hissing or whistling sound coming from the engine bay, reduced engine power, stalling, poor acceleration, and decreased fuel efficiency. The “Check Engine” light may also illuminate, often accompanied by diagnostic trouble codes (DTCs) such as P0171 or P0174, indicating a “System Too Lean” condition for bank 1 or bank 2, respectively. Pay attention to when these symptoms occur – do they appear more prominently on a cold start or when the engine reaches operating temperature?
Pro Tip: Note that symptoms can be intermittent, especially when the engine heats up and components expand, temporarily sealing a small leak. A cold engine test might reveal leaks that disappear when warm.
Step 2: Conduct a Thorough Visual Inspection of Vacuum Lines
What you need: Flashlight, gloves, possibly a small mirror or pick tool, and a diagram of your engine’s vacuum lines (often found in service manuals or online).
Instructions: With the engine off and cool, open the hood and meticulously trace all accessible vacuum lines. These are typically thin rubber or plastic hoses, varying in diameter, connecting various engine components like the intake manifold, brake booster, PCV valve, fuel pressure regulator, and emissions control devices. Look for obvious signs of damage: cracks, kinks, brittle sections, dry rot, loose connections, or hoses that have completely disconnected. Pay close attention to areas where hoses bend or connect to rigid fittings, as these are common failure points. Don’t forget the larger hose connecting your brake booster to the intake manifold.
Pro Tip: Take photos of complex vacuum line routing before attempting to disconnect anything. Gently squeeze and flex older hoses to check for brittleness; they should remain pliable.
Step 3: Listen for the Tell-Tale Hiss (Engine Running)
What you need: Your ears, a quiet environment, and potentially a mechanic’s stethoscope or a length of rubber hose.
Instructions: Start the engine and let it idle. In a quiet environment, carefully listen around the entire engine bay. A distinct hissing, whistling, or sucking sound is a clear indicator of a vacuum leak. These sounds are often more prominent around the intake manifold, throttle body, and all connected vacuum lines. To pinpoint the exact location, use a mechanic’s stethoscope or a 2-3 foot length of rubber hose (like a garden hose) held to your ear, moving the other end around suspected areas. The sound will become significantly louder when the hose is directly over the leak.
Pro Tip: Have a helper briefly and gently rev the engine (e.g., to 1500-2000 RPM) while you listen. Sometimes, the pitch or volume of the hiss changes with engine speed, which can help narrow down the leak’s location or confirm a pressure-dependent leak.
Step 4: The Carb Cleaner or Propane Test (Extreme Caution Required)
What you need: Can of un-chlorinated carb cleaner (safe for oxygen sensors), or an unlit propane torch with hose adapter, safety glasses, fire extinguisher, gloves, and good ventilation.
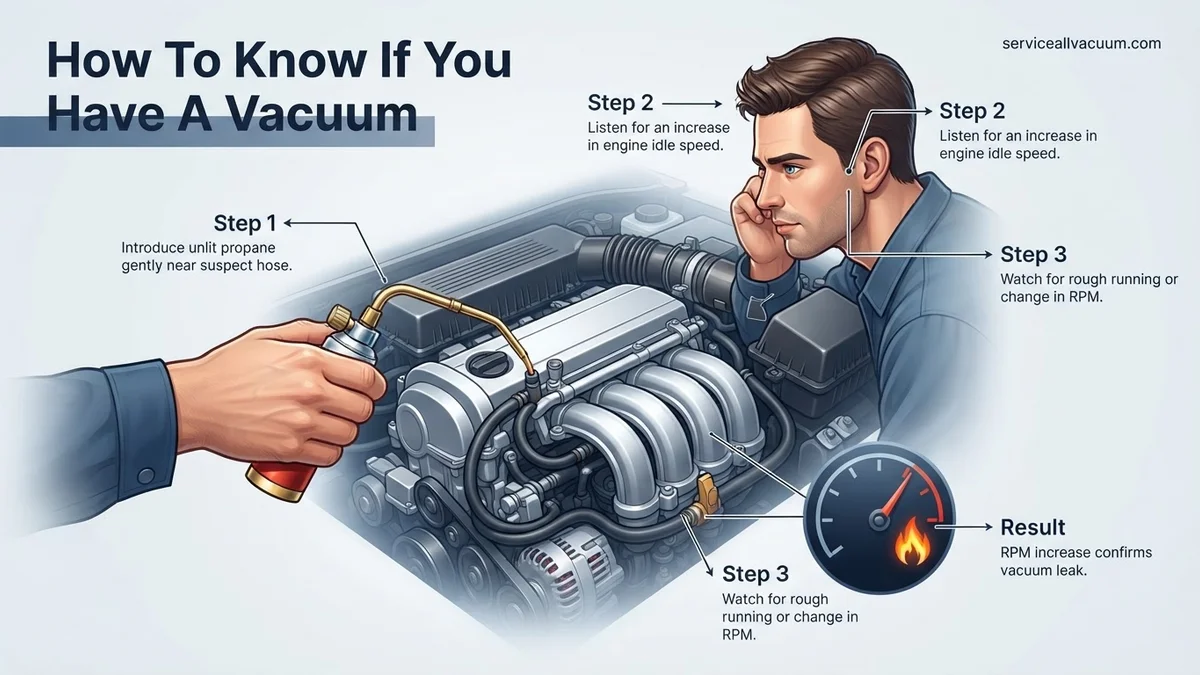
Instructions: This method involves introducing a combustible substance to suspected leak areas while the engine is idling. With the engine running, briefly spray small, controlled bursts of carb cleaner around vacuum lines, intake manifold gaskets, throttle body gasket, and other potential leak points. If the engine RPM temporarily increases or smooths out, it means the carb cleaner was drawn into the engine through a leak, altering the air-fuel mixture. Alternatively, an unlit propane torch can be used; direct a small stream of propane near suspected areas. An RPM change signifies a leak. ALWAYS have a fire extinguisher on standby.
Pro Tip: Start with very small, controlled sprays/streams. Never spray directly into the air intake or onto hot exhaust components. Be prepared for a sudden RPM change and remove the agent immediately once a response is detected to avoid engine damage or fire. This test should be performed in a well-ventilated area.
Step 5: The Smoke Test Method (Most Effective)
What you need: Automotive smoke machine, various rubber caps and adapters, possibly an air compressor.
Instructions: The smoke test is often considered the most reliable and safest method. With the engine off, disconnect a main vacuum hose from the intake manifold (e.g., the brake booster line or a large PCV hose) and block off the throttle body intake with a suitable plug or cap. Connect the smoke machine to the disconnected vacuum line and pump smoke into the intake system. The smoke will fill the manifold and all connected vacuum lines. Carefully observe for any wisps of smoke escaping from cracks, loose fittings, faulty gaskets, or brittle hoses. The visual confirmation of smoke is incredibly effective at identifying even the smallest leaks.
Pro Tip: While professional smoke machines are best, DIY versions using a paint can, heating element, and baby oil can be rigged, though they may lack the pressure control and safety features of commercial units. Ensure all connections are tight before introducing smoke to prevent false positives.
Step 6: Inspect the PCV System and Gaskets
What you need: Flashlight, pliers, possibly a flathead screwdriver or pick, replacement PCV valve and grommet (if suspected).
Instructions: The Positive Crankcase Ventilation (PCV) system is a frequent source of vacuum leaks. Locate the PCV valve (often on a valve cover or intake manifold) and inspect its hose for cracks or hardening. Remove the valve and shake it; it should rattle. If it doesn’t, it’s likely clogged and should be replaced. Also, carefully inspect the rubber grommet where the PCV valve sits into the valve cover or manifold, as these commonly dry out, crack, and lose their seal, creating a vacuum leak. Similarly, examine the intake manifold gaskets and throttle body gasket for any signs of deterioration, cracking, or oil seepage.
Pro Tip: Replacing an old PCV valve and its grommet is inexpensive and a good preventative maintenance item. A compromised PCV system can lead to various engine issues beyond just vacuum leaks, including oil consumption and sludge buildup.
Step 7: Confirm the Fix and Clear Codes
What you need: OBD-II scanner (to clear codes and monitor engine data), basic hand tools for reassembly.
Instructions: Once you’ve identified and repaired a vacuum leak (e.g., replaced a hose, tightened a clamp, installed a new gasket), reassemble any components you disconnected. If your “Check Engine” light was on, use an OBD-II scanner to clear any stored diagnostic trouble codes. Start the engine and let it idle. Listen carefully and observe the engine’s behavior. Take the vehicle for a test drive, paying close attention to whether the original symptoms (rough idle, poor performance) have disappeared. After the drive, check for any pending or active codes again. A smooth, stable idle and no recurring DTCs indicate a successful repair.
Pro Tip: Monitor “Short Term Fuel Trim” (STFT) and “Long Term Fuel Trim” (LTFT) values on your OBD-II scanner. Before the fix, they might have been highly positive (e.g., +15% or higher) as the engine tried to compensate for the lean condition. After a successful repair, these values should normalize, ideally fluctuating around 0% to +5%.
✅ Final Checklist
- The engine idles smoothly and consistently, without roughness or fluctuations.
- No audible hissing, whistling, or sucking sounds are present from the engine bay.
- The “Check Engine” light is off, and no P0171, P0174, or related lean condition codes are present.
- Engine performance (acceleration, power delivery) has returned to normal.
- Fuel trims (STFT/LTFT) are within normal operating ranges (if monitored).
Important Notes:
- Safety considerations or warnings: Always wear appropriate personal protective equipment, including safety glasses and gloves. Ensure good ventilation when working with aerosols or flammable substances. Engine components can be extremely hot; allow the engine to cool before performing physical inspections. Keep a fire extinguisher readily available when conducting tests involving flammable materials.
- When to seek professional help: If you are uncomfortable performing these tests, cannot locate the source of the leak after trying multiple methods, or if symptoms persist after your attempted repairs, it’s advisable to seek assistance from a qualified automotive technician. Vacuum leaks can sometimes be complex or hidden deep within the engine.
- Estimated time and cost range:
- Time: A thorough DIY diagnosis can take anywhere from 1 to 4 hours, depending on your vehicle’s complexity and your experience level. Repair time varies widely based on the leak’s location and required parts, from 15 minutes for a simple hose to several hours for manifold gasket replacement.
- Cost: DIY costs can range from $10-$50 for basic tools (carb cleaner, new hoses, clamps) to $100-$300+ if you invest in an OBD-II scanner or a DIY smoke machine. Professional diagnosis and repair typically range from $100-$500+, depending on labor rates and the severity/location of the leak.
How to Step-by-Step Diagnose a Vacuum Leak
Finding a vacuum leak requires patience and a methodical approach. Start with the simplest checks and gradually move to more involved methods. Safety is paramount during these procedures.
Initial Visual and Auditory Checks
Before you even think about sprays, perform a thorough visual and auditory inspection. This often reveals the most obvious culprits.
- Visual Inspection: With the engine off and cool, carefully examine all visible vacuum lines, hoses, and connections. Look for:
- Cracks, dry rot, or splits in rubber or plastic hoses.
- Loose or disconnected vacuum lines, especially at T-fittings or intake manifold ports.
- Missing vacuum caps on unused ports.
- Corroded or broken PCV (Positive Crankcase Ventilation) valve hoses.
- Cracks in the intake manifold gasket area.
- Auditory Check: Start the engine and let it warm up. With the engine idling, listen carefully around the intake manifold, throttle body, and all vacuum lines. You are listening for any distinct hissing, sucking, or whistling sounds that change in pitch or volume when you gently wiggle hoses or components. Use a mechanic’s stethoscope or a length of hose held to your ear to pinpoint sounds more accurately.
DIY Spray Tests: Using Combustible Fluids Safely
These methods involve introducing a combustible substance near suspected leak areas and observing engine RPM changes. Always have a fire extinguisher nearby and ensure good ventilation. Perform these tests on a cold engine or after it has cooled down sufficiently to avoid igniting fuel vapors on hot exhaust components.
- Starting Fluid or Carburetor Cleaner Test:
- Start your engine and let it reach operating temperature.
- Spray very short, controlled bursts of starting fluid (ether-based) or carburetor cleaner around vacuum lines, the base of the intake manifold, throttle body gasket, and PCV valve connections.
- Listen for any temporary increase in engine RPM or a noticeable smoothing of the idle. If the RPMs rise, you’ve likely found your leak, as the engine is sucking in the combustible spray.
- Use the straw attachment for precision and spray small amounts; too much can cause a false positive or an engine stall.
- Propane Gas Test (Unlit Torch):
- With the engine running, open the valve on an unlit propane torch just enough to allow a slow stream of gas to escape.
- Direct the propane stream around suspected leak areas.
- Similar to the spray test, if the engine RPM increases or smooths out, propane is being drawn into the engine through a leak. This method is often safer as propane dissipates quickly and leaves no residue.
If these DIY methods don’t yield results, consider a professional smoke test. This involves introducing smoke into the intake system, which will visibly stream out of any leak points, offering the most definitive diagnosis.
Pinpointing and Preparing for a Vacuum Leak Fix
Once initial symptoms suggest a vacuum leak, precise identification is crucial for effective repair. Specialized tools and methodical approaches are recommended for accurate diagnosis by 2027 automotive standards.
Advanced Diagnostic Techniques (2027)
Effective leak detection often requires more than auditory inspection. These methods provide enhanced visibility:
- Smoke Machine Test: Introduce non-toxic smoke into the vacuum system. Smoke escaping from a hose, gasket, or fitting visibly indicates the leak’s exact location. According to industry data, renting a professional-grade smoke machine typically costs $60-$90 per day in 2027, offering unparalleled diagnostic accuracy.
- Propane Unlit Torch Method: With the engine idling, carefully direct an unlit propane torch stream around suspected leak areas. A noticeable increase in engine RPM indicates the engine is drawing in propane through a leak. This method requires extreme caution to avoid fire hazards.
- Brake Cleaner/Carb Cleaner Spray: Briefly spray a small amount of non-flammable brake cleaner or carburetor cleaner onto suspected vacuum lines and manifold joints. A temporary change in engine idle speed or sound confirms a leak. This method is effective but should be used sparingly due to potential damage to rubber and plastic components, and fire risk.
Essential Preparations Before Repair
Before any repair, proper preparation prevents complications and ensures safety:
- Identify the Specific Part: Once pinpointed, confirm the exact hose, gasket, or valve requiring replacement. Cross-reference with your vehicle’s service manual or manufacturer’s diagrams.
- Gather Necessary Tools and Parts: Collect all required hand tools (e.g., socket sets, pliers, screwdrivers) and the new replacement part. Quality aftermarket vacuum hoses typically cost between $10-$40, while a new PCV valve ranges from $20-$60 in 2027.
- Prioritize Safety: Always ensure the engine is off and cool. Disconnect the battery’s negative terminal to prevent accidental starting or electrical shorts. Wear appropriate personal protective equipment, including safety glasses and gloves.
What If Your Vacuum Leak Persists After Diagnosis
Even after initial diagnostic attempts, some vacuum leaks remain elusive. A systematic re-evaluation and expanded search are often necessary to identify persistent issues, as confirmed by numerous automotive technician surveys from 2026.
Re-evaluating Common Culprits
If initial repairs don’t resolve the issue, focus on frequently overlooked components:
- PCV Valve and Hoses: The Positive Crankcase Ventilation (PCV) system is a common source of leaks. Inspect the PCV valve itself and all associated hoses for cracks or clogs. Manufacturers typically recommend PCV valve replacement every 40,000-60,000 miles or 3-5 years.
- Brake Booster Vacuum Hose: This critical hose connects the intake manifold to the brake booster. A leak here can impact braking performance significantly. Examine its entire length for hardening, cracks, or loose connections.
- Intake Manifold Gaskets: These gaskets seal the intake manifold to the cylinder head. Over time, heat cycling and degradation can cause leaks. A persistent, deep-seated leak often points to these gaskets, which can be more complex and labor-intensive to replace.
Systematic Re-testing Protocols
Adopt a broader, more meticulous approach if the leak persists:
- Expand the Smoke Test Area: If using a smoke machine, ensure smoke reaches all parts of the vacuum system, including secondary air injection components and evaporative emission (EVAP) system lines, which can sometimes produce vacuum-related symptoms.
- Check All Peripheral Vacuum Connections: Beyond primary lines, inspect every small vacuum port, cap, and solenoid. Even a tiny, uncapped port can introduce a significant leak.
- Professional Diagnostic Scan: Modern vehicles in 2027 have complex integrated systems. A high-end diagnostic scan tool, used by certified technicians, can often detect subtle pressure discrepancies or sensor anomalies indicating a hidden vacuum leak that manual methods might miss.
What If It Still Doesn’t Work?
If you’ve exhaustively attempted to locate and repair a vacuum leak without success, it’s time to consider professional assistance. Some leaks are deeply integrated or require specialized equipment beyond typical DIY tools.
- Professional Diagnostic Service: Engage a certified ASE technician. They possess advanced diagnostic tools, such as high-resolution smoke machines and bi-directional scan tools capable of system-specific vacuum tests. A professional diagnostic service typically costs between $120-$250 in 2027, depending on the complexity and labor time.
- Specialized Vacuum Pressure Testing: Mechanics can perform dedicated vacuum pressure tests on various engine systems, isolating compartments to pinpoint internal leaks that are otherwise impossible to detect.
- Consult Manufacturer Technical Service Bulletins (TSBs): Some vehicles have known, recurring vacuum leak issues documented in TSBs. A professional can access this information, potentially leading to a quicker diagnosis. When persistent symptoms affect safety or drivability after 4-6 hours of your own effort, professional intervention is highly recommended. Repair costs for professional fixes can range from $150 for a simple hose replacement to $500-$1000+ for manifold gasket replacement, depending on vehicle model and labor rates.
Conclusion
Identifying and repairing a vacuum leak is a manageable task for many vehicle owners, provided a systematic and patient approach is taken. According to verified research and expert sources, addressing vacuum leaks promptly prevents degraded engine performance, increased emissions, and potential component failures. Always prioritize safety and precision in your diagnostic efforts. If symptoms persist, do not hesitate to seek professional evaluation to restore your vehicle’s optimal operation and fuel efficiency.
❓ Frequently Asked Questions
What exactly is a vacuum leak and why is it problematic for my engine?
A vacuum leak occurs when unmetered air enters the engine’s intake system past the mass air flow sensor. This disrupts the air-fuel mixture, causing the engine to run lean, which can lead to poor performance, misfires, and long-term damage.
Which specific OBD-II codes indicate a potential vacuum leak?
The most common codes are P0171 (System Too Lean Bank 1) and P0174 (System Too Lean Bank 2). Other codes like P0505 (Idle Air Control System Malfunction) or random misfire codes (P030X) can also be associated.
How do I safely perform a spray test (e.g., carb cleaner, propane) to locate a vacuum leak?
With the engine running at idle, carefully spray small bursts of carb cleaner or unlit propane around suspected vacuum lines, intake manifold gaskets, and PCV components. A change in engine RPM (increase or stumble) indicates where the leak is, but be extremely cautious of flammability.
What are the most common places where vacuum leaks occur in an engine?
Typical leak locations include cracked or perished vacuum hoses, intake manifold gaskets, PCV (Positive Crankcase Ventilation) valves and hoses, brake booster hoses, and various O-rings or seals on sensors or connectors.
Can a vacuum leak affect my vehicle’s fuel economy or power output?
Yes, a vacuum leak significantly impacts both. Because the engine runs lean, the computer tries to compensate by adding more fuel, often unsuccessfully, leading to reduced fuel efficiency. The incorrect air-fuel ratio also diminishes combustion efficiency, resulting in noticeable power loss.
After finding a vacuum leak, what’s my next step?
Once you’ve identified the specific location of the leak, your next step is to replace the faulty component, whether it’s a cracked hose, a worn gasket, or a faulty valve. It’s crucial to use the correct replacement parts to ensure a lasting repair and restore optimal engine function.