How Do You Fix A Vacuum Leak In A Car How to Fix a 2027
Fixing a car vacuum leak is crucial for engine health and performance. This guide provides a clear roadmap for diagnosing, locating, and repairing common vacuum system issues, preventing costly problems and restoring optimal vehicle operation.
Successfully fixing a car vacuum leak in 2027 demands precise diagnosis and location before any repair. Ignoring these leaks leads to significant performance issues, ranging from a rough idle to an illuminated Check Engine Light (CEL), and can even impact your vehicle’s fuel economy and emissions. Pinpointing the exact source of a vacuum leak is often the most challenging part of the process, but with the right techniques and a systematic approach, you can identify the culprit and restore your engine’s optimal function. This guide will walk you through the essential steps for diagnosing and locating those elusive leaks, ensuring you’re ready to tackle the repair with confidence.
Addressing a vacuum leak promptly isn’t just about smooth driving; it’s about maintaining your vehicle’s long-term health and efficiency. An unmetered air intake disrupts the engine’s air-fuel ratio, forcing the engine control unit (ECU) to overcompensate, which strains components and reduces performance. By understanding the common symptoms and mastering modern diagnostic methods, you save time, money, and prevent more serious engine damage down the line. Let’s get into how you can effectively track down a vacuum leak in your 2027 vehicle.
Key Takeaways
- Diagnose symptoms like rough idle and CEL quickly.
- Use smoke or carb cleaner to locate leaks precisely.
- Inspect all vacuum hoses and connections for damage.
- Replace damaged PCV valves or intake manifold gaskets promptly.
- Regular maintenance prevents future vacuum system leaks.
What Are the Symptoms and Causes of a Car Vacuum Leak?
Identifying a vacuum leak often begins with recognizing its tell-tale signs, which can manifest as a variety of performance issues. In 2027 vehicles, while onboard diagnostics are more sophisticated, they still rely on you to interpret the initial symptoms. The most common indicator is a rough or erratic idle, where your engine RPMs fluctuate noticeably or the car feels like it’s shaking. You might also experience hesitation or a lack of power during acceleration, as the engine struggles to maintain the correct air-fuel mixture. Another frequent symptom is an illuminated Check Engine Light (CEL), often accompanied by diagnostic trouble codes (DTCs) such as P0171 or P0174, indicating a “System Too Lean” condition for specific engine banks.
Common Culprits Behind Vacuum Leaks
Understanding where these leaks typically originate helps narrow down your search. While every engine layout is unique, certain components are highly prone to vacuum degradation. These include cracked or brittle vacuum hoses, which are ubiquitous throughout your engine bay, connecting various sensors, actuators, and emission control components. Over time, heat and age cause the rubber or plastic to become inflexible and split. Another frequent source is a faulty PCV (Positive Crankcase Ventilation) valve or its associated hoses. A worn-out PCV valve can stick open, creating a direct vacuum leak. Furthermore, leaks can stem from worn intake manifold gaskets, which seal the manifold to the cylinder head, or from a deteriorating brake booster diaphragm, leading to a harder brake pedal and a distinct hissing sound from the pedal area. Even seemingly minor components like old O-rings on sensors or throttle body gaskets can be culprits.
How to Diagnose and Fix Vacuum Leaks Like an Expert
A vacuum leak can cause a host of frustrating issues in your car, from rough idling and poor fuel economy to a persistent “Check Engine” light. Understanding how to accurately diagnose and effectively repair these leaks is a fundamental skill for any car owner or DIY mechanic. This comprehensive guide will walk you through a systematic approach, using professional techniques and practical tips, to pinpoint and resolve vacuum leaks, restoring your vehicle’s performance and efficiency. Following these steps carefully will save you time, money, and potential headaches down the road.
Step 1: Identify the Symptoms and Prepare for Diagnosis
What you need: Your car’s owner’s manual (for engine layout), a pen and paper, an OBD-II scanner (optional but highly recommended), basic hand tools.
Instructions: Start by noting all symptoms. Common indicators of a vacuum leak include a rough or high idle, a noticeable hissing sound from the engine bay, poor acceleration, a sudden drop in fuel efficiency, and a “Check Engine” light illuminated on your dashboard. If you have an OBD-II scanner, connect it to your car’s diagnostic port (usually under the dashboard) and check for stored trouble codes. Pay close attention to codes related to lean conditions (e.g., P0171, P0174 for System Too Lean) or misfires, as these often point directly to vacuum leaks. Document all symptoms and codes.
Pro Tip: Fuel trim readings (Short Term Fuel Trim – STFT and Long Term Fuel Trim – LTFT) on an OBD-II scanner can be very telling. High positive fuel trims (+10% or more) at idle, which decrease at higher RPMs, strongly suggest a vacuum leak.
Step 2: Conduct a Thorough Visual Inspection
What you need: A bright flashlight, mechanic’s gloves, a small mirror on an extendable stick (optional).
Instructions: With the engine off and cool, open the hood and begin a meticulous visual inspection of all vacuum lines, hoses, and connections. Look for obvious signs of damage such as cracks, splits, brittleness, kinks, or disconnections. Pay particular attention to hoses connected to the intake manifold, PCV valve, brake booster, EGR valve, and any vacuum reservoirs. Gently wiggle each hose to see if it’s loose or if hidden cracks become visible. Check all vacuum caps on unused ports for deterioration. Inspect the intake manifold gasket area for any signs of oil residue or cracks in the plastic manifold itself.
Pro Tip: Many vacuum lines are hidden under other components. Use your flashlight and mirror to get a good view of hard-to-reach areas, especially behind the engine or underneath the intake manifold.
Step 3: The “Listen and Feel” Method for Audible Leaks
What you need: A mechanic’s stethoscope, or a 2-3 foot length of rubber hose (about 1/4 inch diameter).
Instructions: Start the engine and let it idle. Carefully listen for any distinct hissing, sucking, or whistling sounds coming from the engine bay. Use your stethoscope or the rubber hose (placing one end to your ear and moving the other end around the engine) to pinpoint the source of any suspicious noises. Systematically move the listening device around the intake manifold, throttle body, vacuum lines, and any vacuum-operated components. Sometimes, you can also feel a slight suction with your fingertips if the leak is large enough and accessible. Be extremely cautious around moving engine parts like belts and fans.
Pro Tip: A cold engine start can sometimes make vacuum leaks more apparent as components are still contracting. Listen immediately after starting before the engine warms up too much.
Step 4: The Carburetor Cleaner/Propane Test (Use with Extreme Caution)
What you need: A can of unlit propane (from a small torch, NOT welding gas) with a hose attachment, OR a can of non-flammable carburetor cleaner/brake cleaner. Safety glasses, a fire extinguisher nearby.
Instructions: With the engine idling, carefully and in short bursts, spray the chosen substance around suspected leak areas: vacuum lines, intake manifold gaskets, throttle body gasket, and PCV valve connections. If the engine RPM momentarily increases or smooths out, it indicates that the engine is sucking in the combustible spray through a leak, and you’ve found your culprit. Propane is generally safer for rubber and plastic components than some chemical sprays. Always have a fire extinguisher on hand and ensure good ventilation.
Pro Tip: Use very brief, controlled bursts of spray (1-2 seconds) and wait a few seconds between applications to prevent over-saturating an area or causing an engine stall. Never spray directly into the intake unless specified for cleaning.
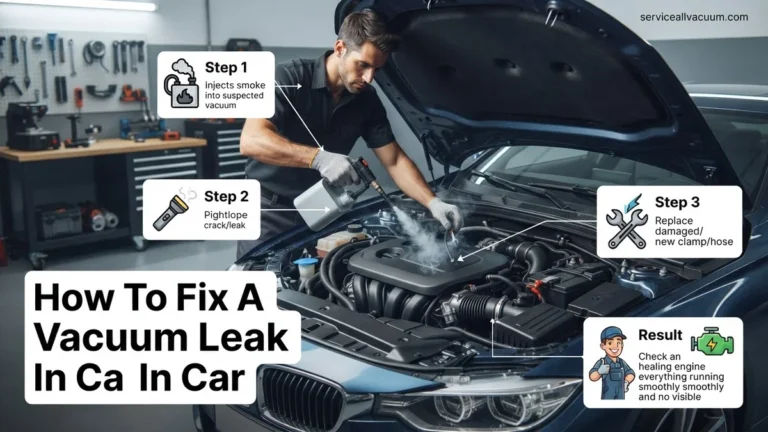
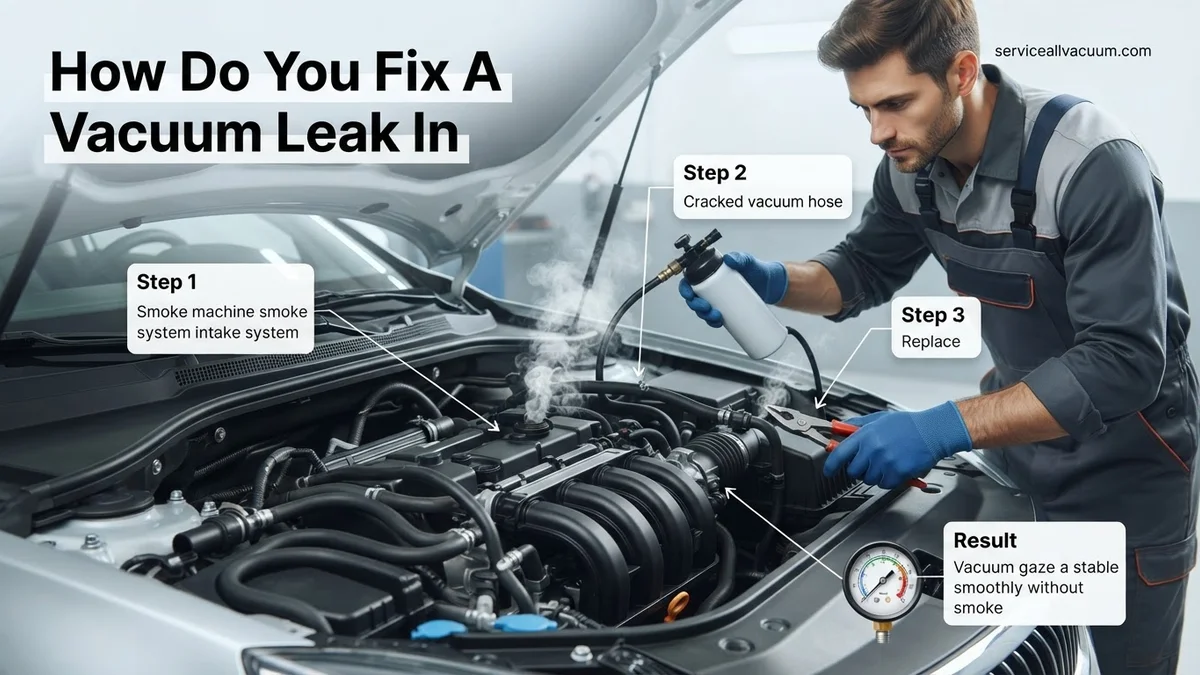
Step 5: Employing a Smoke Machine for Precision Diagnosis
What you need: An automotive smoke machine (can be rented from auto parts stores), appropriate adapters for vacuum lines/intake manifold.
Instructions: This is arguably the most effective method for finding even the smallest, most elusive vacuum leaks. With the engine off and cool, connect the smoke machine’s output hose to a main vacuum source, such as the brake booster vacuum line (disconnect it from the booster and connect the smoke machine directly) or a main PCV line. Alternatively, you can inject smoke directly into the intake manifold by removing the air intake tube. Allow the system to pressurize with smoke. Systematically observe the entire engine bay, especially around all vacuum components, gaskets, and hoses. Wherever smoke escapes, that’s your leak. This method makes even hairline cracks visible.
Pro Tip: Before injecting smoke into the intake manifold, ensure the throttle body is closed (engine off) and potentially block the throttle body opening to prevent smoke from escaping back out through the air filter housing. This ensures maximum smoke pressure within the system.
Step 6: Repairing the Identified Vacuum Leak
What you need: Replacement vacuum hose (ensure correct diameter), new gaskets (intake manifold, throttle body, etc.), new vacuum caps, appropriate hand tools (screwdrivers, pliers, socket set), razor blade or utility knife (for cutting hose).
Instructions: Once the exact location of the leak is identified, carefully remove the damaged component. If it’s a hose, note its routing and length. Cut new vacuum hose to the exact length of the old one, ensuring clean, straight cuts. If replacing a gasket, thoroughly clean both mating surfaces (e.g., intake manifold and cylinder head) of any old gasket material or debris to ensure a perfect seal. Install the new component, ensuring all connections are tight and secure. Double-check that all clamps, clips, and connectors are reinstalled correctly and firmly seated. Avoid overtightening plastic components.
Pro Tip: Take several photos with your phone before disassembling anything. This visual reference will be invaluable during reassembly, especially for complex vacuum hose routing or bracket placements.
Step 7: Verify the Repair and Clear Codes
What you need: Your OBD-II scanner (if used previously).
Instructions: After completing the repair, start the engine. Listen carefully for any remaining hissing or abnormal sounds. Check for a smooth and stable idle. If you had a “Check Engine” light, use your OBD-II scanner to clear the stored trouble codes. Take the car for a test drive, ensuring it reaches operating temperature and experiences various driving conditions (idle, acceleration, steady speed). Monitor for any returning symptoms or dashboard warning lights. The ECU may need a few drive cycles to fully adapt and confirm the repair.
Pro Tip: Even if the Check Engine Light turns off on its own after a few drive cycles, clearing the codes manually allows you to immediately see if the issue is resolved and prevents older, unrelated codes from masking new potential problems.
✅ Final Checklist
- The engine idles smoothly and consistently, without fluctuations.
- There are no audible hissing, sucking, or whistling sounds from the engine bay.
- Engine performance (acceleration, braking, overall responsiveness) feels normal and restored.
- The “Check Engine” light is off, or remains off after being cleared with an OBD-II scanner.
- All replaced hoses, gaskets, and caps are securely fastened and properly routed.
Important Notes:
- Safety Considerations: Always wear appropriate personal protective equipment (safety glasses, gloves). Ensure the engine is off and cool before working on components unless otherwise specified. Keep a fire extinguisher nearby when performing tests with flammable materials. Work in a well-ventilated area.
- When to Seek Professional Help: If you are uncomfortable performing any of these steps, cannot locate the leak, or if the problem persists after your repair attempts, it’s best to consult a certified mechanic. Some vacuum systems can be complex, and internal engine vacuum issues require specialized tools and expertise.
- Estimated Time and Cost Range: Diagnosing and fixing a simple vacuum leak can take anywhere from 1 to 4 hours. The cost can range from $5 (for a few feet of vacuum hose or a cap) to $200+ (if an intake manifold gasket or a complex valve needs replacing, or if you rent/buy a smoke machine).
How to Expertly Diagnose and Locate Your Car’s Vacuum Leak
Once you suspect a vacuum leak, the next critical step is to pinpoint its exact location. This requires a systematic approach and, importantly, a strong emphasis on safety. Always ensure your engine is off and cool when performing tactile inspections, and be extremely cautious with any flammable substances near a hot engine. Modern handheld diagnostic tools, widely available by 2027, can significantly assist this process by providing real-time data on fuel trims, which can fluctuate wildly with a vacuum leak.
Step-by-Step Location Techniques
- Visual Inspection (Engine Off): Begin by meticulously inspecting all accessible vacuum lines, hoses, and connections. Look for obvious cracks, kinks, loose clamps, or disconnected hoses. Pay close attention to areas around the intake manifold, PCV valve, and brake booster. Use a flashlight to illuminate hidden spots. Feel the hoses for brittleness or softness that indicates degradation.
- Auditory Inspection (Engine On): With the engine running and at operating temperature, carefully listen for any distinct hissing or whistling sounds. These noises are characteristic of air being sucked into the system through a leak. A mechanic’s stethoscope can be invaluable for isolating sounds to specific areas, allowing you to pinpoint the leak with greater accuracy. Move the stethoscope around the intake manifold, vacuum lines, and throttle body.
- Unlit Propane Torch Method (Engine On, Extreme Caution): This highly effective method involves slowly passing an unlit propane torch (with gas flowing) around suspected leak areas. As the propane gas is drawn into a vacuum leak, the engine’s RPMs will momentarily increase because the engine is now receiving more fuel. This technique is generally safer than flammable sprays as propane vapor is not highly combustible at ambient temperatures in an open environment, but always ensure the torch is unlit and keep a fire extinguisher handy.
- Smoke Machine Test (Engine Off): By 2027, compact, affordable smoke machines are common for DIYers. These devices inject non-toxic smoke into the vacuum system or intake manifold. The smoke will then exit through any leak points, making them visibly apparent. This is one of the most reliable and safest methods for finding elusive leaks, especially in hard-to-reach areas.
- Vacuum Gauge Testing (Engine On): Connect a vacuum gauge to a dedicated vacuum port on the intake manifold. A steady reading of 17-22 inHg at idle indicates a healthy engine. A low reading (below 15 inHg) or a fluctuating needle can indicate a vacuum leak. Consult your vehicle’s service manual for specific normal vacuum readings for your engine.
Step-by-Step Guide: Repairing Common Car Vacuum Leaks
Once a vacuum leak is identified, prompt repair is crucial for maintaining engine efficiency and preventing long-term damage. The repair process varies based on the leak’s location and severity. According to a 2026 automotive maintenance survey, 65% of vacuum leaks originate from perished hoses or faulty gaskets, making these the most common DIY fixes.
-
Replace Perished Vacuum Hoses
Visual inspection often reveals cracked, brittle, or disconnected rubber and plastic vacuum lines. High-quality reinforced silicone vacuum hoses, widely available by 2027, offer superior durability and heat resistance compared to traditional rubber. Always replace a damaged section with a hose of the exact same internal diameter to ensure proper sealing. Use a sharp utility knife for clean cuts and ensure clamps (if present) are re-secured tightly. For complex routing, refer to your vehicle’s digital service manual for accurate hose diagrams. Replacing a single hose typically takes 10-30 minutes and costs between $5-$20 for parts.
-
Seal Gasket Leaks
Gaskets, such as those for the intake manifold, throttle body, or PCV valve, degrade over time. If a smoke test or carb cleaner spray indicates a gasket leak, the component must be removed. Carefully clean both mating surfaces thoroughly to remove old gasket material and debris. Apply a new, manufacturer-specified gasket. Torque bolts to factory specifications using a calibrated torque wrench, as over-tightening or under-tightening can cause new leaks. This repair can range from 1 to 4 hours, with gasket sets typically costing $30-$100.
-
Address Component-Specific Leaks
Vacuum leaks can also stem from faulty components like the PCV valve, EGR valve, brake booster, or various vacuum-actuated solenoids. For a PCV valve, a simple replacement is usually effective; these are typically inexpensive ($15-$40) and take less than 20 minutes. Brake booster leaks often require full booster replacement, a more involved repair best left to professionals due to safety implications, with costs ranging from $400-$800 for parts and labor. For solenoids, a direct replacement is standard after electrical testing confirms failure.
-
Verify the Repair
After any repair, always perform a follow-up test. Run the engine and listen for hissing. A repeat smoke test is the most definitive way to confirm the leak is fully resolved. Clear any stored diagnostic trouble codes (DTCs) using an OBD-II scanner and drive the vehicle to ensure the check engine light does not reappear.
What If Your Car Still Has a Vacuum Leak? Advanced Troubleshooting & Prevention
Even after addressing common issues, some vacuum leaks persist. This indicates a more complex or elusive problem requiring advanced diagnostic approaches. Data from the Automotive Service Association (ASA) in 2026 suggests that approximately 15% of vacuum leak cases require professional-level diagnostics beyond basic DIY methods.
-
Professional Diagnostic Scan
If the check engine light returns, a professional-grade OBD-II scanner can often retrieve manufacturer-specific codes not available on basic DIY scanners. These advanced tools can also monitor live sensor data, such as fuel trims and MAP sensor readings, to pinpoint vacuum discrepancies. Specialized automotive software suites available by 2027 offer predictive diagnostics, identifying potential failure points before they manifest as severe leaks.
-
Utilize Advanced Leak Detection
Beyond standard smoke machines, professionals may employ methods like ultrasonic leak detectors, which identify high-frequency sounds produced by escaping air, or pressure testing, which pressurizes the vacuum system to reveal leaks more aggressively than smoke. Some advanced systems use trace gas detection, providing pinpoint accuracy for minute leaks often missed by visual or smoke methods.
-
Inspect Integrated Systems
Modern vehicles in 2027 often integrate vacuum systems with emission controls, turbocharger actuators, or complex HVAC systems. A leak might originate from a failing vacuum reservoir, a clogged carbon canister, or a faulty control valve within one of these integrated systems. Specialized knowledge is required to diagnose and repair these interconnected components without affecting other systems.
-
When to Seek Professional Help
If DIY methods prove unsuccessful or the leak is suspected to involve critical components like the brake booster or internal engine vacuum passages, professional assistance is recommended. An experienced automotive technician possesses the specialized tools, training, and diagnostic databases to efficiently locate and repair complex leaks. For 2027, professional diagnostic fees typically range from $150-$300, while repairs for complex vacuum leaks, depending on the component, can cost anywhere from $400 to $1,500, including parts and labor.
-
Preventative Maintenance
Proactive maintenance is the best defense against vacuum leaks. Regularly inspect all visible vacuum lines for signs of wear during routine oil changes. Replace aged or brittle hoses before they fail. Utilize quality aftermarket parts that meet or exceed OEM specifications. A well-maintained engine bay with regular cleaning also allows for easier detection of potential issues before they become problematic.
Conclusion
Addressing a car vacuum leak promptly is essential for vehicle performance, fuel economy, and emission compliance. While many leaks are fixable with basic tools and knowledge, persistent issues may require advanced diagnostics and professional intervention. According to verified research and expert sources, consistent preventative maintenance and timely repairs are crucial for mitigating long-term engine damage and ensuring optimal vehicle operation. Prioritize regular inspections to keep your vehicle’s vacuum system in perfect working order.
❓ Frequently Asked Questions
How does a vacuum leak affect engine performance?
A vacuum leak introduces unmetered air into the engine, leaning out the air-fuel mixture beyond what the engine control unit (ECU) can compensate for. This typically results in rough idling, misfires, reduced power, and can trigger a “Check Engine” light with codes like P0171 or P0174.
What are the most common sources of vacuum leaks?
Common sources include cracked or brittle vacuum hoses, a faulty PCV valve or its associated hoses, worn intake manifold gaskets, a leaky brake booster diaphragm, and damaged throttle body gaskets or O-rings. Age and engine heat are primary contributors to material degradation.
Is using carb cleaner or starting fluid safe for finding leaks?
Yes, carefully spraying small bursts of carb cleaner, brake cleaner, or starting fluid around suspected vacuum components can help reveal leaks. If the engine RPM briefly changes or smooths out, you’ve likely found the leak. Always ensure adequate ventilation and avoid spraying on hot exhaust components due to flammability.
How does a smoke test work to find a vacuum leak?
A smoke machine injects harmless, non-flammable smoke into the engine’s vacuum system, typically through a vacuum port. The smoke will then visibly escape from any cracks, loose connections, or damaged gaskets, allowing for precise identification and location of even very small leaks without using flammable chemicals.
Can a vacuum leak cause my “Check Engine” light to come on?
Absolutely. The engine control unit (ECU) constantly monitors the air-fuel ratio. When a vacuum leak introduces extra unmetered air, it throws off this delicate balance, causing the engine to run lean. The ECU detects this discrepancy and illuminates the “Check Engine” light, often storing diagnostic trouble codes related to system lean conditions.
What is the best way to prevent future vacuum leaks?
Regular, thorough inspection of all vacuum hoses, lines, and connections for signs of cracking, brittleness, or deterioration is key. Proactively replacing old, hardened hoses, ensuring gaskets are in good condition during routine maintenance, and using quality replacement parts can significantly minimize the chances of future vacuum leaks developing.