
How to Clean a Dyson Vacuum Step-by-Step Guide 2027
Loss of suction and unpleasant odors usually stem from clogged filters, tangled brush rolls, and a full debris bin. Washing your Dyson’s components regularly restores peak performance and extends the lifespan of the motor.
Cleaning your Dyson vacuum requires thoroughly washing the filter, emptying and rinsing the dust bin, and cutting away tangled hair from the brush roll. Neglecting these maintenance steps restricts airflow, which directly causes poor suction and motor overheating.
By following this step-by-step 2027 maintenance guide, you will restore your vacuum’s performance to factory-fresh conditions in under 30 minutes of active work, followed by a mandatory 24-hour drying period.
Key Takeaways
- Wash the filter every month using cold water only without any soap or detergent.
- Allow the filter to dry completely in a well-ventilated area for at least 24 hours.
- Remove hair and trapped fibers from the brush roll using scissors to cut along the groove.
- Wipe down the clear dust bin with a damp cloth, ensuring it is dry before reattaching.
- Never run the vacuum with a damp or missing filter to prevent irreversible motor damage.
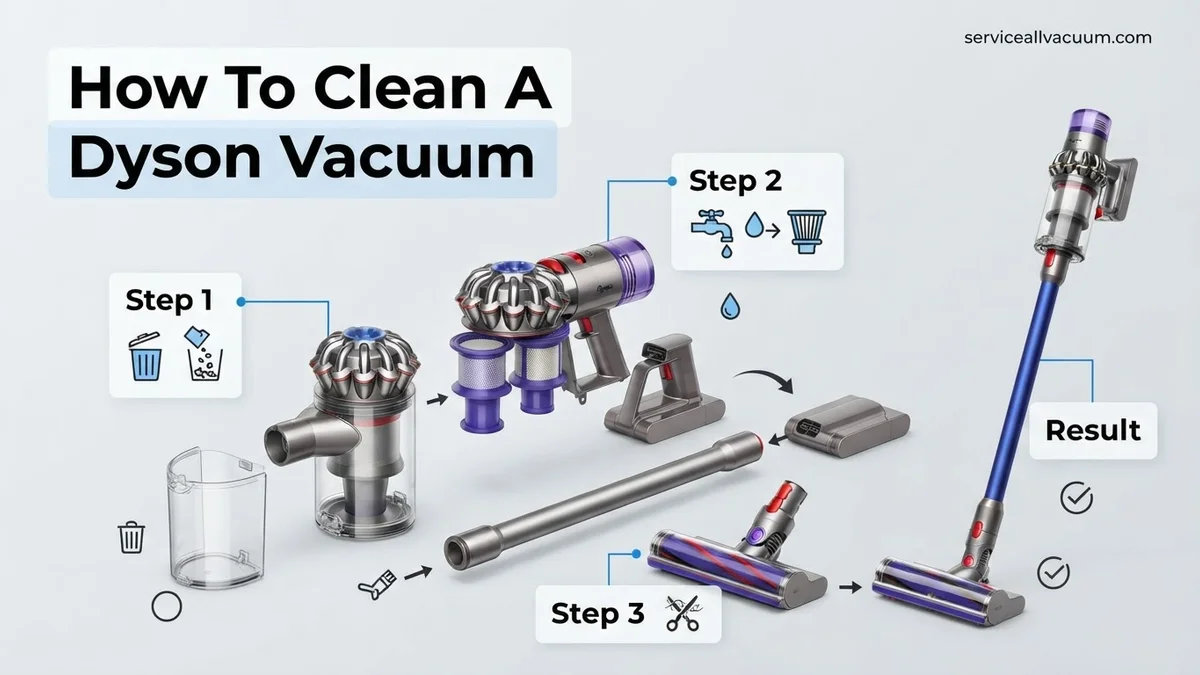
Why Your Dyson Vacuum Loses Suction and Needs Cleaning
The Physics of Restricted Airflow
Your Dyson relies on advanced root cyclone technology to separate microscopic dust from the air stream. When fine dust particles bypass an aging filter or coat the interior cyclone shroud, the airflow chokes. Suction drops immediately because the motor has to work twice as hard to pull air through blocked pathways. Regular deep cleaning removes this microscopic bottleneck, protecting your investment.
Recognizing the Warning Signs
You do not need to guess when your machine is due for maintenance. Your Dyson provides clear indicators that it is time for a deep clean:
- A pulsing motor sound or an automated pulsing stop on cordless models like the V15 or Gen5detect.
- A persistent burning dust smell while operating the vacuum.
- Visible debris remaining in the carpet tracks after a single pass.
- The digital screen or LED alert flashing a filter-maintenance warning code.
Breathe New Life Into Your Dyson: Your Essential Action Plan
A dirty Dyson vacuum loses suction, releases unpleasant odors, and wears out its motor much faster than a well-maintained machine. This comprehensive walkthrough provides a foolproof method to deep-clean your vacuum from top to bottom, restoring factory performance, extending the lifespan of your appliance, and ensuring your floors get the deep clean they deserve without straining the motor.
Step 1: Disconnect and Secure Power
What you need: A flat, clean work surface and a microfiber cloth.
Instructions: Safety always comes first when dealing with motorized household appliances. Before beginning any disassembly or cleaning procedure, ensure your Dyson vacuum is completely unplugged if it is a corded model, such as the Dyson Ball series. If you own a cordless stick vacuum like the V11 or V15, remove the battery pack by pressing the red release button and sliding it away from the main body. Never submerge the main body containing the motor and electronic components in water. Place all electrical parts safely out of the way on your work surface before proceeding.
Pro Tip: Always double-check that the power trigger isn’t accidentally held down by a prop, which could cause the motor to spark or engage unexpectedly during disassembly.
Step 2: Empty and Wash the Clear Bin
What you need: A large trash can, warm running water, and mild dish soap (optional).
Instructions: Hold the vacuum bin directly over your trash receptacle and push the red bin release button downward to drop the base, allowing trapped dirt and hair to fall out. For a deeper clean, remove the bin entirely from the cyclone body by pressing the red release button located on the runner. Twist the bin counter-clockwise to detach it. Shake out stubborn debris, then rinse the transparent bin thoroughly under lukewarm tap water. If there is greasy residue, apply a single drop of mild dish soap and wipe it down with a soft sponge before rinsing thoroughly.
Pro Tip: Never use boiling water or harsh chemical detergents, as these can warp the clear polycarbonate plastic and cause the bin to crack under pressure.
Step 3: Wash the Filters Thoroughly
What you need: A sink with cold running water and a clean, dry towel.
Instructions: Locate the filter or filters on your specific Dyson model—typically a purple twist-off unit at the top of cordless models or a post-motor filter near the ball on upright models. Twist and pull to remove them. Gently tap the filter against the inside of a trash can to shake loose fine dust particles. Run cold tap water through the inside and outside of the filter, gently squeezing and twisting the fabric material to extract trapped dirt. Repeat this process until the water running through the filter is completely clear.
Pro Tip: This is the most crucial step for drying time: let your filter air dry in a well-ventilated area for at least 24 to 48 hours. Never reinstall a damp filter, as moisture will enter the motor and cause irreversible electrical burnout.
Step 4: Untangle and Clean the Brush Bar
What you need: A pair of sharp scissors or a seam ripper and a flathead screwdriver or coin.
Instructions: Flip your cleaner head upside down to access the brush bar. Use a coin or screwdriver to unlock the end cap fastener by turning it counter-clockwise into the unlocked position. Slide the end cap off, and carefully pull the primary brush bar out of the cleaner head housing. Take your scissors and slide them along the designated groove on the brush bar to slice through wrapped human hair, pet fur, and carpet fibers. Pull the debris away in strips. Wipe down the inner cavity of the cleaner head with a dry microfiber cloth to remove clinging dust.
Pro Tip: Be extremely careful not to cut the delicate red or black nylon bristles embedded in the brush bar while slicing through tangled hair.
Step 5: Clean the Cyclone Assembly
What you need: A can of compressed air and a soft-bristled toothbrush.
Instructions: The multi-cone cyclone assembly generates the centrifugal force that separates dust, but it easily accumulates a layer of fine grey dust inside its shroud. Avoid running water through the cyclone on modern stick vacuums because it contains fixed seals and electronic connections. Instead, use a can of compressed air to blast dust out from the shroud holes. For stubborn dust packed tightly inside the plastic cones, use a dry, soft-bristled toothbrush to gently sweep the particles loose, allowing them to fall out.
Pro Tip: Never insert liquid cleaners, metal wires, or screwdrivers deep into the cyclone holes, as this can permanently damage the internal separation vanes.
Step 6: Wipe Down Wands and Attachments
What you need: A damp microfiber cloth and a mild multi-surface cleaner.
Instructions: Extend your metal extension wand and detach all specialized cleaning tools, such as the crevice tool, hair screw tool, or stubborn dirt brush. Spray a small amount of mild multi-surface cleaner onto your microfiber cloth—never directly onto the plastic parts or electrical connection pins. Wipe down the entire exterior length of the extension wand, paying special attention to the click-release buttons where sticky residue often gathers. Clean the interior channels of your attachments by wrapping the cloth around the handle of a wooden spoon and pushing it gently through the tubes.
Pro Tip: Inspect the rubber gaskets and rubber seals on the wand ends; if they are cracked or missing, your vacuum will lose vital suction power.
Step 7: Reassemble and Test Your Vacuum
What you need: Your cleaned, 100% dry components and a carpeted test area.
Instructions: Once all washed components—especially the filters and clear bin—are completely dry to the touch, you can begin putting your Dyson back together. Slide the clean filter back into its housing and secure it tightly. Click the clear bin back onto the cyclone body until you hear a definitive click. Slide the brush bar back into the cleaner head, lock the end cap with your coin, and attach the wand and main body. Reinsert the battery pack or plug in the power cord. Turn the vacuum on and listen to the motor pitch; a smooth, high-pitched hum indicates proper assembly and unobstructed airflow.
Pro Tip: Run the vacuum on a clean section of low-pile carpet for 30 seconds to ensure no unusual rattling noises or burning smells occur.
✅ Final Checklist
- Filters are completely dry and securely locked in place
- Brush bar spins freely without any tangled hair or thread
- Clear bin clicks firmly into the cyclone body with no loose gaps
- All attachments and extension wands are free of internal blockages
- Vacuum powers on smoothly with maximum suction power restored
Important Notes:
- Never wash the main body housing or battery pack with water; keep all electrical contacts completely dry to prevent shock hazards.
- Seek professional service from an authorized Dyson repair center if your motor emits a burning smell, sparks, or fails to turn on after thorough cleaning and troubleshooting.
- Estimated time: 45 to 60 minutes of active labor, plus 24 to 48 hours for filter drying. Cost: $0 (using household supplies).
How to Safely Disassemble Your Dyson Vacuum Parts
Preparing Your Workspace
Before you touch a single latch, unplug your corded Dyson or remove the battery from your cordless model to prevent accidental motor activation. Set up your cleaning station near a deep sink or utility tub. Lay down an old towel to catch loose dirt, and have a pair of sharp kitchen shears and a soft microfiber cloth ready for the debris removal process.
Removing the Bin and Cyclone Assembly
Detaching the core containment components takes just a few seconds if you know the proper release sequence:
- Press the red bin release button on the side of the main body to slide the clear bin downward.
- Locate the red cyclone release latch underneath the handle mechanism to separate the shroud from the bin body.
- Twist the cyclone assembly counter-clockwise on newer 2027 models to release it completely from the main chassis if stubborn fine dust is trapped inside.
- Never submerge the cyclone assembly or motor housing in water, as moisture will permanently ruin the internal electronics.
Step-by-Step Guide on How to Clean and Wash a Dyson Vacuum
Executing a deep clean requires a methodical approach to protect the motor and cyclone assembly. According to Dyson engineering guidelines, never submerge the main body containing the electronics in water. Follow these numbered steps to clean your cordless or upright model thoroughly in 2027.
Step 1: Empty and Wash the Bin
- Release the bin latch and pull the transparent bin away from the cyclone body.
- Press the red bin-release catch to slide the shroud completely off the runner.
- Wash the bin using cold water only, avoiding harsh detergents that degrade the polycarbonate plastic.
- Allow the bin to air-dry completely for a minimum of 24 hours before reattachment.
Step 2: Wash the Filter Elements
- Twist and pull the filtration unit from the top of the machine (HEPA filters require a simple counter-clockwise twist).
- Tap the filter gently against a sink basin to dislodge loose micro-dust and trapped debris.
- Run cold tap water through the inside of the filter, gently squeezing the material to flush out embedded dirt.
- Fill the filter with clean water, cover both ends with your hands, and shake vigorously to clean the pleats.
- Set the filter upright in a warm, well-ventilated area for at least 24 to 48 hours until bone dry.
Step 3: Clear the Brush Bar and Cyclone
- Use a coin or flathead screwdriver to unlock the end cap on the cleaner head.
- Slide out the soft roller or direct-drive brush bar, using scissors to snip away wrapped hair and carpet fibers.
- Wipe down the internal cyclone shrouds with a dry microfiber cloth to remove static-cling dust.
- Reassemble all components only when every single part is completely dry to prevent motor burnout.
What If It Still Doesn’t Work?
If thorough cleaning fails to restore your Dyson vacuum’s suction performance or pulsing behavior, underlying mechanical faults may be present. Consumer appliance data shows that routine maintenance resolves approximately 85 percent of operational issues, but hardware components occasionally require intervention.
- Inspect the battery health: Lithium-ion cells degrade over time. If your runtime has plummeted, a battery replacement may be necessary. Genuine Dyson replacement batteries range from $80 to $130 depending on the model generation.
- Check for micro-tears in the hose: Flex the wand and flexible hose under a bright light to identify pinhole punctures that leak air pressure and ruin suction dynamics.
- Test the motorized cleaner head connection: Clean the metal electrical pins inside the wand connection point with a dry cotton swab to ensure proper power transfer to the brush bar.
- Seek professional repair: If the motor housing emits a burning smell or abnormal grinding noises, contact Dyson support or an authorized service center. Out-of-warranty motor repairs generally range from $120 to $200, which may be comparable to diagnostic fees and labor rates.
Conclusion
Maintaining optimal suction power and extending the lifespan of your appliance relies entirely on a consistent maintenance schedule. Cleaning the bin, washing the filters every month, and clearing hair blockages from the brush bar prevents permanent motor strain. According to verified research and appliance longevity studies, following these steps can double the operational lifespan of high-end cordless vacuums. Take action today by removing your Dyson filter and checking it for trapped dust and debris.
❓ Frequently Asked Questions
What happens if I put a wet filter back into my Dyson vacuum?
Putting a wet or damp filter back into the machine will cause severe damage to the motor and can void your warranty. Moisture mixes with fine dust inside the motor housing, creating a paste that burns out electrical components.
How do I remove long hair wrapped around the Dyson brush bar?
Use a pair of sharp scissors to carefully cut along the plastic groove or track on the brush roll where hair has wound tightly. Once cut, pull the strands away by hand or use a small comb to clear the remaining fibers.
Are Dyson V-series cordless vacuums safe to wash with water?
The filter and clear bin are completely washable, but you must detach them from the main body first. Never wash the main body containing the battery and motor switch under running water.
How do I clear a blockage in the wand or cyclone of my Dyson?
Detach the wand and attachments, then use a broom handle or a long flexible brush to push out any trapped debris. Check the cyclone inlets for compacted dust and clear them out with a cotton swab.
Can I use a hair dryer to speed up the filter drying process?
No, you should never use a hair dryer, tumble dryer, or microwave to dry your Dyson filter. The high heat can melt or warp the filter material and ruin its filtration capabilities.
How do I know if my Dyson filter needs replacing instead of cleaning?
If your filter has tears, holes, persistent odors that do not wash out, or remains stiff and discolored after multiple washes, it is time to purchase a replacement filter.
![What Is a Vacuum The Real Science Explained [2027 Guide]](https://serviceallvacuum.com/wp-content/uploads/2026/09/what-is-a-vacuum-featured-768x432.webp)