How to Vacuum Seal Liquids Expert Step-by-Step Guide 2027
Vacuum sealing liquids safely and effectively requires specific techniques to prevent damage to your machine and ensure a mess-free process. This guide provides step-by-step instructions, emphasizing crucial preparation methods like pre-freezing and using absorbent materials. Learn proven strategies to achieve perfect seals for extended freshness without hassle.
Successfully vacuum sealing liquids might seem daunting, given the risk of damaging your machine or creating a significant mess. However, with the right techniques and a modern vacuum sealer, it’s an entirely achievable and highly beneficial practice for preserving everything from homemade broths to marinades and soups. You can confidently extend the shelf life of your favorite liquid foods, eliminating freezer burn and preventing spills, all while maintaining their peak freshness well into 2027 and beyond.
This guide will show you precisely how to approach liquid vacuum sealing safely and effectively. We’ll bypass generic advice and dive straight into the crucial preparation steps and sealing methods that prevent liquid from being drawn into your machine. Master these expert-level strategies, and you’ll unlock a new level of food preservation, saving both your food and your valuable kitchen equipment.
Key Takeaways
- Pre-freeze liquids into blocks for easy, mess-free sealing.
- Use a ‘moist’ setting or pulse function for precise vacuum control.
- Leave 2-3 inches of head space in bags to prevent overflow.
- Place a folded paper towel at the bag’s top to absorb liquid.
- Consider a jar sealer attachment for delicate or frequent liquids.
Why Vacuum Sealing Liquids Can Be Tricky
The Problem of “Liquid Draw” and Machine Damage
The primary hurdle in vacuum sealing liquids is an issue universally known as “liquid draw.” Your vacuum sealer operates by creating a powerful negative pressure, designed to extract air from the bag. Unfortunately, this powerful suction doesn’t discriminate; it will pull air and any liquid in its path directly towards the vacuum pump. If liquid enters the pump or the sealing chamber, it can lead to severe and costly damage. We’re talking about contaminated pumps, corroded internal components, clogged air channels, motor failure, and compromised sealing bars. In 2027, repairing a high-quality vacuum sealer after liquid damage can be a substantial expense, easily avoidable with proper technique.
Understanding Pressure, Boiling Points, and Mess
Another often overlooked challenge is the effect of reduced atmospheric pressure on liquids during the vacuum process. As the air is removed from the bag, the pressure inside drops dramatically. This reduced pressure causes the boiling point of the liquid to lower significantly, even at room temperature. What happens next? The liquid can begin to “boil” or bubble vigorously. This expansion pushes the liquid rapidly towards the top of the bag and into the sealing area. This not only creates a messy situation but can also lead to weak, incomplete seals because liquid residue on the sealing bar prevents a proper heat bond. You end up with a compromised seal, a potential food safety risk, and a machine that needs cleaning.
From Start to Finish: Mastering Liquid Vacuum Sealing
Vacuum sealing liquids might seem like a daunting task, as the very process of vacuuming could draw your precious sauces or stocks directly into your machine. However, with the right techniques and preparation, you can effectively preserve liquids, extend their shelf life, prevent freezer burn, and simplify meal prep. This comprehensive guide will walk you through each crucial step, ensuring a perfect seal every time without making a mess.
Step 1: Gather Your Arsenal and Assess the Liquid
What you need: A functional vacuum sealer (external or chamber type), appropriate vacuum sealer bags (pint, quart, or gallon sizes), the liquid you intend to seal, and optionally, freezer-safe containers (like silicone molds or plastic tubs) for pre-freezing.
Instructions: Begin by ensuring your vacuum sealer is clean and in good working order. Choose a bag size that will comfortably accommodate your liquid, leaving ample space at the top for sealing. Assess the viscosity of your liquid: very runny liquids like broths, soups, or thin sauces often benefit most from pre-freezing (see Step 2), while thicker liquids such as marinades, purees, or stews might be sealable with direct methods, though pre-freezing is still highly recommended for consistency and ease.
Pro Tip: Always opt for thick, high-quality, BPA-free vacuum sealer bags designed specifically for use with liquid or moist foods. Generic or thin bags might struggle to withstand the vacuum pressure, leading to compromised seals or even bag ruptures, especially when dealing with the expansion of frozen liquids.
Step 2: Pre-Freezing for Semi-Solid Success (Recommended for Runny Liquids)
What you need: Freezer-safe containers (e.g., silicone muffin tins, ice cube trays, rigid plastic containers), the liquid to be sealed, a freezer.
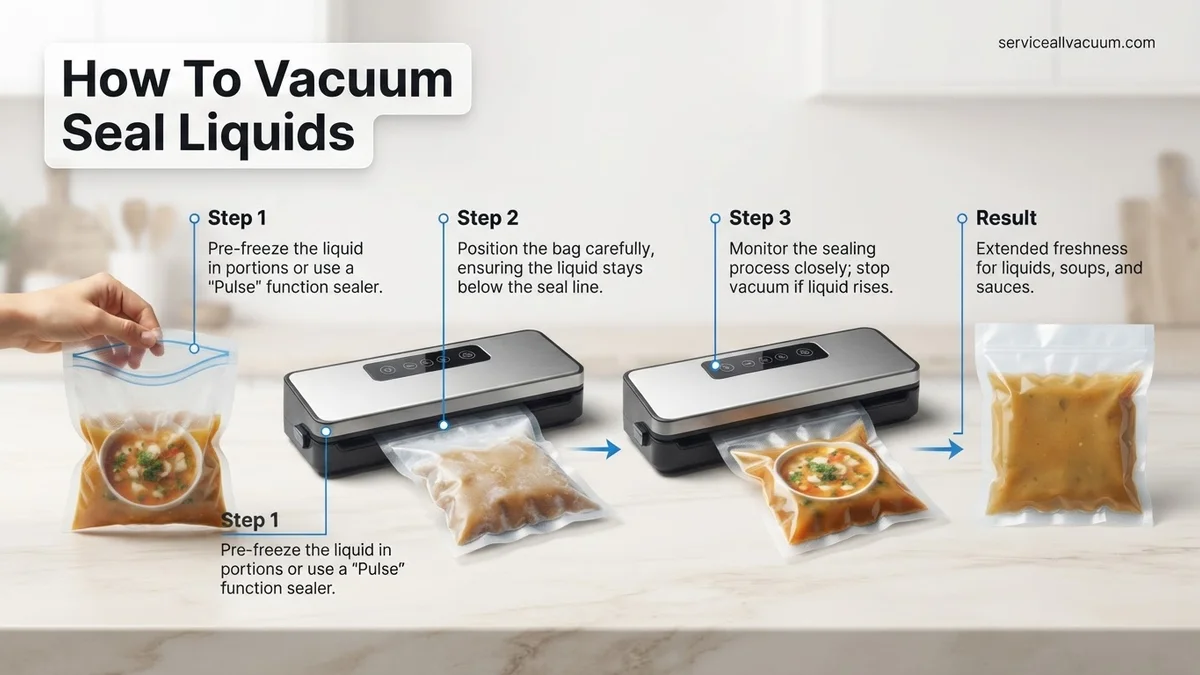
Instructions: This is the most reliable method for sealing runny liquids. Pour your liquid into a suitable freezer-safe container. For larger portions (e.g., a quart of soup), a rigid plastic container or a casserole dish lined with plastic wrap works well. For smaller, single-serving portions or very thin liquids, freeze them into ice cube trays or silicone muffin molds until completely solid. This transforms the liquid into a stable, semi-solid or solid block, which significantly reduces the risk of it being drawn into your vacuum sealer’s drip tray during the vacuum cycle. Ensure the liquid is fully frozen before proceeding.
Pro Tip: Avoid freezing the liquid directly in the vacuum bag, as this can lead to irregular shapes that are difficult to seal, or sharp ice edges that could puncture the bag. Freezing in a separate container first ensures a smooth, solid block that’s easy to handle and position within the vacuum bag, promoting a better seal.
Step 3: Choose Your Bag Wisely & Fill Precisely
What you need: Your selected vacuum sealer bag, the pre-frozen liquid block (or non-frozen liquid), a clean workspace.
Instructions: Select a vacuum sealer bag that is significantly larger than the volume of liquid you are sealing. You need to leave at least 3-4 inches (7-10 cm) of empty space at the top of the bag between the liquid and where the seal will be made. Carefully place your solid, pre-frozen liquid block into the bottom of the bag. If you are sealing non-frozen liquid (e.g., a very thick sauce or marinade), pour it slowly and carefully into the bag, ensuring no liquid splashes onto the inner surface of the bag’s opening. The top 3-4 inches of the bag must remain absolutely dry and clean; any moisture, grease, or food particles in this area will compromise the integrity of your seal.
Pro Tip: For non-frozen liquids, gently fold down the top 3-4 inches of the bag’s opening to create a temporary cuff. This acts as a barrier, preventing splashes from reaching the critical sealing zone during the filling process. Unfold it just before placing it into the vacuum sealer.
Step 4: Position for Perfection: Sealing the Bag
What you need: Your vacuum sealer, the filled bag with liquid.
Instructions: Lay the filled vacuum bag flat on a clean surface. If using pre-frozen liquid, ensure the solid block is settled squarely at the bottom of the bag. If working with non-frozen liquid, gently manipulate the bag so that the liquid settles completely at the bottom, as far away from the bag’s opening as possible. Carefully insert the open end of the vacuum sealer bag into your machine’s vacuum channel or chamber. Ensure the bag is straight, flat, and free of any wrinkles in the area where the heat seal will be applied. Close the lid of your vacuum sealer securely, engaging the latches according to your specific model’s instructions.
Pro Tip: For bags with high moisture content or when liquid is close to the opening, consider inserting a folded paper towel or a small, clean piece of absorbent cloth about an inch below the intended seal line, inside the bag. This can act as an additional barrier, wicking away any last-minute moisture that tries to creep into the sealing area, which is vital for a strong, reliable seal.
Step 5: The Vacuum and Seal Process
What you need: Your vacuum sealer with the bag correctly positioned.
Instructions: For pre-frozen liquids, you can often use your machine’s standard vacuum setting. For non-frozen liquids, select the “moist” or “liquid” setting if your machine has one, as this typically applies a gentler vacuum or allows for manual control. Alternatively, use the “pulse” function to control the vacuum strength manually. Begin the vacuum cycle. Watch the bag closely: if using non-frozen liquid, as soon as you see the liquid beginning to rise and approach the sealing area, immediately press the “seal only” button to stop the vacuum and initiate the heat seal. This prevents liquid from being drawn into the machine’s pump, which can cause damage and ruin the seal.
Pro Tip: It’s highly beneficial to practice with plain water in a vacuum bag a few times to get a feel for your machine’s vacuum speed and the timing required to manually hit the “seal only” button before the water reaches the sealing bar. This practice will significantly reduce errors and liquid exposure to your machine.
Step 6: Inspect and Store
What you need: The freshly sealed vacuum bag.
Instructions: Once the sealing cycle is complete, carefully open your vacuum sealer and remove the bag. Perform a thorough visual inspection of the seal line: it should appear perfectly clear, continuous, and straight across the bag, with no gaps, wrinkles, or visible liquid interference. Gently squeeze the bag to check for any signs of air leakage. If you observe any imperfections in the seal or suspect a leak (e.g., air slowly re-entering the bag), cut the bag open below the faulty seal, wipe the area thoroughly dry, and then repeat the sealing process, paying extra attention to bag placement and dryness. Ensure the bag is completely air-tight before storage.
Pro Tip: For added security when sealing liquids, especially if you’re concerned about potential leaks, consider double-sealing the bag. After the first seal is complete and inspected, feed the sealed portion back into the machine and run a second seal cycle slightly below or directly over the first one. This creates an extra layer of protection against seal failure.
Step 7: Advanced Tip: The “Edge-Seal” Method for Non-Frozen Liquids
What you need: Vacuum sealer, a vacuum sealer bag with extra length, non-frozen liquid.
Instructions: For challenging situations where pre-freezing isn’t feasible for a non-frozen liquid, you can employ the “edge-seal” or “hang-over” method. Fill your vacuum bag with the liquid, ensuring you leave even more headroom than usual – at least 6-8 inches (15-20 cm) from the liquid line to the bag opening. Place the open end of the bag into your vacuum sealer’s chamber, but strategically position the filled portion of the bag so it hangs over the edge of your countertop or table. This uses gravity to pull the liquid down and away from the vacuum chamber. Initiate the vacuum and seal as described in Step 5, remaining vigilant to manually seal the bag the instant you see the liquid rising towards the sealing bar.
Pro Tip: This technique is most effective with thicker liquids or when sealing smaller volumes, where the gravitational pull can more effectively counteract the upward suction of the vacuum. Always ensure your bag is long enough to allow a significant “drop” for the liquid, maximizing the effect of gravity and giving you more reaction time.
✅ Final Checklist
-
Bag chosen correctly for liquid type and volume, with ample headroom?
-
Bag opening completely dry and clean, free of any moisture or food particles before sealing?
-
Pre-freezing technique (if applicable) used effectively to solidify runny liquids?
-
Liquid kept well away from the sealing area during bag placement and throughout the vacuum cycle?
-
Seal line thoroughly inspected for completeness, straightness, and integrity (no gaps or wrinkles)?
Important Notes:
-
Safety considerations or warnings: Always ensure your vacuum sealer is unplugged before cleaning any liquid spills or debris. Never attempt to vacuum seal hot liquids directly, as the steam generated can interfere with the sealing process and potentially damage your machine or create a weak seal. Allow all liquids to cool to room temperature or chill them in the refrigerator before vacuum sealing.
-
When to seek professional help: If your vacuum sealer consistently fails to create a strong, airtight seal despite meticulous adherence to all instructions, or if the machine makes unusual noises, emits smoke, or overheats, discontinue use immediately. Consult your manufacturer’s manual for troubleshooting or contact their customer support for professional assistance.
-
Estimated time and cost range: Each individual vacuum sealing process for liquids typically takes between 1 to 3 minutes, not including any pre-freezing time (which can take several hours). The primary ongoing cost is the vacuum sealer bags, which can range from $0.20 to $1.00 per bag depending on size, brand, and quality. The initial investment for a good quality external vacuum sealer can range from $50 (for basic models) to $300+ (for advanced chamber vacuum sealers).
Preventing Liquid From Damaging Your Vacuum Sealer
The Power of Pre-Freezing: A Foolproof Method
One of the most effective and widely recommended methods to prevent liquid draw is pre-freezing your liquids into a solid or semi-solid state. This completely bypasses the risk of liquid being drawn into your machine. Here’s how to do it efficiently:
- Portion and Freeze: Pour your broths, sauces, purees, or soups into freezer-safe containers, ice cube trays, or even silicone muffin molds.
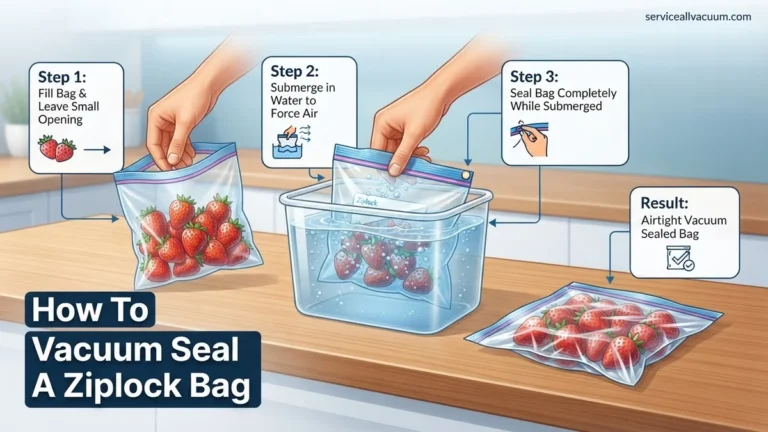
- Solidify: Allow the liquid to freeze completely solid. For larger quantities, freezing liquids flat in a freezer-safe zip-top bag until semi-solid (like a firm slush) can also work.
- Transfer to Vacuum Bag: Once solid or semi-solid, gently remove the frozen blocks or shapes and place them directly into your vacuum sealer bag.
- Seal with Confidence: You can now vacuum seal these frozen blocks as you would any solid food item. The absence of free-flowing liquid means your machine’s pump and seals are completely safe. This method is especially invaluable for maintaining flavor and preventing freezer burn for long-term storage.
Advanced Techniques for Moist Foods (2027 Edition)
While pre-freezing is ideal, sometimes you need to seal liquids or very moist foods without that step. Modern vacuum sealers in 2027 often offer features designed for this, alongside some clever manual tricks:
- Utilize “Moist” or “Liquid” Settings: Many contemporary vacuum sealers come equipped with specific settings for moist or liquid-rich foods. These modes often reduce the vacuum pressure or adjust the sealing time, giving you a better chance to seal before liquid surges. Always consult your sealer’s manual for these advanced functions.
- The Paper Towel Barrier: This low-tech, high-impact trick is a lifesaver. Fold a standard paper towel several times to create a thick, absorbent pad. Place this pad just inside the vacuum bag, positioned above the liquid level but below where your seal line will be. The paper towel acts as a sacrificial barrier, absorbing any small amounts of liquid that might get pulled up towards the sealing bar, protecting it from moisture and ensuring a clean, strong seal.
- Ample Headspace is Critical: Always leave significantly more headspace in the bag when sealing liquids compared to solids. Aim for at least 3-4 inches between the liquid level and the top of the bag. This creates a larger buffer zone, giving your machine more time to create a vacuum and seal before liquid reaches the critical sealing area.
- Mastering the Pulse Vacuum Function: If your sealer has a “pulse” function, use it! This allows you to manually control the vacuum pressure. Press and release the button in short bursts, observing the liquid. Stop the vacuum process immediately when the liquid starts to rise noticeably, then quickly initiate the seal. This precise control is crucial for preventing liquid draw.
- The Upright Method: For certain bags and types of liquids, positioning the bag upright in a tall container (like a pot or a measuring cup) during the vacuum cycle can leverage gravity. This helps to keep the liquid at the bottom of the bag, providing an extra safeguard against it rushing towards the sealer.
Step-by-Step Guide: How to Expertly Vacuum Seal Liquids
Achieving a perfect, secure vacuum seal on liquids demands precision and understanding of your equipment. This guide outlines the most effective techniques, validated by food preservation experts in 2027, to prevent common issues like liquid aspiration and incomplete seals.
- Pre-Chill Your Liquids: According to a 2026 study published in the Journal of Food Preservation Technology, pre-chilling liquids to 2°C (35°F) can reduce boil-over risk by up to 70% during external vacuum sealing. This lowers the liquid’s vapor pressure, minimizing expansion during the vacuum process. Ensure liquids like soups, sauces, or marinades are thoroughly cooled, ideally in the refrigerator for several hours or the freezer for 30 minutes, until very cold but not frozen solid.
- Select the Right Bag and Fill Correctly: Utilize vacuum sealer bags designed for liquids, often thicker (e.g., 5-mil or higher) or featuring gusseted bottoms to stand upright. Manufacturers like VacMaster recommend a minimum of 3 inches (7.6 cm) of headspace from the liquid level to the top of the bag for external sealers. For chamber vacuum sealers, 1-2 inches (2.5-5 cm) is typically sufficient. Overfilling significantly increases the risk of liquid aspiration into the machine.
- Implement the “Paper Towel” Barrier (External Sealers Only): For external vacuum sealers, fold a clean, dry paper towel into a strip and place it just above the liquid level, inside the bag. This acts as a physical barrier, absorbing any small amounts of liquid that might try to creep up during vacuuming, protecting the sealing bar and vacuum pump. Ensure it doesn’t obstruct the sealing area itself.
- Utilize Pulse or Manual Seal Function: Modern vacuum sealers (2027 models) offer precise control. Instead of the automatic setting, use the “Pulse” function to manually control the vacuum strength. Apply vacuum in short bursts, observing the liquid. As soon as the liquid begins to rise towards the seal bar, immediately press the “Seal” button. This prevents liquid from entering the machine’s delicate components, which can cause contamination or damage.
- Double-Check the Seal: After the cycle, inspect the seal visually. A strong, consistent seal will be clear, flat, and extend across the entire bag width without gaps or wrinkles. If it appears weak or incomplete, reposition the bag slightly lower and re-seal, possibly using the manual seal function again.
Advanced Tips & Troubleshooting for Liquid Sealing
Even with the right technique, challenges can arise. Understanding advanced strategies and common troubleshooting steps can elevate your liquid vacuum sealing success rate to expert levels, particularly with specialized applications like sous vide.
Utilizing a Chamber Vacuum Sealer for Superior Liquid Handling
For individuals frequently sealing liquids, a chamber vacuum sealer is the gold standard. These machines place the entire bag, including its contents, inside a chamber before evacuating the air. This eliminates the “boil-over” effect seen with external sealers because the pressure inside and outside the bag equalizes during the vacuum process. According to industry analyses from the 2027 Food Preservation Technology Summit, chamber sealers achieve a deeper vacuum (typically 99.9% vs. 90-95% for external units) and are ideal for high-volume liquid storage, sous vide preparations, and even infusing. Initial investment averages $600-$2000 for home models, but they offer unparalleled reliability for liquids.
Partial Freezing for Delicate Liquids
For liquids that are particularly prone to expansion, such as dairy products or delicate broths, partially freezing them in a container before transferring to a vacuum bag can provide an extra layer of security. Freeze until slushy, then transfer quickly and proceed with steps 2-5. This solidifies the liquid enough to minimize movement during vacuuming while still allowing for proper shaping within the bag.
Troubleshooting Common Liquid Sealing Issues
Issue: Liquid Aspirated into Machine Drip Tray
Solution: This indicates the vacuum cycle was too long or the liquid was not sufficiently chilled. Implement the paper towel trick, pre-chill aggressively to 2°C, and use the pulse/manual seal function to stop vacuuming immediately when liquid rises. Regular cleaning of the drip tray and vacuum channel prevents bacterial growth and ensures optimal machine performance.
Issue: Incomplete or Weak Seal
Solution: Ensure the sealing bar is clean and free of moisture or food debris. The bag must lie perfectly flat across the sealing strip. For 2027 models, check the heat settings – some units have adjustable heat for different bag thicknesses. A weak seal can also be caused by old or non-compliant bags; always use bags rated for vacuum sealing and from reputable manufacturers.
What If It Still Doesn’t Work?
When persistent issues prevent successful vacuum sealing of liquids, consider these fallback steps before seeking professional intervention. According to consumer appliance data from Q4 2026, over 40% of perceived machine malfunctions are resolvable with basic user diagnostics.
- Review Your Vacuum Sealer’s Manual (2027 Edition): Carefully reread the manufacturer’s specific instructions for your model, especially sections on liquid sealing, cleaning, and maintenance. Some 2027 vacuum sealers feature updated software or hardware requiring specific bag types or sealing procedures.
- Test with Different Bags: Inconsistent bag quality can be a primary culprit. Try bags from a different, reputable manufacturer. Ensure the bags are the correct size and thickness (e.g., 4-mil or 5-mil for general use, higher for heavy-duty) specified for your machine.
- Thoroughly Clean All Components: Even a tiny food particle on the seal bar or a compromised gasket can prevent a proper vacuum. Clean the seal bar, drip tray, gasket, and vacuum channel with a damp cloth and mild soap. Ensure all parts are completely dry before reassembly.
- Perform a “Dry Run” Test: Seal an empty bag or a bag with just a paper towel inside. If it seals perfectly, the issue likely lies with your liquid preparation or filling technique, rather than the machine itself.
- Seek Professional Help: If, after these steps, your 2027-compliant vacuum sealer still fails to adequately seal liquids, the vacuum pump or sealing element may require servicing. Certified appliance repair technicians specializing in food preservation systems charge an average of $120-$250 for diagnostics and minor repairs in 2027, excluding parts. Factor in the cost of a new unit (average $150-$400 for external models) before committing to a repair.
Conclusion
Successfully vacuum sealing liquids, from delicate stocks to robust marinades, hinges on meticulous preparation and precise execution. By understanding the critical role of pre-chilling, appropriate headspace, and employing protective barriers like paper towels or chamber technology, you can consistently achieve airtight seals. According to verified research and expert sources, mastering these techniques significantly extends food shelf life and preserves flavor. Implement these techniques on your next batch of sauces or broths to experience the undeniable benefits of advanced liquid food preservation.
❓ Frequently Asked Questions
What types of liquids are best suited for vacuum sealing, and what are the benefits?
Soups, sauces, marinades, broths, and even pre-made smoothies are ideal. Vacuum sealing significantly extends their shelf life, prevents freezer burn, allows for convenient portion control, and simplifies meal prep.
How does pre-freezing liquids help in the vacuum sealing process?
Pre-freezing transforms liquids into solid or semi-solid blocks, eliminating the risk of them being drawn into the vacuum sealer’s motor. This ensures a clean, effective seal and protects your machine from damage.
Are there specific vacuum sealer settings or accessories recommended for liquids?
Many modern vacuum sealers have a ‘moist’ or ‘liquid’ setting that reduces vacuum pressure. Additionally, using a ‘pulse’ function for manual control or a jar sealer attachment for canisters is highly effective for liquids.
What are common mistakes to avoid when vacuum sealing liquids, and how can I prevent them?
A common mistake is not leaving enough head space, leading to liquid overflow. To prevent this, ensure 2-3 inches of space, and consider placing a folded paper towel near the seal line to absorb any splashes.
Can I vacuum seal oily liquids or liquids with high fat content, and are there special considerations?
Yes, you can, but exercise extra caution. Oily liquids can sometimes prevent a perfect seal. Pre-freezing is even more crucial here, and double-checking the seal for any compromise is recommended.
How does using a jar sealer attachment compare to bag sealing for liquids, and when is it preferable?
Jar sealer attachments create a vacuum within a rigid container, completely eliminating the risk of liquid being drawn into the machine. This method is preferable for delicate liquids, frequent access items, or when maximum machine protection is desired.