How Do I Check For a Vacuum Leak Step-by-Step Guide 2027
Identifying a vacuum leak is crucial for engine performance. This guide provides step-by-step methods including spray tests, smoke tests, and visual inspections to help you diagnose and locate common vacuum leaks quickly and effectively in 2027. Learn to recognize symptoms and apply proven techniques.
Detecting a vacuum leak in your vehicle is a critical skill that saves you both headaches and significant repair costs. Rather than letting your engine suffer from rough idles, poor fuel economy, or a persistent “Check Engine” light, this guide provides practical, step-by-step methods you can use right in your driveway to pinpoint the problem. Knowing how to perform these checks yourself, even for modern 2027 vehicles, empowers you to diagnose issues accurately and avoid unnecessary trips to the shop.
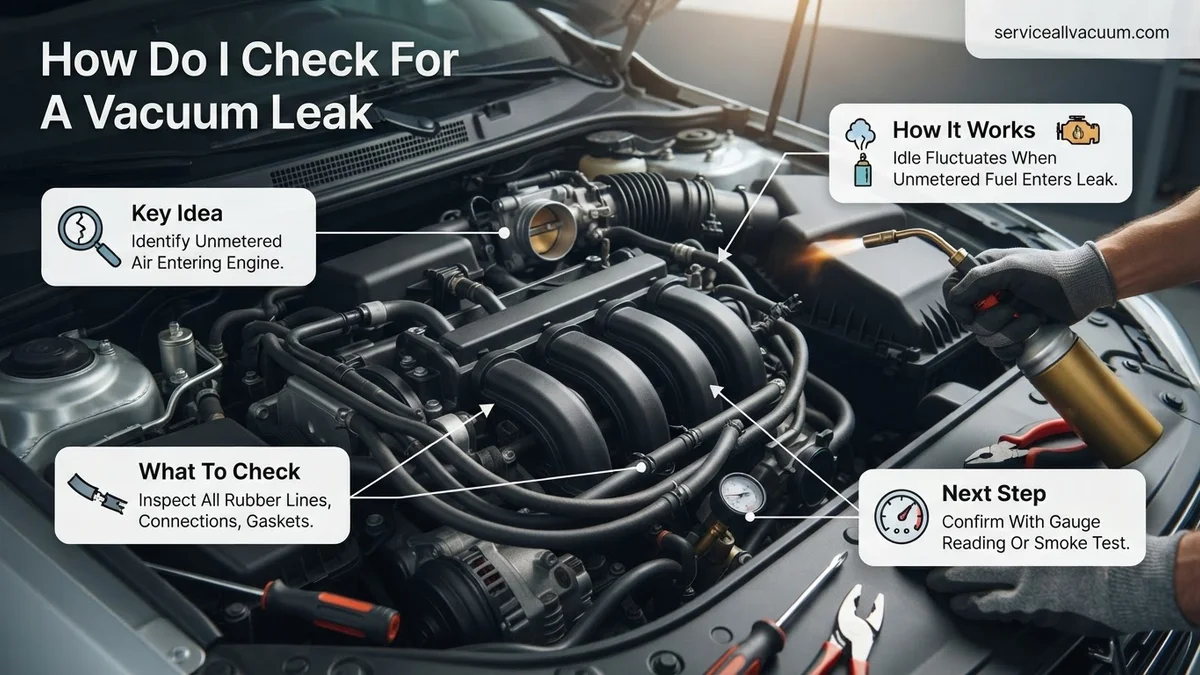
Vacuum leaks, regardless of your car’s age, lead to unmetered air entering your engine, disrupting the crucial air-fuel ratio. This imbalance can degrade performance, increase emissions, and potentially cause long-term damage if left unaddressed. By following these clear instructions, you’ll be able to identify where your engine is losing vacuum, helping you resolve the issue efficiently and keep your car running optimally.
Key Takeaways
- Perform spray or smoke tests to pinpoint leaks.
- Listen for hissing sounds and visually inspect hoses.
- Rough idle and codes often signal a vacuum leak.
- Use appropriate tools and safety gear for diagnostics.
- Repair leaks promptly to restore engine performance.
What Are the Symptoms and Tools You’ll Need?
Key Symptoms of a Vacuum Leak
You’re likely here because your vehicle is exhibiting some troublesome behaviors. Vacuum leaks typically manifest through a distinct set of symptoms that indicate your engine isn’t receiving the proper air-fuel mix. Keep an eye (and ear) out for these common signs:
- Rough or Erratic Idle: The engine RPM might fluctuate wildly, or it might feel like it’s “chugging” while stationary.
- Engine Misfires: Especially noticeable at idle or under light load, causing vibrations or a lack of smooth power delivery.
- Hissing or Whistling Noises: Often heard from the engine bay, indicating air being sucked into a compromised area.
- Lean Fuel Trim Diagnostic Trouble Codes (DTCs): Your Check Engine light might illuminate with codes like P0171 or P0174, signaling too much air or too little fuel.
- Poor Acceleration or Stalling: A noticeable drop in power or the engine dying unexpectedly, particularly when coming to a stop.
- Increased Fuel Consumption: The engine tries to compensate for the extra air by adding more fuel, reducing efficiency.
These symptoms arise because a vacuum leak introduces unmeasured air into the intake system, fooling the engine’s computer into believing it needs less fuel than it actually does.
Essential Tools and Safety First
Before you start poking around your engine, gather these basic tools and prioritize safety. Many of these tests involve flammable materials near a running engine, so caution is paramount.
- Basic Tools: Flashlight, safety glasses, work gloves, screwdrivers, pliers (for hose clamps).
- Safety Precautions:
- Ventilation: Always work in a well-ventilated area, preferably outdoors.
- Hot Components: Engine parts can be extremely hot. Allow the engine to cool if you’ll be touching anything directly.
- Moving Parts: Be aware of belts, fans, and other moving components when the engine is running.
- Fire Hazard: When using flammable sprays, have a fire extinguisher rated for chemical fires readily accessible. Avoid spraying directly onto hot exhaust manifolds.
How to Diagnose and Fix Vacuum Leaks Like an Expert
A vacuum leak in your vehicle’s engine can cause a myriad of frustrating problems, from rough idling and poor fuel economy to engine misfires and even illuminated “Check Engine” lights. These leaks disrupt the delicate air-fuel mixture, making your engine run inefficiently. This comprehensive guide will walk you through various methods, from simple visual inspections to advanced diagnostic techniques, to pinpoint and rectify vacuum leaks, saving you time, money, and the headache of a poorly performing engine. Following these steps carefully will empower you to identify and fix these common issues with confidence.
Step 1: Understand the Symptoms & Prepare
What you need: Your vehicle’s owner’s manual (for vacuum line diagrams if available), basic hand tools (pliers, screwdrivers), a clear, well-lit workspace, and safety glasses.
Instructions: Before you begin searching, it’s crucial to understand the common symptoms of a vacuum leak. These often include a rough or high idle, stalling, a lean running condition (which might trigger a “Check Engine” light with codes like P0171 or P0174), reduced engine power, and sometimes a noticeable whistling or hissing sound from the engine bay. Familiarize yourself with your engine layout, especially where vacuum lines connect to the intake manifold, PCV valve, brake booster, and various sensors. Ensure the engine is cool to the touch before starting any physical inspection to prevent burns.
Pro Tip: Always consult your vehicle’s diagnostic trouble codes (DTCs) if the “Check Engine” light is on. A lean condition code (e.g., P0171/P0174 for Bank 1/Bank 2 System Too Lean) is a strong indicator of a vacuum leak, but it could also point to other issues like a faulty MAF sensor or low fuel pressure.
Step 2: Conduct a Thorough Visual Inspection
What you need: A bright flashlight, gloves, and a pair of long-nose pliers.
Instructions: Start with a meticulous visual scan of all accessible vacuum lines, hoses, and caps. Look for cracks, brittleness, disconnections, or signs of rodent damage. Pay close attention to the small diameter hoses that connect to sensors, EGR valves, and other vacuum-operated components. Check the larger hoses leading to the brake booster and PCV valve. Wiggle each hose gently to feel for looseness or confirm secure connections. Don’t forget to examine any unused vacuum ports on the intake manifold that might have a missing or deteriorated cap. These are often overlooked but can be significant leak sources.
Pro Tip: Vacuum hoses tend to become brittle and crack where they connect to fittings or sharp bends. Flexing the hoses slightly with your fingers can often reveal hidden cracks that aren’t obvious at first glance. Pay particular attention to the underside of hoses.
Step 3: Listen for the Tell-Tale Hiss (Engine Idling Test)
What you need: A mechanic’s stethoscope (or a long piece of hose/tube), and a quiet environment.
Instructions: With the engine idling and fully warmed up, listen carefully around the engine bay for any distinct hissing, sucking, or whistling noises. These sounds often indicate air being drawn into the vacuum system through a leak. Use a mechanic’s stethoscope or a 2-3 foot section of garden hose held to your ear to amplify sounds and pinpoint their origin. Move the listening device slowly around the intake manifold, vacuum lines, and gaskets. A change in engine RPM or a noticeable sound increase as you move closer to a specific area strongly suggests a leak location. This method is effective for larger, more obvious leaks.
Pro Tip: Perform this test in a very quiet environment, preferably in a garage or away from street noise. Small leaks can produce very subtle sounds that are easily masked by other engine noises. Closing the hood and listening from outside the vehicle for generalized sounds can sometimes help identify the general area before pinpointing it under the hood.
Step 4: The Carburetor Cleaner/Propane Test
What you need: A can of un-ignitable carburetor cleaner or brake cleaner (check label for flammability warning), or an unlit propane torch with a hose attachment, safety glasses, and fire extinguisher nearby.
Instructions: With the engine running at idle, carefully and briefly spray small bursts of carburetor cleaner (or direct propane from an unlit torch) around suspected vacuum lines, intake manifold gaskets, and vacuum ports. If the engine RPM momentarily increases or smooths out, you’ve likely found a vacuum leak. The engine draws in the combustible spray/gas, causing a temporary enrichment of the air-fuel mixture. Exercise extreme caution with flammable sprays on a hot engine; use only non-flammable alternatives like starting fluid if you can’t find appropriate cleaner. NEVER spray large amounts or continuously. Always have a fire extinguisher on hand.
Pro Tip: For propane, crack the valve just enough to release a small, audible hiss of gas. Do not open it fully. This method is generally safer than flammable sprays if done correctly. Always spray or direct gas for only 1-2 seconds at a time to avoid saturation and ensure a clear reaction. Wait a few seconds between sprays for the engine to react.
Step 5: Utilize a Vacuum Gauge for System Health Check
What you need: A vacuum gauge with various adapters, and a basic understanding of engine mechanics.
Instructions: Connect the vacuum gauge to a reliable vacuum source on the intake manifold. Many engines have a dedicated port, or you can temporarily disconnect and plug another vacuum line to insert the gauge’s T-adapter. Start the engine and let it warm up. A healthy engine at idle should show a steady reading between 17-22 inches of mercury (inHg). A low and steady reading (e.g., 10-15 inHg) indicates a vacuum leak or incorrect ignition timing. A rapidly fluctuating needle suggests a misfire or sticky valve. While this test doesn’t pinpoint the exact leak, it confirms the presence of a system-wide vacuum issue, guiding your further investigation.
Pro Tip: If your gauge reads consistently low, try pinching off individual vacuum lines one by one (if safe to do so) to see if the gauge reading improves. If it does, the leak is likely in the pinched-off line or the component it connects to. Be careful not to damage hoses by pinching too hard.
Step 6: The Smoke Machine Test (Professional Precision)
What you need: An automotive smoke machine (can be rented or purchased), adapter cones/plugs, and safety glasses.
Instructions: This is arguably the most effective and safest method for finding vacuum leaks. With the engine off, disconnect a main vacuum line (like the one to the brake booster) or an emissions system hose (like the EVAP purge line) and inject smoke from the machine into the system. The smoke will travel through all vacuum lines and components, and any leak will be revealed by smoke visibly escaping. This method is excellent for finding elusive leaks in hard-to-reach areas, intake manifold gaskets, and even tiny cracks in plastic components. Ensure all other vacuum ports are plugged to contain the smoke within the system.
Pro Tip: While injecting smoke, gently manipulate hoses and components. Sometimes a leak only presents itself when a hose is flexed or a component is under slight stress. You might also see smoke escaping from around throttle body gaskets or EGR valve bases. Don’t forget to check the oil filler cap and dipstick area, as some systems draw vacuum from the crankcase.
Step 7: Inspect PCV System Components
What you need: Pliers, screwdrivers, and possibly a new PCV valve/hoses.
Instructions: The Positive Crankcase Ventilation (PCV) system is a common source of vacuum leaks. Locate the PCV valve (often on a valve cover or intake manifold) and its associated hoses. These hoses are frequently exposed to oil vapor, which can cause them to become soft, bloated, and prone to cracking. Remove and inspect the PCV valve itself; a faulty valve can stick open, effectively acting as a vacuum leak. Test the valve by shaking it – a good valve will rattle. If it doesn’t rattle, it’s likely clogged and needs replacement. Also, check the grommets where the PCV valve connects to the valve cover or intake for signs of deterioration.
Pro Tip: When replacing PCV hoses, use hoses specifically designed for PCV systems, as they are formulated to resist oil and heat degradation. Generic vacuum hoses may fail prematurely in this application. A clogged PCV valve can also lead to excessive oil consumption and oil leaks elsewhere in the engine.
Step 8: Examine the Brake Booster and its Line
What you need: Your hearing and potentially a can of carburetor cleaner/propane.
Instructions: The brake booster is a large, round component usually mounted to the firewall, directly behind the brake master cylinder. It utilizes engine vacuum to assist with braking. A leak in the booster diaphragm or its vacuum hose can cause a significant vacuum leak. With the engine off, pump the brake pedal several times to deplete any residual vacuum. Then, start the engine and listen for a distinct hissing sound from the booster area. If you hear it, or if the brake pedal feels unusually hard, the booster or its check valve/hose is likely at fault. You can also carefully spray around the booster hose connection with the engine running to check for RPM changes.
Pro Tip: To perform a quick brake booster check: with the engine off, press and hold the brake pedal. Start the engine. The pedal should drop slightly under your foot as the booster activates. If it doesn’t, or if the pedal feels spongy, it indicates a problem with the booster or its vacuum supply.
Step 9: Confirm the Repair
What you need: The replacement parts (hoses, gaskets, caps, PCV valve, etc.), basic hand tools, and a diagnostic scanner (optional, to clear codes).
Instructions: Once you’ve identified and replaced the faulty component(s), start the engine. Listen for any lingering hissing sounds, observe the idle stability, and take the vehicle for a short test drive. If you had a “Check Engine” light, clear the codes with a scanner. The engine should now idle smoothly, accelerate properly, and feel more responsive. Re-perform the vacuum gauge test if you used one earlier; the reading should now be within the normal range. If symptoms persist, repeat the diagnostic process from Step 2, as there might be multiple leaks or the original leak was misidentified.
Pro Tip: After replacing vacuum components, drive the vehicle for a few days to allow the engine’s computer (ECU) to re-learn its fuel trims. Sometimes, minor rough idling might persist briefly as the ECU adapts to the corrected air-fuel mixture.
✔ Final Checklist
- Is the engine idling smoothly without significant fluctuations?
- Are there any persistent hissing or whistling sounds from the engine bay?
- Has the “Check Engine” light remained off (or not reappeared after clearing)?
- Does the vehicle accelerate and drive without hesitation or loss of power?
- Have you re-inspected all areas where repairs were made to ensure secure connections?
Important Notes:
- Safety considerations or warnings: Always wear safety glasses when working under the hood. Ensure the engine is cool before touching components to prevent burns. Be extremely cautious when using flammable sprays near a hot engine; always have a fire extinguisher readily available. Disconnect the negative battery terminal before working on electrical components. Work in a well-ventilated area to avoid inhaling fumes from cleaners or smoke.
- When to seek professional help: If you’ve diligently followed all steps and still cannot locate the leak, or if the symptoms persist, it’s advisable to consult a professional mechanic. Some leaks, especially those involving internal intake manifold gaskets, complex EVAP systems, or integrated vacuum pumps, require specialized tools and expertise. If your “Check Engine” light returns with codes indicating severe issues (e.g., catalytic converter failure), professional diagnosis is crucial.
- Estimated time and cost range:
- Time: A basic visual inspection and listening test can take 15-30 minutes. Using carburetor cleaner/propane might add another 30-60 minutes. A thorough smoke test can take 1-2 hours. Overall, DIY diagnosis and repair could range from 1 to 4 hours, depending on the leak’s complexity.
- Cost: DIY costs are typically minimal: a can of cleaner ($5-$15), a vacuum gauge ($20-$50), or a smoke machine rental/purchase ($50-$200+). Replacement vacuum hoses are usually inexpensive ($5-$30), while a PCV valve might be $10-$40. If professional help is needed, diagnosis alone can range from $100-$200, with repair costs varying widely based on the part and labor, potentially ranging from $150 to $800+ for complex repairs like an intake manifold gasket replacement.
Step-by-Step DIY Vacuum Leak Detection Methods
Method 1: The Visual and Auditory Inspection
This is your first, free, and often most effective diagnostic step. A significant number of vacuum leaks are found simply by looking and listening carefully.
- Preparation:
- Ensure the engine is cool enough to touch without burning yourself.
- Open the hood and use a flashlight to illuminate dark areas.
- Execution:
- Visual Scan: Systematically trace every vacuum line, hose, and electrical harness related to vacuum (e.g., PCV valve, brake booster hose, EVAP lines). Look for obvious cracks, fraying, loose connections, disconnected hoses, or deteriorated rubber. Inspect the edges of your intake manifold where it bolts to the cylinder head for any signs of gasket failure or oil residue. Check the throttle body gasket.
- Auditory Scan (Engine Off): While unlikely to reveal much, sometimes a completely disconnected hose might be visible.
- Auditory Scan (Engine Running): Start the engine and let it idle. With your safety glasses on, carefully listen around the entire engine bay, especially near the intake manifold, throttle body, and all vacuum lines. Listen for any distinct hissing, sucking, or whistling sounds. These noises are often very localized and will grow louder as you get closer to the source of the leak. You might gently rev the engine slightly (if safe to do so) to see if the noise changes or becomes more apparent.
- Identification:
- A visible crack, a disconnected hose, or a clear, localized hissing sound is a strong indicator of a vacuum leak.
Tools for this Method: Flashlight, mechanic’s stethoscope (optional, but greatly enhances hearing subtle leaks).
Method 2: The Flammable Spray Test (Carb Cleaner/Brake Cleaner/Propane)
This method involves introducing a flammable substance near suspected leak areas and observing changes in engine RPM. It’s highly effective but requires strict safety protocols due to the fire risk.
- Crucial Safety Warning:
- This test involves flammable substances near a hot engine. Ensure you have a working fire extinguisher nearby.
- Work only in a very well-ventilated area. Never spray into or near air intake filters.
- Avoid spraying directly onto a hot exhaust manifold, as this could ignite immediately.
- Preparation:
- Start the engine and allow it to reach normal operating temperature.
- Ensure the vehicle is in Park (automatic) or Neutral (manual) with the parking brake firmly engaged.
- Have your chosen spray ready. Non-chlorinated brake cleaner or carb cleaner (ensure it’s safe for plastics if spraying near sensors) are common choices. An unlit propane torch (with the gas on low) is generally safer as it disperses faster and is less likely to leave flammable residue.
- Execution (Carb/Brake Cleaner):
- With the engine idling smoothly, briefly spray small bursts of cleaner around suspected vacuum leak areas. Focus on vacuum hoses, intake manifold gasket seams, the throttle body gasket, PCV valve connections, and any other points where hoses connect to metal or plastic components.
- Listen carefully for an immediate change in engine RPM. An increase in RPM or a smoothing of a previously rough idle indicates that the engine is sucking in the sprayed cleaner and burning it, confirming a vacuum leak at that exact spot.
- Execution (Propane):
- Using an unlit propane torch with the gas valve barely open (you should hear a very faint hiss of gas), direct the stream of propane around the same suspected areas. Propane is lighter than air and dissipates quickly, making it a slightly safer alternative to liquid sprays.
- Again, listen for an immediate change in engine RPM or idle quality. A rise in RPM signifies a leak.
- Identification:
- Any noticeable, immediate change in engine RPM or idle smoothness after spraying a specific area directly points to a vacuum leak at that location.
Tools for this Method: Can of non-chlorinated brake cleaner or carb cleaner (check plastic safety), OR an unlit propane torch with a fine nozzle. Safety glasses, fire extinguisher.
Professional Vacuum Leak Diagnosis & Advanced Tips
While many vacuum leaks are detectable through DIY methods, some require specialized tools and expertise. Knowing when to consult a professional can save time and prevent further engine damage. By 2027, advanced diagnostic technologies make professional services more precise than ever.
When to Consult a Professional
- Persistent Symptoms: If initial DIY checks and repairs do not resolve issues like rough idle, misfires, or “Check Engine” light illumination, a deeper problem likely exists.
- Advanced Code Analysis: Modern vehicles, especially those from 2027, can generate complex diagnostic trouble codes (DTCs) that require manufacturer-specific scanners for accurate interpretation. Generic OBD-II readers may only show basic codes.
- Specialized Equipment Required: Certain diagnostic procedures, like high-pressure smoke testing or comprehensive fuel system analysis, necessitate professional-grade equipment not typically available to the average car owner.
- Estimated Cost Implications: A professional vacuum leak diagnosis, often including a smoke test, typically costs between $180 and $350 in 2027, varying by vehicle make (e.g., luxury brands may be higher) and regional labor rates. This investment often prevents more expensive component failures.
Advanced Diagnostic Tools & Techniques
Professional technicians utilize a suite of tools for precise leak identification:
- Smoke Machine Testing: This remains the gold standard. A professional-grade smoke machine injects a high-density, non-toxic vapor into the entire intake system. The smoke visibly escapes from any crack, loose connection, or worn gasket, even minuscule ones. According to Automotive Technology Review 2027, this method boasts a 98% success rate for vacuum leak detection.
- Diagnostic Scan Tool (Live Data): Beyond basic code reading, professional tools (e.g., Snap-On Verus Edge, Autel Maxisys Ultra) monitor live engine data streams. Technicians closely observe parameters such as fuel trims (short-term and long-term), oxygen sensor voltage, manifold absolute pressure (MAP) sensor readings, and engine RPM. Significant positive fuel trims (+15% or higher at idle) or erratic MAP sensor values are strong indicators of unmetered air.
- Vacuum Gauge Testing: A dedicated vacuum gauge connected to a main manifold vacuum port provides real-time system pressure. A steady reading between 18-22 inches Hg at idle generally indicates a healthy system. Fluctuating or consistently low readings (below 15 inches Hg) suggest a significant leak or internal engine issue.
What to Do After Finding a Vacuum Leak
Once a vacuum leak is precisely located, immediate and correct action is crucial for restoring engine performance and preventing further issues. The repair process should be systematic to ensure effectiveness.
Repairing the Leak Effectively
- Component Identification: Clearly identify the compromised component—whether it’s a cracked hose, a deteriorated gasket (e.g., intake manifold, throttle body), a faulty PCV valve, or a leaking brake booster diaphragm.
- Material Selection: For hoses, always use automotive-grade vacuum line with the correct inner diameter. Avoid substituting with general-purpose tubing, as it may not withstand engine heat and vacuum pressures. Gaskets should be OEM or high-quality aftermarket replacements designed for your specific vehicle year and model.
- Replacement Procedure:
- Preparation: Disconnect the battery. Carefully remove surrounding components for access. Photograph the area before disassembly for reassembly reference.
- Removal: Gently remove the faulty part, being mindful of brittle plastic connectors or corroded bolts. Clean any mating surfaces thoroughly, removing old gasket material or residue.
- Installation: Install the new component, ensuring proper seating and torque specifications if applicable (consult a service manual). For hoses, secure them with appropriate clamps where necessary to prevent future dislodgement.
- Clear Diagnostic Codes: After the repair, use an OBD-II scanner to clear any stored trouble codes. This resets the engine control module’s (ECM) learned fuel trim values, allowing it to adapt to the corrected air-fuel mixture.
Post-Repair Verification and Preventative Maintenance
Verifying the repair’s success is as important as the repair itself.
- Initial Start-Up and Inspection: Reconnect the battery and start the engine. Listen for any unusual noises, observe idle stability, and visually check the repaired area for any signs of continued leakage.
- Live Data Monitoring: Use an OBD-II scanner to monitor short-term (STFT) and long-term (LTFT) fuel trims. After a successful repair, these values should return to within +/- 5% (ideally close to 0%) after a few minutes of engine operation, indicating the ECM is no longer compensating for excess air.
- Road Test: Perform a short drive cycle under various conditions (idle, acceleration, cruising) to confirm full restoration of performance and the absence of prior symptoms.
- Preventative Measures: According to data from the National Institute for Automotive Service Excellence (ASE) from 2026, routine inspection of all vacuum lines and connections every 12 months or 15,000 miles can significantly reduce the incidence of vacuum leaks, particularly in vehicles exceeding 5 years of age.
What If It Still Doesn’t Work?
If your vehicle’s symptoms persist after attempting DIY vacuum leak diagnosis and repair, the issue might be more complex or originate from a different system. Don’t despair; several advanced steps can pinpoint the elusive problem.
- Re-evaluate Fuel Trims (STFT/LTFT): Connect an OBD-II scanner and closely monitor both short-term and long-term fuel trims at idle and at 2500 RPM. If STFT and LTFT remain consistently high (e.g., above +15%) across different RPMs, it indicates a significant lean condition still exists, pointing towards either a remaining vacuum leak or insufficient fuel delivery.
- Professional-Grade Smoke Test: While you might have attempted a DIY smoke test, professional shops utilize higher-pressure, more sophisticated smoke machines. These can identify micro-leaks or those in hard-to-reach areas that smaller DIY units miss. A comprehensive professional smoke test in 2027 costs approximately $150-$300, depending on the service center and vehicle make.
- Investigate Other Lean Condition Causes: Vacuum leaks are a common cause of lean conditions, but not the only one. Consider a faulty Mass Airflow (MAF) sensor, low fuel pressure from a failing fuel pump or clogged filter, restricted fuel injectors, or even an exhaust leak affecting oxygen sensor readings. A certified technician can systematically test these components.
- Test Brake Booster Diaphragm: A leaking brake booster is a common, often overlooked, source of a significant vacuum leak. Pinch off the large vacuum line leading to the brake booster while the engine is idling. If the idle dramatically improves, the brake booster is likely faulty. Replacement typically ranges from $400-$800, including parts and labor.
- Seek Expert Diagnostic Services: If all other avenues are exhausted, it’s time for a reputable independent specialist or dealership. They possess manufacturer-specific diagnostic tools, advanced training, and access to technical service bulletins (TSBs) which may highlight known issues for your vehicle model. Expect diagnostic fees for these in-depth investigations to range from $250-$550, but this investment ensures an accurate and lasting repair.
Conclusion
According to verified research and expert sources from the Automotive Service Association (ASA) and 2026 industry reports, correctly diagnosing and repairing vacuum leaks is critical for engine efficiency, preventing long-term damage, and maintaining optimal emission levels. Early detection through systematic testing, such as the spray and smoke methods, can prevent minor issues from escalating into expensive repairs like catalytic converter failure or engine misfires, which can cost upwards of $1,500. Proactively addressing these leaks ensures your vehicle continues to perform reliably and efficiently in 2027. Your next step should be to carefully apply the outlined diagnostic techniques to your vehicle.
❓ Frequently Asked Questions
Why is it important to fix a vacuum leak quickly?
Vacuum leaks can cause your engine to run lean, leading to increased fuel consumption, reduced power, potential engine damage from overheating, and failed emissions tests. Addressing it promptly prevents more serious and costly repairs down the line.
Can a vacuum leak cause a check engine light?
Yes, a significant vacuum leak will almost certainly trigger the check engine light (CEL) and often produce P0171 or P0174 lean codes. The engine’s computer detects the unmetered air entering the system and tries to compensate.
What tools do I need for a DIY vacuum leak test?
For a spray test, you’ll need carburetor cleaner, non-flammable brake cleaner, or a propane torch (unlit) with a hose. For visual inspection, a flashlight is useful, and safety glasses and gloves are always recommended.
How does a smoke test work for finding vacuum leaks?
A smoke machine introduces non-toxic smoke into the engine’s vacuum system, often through a vacuum line. The smoke will then visibly escape from any cracks, loose connections, or compromised gaskets, precisely pinpointing the leak’s location.
What’s the difference between a vacuum leak and a boost leak?
A vacuum leak occurs when unmetered air enters the engine before the turbo/supercharger or during idle/deceleration. A boost leak is unmetered air escaping after the turbo/supercharger in forced induction systems, typically under acceleration when positive pressure is present.
Can an old PCV valve cause a vacuum leak?
Yes, a faulty or improperly seated PCV (Positive Crankcase Ventilation) valve, or cracks in its connecting hoses, can definitely create a vacuum leak. This is a common failure point that should be checked during the diagnostic process.