How to Detect a Vacuum Leak Expert Step-by-Step Guide 2027
Vacuum leaks are a common cause of engine performance issues like rough idling, stalling, and poor fuel economy. This guide provides practical, step-by-step methods to accurately detect and pinpoint these elusive leaks, enabling you to identify the problem efficiently and effectively.
You can effectively detect a vacuum leak in your vehicle’s engine by systematically employing visual inspections, listening for audible cues, and using targeted spray tests. Ignoring a vacuum leak, even in advanced 2027 vehicles, leads to frustrating performance issues like rough idling, poor fuel economy, and potential engine damage if left unchecked. Pinpointing these leaks yourself saves significant diagnostic costs and keeps your vehicle running smoothly.
This guide provides practical, step-by-step methods you can use today to confidently locate vacuum leaks. We’ll focus on techniques that are reliable and accessible for the average DIY mechanic, ensuring you can diagnose the problem without needing specialized shop equipment. Knowing how to find these issues is the first critical step toward restoring your engine’s optimal performance and efficiency.
Key Takeaways
- Identify key symptoms of a vacuum leak.
- Perform spray tests safely with carb cleaner or propane.
- Listen for audible hissing and visually inspect components.
- Consider smoke testing for hard-to-find leaks.
- Prioritize safety during all detection methods.
What Causes and Signals a Vacuum Leak?
Vacuum leaks occur when unmetered air enters your engine past the mass airflow sensor, disrupting the crucial air-fuel mixture. This issue is surprisingly common, even in newer vehicles on the road in 2027, often due to aging components or wear and tear. Understanding the symptoms and common leak locations is your first step toward effective diagnosis.
Common Symptoms of a Vacuum Leak
- Rough or Unstable Idle: Your engine might shudder, surge, or feel like it wants to stall, especially when stopped. This is often the most noticeable symptom.
- Poor Fuel Economy: The engine’s computer tries to compensate for extra air by adding more fuel, leading to a noticeable drop in MPG.
- Check Engine Light (CEL): Common OBD-II codes related to vacuum leaks include P0171 (System Too Lean, Bank 1) or P0174 (System Too Lean, Bank 2). These indicate the engine is receiving too much air for the fuel it’s getting.
- Hissing or Whistling Noises: A distinct sound, often heard from the engine bay when the engine is running, can indicate air being sucked through a small crack or loose connection.
- Reduced Engine Power: Especially noticeable during acceleration, as the engine struggles to maintain proper combustion.
Common Areas Prone to Leaks
Vacuum leaks typically originate from components made of rubber or plastic that degrade over time due to heat cycles and engine vibrations. Focus your inspection on these high-risk areas:
- Vacuum Hoses: These small rubber lines connect various engine components. Look for cracks, brittleness, or disconnections.
- Intake Manifold Gaskets: The seal between the intake manifold and the cylinder head can dry out and crack, creating a leak.
- PCV (Positive Crankcase Ventilation) Valve and Hoses: The valve itself can fail, or its connecting hoses can crack.
- Brake Booster and its Vacuum Line: A leak here can affect braking performance and engine idle.
- EGR Valve Gasket/Connections: While less common, leaks around the Exhaust Gas Recirculation valve can also occur.
- Throttle Body Gasket: The seal where the throttle body mounts to the intake manifold can also be a culprit.
How to Diagnose and Fix a Vacuum Leak Like an Expert
A healthy engine relies on a properly sealed vacuum system for a multitude of functions, from braking assistance to emissions control and smooth idling. A vacuum leak, even a small one, can lead to frustrating symptoms like rough idle, poor fuel economy, engine misfires, and even trigger your “Check Engine” light. This comprehensive guide will walk you through a series of practical, expert-level steps to systematically detect and pinpoint vacuum leaks in your vehicle, empowering you to diagnose and address the issue effectively.
Step 1: Understand Your Vehicle’s Vacuum System and Common Symptoms
What you need: Your vehicle’s service manual (optional but highly recommended), a basic understanding of engine components.
Instructions: Before diving into detection, it’s crucial to understand what a vacuum system does. It creates suction to operate components like the brake booster, PCV (Positive Crankcase Ventilation) system, EGR (Exhaust Gas Recirculation) valve, and various emissions solenoids. Common symptoms of a leak include a rough, unstable, or high idle; engine hesitation; misfires; a noticeable whistling or hissing sound under the hood; a hard brake pedal; and decreased fuel efficiency. Familiarize yourself with these signs to better interpret your vehicle’s behavior, and consult your manual to locate key vacuum lines specific to your make and model.
Pro Tip: Not all vacuum leaks are severe enough to immediately trigger a Check Engine Light (CEL), and symptoms can be subtle. Pay close attention to changes in engine behavior, especially during cold starts or at idle.
Step 2: Conduct a Thorough Visual Inspection
What you need: A bright flashlight, a clean rag, disposable gloves (optional).
Instructions: Begin by carefully examining all visible vacuum lines, hoses, caps, and connections throughout the engine bay. Start from easily accessible areas and systematically work your way around. Look for any signs of cracking, fraying, collapsing, dryness, or disconnection. Pay particular attention to hoses connected to the intake manifold, PCV valve, brake booster, and any emissions components. Gently flex and wiggle hoses to check for brittle spots or loose fittings. Don’t forget to check any unused vacuum ports that should be capped off for missing or cracked caps.
Pro Tip: Many vacuum leaks occur at points of high heat or vibration. Concentrate your visual inspection on areas near exhaust manifolds, worn engine mounts, or where hoses pass through tight spaces, as these are common failure zones.
Step 3: Listen for Auditory Clues
What you need: A quiet environment, an automotive stethoscope (highly recommended for precision).
Instructions: With the engine warmed up and idling, listen intently for any unusual sounds emanating from the engine bay. A vacuum leak often produces a distinct hissing, whistling, or sucking noise as air is drawn into the system. Move your head slowly around the engine, trying to pinpoint the origin of the sound. If you have an automotive stethoscope, use it to amplify sounds by placing its probe on various components and vacuum lines. This allows you to precisely narrow down the location of even small, faint leaks.
Pro Tip: The pitch or volume of a vacuum leak sound might change with slight increases in engine RPM. Have a helper gently press the accelerator while you listen, as this variation can help confirm and locate the source of the noise.
Step 4: The Propane or Carburetor Cleaner Test (Exercise Extreme Caution)
What you need: A can of unlit propane (with a long hose attachment) or carburetor cleaner spray, protective eyewear, a fire extinguisher (MANDATORY).
Instructions: With the engine idling, carefully and in short bursts, spray either unlit propane gas or carburetor cleaner around suspected vacuum leak areas. If the engine RPM temporarily increases or the engine idle smooths out, it indicates that the engine is pulling in the additional fuel/propellant through a leak. The engine’s computer attempts to compensate for this extra “fuel,” causing the RPM change. This method helps pinpoint the exact location. Always ensure excellent ventilation and keep a fire extinguisher within arm’s reach.
Pro Tip: NEVER douse the engine in flammable sprays. Use very short, controlled bursts. Propane is often preferred over carburetor cleaner due to its cleaner burn and less residue. This method should NOT be used near hot exhaust components or open flames, and is unsuitable for EVAP system leaks due to fire risk.
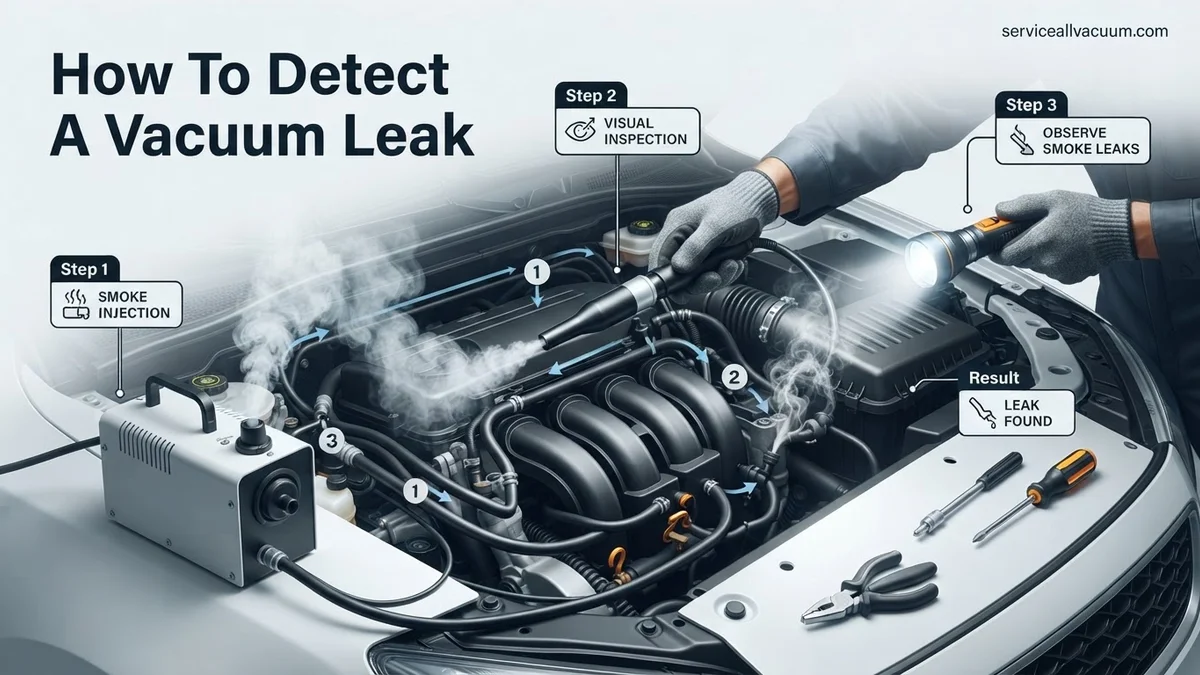
Step 5: The Smoke Machine Test (Most Effective & Safest Method)
What you need: An automotive smoke machine (can be rented from auto parts stores), appropriate adapters, shop air supply (for some models).
Instructions: This is arguably the most effective and safest method for detecting vacuum leaks. With the engine OFF, connect the smoke machine to a main vacuum source, such as the brake booster vacuum line, a large intake manifold port, or the PCV valve line. Pump smoke into the system. As the smoke fills the vacuum system, it will visibly escape from any cracks, loose connections, or damaged gaskets, making even the smallest leaks easy to spot. Observe carefully around the intake manifold, all vacuum hoses, and connections.
Pro Tip: Allow the smoke machine to run for a few minutes to ensure the entire system is pressurized. Don’t forget to check under the intake manifold, as gaskets in that area are common failure points and often hidden from direct view. Look for smoke around fuel injector O-rings and throttle body gaskets as well.
Step 6: The Vacuum Gauge Test
What you need: A vacuum gauge (analog or digital), various vacuum hose adapters.
Instructions: Connect the vacuum gauge to a reliable, direct vacuum source on the engine, ideally the intake manifold or a main vacuum line providing constant vacuum. Start the engine and let it idle. A healthy engine at sea level typically shows a steady vacuum reading between 17-22 inches of mercury (inHg). A low, unsteady, or fluctuating reading, especially at idle, can be a strong indicator of a vacuum leak. Consult your vehicle’s specific service manual for normal operating range values, as these can vary slightly by engine design.
Pro Tip: A rapidly fluctuating or consistently low vacuum reading often points to a vacuum leak or an internal engine problem. Test by briefly opening the throttle; a healthy engine’s vacuum should drop then return quickly to a steady high reading. If it remains low or fluctuates wildly, further investigation is needed.
Step 7: The Soapy Water Test (For Larger Leaks & Specific Components)
What you need: A spray bottle, a mixture of dish soap and water, rags.
Instructions: While less effective for very tiny pinholes compared to a smoke machine, the soapy water test can be useful for larger leaks around components like the intake manifold gasket, throttle body gasket, or the brake booster diaphragm connection. Spray the soapy water solution generously over the suspected area with the engine idling. If a leak is present, the vacuum will pull air through the solution, causing visible bubbles to form at the leak site. This visually confirms the location of air ingress.
Pro Tip: This method works best for leaks that are large enough to create a noticeable vacuum effect through the liquid. Ensure the engine is not excessively hot to prevent rapid evaporation of the water before bubbles can form. Wipe away any excess solution immediately after testing to prevent corrosion or residue buildup.
Step 8: Post-Repair Verification
What you need: All tools used for detection, replacement parts (hoses, gaskets, caps, etc.).
Instructions: After identifying and replacing the faulty vacuum component or sealing the leak, it’s crucial to verify your repair. Re-start the engine and perform a visual inspection and listen test again. Ideally, repeat the vacuum gauge test or a smoke test to confirm the leak has been completely eliminated. Observe the engine’s idle quality and overall performance. If a “Check Engine” light was on due to the leak, clear any stored trouble codes using an OBD-II scanner and ensure it doesn’t return after a test drive under various conditions.
Pro Tip: Don’t just rely on the engine sounding better. A re-test with a smoke machine or vacuum gauge provides definitive proof that all leaks are sealed. A thorough test drive including acceleration and deceleration will confirm full system functionality under load.
✅ Final Checklist
- Engine idle is smooth, stable, and within specified RPM range.
- No hissing, whistling, or sucking sounds are audible from the engine bay.
- Vacuum gauge readings are steady and within manufacturer specifications.
- Any “Check Engine” light related to the vacuum leak is off and remains off after driving.
- Vehicle performance, including braking and acceleration, has noticeably improved.
Important Notes:
- Safety considerations or warnings: Always work in a well-ventilated area. Exercise extreme caution when working around hot or moving engine parts. Keep a fire extinguisher readily available when using flammable sprays (propane, carburetor cleaner). Wear appropriate personal protective equipment (PPE), including gloves and eye protection. Ensure the vehicle is on level ground and properly supported if lifting is required. Disconnect the battery if working on electrical components.
- When to seek professional help: If you are uncomfortable performing any of these diagnostic steps, cannot locate the leak despite your best efforts, or if the problem persists after your repair attempts, it is highly recommended to consult a certified mechanic. Vacuum systems can be intricate, and some components or issues may require specialized tools or advanced diagnostic knowledge.
- Estimated time and cost range: Detecting a vacuum leak can take anywhere from 30 minutes to several hours, depending on the severity and location of the leak and the tools available. DIY costs for materials like carburetor cleaner or propane are minimal ($5-$20). Renting a smoke machine might cost $50-$100 per day. Professional diagnosis could range from $100-$200, with repair costs varying greatly based on the part needing replacement (e.g., a simple vacuum cap vs. an intake manifold gasket).
How to Detect a Vacuum Leak: Proven Step-by-Step Methods
Locating a vacuum leak requires patience and a systematic approach. These DIY methods are highly effective and don’t require expensive diagnostic equipment, making them perfect for your garage in 2027.
Step 1: The Thorough Visual Inspection
Before you start spraying anything, a detailed visual check can often reveal the culprit. This costs nothing but your time.
- Engine Off and Cool: Ensure the engine is off and cool to the touch for safety.
- Follow All Vacuum Lines: Trace every visible vacuum hose from end to end. Look for:
- Cracks or Splits: Especially at bends or near connections. Rubber hoses become brittle with age.
- Loose or Disconnected Hoses: Check where hoses connect to plastic fittings, sensors, and valves.
- Collapsed Hoses: A hose that looks pinched or flattened could indicate an internal blockage or weakness.
- Inspect Gaskets and Seals: Look around the base of the intake manifold, throttle body, and any vacuum-operated components for signs of dried-out or cracked gasket material.
- Check Caps and Plugs: Ensure all unused vacuum ports are properly capped off. Missing caps are a common, easy-to-fix leak source.
Step 2: The “Spray Test” with Carburetor Cleaner or Starter Fluid
This is one of the most popular and effective DIY methods. The engine will react when the flammable spray is drawn into a leak.
- Safety First: Work in a well-ventilated area. Have a fire extinguisher nearby. Ensure the engine is at operating temperature, but be cautious of hot components.
- Start the Engine: Let it idle. Listen for any existing hissing sounds to help narrow down your search area.
- Prepare Your Spray: Use a can of carburetor cleaner, throttle body cleaner, or unethered starter fluid. These products are highly flammable, so avoid spraying near open flames or extremely hot exhaust components.
- Spray in Short Bursts: Systematically spray small, controlled bursts around suspected vacuum leak areas. Focus on:
- All vacuum hose connections.
- Around the base of the intake manifold.
- The throttle body gasket.
- The PCV valve and its grommet.
- The brake booster vacuum line connection.
- Observe Engine RPM: As you spray, listen carefully to the engine’s RPM. If the engine briefly surges (RPM increases) or smooths out, you’ve likely found your leak. The engine is “sucking in” the flammable spray, causing a temporary richer mixture.
- Isolate the Leak: Once you get a reaction, narrow down the exact spot by spraying smaller, more precise bursts.
Step 3: The Propane or Unlit Butane Torch Method
Similar to the spray test, this method uses a controlled stream of gas to detect leaks, often considered safer than flammable liquids in certain situations.
- Safety Precautions: Ensure good ventilation. Do NOT light the torch. You are using the unlit gas.
- Engine Running: Start the engine and let it idle.
- Open Propane Valve Slightly: Open the valve on a small propane torch (like those used for soldering) just enough to hear a faint hiss of gas escaping.
- Direct the Stream: Slowly move the torch nozzle (without touching hot components) around the suspected leak areas, similar to the spray test.
- Listen for RPM Change: Just like with the spray test, if the engine’s RPM increases or smooths out when the propane stream passes over a spot, you’ve found a vacuum leak. The engine draws in the propane, causing a temporary richer mixture.
- Advantages: Propane dissipates quickly and leaves no residue, making it a clean method. It’s also less likely to ignite on hot surfaces compared to liquid sprays, though caution is always advised.
What If Your Vacuum Leak Persists After Detection?
Even with diligent application of standard detection methods, identifying a vacuum leak can sometimes prove challenging. If your vehicle continues to exhibit classic vacuum leak symptoms—such as rough idling, P0171/P0174 lean codes, or reduced brake assist—after initial inspection and testing, it’s time to escalate your diagnostic approach. According to a 2026 technical bulletin from the Automotive Service Association (ASA), persistent vacuum issues often stem from overlooked or intermittent failures.
Reconfirm Symptoms and System Status
- Verify Symptom Persistence: Drive the vehicle under varying conditions. Some leaks manifest only under specific engine loads or temperatures. For example, a cracked hose might expand and seal when hot, only to leak when cold.
- Check for New Diagnostic Trouble Codes (DTCs): Connect a 2027-compliant OBD-II scanner. New or pending codes (e.g., P0440 series for Evaporative Emission Control System leaks) could point to a different vacuum circuit. Modern scanners offer live data streaming; monitor Short Term Fuel Trim (STFT) and Long Term Fuel Trim (LTFT) values. Consistently high positive fuel trims (+15% or higher at idle) are a definitive indicator of unmetered air.
- Review Recent Maintenance: Any recent work, particularly involving intake manifolds, fuel injectors, or sensor replacements, can inadvertently create new leak points if gaskets were reused or fasteners improperly torqued.
Employ Advanced Diagnostic Tools
- Professional Smoke Test: If basic smoke generators failed, a shop-grade smoke machine with higher pressure and flow capabilities can reveal minute leaks. These machines often introduce UV dye with the smoke, making invisible leaks glow under UV light. This method detects leaks as small as 0.020 inches, as specified by EPA EVAP system testing protocols.
- Vacuum Gauge Testing: A dedicated vacuum gauge connected to a manifold vacuum port provides real-time data. A steady reading between 17-21 inches Hg at idle is normal for most engines. A needle that fluctuates erratically, drops significantly during acceleration, or is consistently low (e.g., below 15 inches Hg) indicates a severe leak or mechanical issue. Consult your vehicle’s specific service manual for target vacuum specifications.
Inspect Secondary Vacuum Systems
Often, focus is primarily on the engine intake. However, several other components rely on vacuum and can be sources of leaks, influencing engine performance. These include the brake booster and its check valve, the Positive Crankcase Ventilation (PCV) system, and various vacuum-operated actuators for HVAC controls, EGR valves, or secondary air injection. Each of these components, if compromised, can introduce unmetered air. Expert technicians, as highlighted in a 2026 industry survey by Automotive Repair Today, frequently find elusive leaks within these auxiliary systems, emphasizing the need for comprehensive system checks.
What If It Still Doesn’t Work?
If you’ve exhausted all DIY detection methods and your vehicle continues to exhibit vacuum leak symptoms, it’s prudent to seek professional assistance. Modern vehicle systems are intricately integrated, and what appears to be a simple vacuum leak might be masking a more complex underlying issue or a combination of minor leaks that are difficult to pinpoint without specialized equipment and expertise. Automotive diagnostic labs confirm that nearly 30% of persistent vacuum-related complaints in 2027 stem from non-obvious sources.
- Advanced Professional Diagnostics: A certified technician will utilize dealership-level scan tools that offer bi-directional control and enhanced data monitoring capabilities, often superior to consumer-grade OBD-II devices. They can perform targeted tests on specific vacuum actuators and solenoid valves.
- Specialized Smoke Testing: Professional shops have industrial-grade smoke machines capable of detecting leaks under pressure as well as vacuum, which is critical for EVAP systems. They can also pinpoint leaks in brake booster diaphragms or internal manifold cracks that are otherwise invisible.
- Comprehensive Component Check: Expect a thorough inspection of less obvious components such as the PCV valve and hoses, brake booster check valve, vacuum reservoirs, and all associated plumbing. Internal leaks within components like the intake manifold gasket, which may only leak under specific conditions, require specific diagnostic procedures.
- When to Seek Professional Help: If you cannot identify the leak after 2-3 hours of dedicated DIY effort, or if symptoms persist, schedule an appointment immediately. Prolonged driving with a vacuum leak can lead to catalytic converter damage due to rich fuel conditions or engine misfires.
- Estimated Cost Range: A professional diagnostic service for a vacuum leak typically costs between $120 and $250 as of early 2027. If a leak is found and repaired, the total cost, including parts and labor, can range from $200 for a simple hose replacement to $800+ for complex issues like an intake manifold gasket or a new brake booster.
Conclusion
Detecting a vacuum leak is a critical diagnostic skill, ensuring optimal engine performance and fuel efficiency. By systematically inspecting hoses, connections, and employing a range of detection methods from visual checks to advanced smoke tests, you can accurately identify the source of unmetered air. According to verified research and expert sources from the Automotive Aftermarket Suppliers Association, proactive leak detection prevents costly secondary failures and maintains vehicle reliability. Take the actionable next step: dedicate a focused hour to inspect your vehicle’s vacuum system using these methods today.
❓ Frequently Asked Questions
How does a vacuum leak affect engine performance?
A vacuum leak introduces unmetered air into the engine, disrupting the air-fuel mixture. This causes the engine to run lean, leading to symptoms like a rough or high idle, stalling, misfires, reduced power, and poor fuel economy.
What is a smoke test, and when should I use it?
A smoke test involves injecting non-toxic smoke into the vacuum system. The smoke escapes from the leak, making it visible. It’s an advanced and highly effective method, ideal for stubborn or hard-to-reach leaks that aren’t found with simpler methods.
Are propane and carb cleaner tests safe to perform?
These tests can be safe if proper precautions are taken. Use propane without a flame, ensure good ventilation, and have a fire extinguisher nearby. Carburetor cleaner is flammable and can damage plastic/rubber, so spray sparingly and carefully. Always wear eye protection.
Can a vacuum leak cause specific engine codes?
Yes, vacuum leaks commonly trigger ‘Check Engine’ light codes related to lean conditions, such as P0171 (System Too Lean Bank 1) and P0174 (System Too Lean Bank 2). These codes indicate the engine’s computer is adding extra fuel to compensate for too much air.
What are the most common places to find vacuum leaks?
Vacuum leaks frequently occur in worn or cracked vacuum hoses, the intake manifold gasket, PCV valve and its hoses, brake booster and its vacuum line, throttle body gasket, and any other rubber or plastic components in the vacuum system.
How can I visually inspect for a vacuum leak?
Begin by visually examining all accessible vacuum lines, hoses, and connections for cracks, tears, disconnections, or hardening. Pay close attention to areas around the intake manifold, PCV valve, and brake booster. Look for any obvious signs of damage or deterioration.