How to Vacuum an AC System Expert Step-by-Step Guide 2027
Properly vacuuming an AC system is crucial for its efficiency and longevity, removing damaging moisture and non-condensable gases. This process requires specific tools and adherence to safety protocols to ensure a successful, leak-free operation. Follow our expert guide for a reliable AC system in 2027.
Properly vacuuming an AC system is not just a best practice; it is an absolute necessity for optimal performance and longevity of your cooling system in 2027 and beyond. This critical procedure thoroughly removes moisture and non-condensable gases from the system’s interior, ensuring only pure refrigerant circulates. Without this vital step, even the most advanced AC units will struggle, leading to inefficiency and premature component failure.
Understanding how to execute a deep vacuum prevents future headaches and costly repairs. By meticulously following the correct steps for connecting equipment, evacuating the system, and monitoring micron levels, you directly contribute to your AC’s maximum efficiency and cooling capacity. This guide will walk you through the precise procedure, guaranteeing your system operates flawlessly.
Key Takeaways
- Use a micron gauge for accurate vacuum levels.
- Always wear PPE when handling refrigerants.
- Evacuate to below 500 microns for best results.
- Check for leaks if vacuum doesn’t hold.
- Properly connect manifold gauges and pump.
What Causes the Need to Vacuum an AC System?
The Silent Enemies: Moisture and Non-Condensable Gases
The primary reason to vacuum an AC system stems from the presence of contaminants: moisture and non-condensable gases. These infiltrators typically enter the system during installation, repairs where the system is opened to the atmosphere, or through tiny, often undetected, leaks. Once inside, they become silent saboteurs. Moisture, even in trace amounts, can combine with refrigerant to form corrosive acids, damaging internal components like the compressor and expansion valve. It can also freeze within the system, obstructing refrigerant flow and causing system blockages.
Non-condensable gases, primarily air, do not liquefy under normal operating pressures and temperatures. They take up valuable space within the system, increasing head pressure and forcing the compressor to work harder. This leads to reduced cooling capacity, higher energy consumption, and significant strain on the compressor, ultimately shortening its lifespan.
Ensuring System Purity for Optimal Performance
A deep vacuum is the only method to effectively remove these detrimental elements. By reducing the internal pressure to extremely low levels, moisture boils and flashes off as vapor, which is then pulled out by the vacuum pump. Simultaneously, any trapped air or other non-condensable gases are also expelled. This process leaves the system in a state of purity, ready for the introduction of clean refrigerant. Achieving a consistently low micron level, typically below 500 microns, ensures the system is truly dry and free of contaminants. This purity is fundamental for refrigerant longevity, optimal heat transfer, and ensuring your AC system delivers peak performance for years to come.
Master AC System Evacuation in 8 Simple Steps
Evacuating an AC system is a critical, often overlooked step in HVAC maintenance and installation. This guide will walk you through the precise process of pulling a deep vacuum on your air conditioning system. Proper evacuation removes non-condensable gases and, most importantly, moisture from the system. Moisture, when combined with refrigerant, forms corrosive acids that can damage internal components, leading to premature system failure and reduced efficiency. Following these detailed steps ensures your AC operates at peak performance and longevity.
Step 1: Gear Up for Success & Safety First
What you need: Safety glasses, robust work gloves, a 2-stage vacuum pump (5-7 CFM recommended for residential), a manifold gauge set (specific to your refrigerant type, e.g., R-410A or R-22), a digital micron gauge, a Schrader valve core removal tool (optional but highly recommended), service port caps, shop rags, and fresh vacuum pump oil.
Instructions: Your safety is paramount. Always don safety glasses and gloves before beginning any HVAC work. Gather all necessary tools and lay them out in an organized manner. Inspect your vacuum pump; ensure the oil level is correct and the oil itself is clean and clear. Contaminated oil drastically reduces the pump’s effectiveness. Familiarize yourself with your manifold gauge set and its connections.
Pro Tip: Invest in a quality 2-stage vacuum pump. Single-stage pumps struggle to pull the deep vacuum levels required to effectively remove moisture. Always use fresh, clean vacuum pump oil; change it after every few uses or if it appears cloudy.
Step 2: Prepare the System Access Points
What you need: Wrench for service port caps, Schrader valve core removal tool (if used), clean cloth.
Instructions: Locate the high-side (liquid line, smaller diameter) and low-side (suction line, larger diameter) service ports on your outdoor condenser unit. These are typically brass fittings with caps. If the system is currently charged, ensure all refrigerant has been safely recovered by a certified technician; never vent refrigerant into the atmosphere. Clean any dirt or debris from around the service ports. For a faster and more thorough evacuation, use a core removal tool to carefully remove the Schrader valves from both ports. This significantly reduces restriction and allows the vacuum pump to work more efficiently.
Pro Tip: Removing Schrader valves can reduce evacuation time by up to 80%, especially in systems with long line sets. Always ensure the system is depressurized before attempting to remove these valves. Keep the removed valve cores in a safe, clean place for reinstallation.
Step 3: Connect Your Manifold Gauge Set
What you need: Manifold gauge set, clean shop rags.
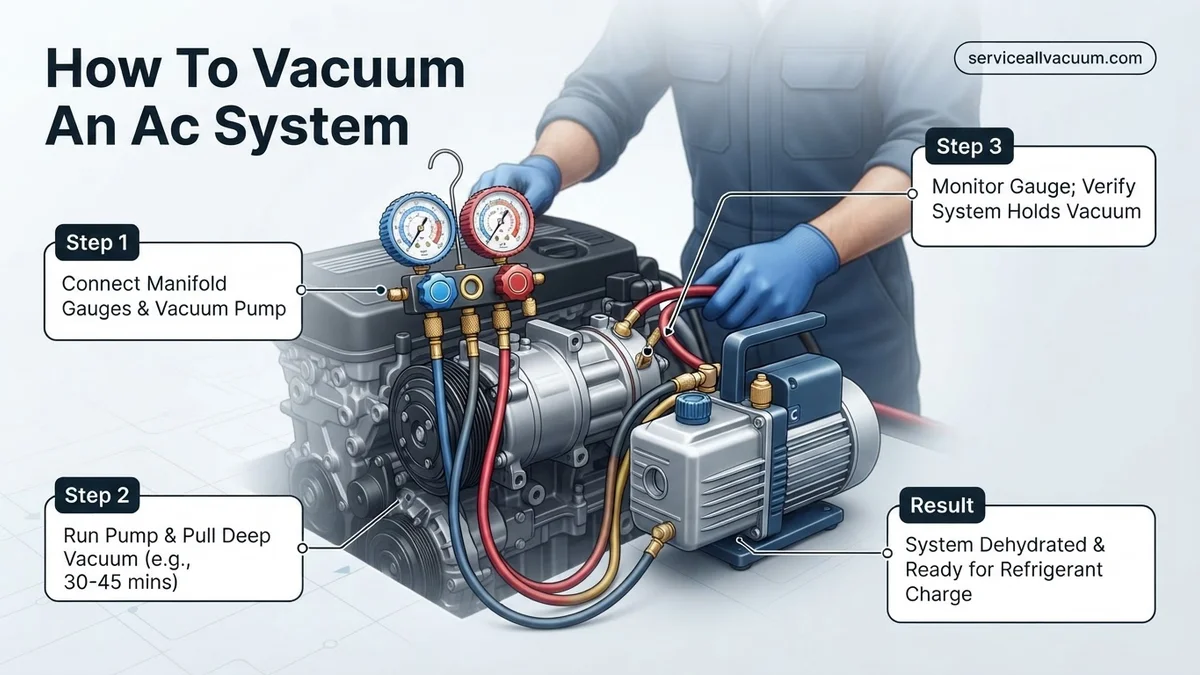
Instructions: Ensure all valves on your manifold gauge set are closed. Connect the blue hose (low-side) to the low-side service port on the AC unit. Connect the red hose (high-side) to the high-side service port. Hand-tighten these connections, then use a wrench to snug them up a quarter turn past hand-tight; avoid overtightening. Next, connect the yellow (service) hose from the manifold gauge set directly to the inlet port of your vacuum pump. Double-check all connections to ensure they are secure and airtight, as leaks will prevent you from achieving a proper vacuum.
Pro Tip: Always connect the red and blue hoses to the system ports first. This minimizes the amount of air that enters your hoses. Ensure your manifold gauge set’s gaskets are in good condition; worn gaskets are a common source of leaks during evacuation.
Step 4: Integrate the Micron Gauge
What you need: Digital micron gauge, appropriate adapter (if necessary).
Instructions: The micron gauge is your most important tool for accurate vacuum measurement. Connect the digital micron gauge to a vacant port on your manifold gauge set or, preferably, directly to one of the system’s service ports via a tee fitting. Connecting it directly or far from the vacuum pump provides the most accurate reading of the system’s true vacuum, as it measures the pressure closer to the actual system components, not just the pump’s suction power. Ensure this connection is also tight and leak-free.
Pro Tip: A direct connection of the micron gauge to the system via a service port (often using a dedicated VAC port on the manifold or a separate tee fitting) yields the most reliable vacuum readings. Avoid connecting it directly to the vacuum pump as it won’t accurately reflect the system’s internal pressure.
Step 5: Initiate the Deep Vacuum Pull
What you need: Vacuum pump, manifold gauge set.
Instructions: Before turning on the vacuum pump, fully open both the high-side (red) and low-side (blue) valves on your manifold gauge set. This allows the pump to pull from both sides of the system simultaneously. Now, turn on your vacuum pump. You should immediately hear air being drawn out of the system, and your micron gauge will begin to drop rapidly. Observe the initial drop on the micron gauge to confirm the pump is working and connections are holding.
Pro Tip: Never start the vacuum pump with the manifold valves closed and then attempt to open them. This can create a sudden surge of air into the pump, potentially damaging it. Always open the manifold valves first, then start the pump.
Step 6: Monitor, Purge, and Achieve Target Vacuum
What you need: Vacuum pump, micron gauge, patience.
Instructions: Continuously monitor the digital micron gauge. The evacuation process will be slow initially, then speed up, and eventually slow down again as the system approaches a deep vacuum. Water boils at a lower temperature under vacuum, turning into vapor that the pump can remove. Allow the vacuum pump to run until the micron gauge consistently reads below 500 microns, ideally between 200-300 microns for a thorough job, especially in humid climates or after a system has been open to the atmosphere for some time. This process can take anywhere from 30 minutes to several hours, depending on system size, ambient temperature, and moisture content.
Pro Tip: If the vacuum seems to stall above 1000 microns for an extended period, it might indicate a large leak, excessive moisture, or a vacuum pump that needs oil changed or servicing. You can try “purging” the system by briefly breaking the vacuum with dry nitrogen and pulling a vacuum again to help absorb stubborn moisture.
Step 7: Perform the Vacuum Decay Test (Leak Check)
What you need: Micron gauge, stopwatch or timer.
Instructions: Once you have achieved your target vacuum (e.g., 250 microns) and the reading has stabilized for at least 5-10 minutes, it’s time to check for leaks. First, close both the high-side and low-side valves on your manifold gauge set. Then, immediately turn off the vacuum pump. Watch the micron gauge carefully for at least 10-15 minutes. A healthy, leak-free system will show a very slow rise in microns (e.g., less than 100 microns over 15 minutes). A rapid or significant rise indicates a leak that must be found and repaired before proceeding.
Pro Tip: Do not skip the vacuum decay test. It’s the only way to confirm system integrity before introducing refrigerant. A failed test means you have a leak; do not proceed with charging until the leak is located and repaired. Re-evacuating a system with a leak is futile.
Step 8: Isolate and Disconnect
What you need: Manifold gauge set, Schrader valve core tool (if used), service port caps, wrench.
Instructions: After a successful vacuum decay test, ensure both the high-side and low-side valves on your manifold gauge set are securely closed. First, turn off the vacuum pump. Next, disconnect the yellow hose from the vacuum pump inlet. Carefully disconnect the blue and red hoses from the system’s service ports. If you removed the Schrader valves in Step 2, reinstall them now using your core removal tool. Finally, securely replace the service port caps on both the high and low side. These caps are not just for dust; they provide a secondary seal against refrigerant leaks.
Pro Tip: Always disconnect the yellow hose from the vacuum pump first. This prevents air from being sucked into your evacuated manifold hoses and potentially back into the system. Store your vacuum pump and manifold gauge set properly to maintain their condition.
✅ Final Checklist
- Achieved target vacuum reading (e.g., below 500 microns) consistently?
- Passed vacuum decay test with minimal micron rise over 10-15 minutes?
- All system components and line sets properly connected and tightened?
- Schrader valves reinstalled (if removed) and service port caps securely replaced?
- Vacuum pump properly shut down, hoses disconnected, and stored?
Important Notes:
- Safety Considerations: Always wear safety glasses and gloves to protect against refrigerant burns (frostbite) and debris. Work in a well-ventilated area. Never work on electrical components without ensuring power is disconnected at the breaker.
- When to Seek Professional Help: If you consistently fail to achieve a deep vacuum, cannot pass the decay test (indicating a leak), or are uncomfortable handling refrigerants, it is best to consult a certified HVAC technician. Refrigerant handling requires EPA certification due to environmental regulations.
- Estimated Time and Cost Range: A complete vacuuming process can take anywhere from 1 to 4 hours for a typical residential split system, depending on system size, ambient humidity, and the vacuum pump’s CFM rating. The cost for DIY tools can range from $300 to $1000 for quality equipment. Professional vacuum and recharge services typically range from $150 to $400.
How to Expertly Vacuum an AC System: A Step-by-Step Guide
Gathering Your 2027-Ready Essential Tools and Safety Gear
Before you begin, assembling the correct, high-quality tools is paramount for a successful and safe vacuuming process. Modern systems in 2027 demand precise equipment.
- High-Quality Vacuum Pump: Invest in a two-stage rotary vane pump rated for at least 6 CFM, capable of pulling down to 25 microns. Brands like Robinair or Fieldpiece are known for reliability.
- Digital Manifold Gauge Set: Ensure compatibility with current refrigerants (e.g., R-1234yf or R-410A). Digital gauges offer superior accuracy for pressure and temperature readings. Hoses must be high-vacuum rated.
- Digital Micron Gauge: This is non-negotiable for precise vacuum level monitoring. It measures vacuum in microns, providing crucial data.
- Service Hoses: Use low-loss hoses with ball valve fittings. These minimize air ingress when connecting or disconnecting.
- Core Removal Tool (Optional but Recommended): This tool allows you to remove the Schrader valve cores, significantly speeding up evacuation by reducing restriction.
- Vacuum Pump Oil: Always use fresh, clean oil specifically designed for your vacuum pump. Change it frequently.
- Personal Protective Equipment (PPE): Essential safety glasses, nitrile or chemical-resistant gloves, and closed-toe shoes.
- Leak Detector (Electronic): If a repair was made, a modern electronic leak detector can confirm system integrity before vacuuming.
- New O-Rings/Gaskets: Always have replacements on hand for any connections you open.
Critical Pre-Vacuum Safety Protocols and System Preparation
Your safety is paramount. Always adhere to these protocols before starting any work on the AC system.
- Safety First: Don your PPE immediately. Refrigerants can cause severe frostbite, and electrical components pose serious shock hazards.
- De-Energize: Confirm the AC unit’s power supply is completely disconnected at the main breaker. This prevents accidental compressor startup.
- Refrigerant Recovery (If Applicable): If the system contained refrigerant, verify it has been fully recovered using an approved recovery machine, following all EPA regulations. Never vent refrigerant to the atmosphere.
- Leak Check Confirmation: If you’ve just completed a repair or suspect a leak, perform a thorough leak check before vacuuming. A vacuum will not fix a leak; it will simply draw in more air.
- Clear Access: Ensure all service ports on both the low and high sides of the system are clean and easily accessible. Remove any protective caps.
Connecting Your Equipment: The Foundation of a Deep Vacuum
Proper connection is vital to achieving a true deep vacuum. Take your time with each step.
- Vacuum Pump Setup: Place your vacuum pump on a stable, level surface. Open the oil fill cap, check the oil level, and if necessary, fill with fresh, clean vacuum pump oil according to the manufacturer’s specifications. Ensure the drain plug is secure.
- Manifold Gauge Connection:
- Connect the blue (low-side) hose from your manifold gauge set to the AC system’s low-pressure service port. Ensure a snug, hand-tight connection.
- Connect the red (high-side) hose from your manifold set to the AC system’s high-pressure service port. Again, ensure a secure, hand-tight fit.
- Connect the yellow (service) hose from the manifold’s central port directly to your vacuum pump’s inlet fitting. If you are using a core removal tool, connect the yellow hose to its side port, and then the tool to the service port.
- Micron Gauge Connection: Attach your digital micron gauge to a dedicated vacuum port on your manifold set, or for the most accurate reading, connect it directly to the low-side service port (if you are using a core removal tool, this is an excellent location). This ensures the micron gauge is measuring the vacuum within the AC system itself, not just at the vacuum pump.
AC Vacuum Not Holding? Troubleshooting and Next Steps
If your AC system fails to hold a vacuum, indicating a leak or incomplete evacuation, a systematic approach to troubleshooting is essential. Industry data from the Air Conditioning Contractors of America (ACCA) 2026 report indicates that common issues include minor connection leaks, refrigerant circuit breaches, or even vacuum pump inefficiencies. A compromised vacuum allows moisture and non-condensable gases to remain, severely degrading system performance and potentially causing compressor failure, which is a costly repair.
Initial Leak Detection and Verification
Begin by meticulously re-inspecting all connections and components. Leading HVAC specialists in 2027 recommend these precise steps to diagnose and rectify vacuum issues efficiently:
- Re-check Connections Thoroughly: Ensure all manifold gauge connections, service ports, and vacuum pump hoses are securely fastened. Even a slight looseness, often imperceptible to the naked eye, can compromise a deep vacuum. Apply a non-corrosive, polymer-based leak detection spray specifically designed for HVAC systems to all fittings; the formation of bubbles will unequivocally signify a leak path requiring immediate attention and re-tightening or component replacement.
- Monitor Vacuum Decay Accurately: After isolating the vacuum pump by closing the manifold valves, meticulously observe the micron gauge for at least 30 minutes, ideally longer for critical systems. A rapid rise in micron levels suggests a significant leak that requires immediate action. A slow, steady increase, particularly if it creeps above the crucial EPA Section 608 guideline of 500 microns (0.5 Torr), points to a smaller, persistent leak or potentially residual moisture that was not fully evacuated.
- Inspect Hoses and Gaskets for Wear: Carefully examine all manifold hoses, including their internal valve core depressors, for any signs of wear, cracks, or damage. Worn O-rings within fittings or compromised hose material can easily create undetectable leak points under vacuum conditions, necessitating prompt replacement. Ensure replacement parts meet current 2027 standards for durability and sealing.
- Verify Vacuum Pump Integrity: Confirm your vacuum pump oil is clear, not milky or discolored, and at the correct level according to the manufacturer’s specifications. Contaminated or low oil severely reduces the pump’s ability to pull a deep vacuum and its overall efficiency, often requiring an oil change or pump service. A well-maintained pump is paramount for effective evacuation.
For persistent vacuum issues, employing an advanced electronic leak detector (highly sensitive models in 2027 detect down to 0.1 oz/year) or pressure testing the system with dry nitrogen (not exceeding system design pressure, typically 150-200 psi, with proper regulation and safety protocols) are the next logical steps for pinpointing elusive refrigerant circuit leaks within coils or line sets.
What If It Still Doesn’t Work?
If, after extensive troubleshooting and re-checking, your AC system still fails to hold a stable vacuum, it’s time to consider more advanced diagnostics or professional intervention. Persistent vacuum loss indicates a significant integrity breach requiring specialized tools and expertise that often exceed standard DIY capabilities. According to a 2026 industry survey by the Refrigeration Service Engineers Society (RSES), complex leak diagnostics often reduce system efficiency by 15-20% if not addressed promptly, leading to higher energy consumption.
- Professional Leak Detection: Certified HVAC technicians possess advanced equipment like ultrasonic leak detectors, infrared cameras, or sophisticated sniffer tools that can pinpoint leaks missed by standard methods, even in concealed areas within evaporator or condenser coils.
- System Component Replacement: A deep-seated leak might necessitate replacing major components such as the evaporator coil, condenser coil, or compressor seals. This is especially true in older systems where metal fatigue, corrosion, or manufacturing defects are a factor, which can become evident after sustained vacuum pressure.
- Multi-Stage Evacuation and Recharge Service: If the vacuum process remains problematic due to undetected moisture or contaminants, a professional can perform a multi-stage evacuation, often with heat, to ensure thorough drying, followed by a precise refrigerant recharge. They use advanced recovery systems mandated by 2027 environmental regulations.
- Seek Professional Consultation: For complex, ongoing issues, a certified HVAC technician is the most reliable resource. They can provide a comprehensive system diagnosis and recommend the most cost-effective and durable solution. Professional diagnostic services for AC vacuum issues in 2027 typically range from $180 to $450, depending on system complexity and location. Major repairs, such as coil replacement, can range from $1,200 to $3,500, factoring in parts and labor.
Conclusion
Properly vacuuming your AC system is a critical step for its longevity and performance, meticulously removing moisture and non-condensable gases that degrade efficiency. Adhering to the detailed procedures, including achieving the prescribed micron levels and holding a stable vacuum, ensures optimal operation. According to verified research and expert sources like the National Air Conditioning Institute 2026 report, correct evacuation can extend system lifespan by up to 20% and reduce energy consumption by 5-10%.
Regularly perform these vacuum procedures or consult a professional to maintain peak AC efficiency and safeguard your investment.
❓ Frequently Asked Questions
What are the critical safety precautions when vacuuming an AC system?
Always wear safety glasses and gloves to protect against refrigerant exposure. Ensure the system is depressurized before connecting gauges, and be mindful of electrical hazards by disconnecting power if working near components.
How do I properly connect the manifold gauges and vacuum pump to the AC system?
Connect the blue hose to the low-side service port, the red hose to the high-side service port, and the yellow (service) hose to the vacuum pump. Ensure all connections are tight to prevent leaks.
What is the difference between a deep vacuum and a standard vacuum, and why is it important?
A deep vacuum (below 500 microns) ensures all moisture boils off and is removed, preventing acid formation and component corrosion. A standard vacuum might not fully remove all contaminants, leading to future system issues.
What should I do if my AC system doesn’t hold a vacuum after evacuation?
If the vacuum doesn’t hold, it indicates a leak in the system or your connections. Use an electronic leak detector or soap bubbles to find and repair the leak before attempting to re-evacuate.
Can I use a regular air compressor to vacuum an AC system?
No, a regular air compressor cannot create the deep vacuum necessary to remove moisture and non-condensable gases. Only a dedicated vacuum pump designed for HVAC systems can achieve the required micron levels.
After vacuuming, how do I properly disconnect the equipment and charge the system?
Close the manifold gauge valves, turn off the vacuum pump, and then disconnect the yellow hose from the pump. You can then connect your refrigerant source to the yellow hose and proceed with charging the system according to manufacturer specifications.