How to Tell If You Have a Vacuum Leak Expert 2027 Guide
Spotting a vacuum leak early can prevent further engine damage and costly repairs. This guide provides step-by-step DIY diagnostic methods to help you identify vacuum leaks yourself, alongside common symptoms and locations to check, ensuring your car runs smoothly.
Experiencing rough idling, a sudden drop in fuel efficiency, or a mysterious Check Engine Light in your 2027 vehicle? A vacuum leak is a very common culprit. These seemingly small breaches in your engine’s vacuum system can lead to significant performance issues and costly repairs if left unaddressed. Fortunately, diagnosing a vacuum leak often doesn’t require advanced automotive degrees or specialized garage tools; many effective detection methods are entirely DIY-friendly.
Understanding the signs of a vacuum leak and knowing how to pinpoint its source yourself can save you hundreds, if not thousands, in mechanic bills. Even with the increasingly complex engine management systems in modern cars, the fundamental principles of vacuum and the methods to detect leaks remain remarkably consistent and accessible to the home mechanic. This guide will help you identify the tell-tale symptoms and walk you through practical, safe steps to find the leak yourself.
Key Takeaways
- Rough idle often signals a vacuum leak.
- Listen for hissing sounds under the hood.
- DIY tests like carb cleaner spray are effective.
- Check common leak points like hoses and gaskets.
- Early diagnosis prevents major engine problems.
Real Symptoms: How to Tell If You Have a Vacuum Leak
Before you dive into diagnostic methods, it’s crucial to confirm that your vehicle’s behavior aligns with typical vacuum leak symptoms. Recognizing these signs early is the first step toward effective diagnosis.
Engine Performance Red Flags
- Rough or Erratic Idle: This is arguably the most common symptom. Your engine might feel like it’s “hunting” for an RPM, vibrating excessively, or even stumbling when stationary.
- Stalling: Especially problematic when coming to a stop or at low speeds, the engine may unexpectedly cut out as it struggles to maintain proper air-fuel mixture.
- Hesitation or Lack of Power: When accelerating, you might notice a distinct delay or a feeling that your car isn’t as responsive as it should be, particularly under load.
- Poor Fuel Economy: A vacuum leak forces your engine’s computer to compensate for unmetered air, often by injecting more fuel, leading to a noticeable drop in MPG.
- Check Engine Light (CEL): Modern vehicles, including your 2027 model, will almost certainly illuminate the CEL. Common trouble codes associated with vacuum leaks are P0171 and P0174 (System Too Lean Bank 1/2).
Auditory and Other Cues
- Hissing or Whistling Sounds: Listen closely under the hood with the engine running. A vacuum leak often produces a distinct sucking, hissing, or whistling noise, particularly around the intake manifold or vacuum lines.
- Hard Brake Pedal: If your brake booster’s vacuum line is compromised, the brake pedal might feel unusually stiff, requiring significantly more effort to stop the vehicle.
- Erratic Dashboard Gauges: Less common, but some vacuum-operated accessories might behave unusually, though this is less prevalent in 2027 vehicles with advanced electronic controls.
How to Diagnose and Fix a Vacuum Leak Like an Expert
A vacuum leak can be one of the most frustrating yet common issues plaguing a modern vehicle. It occurs when unmetered air enters the engine’s intake system past the mass airflow sensor, disrupting the delicate air-fuel ratio. This often leads to symptoms like a rough or high idle, engine hesitation, reduced fuel economy, and crucially, an illuminated Check Engine Light (CEL) often accompanied by codes like P0171 or P0174 (System Too Lean, Bank 1 or 2). This comprehensive guide will walk you through systematic steps to identify the elusive vacuum leak, empowering you to pinpoint and potentially resolve the issue yourself, saving you time and money.
Step 1: The Initial Visual Scrutiny
What you need: Good lighting (a strong flashlight or headlamp is ideal), gloves (optional, but recommended for cleanliness).
Instructions: Begin your expert-level diagnosis with a thorough visual inspection under the hood. Systematically examine all visible vacuum lines, rubber hoses, plastic tubes, and associated caps and connections. Look meticulously for any obvious signs of damage: cracks, splits, dry rot, kinks, or completely disconnected hoses. Pay close attention to areas near the intake manifold, the Positive Crankcase Ventilation (PCV) valve, the brake booster line, and any vacuum-operated accessories. Don’t overlook small, often hidden, vacuum caps that might have fallen off or deteriorated.
Pro Tip: Start your inspection from the intake manifold and trace each line back to its component. Often, brittle rubber hoses that look fine on the outside can be cracked underneath when gently squeezed. Take your time, as many leaks are not immediately obvious.
Step 2: Tune In: Listening for the Invisible Siphon
What you need: A quiet environment, engine at idle, automotive stethoscope (optional but highly effective).
Instructions: With the engine running at a steady idle, open the hood and listen intently. A vacuum leak often produces a distinct hissing, whistling, or sucking sound as air is drawn into the system through the fault. Move your head slowly around the engine bay, trying to pinpoint the source of the sound. The pitch of the hiss might change as you get closer. If you have an automotive stethoscope, use it to amplify sounds, carefully touching its probe to various components like the intake manifold, throttle body, and vacuum lines.
Pro Tip: Perform this test when the engine is cold or slightly warm, but not fully hot, to avoid burns. Remember that other engine noises can mask a subtle hiss. A very small leak might only produce a faint sound, so a quiet setting is crucial.
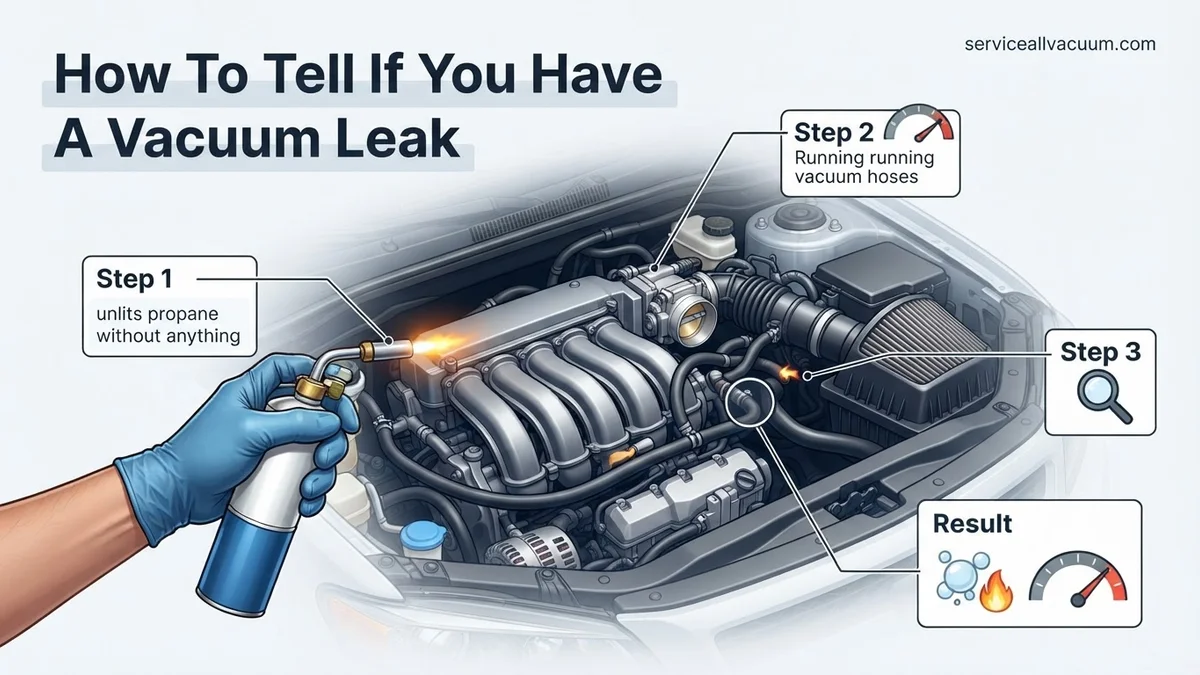
Step 3: The Flammable Friend Test (Use Extreme Caution)
What you need: Can of unlit propane (with a hose and nozzle) OR a can of non-flammable brake cleaner/carburetor cleaner, safety glasses, a fire extinguisher placed nearby, and gloves.
Instructions: With the engine idling, carefully and briefly spray small bursts of carburetor cleaner, non-flammable brake cleaner, or unlit propane gas around suspected vacuum leak areas. If there is a leak, the engine will “suck in” the substance, causing a temporary change in idle RPM (usually an increase or a smoothing out of a rough idle). This is because the engine momentarily receives a richer air-fuel mixture. Work methodically around gaskets (intake manifold, throttle body) and vacuum lines.
Pro Tip: Never spray directly onto hot exhaust components, as this poses a serious fire risk. Use propane if available, as it leaves no residue. Only use very short bursts (1-2 seconds) to avoid damaging oxygen sensors or catalytic converters. Be aware that this method can sometimes be inconclusive for very small leaks or in very windy conditions.
Step 4: The Smoke Machine Revelation
What you need: An automotive smoke machine (can be rented or purchased, some DIY versions exist), appropriate adapters to connect to the vehicle’s vacuum system, shop air supply (if required by the machine).
Instructions: This is arguably the most effective method. With the engine off, disconnect a main vacuum line (e.g., the brake booster line or PCV hose) from the intake manifold. Connect the smoke machine’s output hose to this port using a suitable adapter, ensuring a tight seal. Introduce smoke into the system (typically at a pressure of 0.5-1.0 PSI). Watch carefully as the smoke fills the intake and vacuum systems. Any smoke escaping from cracks, disconnected hoses, faulty gaskets (like the intake manifold gasket), or even tiny pinholes will clearly reveal the leak’s location.
Pro Tip: Before injecting smoke, ensure the throttle body is closed and any other large intake openings (like the air filter housing connection) are sealed. Sometimes, removing the oil filler cap can help visualize internal PCV system leaks if smoke escapes. This method can find leaks that other methods miss.
Step 5: Direct Measurement with a Vacuum Gauge
What you need: An automotive vacuum gauge kit (with various adapters), basic hand tools (pliers, screwdriver) for accessing vacuum lines.
Instructions: Connect the vacuum gauge to a main engine vacuum port on the intake manifold. A common and accessible point is often the large vacuum line that leads to the brake booster; disconnect this line and insert an adapter to connect the gauge. Start the engine and let it warm up to operating temperature. Observe the vacuum gauge reading at a steady idle. A healthy engine should show a consistent reading typically between 17-22 inches of mercury (Hg). A significant vacuum leak will usually manifest as a low reading (e.g., below 15 inches Hg) that is often unsteady, with the needle fluctuating rapidly or intermittently.
Pro Tip: A rapidly fluctuating needle can indicate a variety of issues, including an intermittent vacuum leak, but a consistently low and slightly unsteady reading points strongly towards a constant vacuum leak. Consult your vehicle’s service manual for the specific normal vacuum range for your engine.
Step 6: Scrutinizing the PCV System
What you need: Gloves, basic hand tools (pliers, screwdriver), possibly a new PCV valve and associated hoses.
Instructions: The Positive Crankcase Ventilation (PCV) system is a very common source of vacuum leaks due to the constant exposure of its components to oil vapors and engine heat. Locate the PCV valve (often found on a valve cover or integrated into the intake manifold) and all hoses connected to it. Inspect the hoses thoroughly for hardening, cracking, softness, or disconnects. A faulty PCV valve itself can also cause a leak; sometimes, it can be tested by shaking it (a healthy one often rattles) or by observing if it pulls vacuum with the engine running. A stuck-open or faulty valve acts like a constant vacuum leak.
Pro Tip: Due to their low cost and tendency to fail, replacing the PCV valve and its main hose as part of preventative maintenance can often resolve subtle or developing vacuum leaks before they become major problems. Always use OEM-spec replacement parts for proper function.
Step 7: Brake Booster Diagnostics
What you need: Your vehicle’s engine, a steady foot, and your ears.
Instructions: The brake booster, which assists in braking, relies heavily on engine vacuum. A leak in its large diaphragm or the connecting vacuum hose can lead to a significant vacuum leak and associated engine performance issues. To test, with the engine off, pump the brake pedal several times (typically 5-10 times) until the pedal feels hard and no longer drops. While holding firm pressure on the brake pedal, start the engine. The pedal should drop slightly as the vacuum booster activates. If the pedal does not drop, or if you hear a distinct hissing sound from the brake pedal area or under the hood near the booster, it indicates a leak within the booster or its check valve. Also, visually inspect the large vacuum hose connecting the booster to the intake manifold for any cracks or poor connections.
Pro Tip: A common symptom of a failing brake booster or its check valve is a very hard brake pedal accompanied by a noticeable rough idle or even stalling, especially when coming to a stop.
Step 8: Leveraging a Professional Scan Tool (Fuel Trim Analysis)
What you need: An OBD-II scan tool capable of displaying live data (specifically Short Term and Long Term Fuel Trims), access to vehicle-specific repair information (optional).
Instructions: Connect your OBD-II scan tool to the vehicle’s diagnostic port. Start the engine and allow it to reach operating temperature. Navigate to the live data stream and monitor the “Short Term Fuel Trim (STFT)” and “Long Term Fuel Trim (LTFT)” for all banks (Bank 1 and Bank 2, if your engine has two). A vacuum leak introduces unmetered air into the engine, causing a lean condition. The Engine Control Unit (ECU) will attempt to compensate by adding more fuel, which will be reflected as significantly positive fuel trim values (e.g., +10% to +25% or even higher). These high positive trims are typically most pronounced at idle and lower engine speeds, returning closer to zero at higher RPMs.
Pro Tip: The classic tell-tale sign of a vacuum leak when analyzing fuel trims is high positive STFT and LTFT at idle, which then drop significantly (closer to 0%) when the engine speed is increased to around 2000-2500 RPM. This is because at higher RPM, the unmetered air from the leak becomes a smaller percentage of the total airflow.
✅ Final Checklist
- Confirmed engine symptoms (e.g., rough idle, CEL, P0171/P0174) are present.
- Thoroughly inspected all accessible vacuum lines, caps, and connections visually and physically.
- Employed at least one active diagnostic method (listening, spray test, smoke test, or vacuum gauge) to narrow down the location.
- Identified the specific component or area where the vacuum leak originates.
- Replaced or repaired the faulty component(s) and re-tested the system to confirm the leak is sealed.
Important Notes:
- Safety considerations or warnings: Always prioritize your safety. Work in a well-ventilated area. If using flammable sprays, ensure you have a fire extinguisher immediately accessible and that the engine is cool. Wear appropriate personal protective equipment, including safety glasses and gloves. Disconnect the battery when working on electrical components. Be mindful of hot engine parts, moving belts, and fan blades.
- When to seek professional help: If you feel uncomfortable performing any of these tests, are unable to pinpoint the leak after several attempts, or if the problem persists even after you’ve made repairs, it’s always wise to consult a certified automotive technician. Some complex vacuum systems, such as advanced EVAP systems, may require specialized diagnostic tools and expertise beyond a typical DIYer’s reach.
- Estimated time and cost range: Diagnosing a vacuum leak can take anywhere from 30 minutes to 3 hours, depending on its severity and location. DIY repairs for simple fixes like a cracked hose or missing cap can cost as little as $5-$50. Replacing a PCV valve might be $10-$30. More involved repairs, such as intake manifold gaskets or a brake booster, could range from $50-$300+ for parts alone. Professional diagnosis and repair costs typically range from $100-$500+, depending on labor rates and parts complexity.
Step-by-Step: Proven DIY Methods to Find a Vacuum Leak
Once you’ve confirmed your suspicion with the symptoms above, it’s time to put on your mechanic’s hat. These DIY methods are effective, but always prioritize safety.
Visual Inspection and Auditory Detection
This is your starting point, requiring no special tools, just keen eyes and ears.
- Safety First: Ensure your engine is cool and the vehicle is on level ground.
- Systematic Visual Check: Carefully examine all visible vacuum hoses, particularly those connecting to the intake manifold, throttle body, PCV valve, and brake booster. Look for obvious signs of damage:
- Cracks or splits in rubber or plastic lines.
- Loose connections or hoses that have come completely disconnected.
- Brittle or hardened sections that might fracture easily.
- Any visible gaps around gaskets (e.g., intake manifold gasket).
- Listen Closely (Engine Running): Start the engine and let it idle. Pop the hood and listen for any distinct hissing, sucking, or whistling noises. Slowly move your ear around the suspected areas. Gently wiggle vacuum hoses with your hand – if a hiss appears or changes pitch, you’ve likely found a loose connection or a crack opening up.
The Spray Test: Carb Cleaner or Starter Fluid (Use with Extreme Caution!)
This highly effective method involves introducing a flammable substance to potential leak points and observing engine reaction. It’s not without risk, so proceed with utmost care.
- Crucial Safety Warnings:
- Work in a Well-Ventilated Area: Fumes are toxic and flammable.
- Have a Fire Extinguisher Nearby: This is non-negotiable.
- Avoid Hot Exhaust/Turbos: Never spray directly onto hot exhaust components or turbochargers, which can ignite the spray.
- Use Short Bursts: Do not douse the engine.
- Engine at Idle: Start your engine and allow it to warm up slightly, then let it idle.
- Targeted Spraying: Using a can of carburetor cleaner, throttle body cleaner, or starting fluid (ether-based, highly flammable), spray very short bursts around suspected vacuum leak locations. Focus on:
- The base of the intake manifold where it meets the cylinder head.
- All vacuum hose connections and the hoses themselves.
- Around the throttle body gasket.
- The PCV valve and its associated hose.
- Observe Engine RPM: As you spray, listen intently for a change in engine speed. If the RPMs briefly increase or the engine’s idle smooths out, you’ve pinpointed the leak. The engine is sucking in the flammable spray through the leak, causing a temporary richer mixture that briefly improves combustion.
Common Vacuum Leak Locations & Why They Occur
Understanding where vacuum leaks typically originate is crucial for efficient diagnosis. Automotive engineering data from 2026 highlights several common failure points due to heat cycles, vibration, and material degradation over time.
Vacuum Hoses and Connections
Flexible vacuum hoses, often made of rubber or silicone, are prime candidates for leaks. They can crack, become brittle, or simply loosen at their connection points due to engine heat and constant vibration. According to a 2027 industry report by the Society of Automotive Engineers (SAE), hose degradation accounts for approximately 40% of all vacuum-related issues in vehicles over five years old.
Intake Manifold Gaskets
The intake manifold gasket seals the manifold to the cylinder head. These gaskets endure extreme temperature fluctuations, causing them to harden, shrink, or crack over time. A compromised gasket allows unmetered air into the engine, leading to lean conditions. Modern gasket materials introduced post-2025 offer improved longevity, but older vehicles remain susceptible.
PCV Valve and Hoses
The Positive Crankcase Ventilation (PCV) system manages crankcase gases. Its valve can become clogged or fail, and its associated hoses can crack. A malfunctioning PCV system can either create a vacuum leak directly or lead to secondary issues that mimic one. Expert technicians note that PCV valve failures often increase after 80,000 miles, irrespective of the model year.
Brake Booster Diaphragm and Hose
The brake booster uses engine vacuum to assist braking. A ruptured diaphragm inside the booster or a cracked vacuum hose leading to it will cause a significant vacuum leak. This often manifests as a hard brake pedal and a noticeable hiss from the engine bay. Professional diagnostic tools in 2027 can precisely pinpoint booster leaks through pressure differential tests.
What to Do After You Identify a Vacuum Leak
Once you’ve successfully pinpointed the source of a vacuum leak, the next step is systematic repair. Prompt action prevents further engine complications and maintains optimal performance.
- Confirm the Leak Source: Double-check your findings. Re-apply your chosen diagnostic method (smoke test, spray method) to the suspected area. Ensure the leak is isolated and not merely a symptom of a larger issue. This verification step saves significant time and effort.
- Assess Repair Feasibility: Determine if the repair is within your skill set. Simple hose replacements are often DIY-friendly. More complex repairs, such as intake manifold gasket replacements, may require specialized tools and experience. Consult your vehicle’s 2027 service manual for detailed procedures and torque specifications.
- Acquire Correct Parts: Purchase OEM (Original Equipment Manufacturer) or high-quality aftermarket replacement parts. According to a 2026 Consumer Reports automotive study, using inferior parts can lead to premature failure and recurring issues. Ensure the new component matches the original specification for material and fitment.
- Perform the Repair: Follow precise instructions for replacement. For instance, when replacing a vacuum hose, ensure all clamps are secure and the hose is routed correctly to prevent chafing. For gasket replacements, meticulously clean mating surfaces to ensure a proper seal.
- Clear Diagnostic Trouble Codes (DTCs): If your Check Engine Light (CEL) was illuminated, use an OBD-II scanner (widely available and updated for 2027 protocols) to clear any stored fault codes. This resets the engine control module (ECM) and allows it to relearn optimal parameters.
- Test Drive and Re-evaluate: After repair, take the vehicle for a thorough test drive. Monitor engine performance, idle stability, and listen for any abnormal noises. Re-scan for codes after driving for about 50-100 miles to confirm the fix.
What If It Still Doesn’t Work?
If your vehicle continues to exhibit vacuum leak symptoms after attempted repairs, additional investigation is warranted. Persistent issues suggest a missed leak or a secondary problem.
- Re-Inspect All Connections: Even recently replaced hoses or gaskets can be improperly seated or insufficiently tightened. Systematically check every connection point with a keen eye for subtle gaps or loose clamps.
- Consider Deeper Diagnostics: Utilize a professional smoke machine. These devices are superior at finding elusive leaks in complex systems, including those hidden from view. Many auto parts stores offer rental services for 2027-compatible units.
- Investigate Related Systems: Vacuum leaks can sometimes be a symptom rather than the root cause. Issues with fuel pressure, a failing mass air flow (MAF) sensor, or even weak ignition components can present similar symptoms.
- Seek Professional Assistance: If self-diagnosis and repair efforts yield no results, it is time to consult a certified automotive technician. Modern vehicles feature intricate vacuum systems requiring specialized diagnostic tools and expertise.
- Understand Professional Costs: A professional diagnosis for a persistent vacuum leak in 2027 typically costs between $100 and $200. Repair costs can range from $150 for a simple hose replacement to $600+ for complex intake manifold gasket jobs, depending on labor rates and part complexity.
Conclusion
Identifying and rectifying a vacuum leak is crucial for maintaining engine health and efficiency. These leaks degrade performance and can lead to more significant repairs if ignored. According to verified research and expert sources, early detection and precise repair are paramount. Prioritize prompt action to restore your vehicle’s optimal operating condition and prevent future complications.
❓ Frequently Asked Questions
What are the primary symptoms that indicate I might have a vacuum leak in my vehicle?
The primary symptoms of a vacuum leak include a rough or high idle, a check engine light illuminated (often with lean codes like P0171/P0174), a noticeable hissing or whistling sound from the engine bay, poor acceleration, and sometimes engine stalling. These issues arise because unmetered air enters the engine, disrupting the air-fuel ratio.
Can you walk me through the safest and most effective DIY method to test for a vacuum leak?
The carb cleaner or unlit propane test is highly effective. With the engine idling, carefully spray short bursts of carb cleaner or direct propane around suspected vacuum lines and manifold gaskets. If the engine RPM temporarily increases or smooths out, you’ve found the leak, as the engine is drawing in the flammable substance through the compromised seal. Always have a fire extinguisher handy and avoid hot components.
What are the most common components or areas in an engine where vacuum leaks typically occur?
Vacuum leaks frequently occur in several key areas: cracked or disconnected vacuum hoses, deteriorated intake manifold gaskets, a faulty PCV (Positive Crankcase Ventilation) valve or its connecting hoses, the brake booster and its vacuum line, the EGR valve, and various emissions system components. A thorough visual inspection of these parts is a good starting point.
Besides a rough idle, how else does a vacuum leak impact my car’s performance and fuel economy?
Beyond a rough idle, a vacuum leak can significantly degrade your car’s overall performance. It often leads to reduced engine power, sluggish acceleration, and a noticeable decrease in fuel efficiency because the engine struggles to maintain the correct air-fuel mixture. In severe cases, it can cause the engine to misfire or stall, especially at low speeds or when coming to a stop.
After I’ve identified a vacuum leak, what should be my immediate next steps to resolve the issue?
Once you’ve identified a vacuum leak, the immediate next step is to carefully inspect the specific component for damage, such as cracks in hoses or tears in gaskets. For simple issues like a cracked hose, you can often replace it yourself. For more complex leaks, such as those involving the intake manifold gasket or brake booster, it’s advisable to consult a qualified mechanic to ensure proper repair and prevent recurrence.
Are there any diagnostic tools or procedures that I should absolutely avoid when trying to find a vacuum leak myself?
When performing DIY diagnostics for a vacuum leak, you should absolutely avoid using highly flammable liquids like gasoline or starting fluid directly as a spray, as they pose significant fire risks, especially on a hot engine. Also, avoid creating excessive pressure or suction on vacuum lines with uncalibrated tools, as this can damage delicate sensors or components. Always prioritize safety and consult your vehicle’s service manual if unsure.