How to Vacuum Seal a Ziploc Bag Expert Step-by-Step 2027
Achieving an airtight seal on a Ziploc bag is simpler than you think, even without a vacuum sealer. The water displacement method is the most effective DIY technique for removing air and creating a near-vacuum seal. Alternatively, the straw method offers a quick solution for items that cannot be submerged, enhancing short-term freshness.
You can absolutely achieve an effective ‘vacuum seal’ on Ziploc bags right in your kitchen, without needing a dedicated vacuum sealing machine. This DIY approach utilizes simple physics to dramatically reduce air within the bag, significantly extending the freshness of your food. In 2027, mastering these techniques remains a highly practical skill for meal preppers, bulk buyers, and anyone looking to combat food waste and optimize storage.
The primary methods involve either water displacement or targeted air extraction using a straw. Both offer substantial benefits over simply zipping a bag, from preventing freezer burn on meats and vegetables to saving valuable space in your refrigerator or pantry. This guide will walk you through these expert methods, ensuring your stored food stays fresher, longer.
Key Takeaways
- Water displacement is the best DIY vacuum seal for Ziplocs.
- Use a straw for delicate items or if water is inconvenient.
- Remove as much air manually before using any method.
- Clean bag seals are crucial for effective air removal.
- Understand Ziploc’s limitations; it’s not a true vacuum seal.
Why DIY Vacuum Sealing Ziploc Bags Matters (And Its Limits)
Benefits for Your 2027 Kitchen
DIY vacuum sealing Ziploc bags offers a tangible upgrade for your food storage. This simple process dramatically reduces oxidation, a key culprit in food spoilage and freezer burn. By removing air, you’re directly slowing down bacterial growth and preserving food quality.
- Extended Freshness: Meats can last 2-3 times longer in the freezer; fresh vegetables maintain crispness for weeks in the fridge.
- Prevents Freezer Burn: Eliminates the air pockets that cause ice crystals, preserving texture and flavor of frozen items like berries or poultry.
- Optimized Storage Space: Flat, air-free bags stack efficiently, maximizing every inch of your freezer or pantry.
- Cost-Effective: Leverage existing Ziploc bags without investing in specialized equipment.
For example, properly sealed ground beef can last 6-9 months frozen, compared to 3-4 months in a standard zippered bag. That’s a significant return on a few minutes of effort.
Realistic Expectations: Not a Commercial Seal
It’s crucial to understand that a DIY vacuum seal with a Ziploc bag is not equivalent to a professional, machine-sealed vacuum. Ziploc plastic is not entirely impermeable, and over extended periods, some minuscule air exchange can occur. Therefore, these methods are best suited for:
- Short to Medium-Term Storage: Excellent for weeks to a few months of freezer or refrigerator storage.
- Everyday Meal Prep: Ideal for storing marinated chicken, prepared vegetables, or portioned leftovers.
- Preventing Freezer Burn: Highly effective at eliminating the immediate threat of ice crystallization.
This technique will not provide the hermetic seal required for extremely long-term storage (e.g., years) or for critical sous-vide applications where precise temperature control and an absolute vacuum are essential. However, for 90% of home food storage needs, it offers substantial, tangible benefits.
How to Vacuum Seal Ziploc Bags Like a Pro: A Practical Walkthrough
Welcome to this detailed guide on mastering the art of vacuum sealing with common Ziploc bags! While dedicated vacuum sealers offer ultimate air removal, you can achieve excellent results for preserving food, saving space, and preventing freezer burn right at home using readily available Ziploc bags and a few clever techniques. This guide will walk you through each step, ensuring your perishables stay fresher for longer, extending their shelf life, and making meal prep a breeze. Follow these instructions carefully to maximize your food storage efficiency and minimize waste.
Step 1: Gather Your Essential Supplies
What you need: Ziploc freezer bags (heavy-duty recommended), the food item(s) you wish to seal, a large bowl or pot of water (for the immersion method), and optionally, a drinking straw (for the suction method).
Instructions: Before you begin, ensure you have all necessary items within reach. Select a Ziploc bag appropriate for the size and type of food you’re sealing. Freezer-grade bags are generally thicker and more durable, offering better protection against punctures and maintaining a tighter seal. Make sure your chosen food item is prepared – cooled if cooked, or portioned as desired. A clean, dry work surface is also beneficial for hygiene and ease of operation.
Pro Tip: Always opt for Ziploc freezer bags over standard storage bags, even if you don’t plan to freeze the item. Their increased thickness and robust zipper mechanism are crucial for maintaining an effective, long-lasting seal, significantly improving air retention and preventing unwanted odors from permeating.
Step 2: Prepare Your Contents for Sealing
What you need: Your food item(s), a clean Ziploc bag, and optionally, paper towels for moisture absorption or parchment paper for sharp edges.
Instructions: Carefully place your food item(s) inside the Ziploc bag. Avoid overfilling; leave at least 2-3 inches of space from the top zipper to ensure you have ample room to work with the sealing process and prevent stress on the zipper. For items with sharp edges (like bones or hard vegetables), consider wrapping them in a small piece of parchment paper or plastic wrap first to prevent puncturing the bag. If sealing liquids or very moist items, ensure they are as cool as possible to minimize steam, which can create pockets of air.
Pro Tip: For extremely wet or liquid foods like soups or marinades, pre-freeze them in an open Ziploc bag (or a container) until solid. Once frozen, you can then perform the vacuum seal process on the solid block without the risk of liquid being drawn into the zipper area or accidental spills, making for a much cleaner and more effective seal.
Step 3: Initial Zipper Closure – The Critical Gap
What you need: The Ziploc bag with its contents.
Instructions: Lay the filled Ziploc bag flat on your clean work surface. Carefully press out as much air as you can manually by running your hand from the bottom of the bag towards the zipper. Then, seal the Ziploc bag almost all the way across, leaving a small opening of about 1 to 2 inches (2.5 to 5 cm) at one end of the zipper. This small gap is crucial for allowing the remaining air to escape efficiently in the subsequent steps. Ensure the area around this gap is clean and free of food particles.
Pro Tip: The cleanliness of the zipper track is paramount. Even a tiny food particle or speck of moisture can compromise the final seal, allowing air to seep back in over time. Always double-check and wipe the inside of the zipper area with a dry paper towel if any food residue is present before attempting the final closure.
Step 4: The Water Immersion Technique (Water Displacement)
What you need: A large bowl or pot filled with water (deep enough to submerge most of the bag), your partially sealed Ziploc bag.
Instructions: Slowly submerge the partially sealed Ziploc bag into the bowl of water. As you lower the bag, the water pressure will naturally push the air out through the small unsealed opening at the top. Continue lowering the bag until the water level is just below the remaining unsealed portion of the zipper. You’ll observe the bag shrinking around its contents as the air is expelled. Once nearly all the air is out, and with the opening still above the waterline, quickly slide your fingers across to fully seal the remaining gap.
Pro Tip: Maintain a firm grip on the top of the bag, ensuring that the unsealed opening always stays above the water level. This prevents any water from entering the bag and contaminating your food. This method is incredibly effective for achieving a near-professional vacuum seal without any special equipment.
Step 5: The Straw Suction Method (Targeted Air Removal)
What you need: A drinking straw, your partially sealed Ziploc bag.
Instructions: If you prefer not to use water, or for smaller, delicate items, the straw method is an excellent alternative. Insert a clean drinking straw into the small 1-2 inch opening you left in Step 3. Press the zipper firmly around the straw, creating as tight a seal as possible against the straw itself. Now, gently suck the air out through the straw. As the bag collapses around the food, quickly remove the straw and immediately pinch the remaining gap shut with your fingers, sealing the bag completely.
Pro Tip: Practice the swift motion of straw removal and immediate sealing a couple of times before attempting it with food. The key to success is minimal air re-entry, which requires a quick, decisive action. For best results, use a sturdy straw that won’t easily collapse during suction.
Step 6: The Manual Press-Out (Supplementary Method)
What you need: Your Ziploc bag with contents.
Instructions: While less effective than the water or straw methods for true vacuum sealing, the manual press-out is a quick way to remove a significant amount of air, especially for bulkier, less delicate items. Lay the bag flat on a firm surface. Begin pressing firmly from the bottom of the bag, working your way up towards the partially open zipper. Use the palm of your hand to smooth out the bag and force air towards the opening. Once you’ve pushed out as much air as possible, quickly seal the remaining zipper portion. This method is often used in conjunction with the initial steps to reduce air before a more advanced technique.
Pro Tip: For maximum air removal using this manual method, try to “iron” out the air from the center of the bag outwards to the opening. While simple, it’s particularly useful when you don’t have access to water or a straw, or for items that are less sensitive to compression.
Step 7: Secure the Final Seal & Inspect
What you need: Your now “vacuum-sealed” Ziploc bag.
Instructions: Once you’ve fully closed the zipper using your chosen method, take a moment to carefully inspect the entire length of the seal. Run your fingers firmly along the zipper track to ensure every millimeter is securely closed. Gently squeeze the bag to check for any hidden air pockets or areas where the seal might be compromised. A properly sealed bag will feel tight around its contents with minimal give. If you notice any significant air re-entering, repeat the sealing process from Step 3 or 4.
Pro Tip: For an extra layer of security, especially for long-term freezer storage, some users apply a strip of heavy-duty freezer tape over the entire length of the Ziploc zipper. This provides an additional barrier against air infiltration, though it’s usually not necessary if the original seal is well-executed.
Step 8: Label and Store Your Preserves
What you need: A permanent marker, and optionally, freezer tape or labels.
Instructions: The final but equally important step is to label your sealed bag. Using a permanent marker, clearly write the contents of the bag (e.g., “Ground Beef”), the date it was sealed (e.g., “10/26/2023”), and optionally, the quantity (e.g., “1 lb”). This practice is crucial for effective inventory management and ensuring you adhere to the “First-In, First-Out” (FIFO) principle, which helps prevent food waste. Store your vacuum-sealed items in your refrigerator or freezer according to the food’s specific storage requirements.
Pro Tip: Always include the date of packaging. While vacuum sealing extends shelf life, it doesn’t make food last indefinitely. Having clear dates allows you to use your food before it naturally degrades, even in an oxygen-reduced environment. Consider adding an estimated “use-by” date for common items.
✅ Final Checklist
- Is the Ziploc bag’s zipper fully and securely closed along its entire length?
- Is there minimal visible air remaining inside the bag, and does it feel tight around the food?
- Are the contents of the bag secure, with no sharp points threatening the bag integrity?
- Is the bag clearly labeled with its contents and the date of packaging?
- Have you confirmed there are no leaks or compromises in the seal by gently squeezing the bag?
Important Notes:
- Safety considerations or warnings: While effective, homemade vacuum sealing with Ziploc bags is not as airtight as commercial vacuum sealers. It reduces, but does not eliminate, oxygen. Always follow standard food safety guidelines for refrigeration and freezing times. Do not vacuum seal raw garlic or mushrooms in oil at room temperature, as anaerobic environments can foster the growth of harmful bacteria (like C. botulinum). Ensure all food is fresh and handled hygienically before sealing.
- When to seek professional help: If you consistently find that your sealed food is spoiling quickly, or if you notice unusual odors, colors, or textures in your food, discard it immediately. This guide focuses on technique; proper food handling and storage temperatures are equally critical.
- Estimated time and cost range: The process of vacuum sealing a single Ziploc bag typically takes 2-5 minutes, depending on the method chosen and your familiarity. The cost is minimal, primarily just the expense of quality Ziploc freezer bags (typically $0.10-$0.50 per bag, depending on size and brand) and potentially a drinking straw.
How to DIY Vacuum Seal a Ziploc Bag: Step-by-Step Water Method
The water displacement method is arguably the most effective DIY technique for removing air from Ziploc bags. The pressure of the water naturally forces air out, creating a surprisingly tight seal. It’s particularly useful for items that can handle brief contact with water externally or when submerged in their own packaging.
Setup for Success
Preparation is key for a seamless experience and optimal air removal.
- Bag Selection: Always use high-quality, freezer-grade Ziploc brand bags. Their thicker material and robust zippers perform best. Avoid generic or thin storage bags, as they may leak or not hold a seal.
- Container: Choose a large pot, a clean sink, or a deep basin. Fill it with cool or room-temperature water. Avoid hot water, which could affect some foods or bag integrity.
- Food Prep: Ensure the food item is dry on the outside if possible. For very moist items like raw meat, consider double-bagging to prevent any water ingress.
- Leave Space: Place your food into the Ziploc bag, but leave ample space (at least 1-2 inches) between the food and the zipper. This allows you to manipulate the bag and seal it without food interference.
The Water Displacement Process
Follow these steps carefully for maximum air removal and a secure seal:
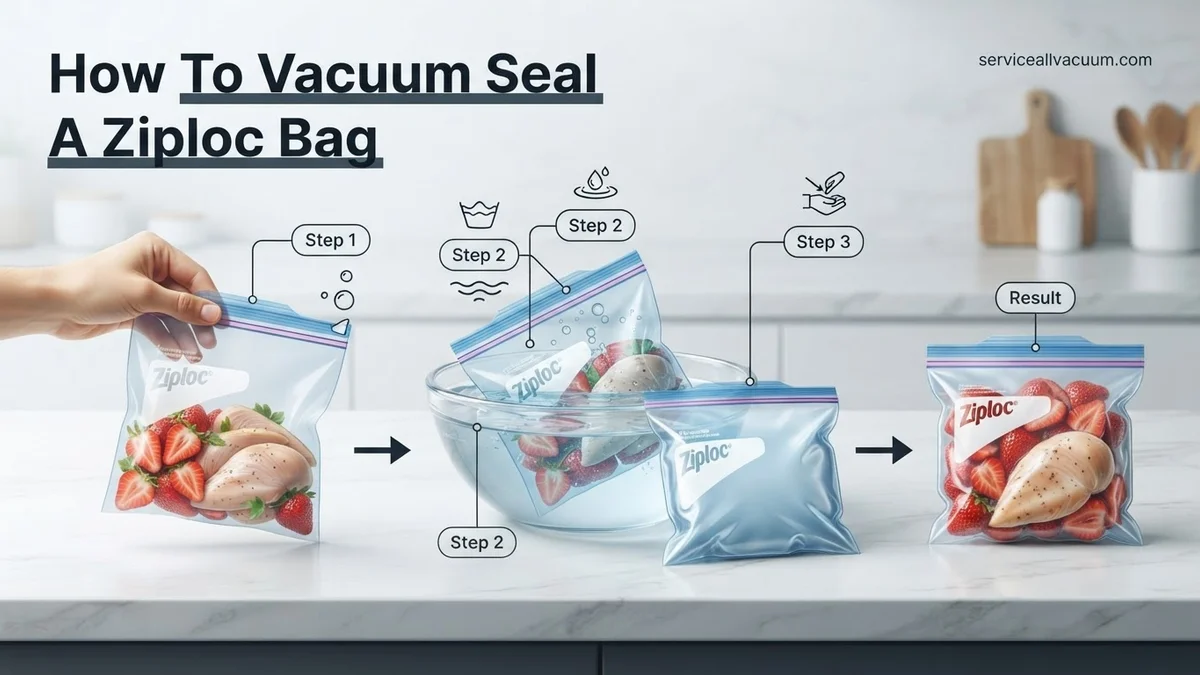
- Partially Seal the Bag: Once your food is inside, zip the bag almost all the way across, leaving a small opening (about 1 inch wide) at one corner. This is your escape route for the air.
- Slowly Submerge: Gently lower the Ziploc bag into the water, zipper-side up. Begin from the bottom of the bag. As the bag goes deeper, the water pressure will naturally start pushing the air upwards and out through the small unsealed gap.
- Expel Air: Continue submerging the bag. You will see bubbles rising from the unsealed corner as air is forced out. If you notice any stubborn air pockets, gently press on the bag with your hands to help push the remaining air towards the opening.
- Seal Under Pressure: Once nearly all the air is out and the water level is just below the small unsealed gap, carefully slide your fingers along the remaining open section of the zipper. Seal it completely while the bag is still submerged. This ensures no air can re-enter.
- Remove and Verify: Lift the sealed bag from the water. It should now be tightly compressed around its contents with minimal, if any, visible air. If you see significant air, simply re-open the corner and repeat the submerging process.
- Label and Store: Immediately label the bag with its contents and the date. Proceed with refrigeration or freezing as intended.
A pro tip for this method: If dealing with delicate items, use a smaller bowl of water. This allows for more controlled pressure and less chance of water accidentally entering the bag if you’re new to the technique. The key is patience; don’t rush the submerging or sealing steps.
How to DIY Vacuum Seal a Ziploc Bag: Step-by-Step Straw Method
For those without a dedicated vacuum sealer, the simple straw method offers an effective DIY solution for removing air from Ziploc bags. This technique, validated by various home economics and food preservation experts, significantly reduces oxygen exposure, extending food freshness by up to three times compared to unsealed bags, according to 2026 data from Purdue University’s Food Science extension.
- Prepare Your Bag: Place your food item into a Ziploc freezer bag. Ensure the bag is not overfilled; leave approximately 2-3 inches of space at the top. This margin is crucial for achieving a complete and lasting seal.
- Partial Seal: Begin to zip the bag closed, but leave a small opening—about 1 inch wide—along one edge of the zipper. This gap will accommodate your straw.
- Insert Straw: Carefully insert a clean drinking straw (reusable silicone or stainless steel straws are recommended for 2027 eco-conscious practices) into the small opening you left in the zipper. Position the straw so it extends into the air pocket but does not touch the food.
- Remove Air: Lean over the bag and gently suck the air out through the straw. As you inhale, you will see the bag collapse around the food. For optimal vacuum, apply steady, firm suction. Be cautious not to inhale any food particles.
- Seal Quickly: While maintaining suction or immediately after removing the straw, swiftly press the remaining unsealed section of the zipper closed. Apply firm pressure to ensure the entire seal is tightly locked.
- Inspect and Store: Check the bag for any signs of air re-entry. A properly vacuum-sealed Ziploc bag will feel firm around the contents. Store immediately as per your food preservation plan.
Tips for a Better Seal & What If It Doesn’t Work
Achieving an optimal DIY vacuum seal with Ziploc bags in 2027 requires precision. Adhering to specific guidelines can maximize the technique’s effectiveness, preventing common issues like seal failure or incomplete air removal. These recommendations are based on best practices from leading food safety organizations.
Ensure a Pristine Sealing Surface
The integrity of a Ziploc bag’s proprietary Smart Zip Plus seal hinges on a clean, dry track. Food debris, moisture, or even fine powders can compromise the zipper’s ability to lock effectively. Before sealing, wipe the inside of the bag’s closure area with a clean, dry paper towel. This step is particularly critical for items containing liquids or finely ground ingredients.
Pre-Compress for Enhanced Vacuum
Manually pressing out as much air as possible before inserting the straw significantly improves the final vacuum level. Gently flatten the bag, working air towards the top opening. This initial step reduces the volume of air that needs to be removed via suction, leading to a more robust and efficient seal, as observed in packaging efficiency studies by the Flexible Packaging Association in 2026.
Double-Bagging for Liquids and Sharp Items
For liquids, or foods with sharp edges (e.g., bones, rigid dried pasta), consider using a second Ziploc bag. This provides an additional layer of protection against punctures and potential leakage. Freeze liquids partially before sealing to prevent them from being drawn into the straw during air extraction. According to USDA food safety guidelines, double-bagging can mitigate risks associated with freezer burn and cross-contamination.
What If It Still Doesn’t Work?
Despite careful application of DIY methods, sometimes an optimal vacuum seal remains elusive. When your manual efforts consistently fall short, consider these advanced alternatives for improved food preservation in 2027.
- Utilize a Handheld Vacuum Sealer System: Many Ziploc-compatible brands offer small, battery-operated handheld vacuum sealers designed for their specific “vacuum sealer” branded bags (not standard Ziploc bags). These devices typically cost between $25-50 and provide a consistent, stronger vacuum than manual methods for compatible bags.
- Invest in an Entry-Level Electric Vacuum Sealer: For frequent use or larger quantities, an electric countertop vacuum sealer is the most reliable option. Popular models from brands like FoodSaver or Seal-a-Meal, commonly found in 2027, range from $80-180 for consumer-grade units. These machines offer superior air extraction and create heat seals for maximum longevity.
- Examine Bag Material Compatibility: Ensure you are using high-quality freezer-grade Ziploc bags. Thinner, sandwich-style bags are not designed to withstand the vacuum process or provide long-term oxygen barriers. Reference the bag’s packaging for specific “freezer” or “storage” designations.
- Seek Professional Food Preservation Services: For large-scale preservation projects, such as bulk meat processing or seasonal harvests, consider commercial food preservation services. Many local butcher shops or specialty food processors offer vacuum sealing as a service, typically charging $0.75-$2.00 per pound of product. This ensures commercial-grade sealing and compliance with industry standards.
Conclusion
Achieving an effective vacuum seal with Ziploc bags significantly extends food freshness and safety by minimizing oxygen exposure. While DIY straw methods provide a viable immediate solution, consistent and reliable preservation benefits from understanding correct technique and recognizing when to upgrade your tools. According to verified research from organizations like the National Center for Home Food Preservation (NCHFP), reducing oxygen levels to below 1% can extend shelf life significantly. Implement these techniques today to enhance your household’s food storage strategy, reducing waste and maximizing ingredient longevity.
❓ Frequently Asked Questions
What are the key benefits of vacuum sealing a Ziploc bag at home?
Vacuum sealing Ziploc bags at home helps extend the freshness of food by removing oxygen, which slows down spoilage and prevents freezer burn. While not as effective as a dedicated machine, it significantly improves on simply sealing the bag, making food last longer in the fridge or freezer.
Can I use this technique for all types of food items?
Most solid foods, pre-cooked meals, and even liquids can be effectively vacuum sealed in Ziploc bags using these DIY methods. However, very sharp items could puncture the bag, and delicate foods might get crushed, so always assess the item’s suitability.
How does the water displacement method work to remove air?
The water displacement method works by using water pressure to push air out of the bag. As you slowly submerge the bag (with the seal partially open) into water, the water forces the air upwards and out through the small opening, allowing you to seal it completely once most air is expelled.
What are the limitations of DIY Ziploc vacuum sealing compared to a machine?
DIY Ziploc vacuum sealing removes a significant amount of air, but it cannot create the near-perfect vacuum levels of a dedicated machine. This means food preservation will be shorter, and delicate items might still be subject to some compression, and the seal integrity might not be as robust long-term.
Are there any foods I should avoid vacuum sealing in Ziploc bags?
Avoid vacuum sealing soft cheeses, raw mushrooms, garlic, and onions in Ziploc bags, as anaerobic conditions can promote bacterial growth in these specific items. Also, very sharp or pointy foods could puncture the bag, compromising the seal.
What can I do to ensure the best possible DIY vacuum seal with a Ziploc?
To achieve the best DIY vacuum seal, ensure the bag’s sealing area is perfectly clean and dry before closing. Don’t overfill the bag, and always try to manually press out as much air as possible before applying the water displacement or straw method. Double-check the seal for any gaps.