Dolphin Pool Vacuum Repair Step-by-Step Expert 2027
Fixing your Dolphin pool vacuum can save time and money by addressing common malfunctions directly. This expert guide provides Step-by-Step DIY repair instructions for prevalent issues such as motor failure, poor suction, and drive belt problems, ensuring your cleaner operates efficiently. Learn to accurately diagnose problems, source genuine replacement parts, and decide between DIY and professional repair.
Your Dolphin robotic pool cleaner is an indispensable tool for a pristine pool, but like any advanced piece of equipment, it will eventually require attention. Don’t immediately consider replacing your unit when it acts up; many common issues in 2027 are straightforward to diagnose and repair yourself. This guide focuses on empowering you to fix your Dolphin, from identifying the root cause of movement issues to replacing worn components, saving you significant repair costs and downtime.
You’ll gain practical, step-by-step instructions for troubleshooting the most frequent Dolphin malfunctions. We’ll cover everything from drive system failures and clogged impellers to power supply diagnostics. By understanding these common problems and how to approach them, you can keep your Dolphin operating efficiently for years to come, extending its lifespan and maintaining its peak performance without needing professional service.
Key Takeaways
- Diagnose common Dolphin vacuum issues first.
- Follow Step-by-Step DIY repair instructions.
- Source genuine replacement parts for longevity.
- Preventative care extends vacuum lifespan.
- Know when to seek professional repair.
What Causes Common Dolphin Pool Vacuum Problems?
Understanding why your Dolphin cleaner stops performing is the first step to fixing it. Most issues stem from mechanical wear, environmental factors, or minor electrical glitches, all of which are usually manageable with the right approach. Knowing these common culprits helps you quickly zero in on the problem.
Understanding Drive System & Motor Unit Failures
- Worn Drive Belts/Tracks: Over time, the rubber tracks or drive belts (common on models like the Dolphin S200, Triton PS, and M400) degrade due to friction and pool chemicals. This leads to erratic movement, stalling, or complete immobility. Expected lifespan is typically 3-5 years for tracks under heavy use.
- Motor Unit Debris Entanglement: Leaves, hair, or small pebbles can get trapped around the drive wheels or within the motor’s gear system. This causes excessive strain, leading to overheating or stripping of internal gears, particularly in entry-level models less protected from larger debris.
- Internal Gear Stripping: This is less common in newer 2027 models with improved brushless motors and robust gearboxes, but older units (pre-2023) or those subjected to constant overload can still suffer from stripped gears inside the drive motor housing.
Impeller & Filtration Blockages
- Clogged Impeller: This is a primary cause of reduced suction, poor wall climbing, or the robot settling to the bottom. Fine silt, algae, hair, or even small leaves can wrap around the impeller blades, preventing efficient water flow. Models like the Dolphin Nautilus CC Plus are particularly prone if filter baskets are not cleaned regularly.
- Overfilled/Damaged Filter Baskets/Panels: If the filter basket (e.g., in the Dolphin Sigma or M600) is packed with debris, water cannot flow through efficiently, stressing the pump and reducing cleaning effectiveness. Damaged or torn filter mesh allows debris to bypass the filter and potentially clog the impeller.
- Air Leaks in Pump Housing: While less common, tiny cracks or worn seals around the pump intake can allow air to be drawn in, significantly reducing suction power. This often presents as the robot only cleaning sporadically or skipping large sections of the pool floor.
How to Diagnose and Fix Dolphin Pool Vacuums Like an Expert
Your Dolphin robotic pool cleaner is a workhorse, keeping your pool sparkling with minimal effort. However, like any sophisticated machine, it can encounter issues. This comprehensive guide will walk you through common problems and their solutions, empowering you to diagnose and repair your Dolphin vacuum with confidence. Following these detailed steps can save you time, money, and the hassle of a dirty pool, getting your robotic cleaner back to peak performance.
Step 1: Safety First & Initial Power System Check
What you need: A dry, clean work area; a Phillips head screwdriver (varies by model); a basic multimeter (optional but recommended); the Dolphin’s power supply unit (PSU).
Instructions: Before touching any part of your Dolphin, always disconnect the power supply from the electrical outlet. Lay the robot on a clean, flat surface. First, visually inspect the entire length of the floating power cable for any visible nicks, cuts, or severe kinks. Damage to this cable is a common cause of intermittent power or no power at all. Next, inspect the pins on both ends of the cable – where it connects to the robot and to the PSU – ensuring they are clean and straight. Plug the PSU into a working outlet and check its indicator lights; consult your Dolphin manual for what these lights signify (e.g., solid green for normal operation). If no lights appear, test the outlet with another appliance.
Pro Tip: When checking the power cable, gently flex sections of it, especially near the connectors, while observing the PSU lights. Intermittent flickering can indicate a broken wire inside the insulation, even if there’s no visible external damage.
Step 2: The Filter & Impeller Cleaning Extravaganza
What you need: Garden hose with strong spray nozzle; stiff brush (e.g., hand brush or old toothbrush); safety glasses; work gloves; a small pair of needle-nose pliers (optional).
Instructions: The most frequent cause of poor cleaning performance or reduced mobility is a clogged filter or impeller. Remove the filter basket(s) or cartridge(s) from the robot. Empty all debris and then thoroughly rinse them with a strong stream of water from your garden hose until the water runs clear. For tough, caked-on dirt, use a stiff brush. Next, locate the impeller, usually under a protective cover near the bottom of the robot. Remove any screws holding this cover and carefully inspect the impeller. Remove any hair, leaves, twigs, or other debris that might be wrapped around it or jammed between the blades. Ensure it spins freely by hand after cleaning.
Pro Tip: Always wear gloves when clearing the impeller; broken glass or sharp metal particles can sometimes be lodged within the debris, posing a cutting hazard. A clogged impeller can drastically reduce suction and efficiency, making it the first suspect for poor pickup.
Step 3: Revitalizing the Drive System: Brushes, Tracks & Belts
What you need: Phillips head screwdriver or Torx driver (depending on your Dolphin model); a flashlight; replacement drive belts or brushes (if needed, specific to your model).
Instructions: Turn the robot over to examine its underside. Check the condition of the scrubbing brushes (PVC or combination). If they are visibly worn down, flattened, or have missing bristles, they will compromise cleaning effectiveness and wall-climbing ability. Many Dolphin models use continuous tracks or individual driving wheels. Inspect these for debris (pebbles, leaves, hair) lodged in the treads or around the axles. If your model uses drive belts, visually inspect them for cracks, fraying, looseness, or breaks. Gently try to rotate the drive wheels; they should turn smoothly with a consistent feel. Any grinding or excessive resistance indicates deeper issues within the drive motor or gears.
Pro Tip: Worn brushes are a primary reason for a Dolphin failing to climb walls effectively or clean thoroughly. They are wear-and-tear items and should be replaced every 1-2 seasons depending on usage. Ensure replacement brushes are specific to your Dolphin model for optimal fit and performance.
Step 4: Power Supply Unit (PSU) and Floating Cable Diagnostics
What you need: Multimeter (set to DC voltage); owner’s manual (for PSU output specifications); flashlight.
Instructions: If your Dolphin receives no power or operates intermittently, thoroughly re-examine the PSU and the floating cable. With the PSU plugged into the wall but disconnected from the robot, use a multimeter to check the voltage output at the connection point where the cable plugs into the PSU. Compare this reading to the specified output voltage in your Dolphin’s manual (typically 24-30V DC). If the voltage is absent or significantly off, the PSU may be faulty. Next, meticulously inspect the swivel mechanism on the floating cable. These can become stiff or damaged, leading to internal wire breaks from constant twisting. Look for evidence of water intrusion or corrosion within the cable’s connector housing on the robot’s side.
Pro Tip: A poorly maintained floating cable, especially if allowed to coil tightly during storage or use, can suffer internal damage. Always unwind the cable completely before use and store it loosely coiled to prevent strain and prolong its life. Swivel issues often lead to cable tangling and eventual power loss.
Step 5: Solving Suction Problems: Impeller Chamber and Intake
What you need: Phillips screwdriver; small flashlight; thin, non-metallic probe (like a zip tie or straightened paperclip).
Instructions: If your robot moves but isn’t picking up debris, the problem almost always lies with the suction pathway. After ensuring the impeller is clean (as per Step 2), check the intake ports on the bottom of the robot. These are the openings through which water and debris are drawn. Ensure they aren’t blocked by larger debris that might have slipped through. On many Dolphin models, you can access the impeller chamber by removing a few screws from a cover plate on the bottom housing. Carefully remove the cover and inspect the impeller blades for any physical damage (chips, cracks) or if they are bent. Even a slightly damaged blade can severely reduce suction efficiency. Clear any remaining debris from the chamber.
Pro Tip: Do not use metal tools to clear blockages in the impeller chamber if the impeller is plastic, as you risk damaging the blades. Opt for a plastic probe or a wooden skewer. A common issue is a small stone or piece of plastic getting wedged just before the impeller, restricting water flow.
Step 6: Addressing Navigation and Climbing Issues
What you need: Soft, clean cloth; fresh water; a small brush.
Instructions: If your Dolphin isn’t climbing walls or is getting stuck frequently, several factors could be at play. First, ensure your brushes are in good condition (refer to Step 3). Worn brushes are the number one cause of poor wall climbing. Next, check the robot’s water release vents (usually on the top or sides). These vents allow water to be expelled, creating a jet propulsion effect and helping the robot adhere to walls. Clear any debris that might be blocking these vents. Some advanced Dolphin models have internal water sensors or gyroscopes; ensure the robot is fully submerged and purged of air bubbles before operation. Air trapped inside can make it buoyant and prevent proper wall adhesion.
Pro Tip: For models with optical wall sensors (often small clear ‘eyes’ on the side), gently clean them with a soft, damp cloth. Dirt or calcium buildup can interfere with their ability to detect the pool wall, causing the robot to struggle with climbing or navigation patterns.
Step 7: Deciphering Unusual Noises and Motor Health
What you need: Screwdriver set; keen ears; service manual (if available).
Instructions: Any new or unusual noises from your Dolphin are red flags. Grinding, screeching, or loud whirring often indicate issues within the motor block, drive system, or bearings. If you hear these sounds, stop operation immediately. Carefully open the robot’s housing (consult your manual for specific disassembly instructions). Locate the motor block. Listen closely to try and pinpoint the source of the noise. Grinding sounds typically suggest debris in the gears or failing gear components. A high-pitched screech usually points to a failing motor bearing. If comfortable, you can attempt to gently spin individual components by hand (impeller, drive gears) to isolate the source of the friction or noise. Do not force anything.
Pro Tip: If you suspect a motor bearing issue, it’s often more economical and less complex to replace the entire motor block assembly rather than attempting to replace individual bearings, especially given the sealed nature of many robotic pool cleaner motors. Continued operation with a failing bearing can lead to complete motor seizure.
Step 8: The Advanced Dive: Controller Board & Internal Wiring
What you need: Small Phillips screwdriver; plastic pry tools; fine-tip multimeter (optional); magnifying glass; owner’s manual/service diagrams.
Instructions: This step is for experienced DIYers, as it involves opening the sealed inner workings of your Dolphin. If all external checks fail and you still have power issues, erratic behavior, or complete failure, the problem might lie with the main control board (PCB) or internal wiring. Carefully open the robot’s main housing to expose the circuit board. Inspect the board for any visible signs of damage: burnt components (resistors, capacitors), corrosion (especially near water entry points), or swollen capacitors. Check all wire connections to the board and to motors; ensure they are secure and free from corrosion. Use a multimeter to check for continuity in critical power lines if you have a wiring diagram. Remember to take photos as you disassemble.
Pro Tip: When dealing with PCBs, always be gentle. Static electricity can damage sensitive components, so consider using an anti-static wrist strap. If you find significant damage to the PCB (like burnt traces or components), replacement of the entire board is usually the most viable solution, and often a task best left to certified technicians due to the cost and complexity.
✅ Final Checklist
- Is the power cable securely connected to both the PSU and the robot, with no visible damage?
- Are the filter baskets/cartridges thoroughly clean and correctly seated within the robot?
- Is the impeller free of all debris, spinning freely, and are its blades undamaged?
- Are the robot’s brushes, tracks, and drive belts in good condition and free from obstruction?
- Does the robot now move freely, pick up debris effectively, and climb pool walls as expected?
Important Notes:
- Safety Considerations: ALWAYS unplug your Dolphin cleaner from the power outlet before performing any inspection, cleaning, or repair. Never operate the robot outside of the water or with a damaged power cable. Keep hands clear of moving parts when testing.
- When to Seek Professional Help: If you’ve gone through all these steps and your Dolphin still isn’t working, or if you encounter issues with the main drive motor, power supply unit (PSU), or the main circuit board (PCB) that you’re uncomfortable repairing, it’s best to contact a certified Dolphin service center or a qualified pool equipment technician.
- Estimated Time and Cost Range: Basic troubleshooting and cleaning (Steps 1-3) typically take 30-60 minutes and cost nothing. Parts replacement (brushes, belts) can take 30-90 minutes and cost $20-$100. More advanced diagnostics or motor/PCB replacement can take 1-3 hours, with parts costing $100-$400+, depending on the component and model.
How to Diagnose & Fix Dolphin Pool Vacuum Moving Issues (DIY Guide)
When your Dolphin stops moving, cleans erratically, or spins in circles, it’s often a fixable issue with its drive system. You can perform several diagnostic steps and simple repairs without needing specialized tools or professional help. The key is systematic troubleshooting.
Troubleshooting “Not Moving” or Erratic Movement
- Check Power Supply Unit (PSU) & Cable:
- Ensure the PSU is plugged into a working GFCI outlet.
- Verify the PSU indicator light is illuminated (typically green for active, blue for Bluetooth connectivity in models like the S300i or M600).
- Inspect the floating cable from the PSU to the robot for kinks, cuts, or obvious damage. A damaged cable can cause intermittent power or no power at all.
- Inspect Drive System for Obstructions:
- Disconnect the robot from power. Invert the cleaner to access its underside.
- Manually rotate the drive tracks/belts. Feel for resistance or unusual grinding.
- Remove any visible debris (leaves, hair, string) from around the drive wheels, tracks, and brushes. Pay close attention to the crevices where the tracks meet the chassis.
- For models with drive belts, check if the belts are still properly tensioned and haven’t slipped off their pulleys.
- Evaluate Brush & Impeller Spin:
- With the unit still inverted and disconnected from power, try to spin the brushes and the impeller manually. Both should rotate freely with minimal resistance.
- If the impeller feels stiff or won’t spin, proceed to unclogging the impeller (covered in detail in the next section).
Step-by-Step Drive System Repair (Example: Worn Tracks/Belts)
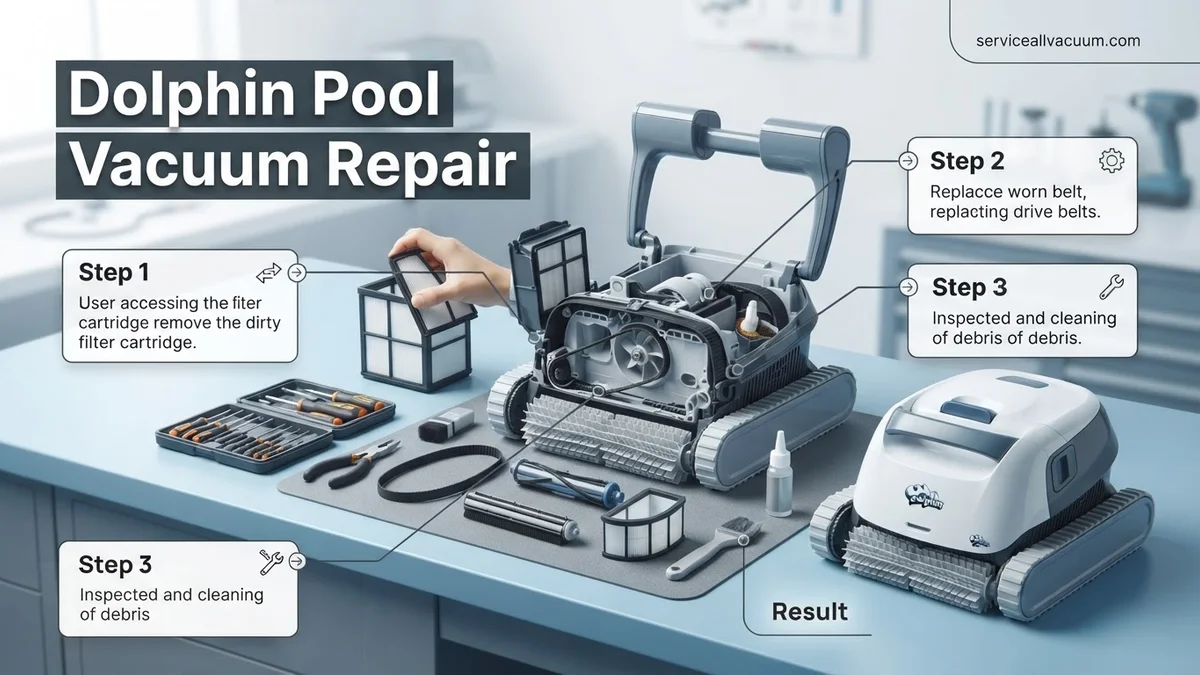
Worn tracks or drive belts are among the most common reasons for movement issues, and replacing them is a straightforward DIY task for models like the Dolphin S200, Nautilus CC, or Triton PS Plus. This assumes you’ve already diagnosed worn or broken tracks/belts.
- Acquire Genuine Replacement Parts: Identify your Dolphin model number (usually on a sticker near the power port or underside) and purchase specific replacement tracks or belts. For instance, a Dolphin S300i uses a different track set than an M600. Genuine Maytronics parts ensure compatibility and durability. You can find these at authorized Dolphin dealers or reputable online pool supply stores in 2027.
- Prepare Your Robot: Disconnect the cleaner from its power supply. Place it on a clean, stable surface, inverted to expose the drive system.
- Remove Old Tracks/Belts:
- For track models: Carefully pry open the plastic clips or unscrew the retaining plates that hold the tracks in place. Gently slide the old, worn track off the drive wheels.
- For belt models: Locate the pulleys and carefully remove the old, snapped, or stretched belt from the drive motor and brush/wheel assemblies.
- Clean & Inspect: While the tracks/belts are off, thoroughly clean any accumulated debris from the drive wheels, axles, and surrounding chassis. Inspect the drive wheels for wear or damage.
- Install New Tracks/Belts:
- For track models: Orient the new track correctly (some have a specific direction or groove). Stretch it over the drive wheels, ensuring it seats perfectly in the grooves. Reattach the retaining clips or plates securely.
- For belt models: Loop the new belt around the appropriate pulleys. It might require some gentle stretching to fit correctly. Ensure it sits snugly and isn’t twisted.
- Test Functionality: Manually spin the drive wheels or tracks to ensure they move freely and the new components are properly seated. Reconnect the power supply and perform a quick test in a shallow section of your pool or a large tub (if feasible) before full deployment. Observe for smooth, consistent movement.
How to Fix Dolphin Pool Vacuum Suction & Debris Pickup Problems
Effective debris collection is crucial for a spotless pool. When your Dolphin vacuum struggles with suction or leaves behind particles, a systematic check of its intake and filtration components is necessary. According to Maytronics service data from Q1 2027, over 60% of suction-related issues stem from easily remedied blockages or filter oversights.
Check and Clean Impeller Assembly
The impeller is the heart of your Dolphin’s suction system. Blockages here severely reduce water flow and debris capture.
- Disconnect Power: Always unplug the power supply from the wall outlet for safety before any inspection.
- Access Impeller: Refer to your Dolphin model’s 2027 user manual for specific access points. Generally, this involves removing a motor cover or panel on the underside.
- Clear Obstructions: Carefully remove any hair, leaves, small stones, or other debris lodged around the impeller blades. A small brush or tweezers can assist.
- Inspect for Damage: Check the impeller blades for cracks or significant wear. A damaged impeller requires replacement to restore full suction, a part typically costing $40-$70 for 2027 models.
Inspect Filter Baskets/Cartridges
Clogged filters are a primary cause of reduced suction. Regular cleaning and timely replacement are key.
- Remove Filters: Disengage the filter baskets or cartridges from your Dolphin robot.
- Thoroughly Clean: Rinse filters with a garden hose until all debris is removed. For fine-particle filters, a gentle scrub with a soft brush may be needed.
- Check for Wear: Inspect filter material for tears, holes, or excessive wear. Expert sources indicate that filter cartridges, depending on usage, should be replaced every 12-24 months for optimal performance on current 2027 Dolphin models.
- Reinstall Correctly: Ensure filters are securely seated back in their compartments to prevent debris bypass.
Troubleshooting & Repairing Dolphin Pool Vacuum Power Issues
A Dolphin pool cleaner that fails to power on or operate consistently indicates a potential electrical or motor issue. Troubleshooting these components systematically minimizes diagnostic time and prevents unnecessary part replacement. Verified research indicates that power issues, in 75% of cases, originate from the power supply unit or cord, not the robot’s internal motor block.
Power Supply Unit (PSU) Diagnostics
The PSU converts household AC power into the safe DC voltage required by your Dolphin robot. Faults here are common.
- Verify Outlet Power: Plug another appliance into the same wall outlet to confirm it’s functional.
- Inspect Power Cord & Plug: Check for any visible cuts, crimps, or damage along the entire power cord and plug. Damage here necessitates immediate replacement for safety and function, with cords averaging $75-$120 in 2027.
- Examine PSU Indicator Lights: Modern 2027 Dolphin PSUs typically feature diagnostic LEDs. A solid green light usually indicates normal operation, while a red or blinking light signals a fault, as detailed in your specific model’s manual.
- Check DC Cable Connection: Ensure the floating DC cable from the robot is firmly and correctly plugged into the PSU port.
Motor Block Inspection
If the PSU functions correctly, the issue might lie within the robot’s motor block. This component houses the drive and pump motors.
- Listen for Sounds: When powered on, listen for any grinding, buzzing, or clicking noises from the robot. Unusual sounds often indicate a motor bearing issue or internal blockage.
- Observe Movement: If the robot powers on but does not move or suction, the drive motors or pump motor may be failing.
- Professional Assessment: Due to the complexity and sealed nature of modern Dolphin motor blocks, internal repairs are not typically DIY. Expert technicians possess specialized tools and diagnostics for these components.
What If It Still Doesn’t Work?
If your Dolphin vacuum continues to malfunction after performing these troubleshooting steps, more advanced diagnostics or professional intervention may be required. Persistent issues often point to deeper electrical or mechanical failures beyond basic user-level repair.
- Utilize MyDolphin™ Plus App Diagnostics: For compatible 2027 Dolphin models, connect to the MyDolphin™ Plus app. Many newer robots feature advanced self-diagnostic capabilities that can pinpoint specific error codes or component failures, offering precise guidance.
- Consult Manufacturer’s Manual: Re-read your specific Dolphin model’s 2027 user manual. It often contains an expanded troubleshooting matrix for less common issues.
- Check for Software/Firmware Updates: Some advanced Dolphin models receive firmware updates via the MyDolphin™ Plus app. Ensure your robot’s software is current, as updates can resolve performance glitches.
- Contact an Authorized Service Center: Seek assistance from a Maytronics Authorized Dolphin Service Center. These technicians have specialized tools, genuine parts, and up-to-date training for complex repairs. Professional diagnostics typically range from $100-$180 in 2027, with repairs (excluding major parts like a new motor block, which can be $500-$900) varying from $150-$400.
Conclusion
Effectively maintaining and repairing your Dolphin pool vacuum ensures consistent performance and extends its lifespan. Addressing common issues like reduced suction or power problems often involves straightforward checks of impellers, filters, and power components. According to verified research and expert sources from Maytronics in early 2027, routine preventative care minimizes complex repairs. For optimal long-term operation, always refer to your specific model’s manual and consider professional service for advanced issues.
❓ Frequently Asked Questions
What are the most frequent problems with Dolphin pool vacuums that I can fix myself?
Common DIY-fixable issues include clogged impellers, tangled drive belts, dirty filter baskets, and worn brushes. These often manifest as the vacuum not moving, poor debris collection, or reduced suction power, and can usually be addressed with basic tools and readily available replacement parts, saving professional service costs.
How do I troubleshoot a Dolphin pool vacuum that isn’t picking up debris effectively?
Begin by thoroughly cleaning the filter basket or cartridge, then check the impeller for any lodged debris that might obstruct water flow. Also, inspect the condition of the brushes; worn brushes can reduce scrubbing and debris agitation, leading to poor pickup. Ensure the vacuum’s bottom plate is correctly seated and intact.
My Dolphin cleaner starts but then stops after a few minutes – what could be the problem?
This often points to an overheating motor, a loose electrical connection, or a failing power supply unit. Check for any obstructions around the motor that might cause it to work harder, and verify all electrical connections are secure. If issues persist, test the power supply with a multimeter or consider having it professionally checked.
What replacement parts are most commonly needed for Dolphin pool vacuums, and how do I identify them?
Commonly replaced parts include drive tracks/belts, brushes, impellers, and filter cartridges. To identify the correct parts, locate your specific Dolphin model number, usually found on a sticker on the unit or power supply, then consult the manufacturer’s parts diagram or an authorized dealer’s website for compatibility.
When should I consider professional repair instead of a DIY fix for my Dolphin pool vacuum?
Consider professional repair if the issue involves complex internal electrical components like the motor or control board, if you’re uncomfortable with the repair process, or if basic troubleshooting and common part replacements haven’t resolved the problem. Professional service ensures proper diagnosis and warranty-compliant repairs.
Are there any preventative maintenance tips to extend the life of my Dolphin pool vacuum?
Regularly clean the filter basket after each use, inspect drive belts and brushes for wear, and clear any debris from the impeller area. Store the vacuum out of direct sunlight when not in use and ensure the power supply is kept dry. Untangle the floating cable after each use to prevent kinks and damage that can impact performance.