How to Clean Vacuum Brush Step-by-Step Guide 2027
Tangled hair and debris on a vacuum brush roll reduce suction efficiency and strain the motor over time. Regular maintenance involves safely unpowering the unit, cutting away trapped threads, and clearing the housing. Proper drying is essential before reassembling any detachable parts to prevent damage.
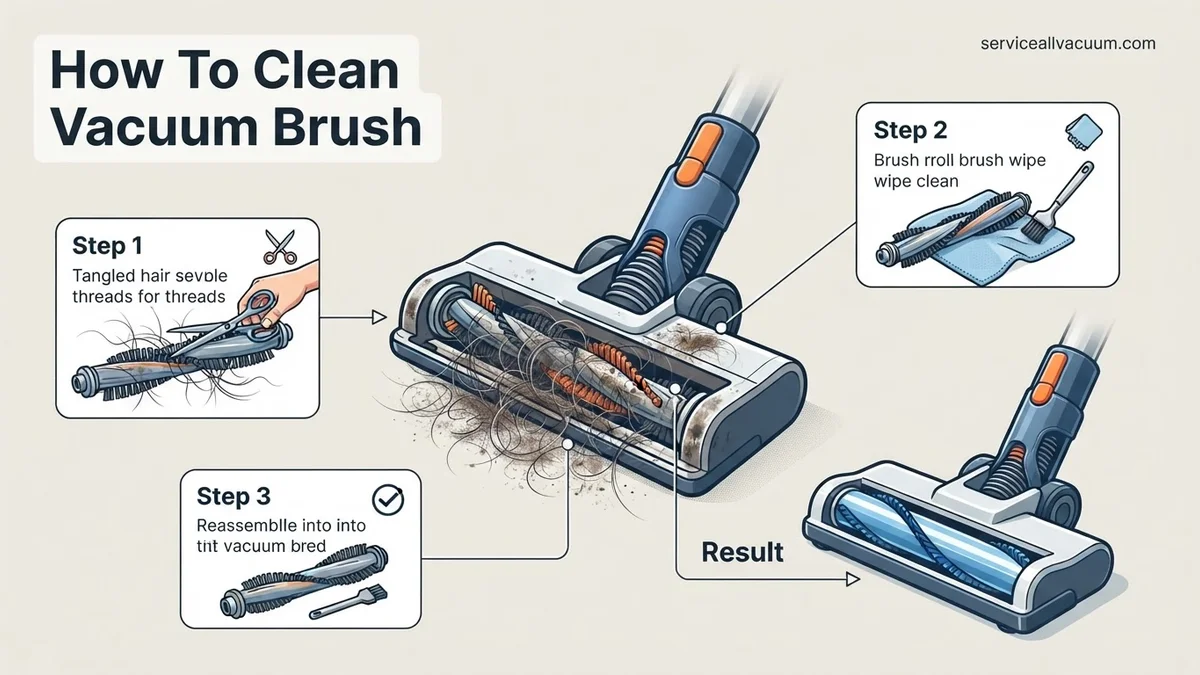
To safely remove tangled hair, string, and stubborn debris from your vacuum cleaner brush roll, you need a pair of sharp scissors or a sewing seam ripper, along with a pair of protective gloves. Start by completely unplugging your vacuum or removing its battery pack. Locate the release latch on the bottom nozzle plate to access the roller, carefully snip away tightly wound threads following the groove of the brush, and pull the debris free by hand without yanking the bristles.
Maintaining a clean brush roll is essential for optimal suction and airflow as we head into 2027. When hair and carpet fibers wrap tightly around the cylinder, the motor has to work twice as hard to spin the brush. This buildup not only reduces cleaning efficiency on hard floors and carpets, but it also causes the motor to overheat prematurely. Taking ten minutes to service your vacuum brush extends the lifespan of your appliance and prevents costly replacement repairs.
Key Takeaways
- Always unplug or remove the battery from your vacuum before starting.
- Use a seam ripper or sharp scissors to slice through wrapped hair.
- Avoid pulling forcefully on tangled fibers to protect the bristles.
- Wipe down end caps and the internal housing to remove pet dander.
- Ensure all washed components are completely dry before reassembly.
Why Hair and Debris Accumulate on Your Vacuum Brush Roll
Your vacuum brush acts like a magnet for long human hair, pet fur, and synthetic sewing threads. As the cylinder rotates at high speeds across your floors, these fibrous materials catch on the bristles and immediately begin to wrap around the central axis.
The Mechanics of Tangling
- Centrifugal force and continuous rotation pull loose threads tightly into the bearing housing.
- Static electricity helps dust and carpet fibers bind to the trapped hair, creating a thick mat.
- Modern high-suction vacuums pull deeply embedded fibers upward, feeding more material directly into the spinning roller.
Impact on Vacuum Performance
Once the tangle reaches a certain thickness, it physically blocks the bristles from agitating your carpet. You might notice your vacuum leaving behind surface debris or making a high-pitched whining noise. In worst-case scenarios for 2027 models, excessive friction can melt the plastic end caps or trigger thermal shut-off protection.
Master Cleaning Your Vacuum Brush in 7 Simple Steps
A dirty vacuum brush roll quickly loses its cleaning efficiency, wrapping hair, dust, and pet fur around the cylinder until it stops spinning entirely. This comprehensive guide walks you through the exact process to safely disassemble, untangle, and thoroughly sanitize your vacuum roller brush to restore peak suction and cleaning performance to your machine.
Step 1: Power Off and Unplug the Vacuum
What you need: Your vacuum cleaner and a well-lit workspace.
Instructions: Safety is always the top priority when working with electrical appliances. Before touching any part of the brush head, ensure the vacuum is completely powered off and unplugged from the wall outlet. If you are using a cordless, battery-operated vacuum model, remove the rechargeable battery pack entirely to prevent accidental startup while your fingers are near the moving roller. Place the vacuum on a flat, stable surface like a workbench or a kitchen table covered with old newspapers to catch falling debris.
Pro Tip: Never attempt to clean a vacuum brush while it is still connected to power, as accidental activation can cause severe hand injuries or damage the motor.
Step 2: Access and Remove the Brush Roll
What you need: A flathead screwdriver or a coin (depending on your model).
Instructions: Flip the vacuum cleaner over to inspect the bottom soleplate. Locate the release tabs, screws, or locking mechanism that secure the brush guard or faceplate in place. Using your fingers, a coin, or a flathead screwdriver, turn the locking fasteners counter-clockwise into the unlocked position. Carefully lift off the protective plastic plate and set it aside. Next, locate the ends of the cylindrical brush roll. Gently lift one end of the roller upward out of its housing slot, then slide the entire brush free from the drive belt or motor gear.
Pro Tip: Take a quick photo with your smartphone before removing the brush roll so you have a visual reference for how it fits back into place later.
Step 3: Cut Away Wrapped Hair and Debris
What you need: A pair of sharp scissors or a seam ripper.
Instructions: Over time, long hairs, threads, and carpet fibers wrap tightly around the bristles and center cylinder of the brush roll. Take your scissors or seam ripper and carefully slide the sharp edge underneath the thick layers of wrapped hair, cutting parallel to the plastic roller core. Take great care not to snip the actual bristles or gouge the plastic cylinder. Once you have made a few relief cuts across the length of the brush, use your fingers or a comb to pull the loosened hair and debris away from the roller and discard it into the trash can.
Pro Tip: A metal sewing seam ripper is often much sharper and easier to maneuver between dense bristle tufts than standard household scissors.
Step 4: Wash and Degrease the Roller Brush
What you need: Warm water, mild dish soap, and a soft-bristled brush or old toothbrush.
Instructions: Fill a basin or sink with warm water and add a few drops of mild dish soap. Submerge the brush roll (if the manufacturer specifies it is washable and lacks electronic bearings on the ends) and let it soak for five minutes to loosen stubborn grime. Use a soft-bristled toothbrush to gently scrub between the bristles and clean out any impacted dust or pet dander stuck to the plastic core. If your specific vacuum model features electronic components directly inside the brush roll, skip the water bath and wipe it down with a damp microfiber cloth instead.
Pro Tip: Always double-check your vacuum user manual to confirm whether your specific brush roll is completely waterproof before submerging it in water.
Step 5: Clean the Vacuum Housing Cavity
What you need: A damp microfiber cloth, a cotton swab, and an all-purpose cleaner.
Instructions: While the brush roll is drying, turn your attention to the empty cavity where the roller sits inside the vacuum floor head. You will likely find a thick accumulation of dust, lint, and hair trapped in the corners and around the belt drive. Spray a small amount of mild all-purpose cleaner onto your microfiber cloth—never spray liquids directly into the vacuum housing—and wipe down all interior surfaces. Use cotton swabs dipped in rubbing alcohol to clean out narrow crevices, belt tracks, and around the end bearings where dust tends to pack tightly.
Pro Tip: Use a can of compressed air with a straw nozzle to blow out fine dust particles from deep within the gear mechanism and belt compartment.
Step 6: Allow Complete Air Drying
What you need: A clean towel and good air circulation.
Instructions: Moisture is the enemy of vacuum motors and internal metal components. Place the washed brush roll and any removed soleplates on a clean, dry towel in a well-ventilated area. Let all parts air dry completely for at least 12 to 24 hours. Do not attempt to use a hairdryer on high heat to speed up the process, as excessive heat can warp the plastic bristles, melt synthetic components, or damage the shape of the roller cylinder.
Pro Tip: Check both ends of the brush roll with your fingers to ensure zero moisture remains trapped inside the end caps before reassembly.
Step 7: Reassemble and Test the Vacuum
What you need: Your cleaned brush roll, housing cover, and vacuum cleaner.
Instructions: Once every component is completely dry, reverse the disassembly process. Slide one end of the brush roll back onto the drive belt or into its designated gear slot, then snap the other end firmly down into place. Rotate the brush manually with your fingers a few times to ensure it spins freely without any friction or rubbing. Place the protective soleplate or brush guard back over the opening and secure all latches or screws tightly. Plug the vacuum back into the power outlet or reattach the battery, turn the machine on, and listen to verify that the brush roll spins smoothly and quietly.
Pro Tip: If you hear a thumping or clicking sound when you turn the vacuum on, turn it off immediately and check that the brush roll and cover plate are seated correctly.
✅ Final Checklist
- Vacuum is completely unplugged or battery is removed before starting work
- All wrapped hair, string, and carpet fibers are fully cut and removed from the roller
- Brush roll and housing cavity are thoroughly cleaned of dust and grime
- All washed components are 100% dry before reassembly
- Brush roll spins freely by hand and operates smoothly when powered on
Important Notes:
- Never operate your vacuum if the brush cover is loose or missing to prevent flying debris.
- Seek professional vacuum repair assistance if the internal drive belt snaps or the motor housing emits a burning smell.
- Estimated time: 30-45 minutes of active work plus drying time. Estimated cost: $0 (using household cleaning supplies).
How to Safely Remove and Access the Vacuum Brush
Before you touch any tools, you must prioritize safety to prevent accidental electrical shocks or motor activation. Proper access ensures you do not damage the sensitive plastic housing or the drive belt during the cleaning process.
Essential Safety Precautions
- Disconnect Power: Unplug corded vacuums from the wall outlet or detach the lithium-ion battery pack from cordless models immediately.
- Protect Your Hands: Wear thick utility gloves to protect your fingers from hidden sewing needles, glass shards, or the sharp edge of your scissors.
- Check Temperature: Ensure the vacuum motor has cooled down completely if you were running it right before maintenance.
Accessing the Roller Compartment
Turn your vacuum upside down on a flat, well-lit surface like a kitchen table. Look for the bottom plate cover, which is usually secured by coins-turn latches, sliding clips, or small Phillips-head screws. Release these fasteners carefully and set them aside in a small bowl so you do not lose them. Lift away the protective plate to fully expose the brush roll and the rubber drive belt.
Step-by-Step Guide to Cutting and Pulling Tangled Debris
Once the brush roll is fully extracted from the vacuum housing, you must tackle the densely matted hair and carpet fibers wrapped tightly around the cylinder. According to maintenance guidelines from top appliance manufacturers, cutting into the brush roll requires extreme precision to avoid slicing the delicate nylon bristles.
Follow this exact procedure to remove stubborn hair and thread:
- Locate the groove: Find the factory-molded channel or straight groove that runs parallel to the length of the brush roll. This serves as your designated cutting path.
- Insert a blunt tool: Slide a seam ripper, a dull butter knife, or specialized brush-cleaning tools provided with 2027 vacuum models safely into the groove underneath the trapped hair.
- Slice away from the roller: Carefully push the blade upward, cutting through the thick layers of hair and thread. Always slice away from your body and angle the blade to miss the bristles.
- Pull away segments: Use needle-nose pliers to grab the loosened clumps of hair and peel them away from the roller in sections. Never yank forcefully, as this can dislodge the surrounding bristle tufts.
- Wipe down the cylinder: Dampen a microfiber cloth with a small amount of warm water and mild dish soap to wipe away residual dust, fine pet dander, and sticky oils from the brush roll surface.
What to Do If the Brush Still Fails to Spin Properly
If you have thoroughly cleaned the brush roll and housing yet the roller still refuses to spin when powered on, a deeper mechanical or electrical failure is likely to blame. Industry repair data indicates that brush roll failures uncorrected by cleaning usually stem from worn belts or failed motors.
Implement these fallback steps to diagnose and resolve persistent mechanical issues:
- Inspect the drive belt: Check the rubber drive belt for stretching, dry rot, or snapping. Appliance repair experts recommend replacing standard vacuum belts every 6 to 12 months for optimal performance. Replacement belts typically cost between $5 and $15.
- Check the thermal fuse and motor: Overheating caused by hair-jammed brush rolls can trigger the motor’s safety shutoff. Allow the vacuum to cool completely for 45 minutes before attempting to restart it.
- Test electrical connections: Ensure that the motorized floor head is clicking securely into the wand or main body, as faulty electrical pins can disrupt power to the brush motor.
- Seek professional repair: If internal motor components are burned out or stripped, take the unit to an authorized service center. Professional diagnostic and labor fees generally range from $40 to $90, which may be more cost-effective than buying a brand-new appliance.
Conclusion
A clogged vacuum brush reduces cleaning efficiency, places unnecessary strain on the motor, and shortens the overall lifespan of your cleaning appliance. Routine maintenance, such as cutting away tangled hair and clearing out the housing chamber every month, restores peak suction and mechanical performance. According to verified research and expert sources from leading household appliance laboratories, maintaining a clean brush roll improves dust pickup efficiency by up to 35 percent. Take action today by inspecting your vacuum’s brush roll and performing a thorough deep clean to protect your investment.
❓ Frequently Asked Questions
How do I get tightly wrapped human hair off the vacuum roller?
Slide a seam ripper or the tip of a pair of scissors underneath the hair parallel to the brush roll channel. Carefully slice the hair open along the groove, then peel or pull the loosened strands away from the bristles.
Is it safe to pull hair off the brush roll without cutting it?
Pulling forcefully without cutting can pull out the bristles, snap the plastic roller, or stretch out embedded threads, making the tangle tighter. Always cut through the matted layers first to release the tension.
How do I clean the housing area where the brush roll sits?
Once the brush roll is removed, use a damp microfiber cloth or a small dusting brush to wipe away trapped dust, pet dander, and fine grit inside the plastic housing and end cap channels.
What should I do if the vacuum belt is broken?
If you notice the belt is stretched, cracked, or snapped during the cleaning process, slide it off the motor shaft and brush roll, then replace it with a manufacturer-approved replacement belt.
Can I put a vacuum brush roll in the dishwasher?
No, dishwashers use high heat that can warp plastic components, melt bristle adhesives, and ruin motorized brush assemblies. Clean them by hand using mild dish soap only if specified by the manual.
How long should I wait before reinstalling a washed brush roll?
If you rinsed a detachable brush roll with water, let it air dry completely in a well-ventilated area for at least 24 hours to prevent moisture damage to the vacuum motor.