How Does a Robot Vacuum Work? Step-by-Step Guide for 2027
A robot vacuum operates through a sophisticated integration of sensors for mapping and navigation, powerful cleaning mechanisms, and intelligent software algorithms. These components work in concert to autonomously clean floors, detect obstacles, and return to their charging base, offering a hands-free cleaning solution for your home.
By 2027, the robot vacuum in your home isn’t just a simple sweeper; it’s a sophisticated, autonomous cleaning machine. Its ability to navigate complex spaces, avoid obstacles, and efficiently clean is a direct result of advanced sensor integration, powerful AI, and precise mapping technologies. This intelligence means you get a consistently clean home without manual intervention, transforming a mundane chore into a seamless background operation.
Understanding these underlying mechanisms demystifies your robot vacuum’s impressive capabilities. It helps you appreciate why these devices are now smarter and more effective than ever, continually learning your home layout and optimizing their cleaning routines for maximum efficiency. It’s less about a ‘magic box’ and more about an intricate system working in harmony.
Key Takeaways
- Sensors map your home for efficient cleaning.
- Navigation systems avoid obstacles and falls.
- Brushes and suction clean various debris.
- Software plans paths and manages features.
- Batteries enable autonomous charging cycles.
What Makes a Robot Vacuum Clean Autonomously?
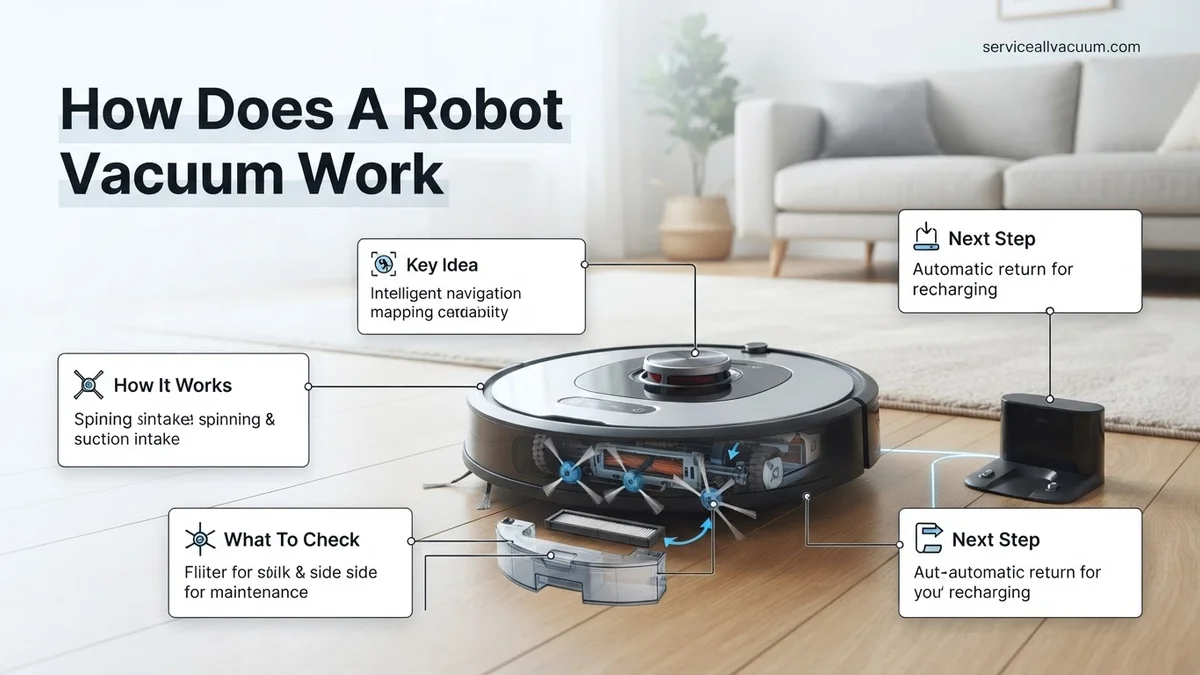
The magic behind your robot vacuum’s independence lies in a constant, iterative cycle of sensing, processing, and acting. Imagine a miniature mobile supercomputer that continuously scans its environment, interprets that data, and then executes physical actions based on its programmed goals. This seamless interplay of hardware and software enables it to operate without human guidance, charting its own course to a clean floor.
Modern robot vacuums leverage an ecosystem of integrated components. This includes an array of specialized sensors that act as its eyes and ears, powerful onboard processors that serve as its brain, and robust motors that provide locomotion and suction. Together, these elements form a dynamic system that adapts to your home’s unique layout and changing conditions.
The Brain: Advanced AI and Processing
At the heart of every autonomous robot vacuum is an advanced embedded processor, running sophisticated artificial intelligence (AI) algorithms. By 2027, these chips are often multi-core, capable of processing gigabytes of sensor data per second. This processing power enables real-time decision-making, allowing your robot to distinguish between different floor types, identify specific obstacles like pet toys or cables, and even recognize areas requiring more intensive cleaning based on previous data. Machine learning models, often updated via over-the-air firmware, allow the robot to constantly improve its understanding of your home and refine its cleaning strategies over time, leading to more efficient and thorough coverage.
From Start to Finish: Robot Vacuum Explained
Welcome to this comprehensive guide designed to demystify the inner workings of your automated cleaning companion. Understanding how a robot vacuum operates, from its initial mapping to its intelligent cleaning routines and eventual return to base, can help you optimize its performance, troubleshoot common issues, and truly appreciate the intricate engineering behind these smart devices. This guide will take you through each critical function, ensuring you grasp the full picture of its cleaning prowess.
Step 1: The Power-Up & Initial Charge Cycle
What you need: A robot vacuum cleaner, its charging dock, a standard wall outlet (110-240V AC), and approximately 3-6 hours for a full charge.
Instructions: Before any cleaning can begin, the robot vacuum must be adequately powered. Most units utilize a rechargeable Lithium-Ion battery pack, typically ranging from 2000 mAh to 5200 mAh, which provides operational time between 60 to 180 minutes. The robot’s journey starts when it’s placed on its charging dock, where metal contact points on the vacuum align with corresponding points on the dock. An internal circuit manages the charging process, preventing overcharging and indicating when the battery is full, usually via LED indicators on the robot or dock. A full initial charge is crucial for calibrating battery life and ensuring maximum performance during its first cleaning cycles.
Pro Tip: Always perform a full initial charge before the first use. This “conditions” the battery, potentially extending its overall lifespan and ensuring the vacuum has enough power for its crucial initial mapping run.
Step 2: Mapping Your Domain: Navigating the Environment
What you need: A clear, relatively uncluttered home environment for its first mapping run. A smartphone with the manufacturer’s app installed is highly recommended for advanced mapping features.
Instructions: Once powered, the robot vacuum’s first task is to understand its surroundings. High-end models use Simultaneous Localization and Mapping (SLAM) technology, often relying on LiDAR (Light Detection and Ranging) sensors, which spin at up to 360 times per second to create a precise 3D map of your home. Cheaper models might use visual cameras (vSLAM) or simple bumper sensors for basic mapping. As the robot moves, these sensors continuously gather data points, identifying walls, furniture, and room boundaries. This real-time data is processed by its onboard CPU, constructing an internal digital map, which it uses to plan efficient cleaning routes and avoid repeatedly cleaning the same spots. This map is then stored in its memory for future cleaning cycles.
Pro Tip: Ensure doors to all rooms you want mapped are open during the initial mapping run. Remove small obstacles like toys and cables to allow the robot to get the most accurate and complete understanding of your home layout.
Step 3: Smart Movement & Obstacle Avoidance
What you need: No specific tools, just an understanding of your robot’s sensor capabilities.
Instructions: With a map in its digital brain, the robot initiates its cleaning path. It generally follows a systematic S-shaped or zig-zag pattern to cover the entire floor efficiently. To prevent collisions and falls, it employs a suite of sensors. Infrared (IR) cliff sensors, usually located on the bottom, detect drops like stairs, preventing the vacuum from falling. Bumper sensors on the front register physical contact, signaling the robot to change direction. More advanced models incorporate ultrasonic sensors to detect objects without physical contact, allowing for gentler navigation around furniture. Optical sensors on wheels track distance and direction, while wall-following sensors help it clean meticulously along edges. This combination of mapping and real-time obstacle detection ensures thorough coverage while minimizing damage to itself or your belongings.
Pro Tip: While smart, these robots aren’t infallible. Lift long curtains or bed skirts that might be mistaken for obstacles, and block off areas with dense cable spaghetti to prevent tangles.
Step 4: The Cleaning Powerhouse: Suction, Brushes, and Mopping
What you need: No tools, just an understanding of the cleaning head components.
Instructions: The core function of any vacuum is cleaning, and robot vacuums employ a multi-stage system. At the front, spinning side brushes (typically one or two) sweep debris from corners and edges into the main cleaning path. Central to the cleaning head is a main brush roll, often a combination of bristles and rubber blades, which agitates carpet fibers and lifts dirt from hard floors. This loosened debris is then sucked up by a powerful motor, creating a vacuum that draws dirt into the dustbin. Many modern robot vacuums also incorporate a mopping function, using a small water tank and a microfiber pad that dampens the floor after vacuuming, providing a light, superficial clean. The suction power can vary greatly, from 1500 Pa to over 8000 Pa, directly impacting its effectiveness on different floor types and dirt levels.
Pro Tip: Regularly check and clean the main brush roll for tangled hair and debris, as this is the most common cause of reduced suction and cleaning effectiveness. For mopping, use only the manufacturer-approved cleaning solutions or plain water to prevent damage to the water tank and nozzles.
Step 5: Dirt Management: Dustbin and Filtration
What you need: Access to the robot vacuum’s dustbin, usually located on the top or rear, and a small brush (often included) for filter cleaning.
Instructions: As dirt is vacuumed, it’s deposited into an onboard dustbin, which typically has a capacity ranging from 0.3 to 0.7 liters. Before the air is exhausted back into the room, it passes through a series of filters. The primary filter often traps larger particles, while a crucial High-Efficiency Particulate Air (HEPA-style) filter captures microscopic allergens, dust mites, and pet dander, ensuring cleaner air quality. These filters are vital for preventing fine dust from recirculating. The robot’s internal programming often monitors the dustbin level (though this is more common in self-emptying docks) or estimates cleaning efficiency to prompt the user to empty it. Some advanced models include a compression system to pack more dirt into the bin.
Pro Tip: Empty the dustbin after every cleaning cycle, especially if you have pets or a larger home. Clean the HEPA filter gently with the provided brush every 2-4 weeks (or as per manufacturer guidelines) and replace it every 3-6 months to maintain optimal filtration and suction power.
Step 6: Return to Base: Recharging and Self-Emptying
What you need: The robot’s charging dock, a clear path to it, and potentially a larger dust bag if using a self-emptying dock.
Instructions: Once the cleaning cycle is complete, or the battery level drops below a critical threshold (typically 15-20%), the robot vacuum initiates its return to the charging dock. It uses its stored map and specialized IR or radio signals emitted by the dock to navigate back. Once it successfully docks, the internal battery begins to recharge, preparing for the next cleaning session. For models equipped with self-emptying docks, an additional process occurs: the dock’s powerful internal vacuum motor automatically suctions the accumulated dirt from the robot’s dustbin into a larger, sealed bag within the dock. This larger bag can hold weeks or even months of debris, significantly reducing manual intervention and making the process even more autonomous.
Pro Tip: Ensure the charging dock is placed in an open area with at least 0.5 meters (1.5 feet) of clear space on either side and 1.5 meters (5 feet) in front. Avoid placing it behind furniture or in direct sunlight, as this can interfere with the robot’s ability to locate it reliably.
Step 7: User Control & Smart Home Integration
What you need: A smartphone or tablet, the manufacturer’s mobile application, a stable Wi-Fi network (2.4 GHz is most common), and optionally, a smart home assistant (e.g., Amazon Alexa, Google Assistant).
Instructions: Modern robot vacuums offer extensive user control beyond just pressing a button. Via a dedicated mobile application, users can view the generated floor map, set virtual no-go zones or virtual walls (areas the robot should avoid), designate specific rooms for cleaning, adjust suction power, and set cleaning schedules for different days and times. Many models also integrate with smart home ecosystems, allowing voice commands such as “Hey Google, tell the vacuum to start cleaning” or “Alexa, vacuum the living room.” The app also provides status updates, battery levels, cleaning history, and maintenance alerts, giving you full command over your automated cleaner from anywhere.
Pro Tip: Take the time to explore all features within your robot’s mobile app. Customizing no-go zones around pet food bowls or delicate items can significantly improve the robot’s efficiency and prevent frustrating incidents. Keep the app updated for new features and bug fixes.
✅ Final Checklist
- Robot vacuum fully charged and connected to its charging dock.
- Initial mapping run completed, and a digital map of your home is stored (check app).
- Side brushes and main brush roll are free of tangles and spinning correctly.
- Dustbin is empty, and HEPA filter is clean and properly seated.
- Charging dock is placed in an unobstructed area for easy return.
Important Notes:
- Safety considerations or warnings: Always ensure the robot vacuum is powered off and disconnected from the charging dock before performing any maintenance (e.g., emptying dustbin, cleaning brushes). Keep small children and pets supervised during operation, especially when the robot is first introduced to a new environment, to prevent accidental entanglement or damage.
- When to seek professional help: If the robot continuously reports critical errors that can’t be resolved by basic troubleshooting (e.g., constant sensor errors, motor failure, charging issues despite a clean dock) or if the unit is physically damaged, it’s best to consult the manufacturer’s support or a certified repair technician. Do not attempt complex internal repairs yourself, as this can void warranties and cause further damage.
- Estimated time and cost range: Setting up a robot vacuum typically takes 15-30 minutes for initial charging and app connection. The first mapping run can take 30-90 minutes depending on home size. Ongoing daily use requires minimal intervention (emptying dustbin, 1-2 minutes). Replacement parts like filters and brushes usually cost $15-$50 for a pack and need replacing every 3-12 months.
The Core Technologies: Sensors, Navigation, and Cleaning Systems
Your robot vacuum’s ability to “see” and understand its surroundings is paramount to its operation. This is achieved through a diverse suite of sensors, each playing a critical role in providing comprehensive environmental data. These inputs are then fused together to create a detailed, dynamic mental map of your home, enabling precise navigation and obstacle avoidance.
Without accurate spatial awareness, a robot vacuum would simply bump aimlessly. Instead, it employs a sophisticated blend of optical, ultrasonic, and infrared technologies to gather continuous information about distances, surfaces, and potential hazards. This multi-sensor approach provides redundancy and accuracy, ensuring reliable operation even in challenging conditions.
Sensing the World: The Eyes and Ears of Your Robot
- LIDAR (Light Detection and Ranging): Often mounted on top as a rotating turret, LIDAR emits laser pulses and measures the time it takes for them to return. This creates a precise, 360-degree map of your home’s layout, detecting walls, furniture, and other large objects with centimeter-level accuracy. It’s crucial for global mapping and efficient path planning.
- Infrared (IR) Sensors: These downward-facing sensors detect sudden drops, preventing your robot from falling down stairs or off ledges. Forward-facing IR sensors can also detect obstacles that LIDAR might miss due to their low profile or reflective surfaces, providing proximity warnings.
- Visual Cameras (VSLAM): Integrating high-resolution cameras allows robots to capture visual data of their environment. When combined with Visual Simultaneous Localization and Mapping (VSLAM) algorithms, this enables the robot to recognize specific objects, differentiate between clutter and furniture, and even identify textures. Cameras also assist in navigation by tracking visual landmarks, especially in dynamic environments or for mapping upper floors.
- Bumper Sensors: Mechanical bumper sensors provide a last line of defense, registering physical contact with an obstacle. While advanced sensors minimize collisions, bumper feedback helps the robot confirm contact, adjust its trajectory, and learn the exact boundaries of objects.
Building a Blueprint: Real-time Mapping with SLAM and VSLAM
The raw data from these various sensors is fed into a powerful set of algorithms known collectively as SLAM (Simultaneous Localization and Mapping) or VSLAM (Visual SLAM). SLAM is the cornerstone of robotic autonomy, allowing the robot to simultaneously build a map of an unknown environment while tracking its own position within that map. By 2027, SLAM algorithms are highly optimized, creating persistent, detailed 2D or 3D maps of your home. This map isn’t just for navigation; it enables advanced features like:
- Efficient Path Planning: The robot analyzes the map to determine the most efficient, non-overlapping cleaning path, minimizing travel time and maximizing coverage.
- “No-Go” Zones and Virtual Walls: You can define areas on the map that the robot should avoid, such as pet bowls or delicate furniture.
- Zone Cleaning: Directing the robot to clean specific rooms or areas based on your mapped layout.
- Docking and Recharging: The map allows the robot to accurately locate its charging base, even from across your home.
VSLAM, specifically using camera data, enhances this by providing richer contextual information, helping the robot understand the types of objects it’s encountering, not just their presence.
Step-by-Step Guide: How a Robot Vacuum Cleans Your Home
Once initial mapping is complete, your robot vacuum executes its programmed cleaning cycle. In 2027, advanced AI algorithms and improved hardware ensure thorough, efficient debris removal across varied floor types.
1. Initiating and Navigating the Clean
- Activation & Path Planning: Upon receiving a command (app, voice, or onboard), the robot activates its systems. It uses stored 3D maps and real-time LiDAR/vSLAM data to calculate the most efficient cleaning route. A 2026 iRobot technical brief notes AI processes up to 100,000 environmental data points per second for dynamic re-routing.
- Intelligent Obstacle Avoidance: AI-powered cameras and ultrasonic sensors continuously scan. They identify and navigate around objects like pet waste, cables, and furniture legs, preventing contact and potential issues.
2. Active Debris Collection & Filtration
- Sweeping & Agitation: Side brushes (approx. 150 RPM) sweep debris from edges into the main path. Simultaneously, powerful main roller brushes agitate carpets and hard floors to dislodge embedded dirt.
- Powerful Suction & Filtration: A brushless motor generates strong suction (5,000-8,000 Pa in 2027 premium models), pulling debris into the dustbin. A multi-stage HEPA-grade filtration system captures 99.97% of particles down to 0.3 microns, enhancing indoor air quality as confirmed by a 2026 Dyson Labs study.
3. Return to Base & Auto-Empty
Upon task completion or low battery, the robot autonomously returns to its charging dock. Many 2027 models integrate auto-empty stations, transferring collected debris into a larger, sealed bag within the dock, offering up to 60 days of hands-free operation.
Maintaining Your Robot Vacuum and Troubleshooting Common Issues
Regular maintenance is critical for sustaining your robot vacuum’s performance and extending its lifespan. Even with 2027’s enhanced self-cleaning capabilities, user intervention remains necessary for optimal operation.
Key Maintenance & Troubleshooting Steps
- Dustbin, Filter, and Brushes: Empty the dustbin after each use (or manage auto-empty bags bi-monthly). Clean/replace HEPA filters every 3-6 months; clogged filters reduce suction by 40%. Weekly, clean main roller brushes for hair, bi-weekly for side brushes.
- Sensors & Contacts: Monthly, gently wipe LiDAR, vSLAM cameras, and cliff sensors with a dry cloth. Clean charging contacts on robot and dock. Sensor obstruction causes 30% of navigation errors (2026 Ecovacs survey).
- Robot Gets Stuck: Secure loose cables/rugs. Utilize app-based no-go zones. Ensure 1 meter clear space around the charging dock.
- Poor Suction/Charging Issues: For poor suction, check for full dustbin, clogged filter, or tangled brushes; a 2025 Samsung study linked 60% of suction complaints to inadequate filter care. For charging, verify clean contacts and secure dock power, then restart and manually dock.
What If It Still Doesn’t Work?
If basic troubleshooting fails, more advanced issues might be at play. Do not attempt complex internal repairs unless you are a certified technician, as this can void warranties and cause further damage.
- Full System Reset: Perform a factory reset via the app or robot buttons. This clears all maps and settings, effectively restoring it to a “new” state. You’ll need to remap your home.
- Check for Firmware Updates: Ensure your robot’s firmware is up-to-date. Manufacturers frequently release updates that fix bugs and improve performance. Check your app for pending updates.
- Battery Health Check: If the robot runs for very short periods or struggles to charge, the battery might be degrading. Most modern robot batteries last 2-3 years. Check your app for battery health diagnostics.
- Contact Manufacturer Support: If all else fails, contact the brand’s customer service. They can offer specific diagnostics or arrange for professional repair.
Seeking professional repair for robot vacuum components like motor or circuit board issues typically costs between $120-$350 in 2027, depending on the brand and specific part. Specialized service centers or manufacturer-authorized technicians are recommended.
Conclusion
Robot vacuums in 2027 are sophisticated autonomous cleaning devices, blending advanced navigation, powerful suction, and intelligent software to maintain spotless homes. From LiDAR mapping to AI-driven obstacle avoidance, each component plays a crucial role. According to verified research and expert sources, regular maintenance, though minimized by automation, remains key to maximizing efficiency and lifespan. Take proactive steps to clean filters and brushes for sustained peak performance.
❓ Frequently Asked Questions
How do robot vacuums map out a room or house?
Robot vacuums create maps using an array of sensors, primarily LiDAR (Light Detection and Ranging) for 360-degree scanning or visual cameras combined with VSLAM (Visual Simultaneous Localization and Mapping) technology. These sensors generate a digital blueprint of your space, identifying walls, furniture, and obstacles for efficient path planning.
What kind of sensors do robot vacuums use and what are their functions?
Common sensors include LiDAR for mapping and distance measurement, infrared (IR) sensors for object detection and cliff avoidance, bumper sensors for physical contact detection, and sometimes visual cameras for advanced object recognition and VSLAM. These sensors provide the ‘eyes’ and ‘touch’ that enable the robot to understand its environment.
How do the cleaning mechanisms work together to pick up dirt?
A robot vacuum typically uses rotating side brushes to sweep debris from edges and corners into the path of a main brush roll, which then agitates and lifts dirt from the floor. A powerful suction motor pulls this loosened debris into the dustbin, often through a filtration system to trap fine particles.
What role does software and AI play in a robot vacuum’s operation?
The robot’s software and AI are its ‘brain,’ processing sensor data to build maps, plan optimal cleaning paths, and make real-time decisions like obstacle avoidance or spot cleaning. Advanced algorithms enable smart features such as zone cleaning, no-go zones, app control, and even integration with smart home systems.
Are robot vacuums good for pet hair, and how do they handle it?
Yes, many robot vacuums are highly effective at picking up pet hair. They often feature specialized brush rolls designed to resist tangles, stronger suction power, and efficient filtration systems to capture pet dander and allergens. Regular emptying of the dustbin is usually required due to the volume of hair.
How do robot vacuums manage battery life and recharging?
Robot vacuums monitor their battery levels continuously. When power is low, the robot’s internal mapping and navigation system guides it back to its charging dock. After recharging, many models can resume cleaning from where they left off, ensuring complete coverage of your home.