How to Vacuum a Pool Without a Pump Step-by-Step Guide 2027
When your pool pump fails, cleaning becomes a challenge. Discover expert, no-pump methods like siphoning or using a garden hose Venturi to effectively vacuum your pool, ensuring it stays clean until repairs are made. These proven techniques offer a practical solution for common debris without your main system.
A non-functioning pool pump doesn’t mean your pool has to collect unsightly debris. When your traditional pump system fails, is undergoing repair, or if you simply lack one for your setup, effective manual methods exist to keep your water pristine. The most reliable and widely used technique by 2027 remains siphon vacuuming, a low-tech yet powerful solution that removes dirt and leaves from your pool bottom. This approach allows you to maintain a clean swimming environment without reliance on electricity or complex machinery, providing a practical workaround for any pool owner.
This guide will walk you through the essential steps for vacuuming your pool without a pump, focusing on the highly effective siphon method. Understanding these techniques empowers you to address pool cleanliness issues independently, ensuring your swimming experience remains enjoyable and hygienic, regardless of your equipment’s status.
Key Takeaways
- Siphon vacuuming requires proper setup to start water flow.
- Venturi vacuum attachments use garden hose pressure effectively.
- Vacuum slowly to avoid stirring up settled debris.
- Pre-treating heavy debris simplifies manual removal.
- Consider water loss when using vacuum-to-waste methods.
Understanding Why You Can’t Use Your Pool Pump
Common Scenarios for Pump-Free Vacuuming
There are several practical reasons why you might need to vacuum your pool without its primary pump. Perhaps your pump motor has unexpectedly burned out, an impeller is broken, or you’re experiencing a localized power outage. For some above-ground pools, an integrated pump system might not be standard, or you’re setting up a temporary pool where installing a full filtration system isn’t feasible. Furthermore, some environmentally conscious owners in 2027 might opt for manual cleaning to reduce energy consumption. In all these cases, abandoning your pool to accumulating debris is not an option; manual solutions become critical.
The Limitations of Traditional Pump Systems for This Task
A traditional pool pump and filter system work by drawing water from the pool, pushing it through a filter to trap debris, and then returning the clean water. This entire process relies on electrical power to operate the pump and the integrity of the filter media. When the pump is non-operational, or the filter is compromised (e.g., completely clogged and unable to create sufficient suction, or removed for cleaning), the fundamental mechanics of a powered vacuum simply cease to function. Alternative methods bypass these dependencies, creating suction or displacement through different means.
From Start to Finish: Pool Vacuuming Without a Pump Explained
Even without a dedicated pool pump or filtration system running, it’s entirely possible to achieve a sparkling clean pool bottom. This comprehensive guide will walk you through the precise steps required to effectively vacuum your pool using the power of siphoning. Perfect for smaller pools, above-ground setups, or situations where your main pump is down for maintenance, mastering this technique will save you time and money, ensuring your swimming environment remains pristine.
Step 1: Gather Your Essential Tools and Prepare the Area
What you need: A standard pool vacuum head (weighted), a telescopic pool pole, a dedicated floating pool vacuum hose (at least 25-30 feet, or long enough to reach all areas of your pool and extend to a lower drain point), goggles (optional but recommended), and access to a suitable waste disposal area (e.g., a downhill drain, garden bed, or storm drain) that is lower than the pool’s water level. Ensure the disposal area can handle the volume of water you’ll be removing.
Instructions: Before you even think about getting in the water, lay out all your equipment by the pool. Connect the vacuum head securely to one end of the telescopic pole. Uncoil your floating vacuum hose completely and inspect it for any cracks, holes, or blockages, as these will severely impede your siphon. Position your waste disposal point and ensure the end of the vacuum hose can reach it easily without kinks or obstructions. Remember that you will be losing pool water, so plan for refilling if necessary.
Pro Tip: A perfectly uncoiled hose free of kinks is crucial for successful siphoning. Take a few extra moments to ensure it’s straight and pliable. Pre-wetting the hose can also make it more flexible and easier to handle.
Step 2: Assemble and Submerge the Vacuum Head & Hose
What you need: The assembled vacuum head and pole, the floating pool vacuum hose.
Instructions: With the vacuum head firmly attached to the pole, connect the floating vacuum hose to the vacuum head. Push the hose onto the vacuum head’s suction port until it fits snugly, preventing any air from entering. Now, slowly lower the vacuum head into the pool, allowing it to sink to the deepest part. As the head submerges, begin feeding the rest of the floating hose into the water, starting from the end connected to the head. The goal is to completely fill the entire length of the vacuum hose with water, expelling all air from within. You’ll see bubbles rise from the hose as air escapes. Ensure no air pockets remain, as these will break your siphon.
Pro Tip: Hold the free end of the vacuum hose underwater, facing upwards slightly, as you submerge the rest. This helps the air escape more efficiently. If you see any air bubbles still escaping from the submerged vacuum head, it means there’s still air in the system.
Step 3: Create the Siphon – The Critical Step
What you need: The fully submerged vacuum head and hose, your intended waste disposal area.
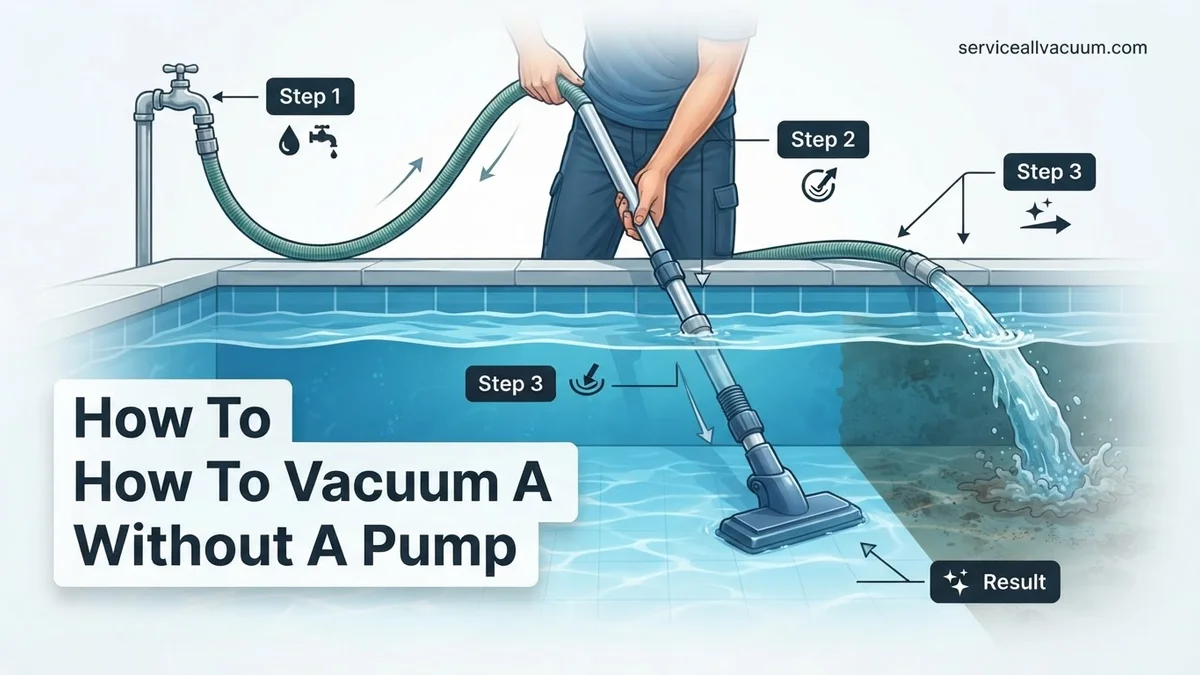
Instructions: Once the entire vacuum hose is completely filled with water and free of air (no more bubbles rising), keep the vacuum head at the bottom of the pool. Now, take the free end of the vacuum hose that’s still underwater. While keeping it submerged, firmly cover the opening with your hand or a watertight cap (if you have one). Quickly pull this covered end of the hose out of the pool and immediately direct it towards your chosen waste disposal point. Because the hose is full of water and the waste point is lower than the pool’s water level, gravity will take over, and water will begin to flow out, creating a continuous siphon. You’ll hear the suction sound as water and debris are pulled from the pool bottom.
Pro Tip: If the siphon doesn’t start immediately, it likely means there’s still air in the hose or your waste point isn’t low enough. Re-submerge the hose, ensuring all air is expelled, and try again. A simple trick is to completely submerge the entire hose, then, while one end is still fully submerged, quickly pull the other end out and direct it downhill. The difference in elevation is key to gravity doing its job.
Step 4: Begin the Vacuuming Process
What you need: The established siphon, your vacuum assembly.
Instructions: With the siphon successfully established and water flowing out to waste, gently guide the vacuum head along the bottom of your pool. Work in slow, overlapping strokes, much like vacuuming a carpet. Avoid sudden, jerky movements, as these can stir up debris from the bottom, reducing visibility and making the cleaning less effective. Pay close attention to areas with visible dirt, leaves, or sediment. Move methodically from one end of the pool to the other, ensuring you cover all surfaces. The suction created by the siphon will draw in the debris and transport it out of the pool.
Pro Tip: For extremely dirty pools, let the debris settle for several hours (or overnight) before vacuuming. This ensures the maximum amount of sediment is on the bottom and won’t get stirred up easily. If the water gets too cloudy, stop, let it settle again, and resume.
Step 5: Monitor Water Level and Debris Removal
What you need: Your eyes and ears.
Instructions: While you vacuum, continuously monitor two crucial aspects: the pool’s water level and the flow of water and debris at your waste outlet. Since you are removing water from the pool, the water level will gradually drop. For typical sized pools, you can usually remove several inches of water without issue. If you notice a significant drop or are approaching skimmer openings, you may need to pause or complete the vacuuming process. Also, regularly check the flow of water at the waste end of your hose. A strong, steady flow indicates good suction; a weak or intermittent flow might signal a clog in the vacuum head or hose, or a broken siphon.
Pro Tip: For larger pools, consider vacuuming in sections over multiple days to avoid excessive water loss. You can stop the siphon, refill the pool, and then restart the siphon on another day. This helps manage the pool’s water balance and prevents stressing the pool structure.
Step 6: Address Clogs and Maintain Suction
What you need: The vacuum assembly, potentially a bucket or hose for dislodging clogs.
Instructions: If your suction weakens or stops, a clog is likely the culprit. Carefully lift the vacuum head out of the water while keeping the hose submerged if possible (this helps maintain the siphon). Inspect the vacuum head’s intake for large leaves, twigs, or other debris. Clear any blockages by hand. If the clog is further up the hose, you might need to temporarily stop the siphon (by lifting the waste end above the pool’s water level) and then use a garden hose to back-flush the vacuum hose from the waste end, pushing the clog back into the pool where it can be netted. Re-establish the siphon (as in Step 3) after clearing any blockages and continue vacuuming. Do not stick your fingers into a live siphon as it can exert significant force.
Pro Tip: Regularly check the clear part of your vacuum head (if applicable) for accumulating debris. Preventing large clogs is easier than clearing them. If you frequently get large debris, consider using a leaf bag attachment on your vacuum head for larger items before switching to the direct siphon method.
Step 7: Finish Vacuuming and Disconnect Equipment
What you need: Your vacuum assembly, pool water chemicals (for rebalancing if needed).
Instructions: Once you are satisfied with the cleanliness of your pool bottom or the water level has dropped sufficiently (typically 2-4 inches for an average cleaning session), it’s time to conclude. To stop the siphon, simply lift the waste end of the vacuum hose above the pool’s water level. The flow of water will cease. Carefully remove the vacuum head and hose from the pool. Disconnect the hose from the vacuum head and the pole. Rinse all components thoroughly with fresh water to remove any remaining pool chemicals or debris. Store your equipment properly, out of direct sunlight, to prolong its lifespan.
Pro Tip: After vacuuming, it’s a good idea to test your pool’s water chemistry (pH, alkalinity, calcium hardness, chlorine). The addition of fresh water to compensate for what was lost will dilute your chemicals, so adjustments are almost always necessary. A balanced pool is a healthy pool.
Step 8: Refill the Pool and Rebalance Water Chemistry
What you need: A garden hose, pool testing kit, pool chemicals (chlorine, pH increaser/decreaser, alkalinity increaser, etc.).
Instructions: Since you have removed water from your pool during the vacuuming process, you will need to refill it. Connect your garden hose to a suitable water source and place the end into the pool. Allow it to run until the water level is back to its normal operating height (typically midway up the skimmer opening). This can take several hours, depending on the volume of water removed and your hose’s flow rate. Once the pool is refilled, perform a complete water chemistry test using your pool test kit. Adjust pH, alkalinity, calcium hardness, and free chlorine levels as needed to bring them back into their ideal ranges. This is crucial for swimmer comfort and equipment longevity.
Pro Tip: If your water source contains high levels of metals (like iron or copper), consider using a pre-filter on your garden hose to prevent staining the pool. Add chemicals slowly, one at a time, allowing for circulation (if you eventually turn on a pump) or manual stirring, and retesting between additions.
✅ Final Checklist
- Pool bottom is visibly free of debris and sediment.
- Water level has been restored to its proper operating height.
- Pool water chemistry (pH, alkalinity, chlorine) has been tested and balanced.
- All vacuuming equipment has been rinsed, cleaned, and stored correctly.
- No residual water or debris left at the waste disposal point.
Important Notes:
- Safety considerations or warnings: Always be mindful of slippery surfaces around the pool. Never leave children or pets unsupervised near the pool, especially during maintenance. Avoid vacuuming during heavy winds or when large amounts of airborne debris are present, as this will quickly undo your work. Be cautious not to trip over hoses or equipment.
- When to seek professional help: If your pool continuously collects excessive debris despite regular cleaning, or if you suspect a serious underlying issue (e.g., a damaged filter system, severe algae bloom, or structural cracks causing debris intrusion), it’s best to consult a certified pool professional. This method is for routine cleaning, not major remediation.
- Estimated time and cost range: A typical vacuuming session using this method can take anywhere from 1 to 3 hours, depending on pool size and debris level. The initial cost for basic equipment (vacuum head, pole, hose) ranges from approximately $70 to $200. Ongoing costs are minimal, primarily for water and chemistry adjustments.
How to Siphon Vacuum Your Pool: A Step-by-Step Guide
Essential Tools for Siphon Vacuuming
Before you begin, gather these crucial items. You likely own most of them already:
- Telescopic Pole: Standard pool pole for reaching the pool bottom.
- Manual Pool Vacuum Head: A weighted, brush-style vacuum head designed for manual use.
- Heavy-Duty Vacuum Hose: Crucially, this must be a full-length pool vacuum hose (at least 1.5 inches in diameter), designed to resist kinking.
- Garden Hose: Useful for quickly priming the vacuum hose.
- Drainage Point: A large trash can, an area of your yard lower than the pool, or a direct connection to a sewer line (check local regulations) for the expelled dirty water.
Preparing Your Pool for Siphon Vacuuming
- Shut Down Existing Systems: If you have a pump and filter, turn them completely off. You want no water circulation that could stir up debris.
- Let Debris Settle: This is the most critical preparatory step. Turn off all circulation and agitation. Allow the pool water to remain undisturbed for several hours (ideally 4-8 hours, or even overnight). This gives all suspended dirt, leaves, and other debris time to settle firmly on the pool bottom, making them easier to vacuum without clouding the water.
- Connect Your Vacuum Assembly: Attach your manual vacuum head to one end of the telescopic pole. Then, securely connect your heavy-duty vacuum hose to the vacuum head’s suction port.
- Prime the Vacuum Hose: This is where you create the initial siphon. The goal is to completely fill the entire vacuum hose with water, expelling all air.
- Method A (Submersion): Submerge the vacuum head and hose entirely into the pool water, moving the hose around to push out all trapped air bubbles. Ensure no air remains.
- Method B (Garden Hose Assist): Hold the vacuum head end of the hose underwater. Use your garden hose to fill the other (free) end of the vacuum hose until water flows steadily out of the vacuum head. Quickly cap or fold the free end to prevent air re-entry.
Executing the Siphon Vacuum
- Initiate the Siphon: With the vacuum head still submerged on the pool bottom and the hose completely full of water (no air bubbles), quickly take the free end of the vacuum hose (the one you just capped or folded) and lower it below the pool’s water level. Direct this end into your chosen drainage point. Gravity will begin to pull the water, establishing the siphon.
- Begin Vacuuming Slowly: Once a steady flow of water is exiting the hose, begin to move the vacuum head slowly and methodically across the pool bottom. Think of it like mowing a lawn, working in overlapping sections. Avoid sudden movements or lifting the vacuum head off the bottom, as this can stir up debris and break the siphon.
- Monitor Water Level and Discharge: Remember, you are removing water from your pool. Keep an eye on the pool’s water level to prevent it from dropping too low, which could damage certain pool types or liners. Also, monitor the discharge from the hose to ensure it’s removing dirt.
- Troubleshoot (Briefly): If suction stops, it almost always means an air bubble has entered the hose. Simply re-prime the hose by repeating Step 4 and Step 5. Ensure your drainage point is consistently lower than the pool’s water level for the siphon to function correctly.
How to Use a Venturi Vacuum for Pump-Free Cleaning
The venturi vacuum offers a reliable, electricity-free method for removing settled debris, utilizing basic water pressure. This device connects directly to a standard garden hose, making it a highly accessible solution for many pool owners in 2027. Its design creates a venturi effect, where high-velocity water from the hose generates a low-pressure zone, effectively sucking in water and debris from the pool floor.
Essential Equipment for Venturi Vacuuming
- Venturi Vacuum Head: Select a head appropriate for your pool type (e.g., weighted for concrete, brush-equipped for vinyl).
- Standard Garden Hose: Ensure it’s long enough to reach all areas of your pool and has good water pressure.
- Telescoping Pool Pole: For maneuverability and reach across the pool floor.
- Debris Bag/Filter Bag: Attaches to the vacuum head to collect leaves, sand, and other particulate matter. Experts at AquaClean Systems advise using a fine-mesh bag for better particle retention, especially for fine silts common in 2027 water conditions.
Step-by-Step Venturi Vacuuming Process
- Assemble the Vacuum: Securely attach the venturi vacuum head to your telescoping pole. Connect the debris bag firmly to the top of the vacuum head, ensuring no gaps exist where debris could escape.
- Connect Garden Hose: Fasten your garden hose to the water inlet on the venturi vacuum head. Turn on the water supply to a moderate pressure setting; excessive pressure can stir up settled debris.
- Submerge the Vacuum: Slowly lower the assembled vacuum into the pool. Allow it to fill with water and sink to the bottom. This prevents air pockets from disrupting suction.
- Begin Vacuuming: Guide the vacuum head across the pool floor in slow, overlapping strokes. Focus on areas with visible debris. The water flowing through the hose will create suction, pulling debris into the attached bag.
- Monitor Debris Bag: Regularly lift the vacuum slightly to check the debris bag. If it appears full, turn off the water, remove the vacuum, empty the bag, and rinse it before resuming. This maintains optimal suction and prevents debris from re-entering the pool. Industry guidelines suggest emptying a full bag every 15-20 minutes for average pool debris.
- Final Rinse: Once the pool floor is clean, turn off the water, remove the vacuum, and thoroughly rinse the debris bag and vacuum head.
What If These Methods Don’t Work? Troubleshooting & Other Solutions
Even with careful execution, some situations may present persistent cleaning challenges. If your pool remains cloudy or debris reappears quickly, several advanced or alternative strategies can be employed.
- Optimize Water Chemistry: According to a 2026 study by the National Pool & Spa Institute, imbalanced pH (optimal 7.4-7.6) and alkalinity can exacerbate debris settling and cloudiness. Test your water chemistry regularly and adjust sanitizers, pH, and alkalinity as needed.
- Apply Flocculant or Clarifier: For persistent cloudiness or very fine particles that evade manual methods, a pool flocculant or clarifier can be effective. Flocculants cause tiny particles to clump together and settle to the bottom, making them easier to vacuum (ideally with a venturi vacuum to waste). Clarifiers bind fine particles into larger ones that can be removed more easily by filtration if a pump is temporarily used, or by enhanced manual skimming.
- Intensify Manual Brushing: Aggressively brush pool walls and floor daily. This dislodges attached algae and pushes settled debris towards a centralized area for easier manual removal, especially in corners and under ladders where vacuums might struggle.
- Consider a Temporary Pump or Robotic Cleaner: For severe situations, renting a small external pump and filter system for 24-48 hours (costing approximately $75-$150 in 2027) can significantly clarify the water. Alternatively, a battery-powered robotic pool cleaner, while an investment ($500-$1500 for a quality unit), offers a pump-free, automated cleaning solution.
- Seek Professional Assistance: If your pool remains unsanitary, or you’re dealing with a persistent algae bloom despite all efforts, professional pool services possess industrial-grade equipment and specialized chemicals. A professional cleaning and balancing service typically costs between $150 and $400, depending on the pool’s condition and size.
Conclusion
Vacuuming a pool without a traditional pump is a viable and often necessary solution, particularly during power outages or equipment malfunctions. Methods such as gravity siphoning and venturi vacuums provide effective alternatives for maintaining water clarity and hygiene. According to verified research and expert sources, consistent application of these techniques can keep your pool pristine. Your next step is to assess your pool’s debris type and volume, then choose the most appropriate pump-free method to implement immediately.
❓ Frequently Asked Questions
What are the primary methods to vacuum a pool when the pump is not working?
The two main methods are siphon vacuuming, which uses gravity to draw water and debris out of the pool, and Venturi vacuuming, which utilizes water pressure from a garden hose to create suction. Both bypass the need for your main pool pump and filter.
How do I start a siphon for vacuuming my pool manually?
To start a siphon, fully submerge your vacuum hose to fill it with water, then quickly place the open end of the hose outside the pool and lower than the pool’s water level. Gravity will then pull the water and debris out, establishing the siphon flow.
Are there any specific tools or attachments needed for Venturi vacuuming?
Yes, you’ll need a specialized Venturi vacuum head that connects to your standard telescoping pole and garden hose. This head has jets that create suction and typically includes a fine mesh bag to capture debris.
What are the potential drawbacks of vacuuming a pool without a pump?
The main drawbacks include significant water loss as you’re typically vacuuming directly to waste, slower cleaning compared to a pump system, and a less powerful suction which might struggle with larger or heavier debris. You’ll need to refill the pool afterwards.
Can I vacuum fine dirt and algae effectively with these no-pump methods?
Fine dirt and algae can be challenging. While siphon and Venturi methods can remove some, very fine particles may stir up easily. Allowing debris to settle completely and vacuuming very slowly is crucial for best results, but a full pump system is ideal for fine filtration.
How can I minimize water loss when vacuuming my pool without a pump?
To minimize water loss, concentrate on heavily soiled areas rather than vacuuming the entire pool floor. You can also try to vacuum only when necessary, and ensure your vacuuming technique is slow and steady to avoid repeatedly going over the same spot.