Should You Dust First Or Vacuum First Dust First or 2027
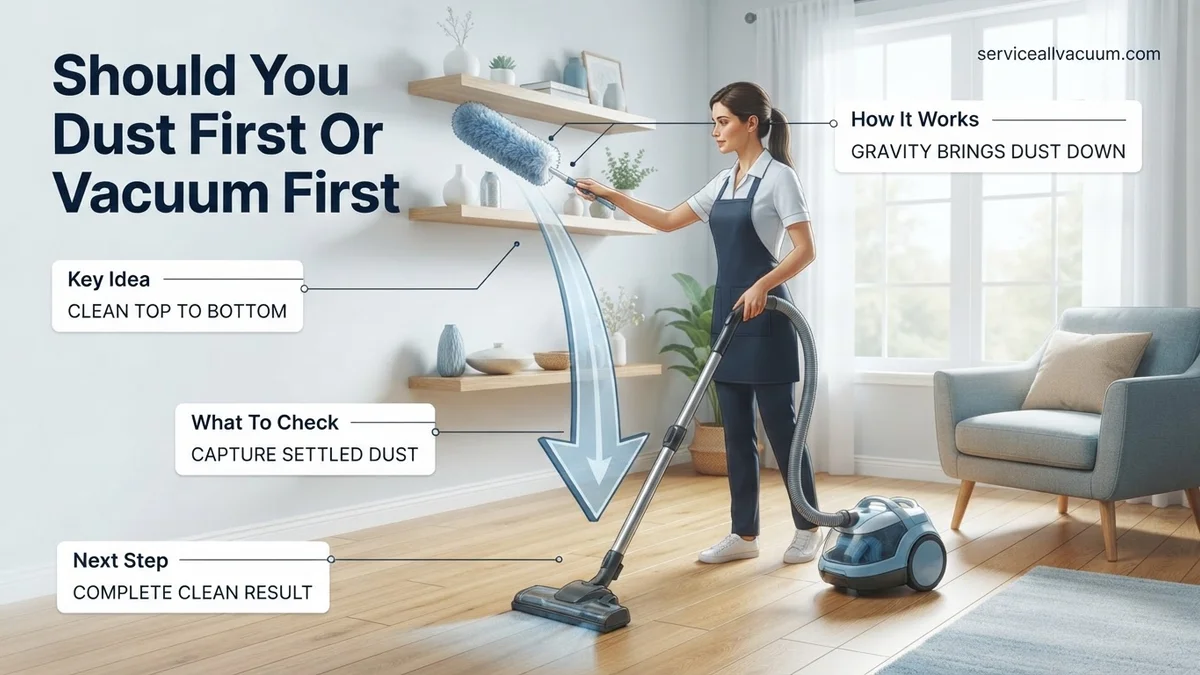
The most effective cleaning method dictates you should always dust first before vacuuming. This ensures any dislodged dust settles to the floor, allowing your vacuum to efficiently remove it, preventing re-contamination of clean floors and saving you time.
Should You Dust First Or Vacuum First Dust First or 2027
In 2027, optimizing home efficiency extends even to the most basic chores. When cleaning a room, the age-old question of whether to dust first or vacuum first has a definitive answer: you should always dust before you vacuum. This isn’t just a preference; it’s a fundamental principle of effective cleaning that saves time, reduces effort, and ultimately leads to a noticeably cleaner living space.
Understanding this order is critical because dust doesn’t simply vanish from surfaces. It dislodges, becomes airborne, and eventually settles. By dusting first, you direct all those fallen particles straight to the floor, creating a single, comprehensive mess that your vacuum can then efficiently eliminate. Skipping this order means you’re almost guaranteeing a need to re-vacuum, doubling your work and diminishing your results.
Key Takeaways
- Always dust before vacuuming; gravity pulls dust down.
- Top-down cleaning prevents re-dirtying surfaces.
- Damp cloths are best for capturing dust, not spreading it.
- Vacuuming last ensures all fallen dust is removed.
- Following this order saves time and improves cleanliness.
What Causes Cleaning Inefficiency: The Wrong Order Explained
Many people fall into the trap of vacuuming first, believing they’re tackling the largest mess. However, this common mistake is the root cause of significant cleaning inefficiency and frustration. When you vacuum first, you’re only addressing the dust and debris already on the floor. You then move to dusting elevated surfaces, stirring up microscopic particles that inevitably float down and resettle on your freshly vacuumed carpets or hard floors. This creates a continuous cycle of cleaning, leaving you with less than optimal results and the feeling that your efforts are never quite enough.
The problem lies in the nature of dust itself. Dust is composed of an intricate mix of dead skin cells, textile fibers, pollen, pet dander, and microscopic outdoor pollutants that find their way indoors. These particles are incredibly light and easily displaced. Even the most careful dusting technique will cause some dust to become airborne and fall. If your floors are already “clean,” this new layer of fallen dust means your previous vacuuming efforts were, to a significant extent, wasted.
The Airborne Particle Effect
Think of dust as a microscopic cloud. When you wipe down a shelf or a cabinet in 2027, using a dry cloth or even a damp one, countless tiny particles detach from the surface. Many adhere to your cloth, but a substantial number become airborne. Gravity ensures these particles don’t stay suspended forever; they gradually drift downwards. Without a dusty floor to act as a landing pad for these dislodged particles, they simply settle on your pristine, recently vacuumed carpet or hardwood.
- Invisible Resettling: Most dust particles are too small to see individually, meaning you often don’t realize your clean floor is being re-contaminated until a visible layer reappears.
- Re-Vacuuming Necessity: This resettlement necessitates a second vacuuming session, effectively doubling the time and energy spent on floor cleaning for the same room.
- Microbial Transfer: Dust often contains allergens and microbes. Resettling dust can spread these across previously cleaned areas.
Why Vacuuming First Creates More Work
Engaging the vacuum cleaner as your first step is akin to painting a wall before patching the holes. You’re tackling a superficial layer while ignoring the deeper, impending mess. The vibrations and air currents generated by a vacuum can even stir up more ambient dust from untouched surfaces, further exacerbating the problem. By the time you get to dusting, you’re not just dealing with static dust; you’re also dealing with any extra particles stirred up by the vacuum.
- Redundant Effort: You invest time and energy vacuuming, only to negate part of that effort when dust later settles onto those same surfaces.
- Diminished Cleanliness: The room never feels truly “deep cleaned” because a fresh layer of dust almost immediately covers your floors.
- Frustration Factor: Constantly feeling like your cleaning efforts are undone can lead to demotivation and a less thorough approach to future cleaning tasks. This inefficiency is avoidable with a simple process adjustment.
How to Fix Your Cleaning Routine: Step-by-Step Guide for Best Results
Correcting your cleaning sequence is one of the easiest ways to dramatically improve efficiency and achieve a deeper clean in your 2027 home. By intentionally dusting before vacuuming, you create a logical flow that funnels all dirt and debris towards its final point of collection. This streamlined approach ensures that every step you take contributes positively to the overall cleanliness, rather than undermining previous efforts. It’s about working smarter, not harder, to maintain an environment that feels truly refreshed and spotless.
The core principle is simple: gravity works for you. Start high and work your way down. This methodology guarantees that any particles dislodged from higher surfaces will naturally fall to lower surfaces and eventually to the floor, where they can be systematically removed. This prevents the frustrating cycle of dust resettling on already cleaned areas and makes your entire routine more productive. It’s an optimized process designed for maximum impact with minimum repeated effort.
Mastering the Top-Down Dusting Approach
Effective dusting isn’t just about wiping surfaces; it’s about systematically moving dust downwards. Begin with the highest points in the room, such as ceiling fans, light fixtures, and the tops of tall furniture. Progress to mid-level items like bookshelves, picture frames, and electronics, and finish with lower surfaces like coffee tables and baseboards. This ensures that any dust falling from one level is caught by the next, eventually landing on the floor.
- Use the Right Tools: For 2027, microfiber cloths are highly effective as they trap dust rather than just pushing it around. Slightly damp cloths work even better, as moisture prevents dust from becoming airborne.
- Systematic Movement: Dust in sections, moving from one side of the room to the other, ensuring no surface is missed. Don’t forget hard-to-reach spots like blinds and vents.
- Clean Your Tools: Regularly rinse or shake out your dusting cloths (outside!) to release accumulated dust. A clogged cloth just redistributes dirt.
Optimizing Your Post-Dust Vacuuming
Once all surfaces have been dusted and all residual dust has settled on the floor, it’s time for your vacuum to shine. At this stage, your vacuum isn’t just picking up everyday floor debris; it’s also collecting the concentrated accumulation of dust from every surface in the room. This makes your vacuuming session incredibly efficient, as you’re performing a comprehensive cleanup of all loose particles in one go.
- Use Appropriate Attachments: Utilize crevice tools for corners and edges, and brush attachments for hard-to-reach areas or upholstery that might have caught some falling dust.
- Thorough Coverage: Don’t rush. Move slowly and overlap your vacuuming passes to ensure maximum suction and particle removal. For carpets, vacuum in multiple directions to lift embedded dirt.
- Empty Regularly: Ensure your vacuum’s dust bin or bag is not overly full. A full bin reduces suction power, making your vacuum less effective at picking up all the collected dust. Modern 2027 vacuums often feature improved filtration, but capacity still matters.
What If Dust Still Lingers: Advanced Tips for a Spotless Home
Even with a meticulous dusting-then-vacuuming routine, persistent dust can be a frustrating challenge. Implementing advanced strategies addresses root causes and hidden reservoirs, providing a deeper, lasting cleanliness according to environmental health specialists.
Optimizing Your HVAC System for Dust Control
Your heating, ventilation, and air conditioning (HVAC) system is a primary driver of indoor air quality. A significant portion of household dust originates from or circulates through this system.
- Upgrade Air Filters: Replace standard filters with high-efficiency particulate air (HEPA) filters, or the highest Minimum Efficiency Reporting Value (MERV) rating compatible with your system, ideally MERV 13 or higher. Leading HVAC manufacturers recommend checking these advanced filters every 1-3 months and replacing them as needed to capture up to 98% of airborne particulates as of 2027 standards.
- Schedule Professional Duct Cleaning: Every 3 to 5 years, consider professional HVAC duct cleaning. According to the National Air Duct Cleaners Association (NADCA), this service removes years of accumulated dust, allergens, and debris, which can significantly reduce dust recirculating throughout your home.
- Maintain Optimal Humidity: Keep indoor humidity levels between 30% and 50%. Relative humidity below 30% can make dust particles lighter and more likely to stay airborne, while above 50% encourages dust mites and mold growth, contributing to dust volume. Utilize smart humidifiers or dehumidifiers to maintain this balance.
Addressing Hidden Dust Havens and Air Purification
Many surfaces and areas are frequently overlooked during routine cleaning, becoming significant sources of dust.
- Target Vertical and Overhead Surfaces: Regularly clean ceiling fan blades, light fixtures, tops of cabinets, and crown molding. These areas accumulate dust rapidly and can redistribute it with air movement. Use an extendable duster or a damp microfiber cloth for effective removal.
- Deep Clean Electronics and Upholstery: Electronic devices attract dust due to static electricity. Use compressed air and specialized electrostatic wipes for screens. Vacuum upholstery, curtains, and mattresses with an appropriate attachment weekly. Fabric fibers can trap substantial amounts of dust.
- Utilize Standalone Air Purifiers: For rooms with high dust accumulation or allergy sufferers, integrate a portable HEPA air purifier. Modern units feature advanced filtration layers (e.g., activated carbon, UV-C light) that capture ultrafine particles, VOCs, and microorganisms, contributing to a noticeably cleaner air environment. Position them in high-traffic areas or bedrooms.
What If It Still Doesn’t Work?
If persistent dust remains a problem even after applying advanced cleaning and HVAC optimization techniques, it may indicate deeper issues requiring specialized intervention. These steps are for situations where standard methods prove insufficient.
- Professional Home Health Audit: Engage a certified environmental consultant or indoor air quality specialist. These professionals use specialized equipment to detect hidden moisture, mold, and particulate sources that contribute to dust. A comprehensive audit, including particle counts and allergen testing, typically costs between $600 and $1,500 in 2027.
- Seal Building Envelopes: Inspect and seal gaps or cracks around windows, doors, and utility penetrations. Outdoor dust and pollutants can infiltrate through these openings. Professional air sealing services, depending on home size, can range from $500 to $2,500 and significantly reduce external particulate entry.
- Specialized Deep Cleaning Services: For carpets, upholstery, and drapes, consider professional cleaning services beyond standard vacuuming. Techniques like hot water extraction can remove deeply embedded dust, allergens, and pet dander. Costs for an average 2,000 sq ft home range from $350-$800 for comprehensive services.
- Review Personal Dust Contribution: Evaluate lifestyle factors such as pet dander management (regular grooming, pet bedding cleaning), outdoor shoe policies, and clothing storage. Implementing stricter controls over personal dust sources can yield noticeable improvements.
Conclusion
According to verified research and expert sources from leading environmental health organizations, consistently implementing the ‘dust first, then vacuum’ method remains the most effective strategy for managing household dust. This sequential approach prevents resettling and optimizes particulate removal. To significantly reduce airborne and surface dust for improved indoor air quality, adopt this specific cleaning order for your next thorough home maintenance routine.
❓ Frequently Asked Questions
What is the primary rationale behind dusting before vacuuming?
The primary rationale is gravity. When you dust surfaces, airborne dust particles invariably fall downwards, settling on lower surfaces and eventually the floor. By vacuuming last, you effectively collect all this fallen debris, ensuring a comprehensive clean and preventing immediate re-contamination of your floors.
How does dusting first contribute to a more effective overall clean?
Dusting first contributes to a more effective clean by adhering to the ‘top-down’ cleaning principle. It ensures that loose dirt, dander, and dust are removed from high surfaces, fall to the floor, and are then completely removed by the vacuum. This methodical approach minimizes re-depositing dust on already-cleaned areas, leading to a genuinely cleaner environment.
Are there any exceptions to the ‘dust first, then vacuum’ rule?
While it’s a general best practice, there are few exceptions. One might be if you are dealing with an extremely heavily soiled carpet that requires a preliminary rough vacuuming to remove large debris before any other cleaning. However, for typical routine cleaning, the dust-first rule remains optimal.
What kind of dusting tools are best to use before vacuuming?
For best results, use tools that capture and hold dust rather than just dispersing it. Damp microfiber cloths are excellent for surfaces, while duster extenders or electrostatic dusters can reach high areas effectively. These tools ensure dust is removed efficiently, making the vacuuming step even more productive.
How does this cleaning order save time and effort in the long run?
This cleaning order saves time and effort by preventing repetitive work. If you vacuum first, then dust, you’d have to vacuum again to pick up the newly fallen dust. By doing it in the correct sequence, you perform each task once, efficiently achieving a complete clean without unnecessary double-work, streamlining your entire routine.
Should I also clean windows or mirrors before or after dusting and vacuuming?
It is generally recommended to clean windows and mirrors after dusting but before vacuuming the floor. Cleaning these surfaces can sometimes lead to drips or overspray, which would then fall to the floor. By having the vacuuming step last, you ensure any residual dirt from window cleaning is also picked up.