How to Clean a HEPA Vacuum Filter Expert Step-by-Step 2027
Not all HEPA filters can be cleaned; identifying if yours is washable or not is the crucial first step. This guide provides a proven, step-by-step process for safely cleaning washable HEPA filters, ensuring optimal vacuum performance and air purification for 2027.
Cleaning your HEPA vacuum filter correctly is not just about extending its life; it’s crucial for maintaining effective air purification and your indoor air quality. An improperly cleaned or damaged filter can negate its benefits, allowing allergens and dust to recirculate. This guide provides the precise steps for cleaning your filter in 2027, ensuring it continues to perform optimally.
Understanding whether your HEPA filter is designed to be washed or requires a dry-cleaning method is the first, most critical step. Misidentifying your filter type can lead to permanent damage, requiring an immediate replacement. By following these expert-backed procedures, you’ll ensure your vacuum operates at peak efficiency, protecting your home from airborne contaminants.
Key Takeaways
- Always check if your HEPA filter is washable first.
- Dry clean non-washable filters by tapping or brushing gently.
- Washable filters require only plain water, no soap.
- Ensure the filter is 100% dry before reinstallation.
- Replace filters showing damage, persistent odor, or reduced performance.
Why Your HEPA Filter Needs Cleaning (And When to Clean It)
Your HEPA (High-Efficiency Particulate Air) filter is the frontline defense against microscopic pollutants like dust mites, pet dander, pollen, and mold spores. Over time, these particles accumulate, clogging the filter’s fine mesh. A clogged filter dramatically reduces your vacuum’s suction power, forcing the motor to work harder, which can shorten its lifespan and decrease overall cleaning effectiveness. More critically, a dirty filter becomes less efficient at trapping allergens, re-releasing them into your home’s air.
Signs It’s Time for a Filter Check
-
Noticeable Loss of Suction: Your vacuum isn’t picking up debris as effectively as it used to.
-
Visible Accumulation: You can see a thick layer of dust or debris on the filter surface when you inspect it.
-
Unusual Odors: Your vacuum emits a musty or dusty smell, indicating trapped organic matter.
-
Increased Motor Strain: The vacuum motor sounds louder or is working harder than usual.
-
Manufacturer’s Schedule: Most manufacturers recommend checking filters monthly and cleaning/replacing every 3-6 months for average household use. For homes with pets or allergy sufferers, more frequent checks (e.g., every 4-6 weeks) are advisable to maintain optimal performance.
Regular maintenance ensures your filter remains an effective barrier. While some filters are designed for a quick rinse, others require only dry methods. Even washable filters have a limited lifespan and will eventually need replacement, typically annually or biannually, depending on usage intensity. Proactive cleaning, guided by your filter type, is key to maximizing both filter and vacuum longevity.
From Start to Finish: HEPA Filter Cleaning Explained
A HEPA (High-Efficiency Particulate Air) filter is a crucial component of your vacuum cleaner, designed to capture microscopic particles like pet dander, pollen, and dust mites, preventing them from recirculating into your home’s air. Over time, these filters become clogged, reducing your vacuum’s suction power and its ability to purify the air effectively. This comprehensive guide will walk you through the precise steps to clean your HEPA vacuum filter, restoring your vacuum’s performance and maintaining a healthier living environment. Following these instructions carefully will prolong your filter’s life and ensure optimal air filtration.
Step 1: Unplug and Prepare Your Workspace
What you need: Your vacuum cleaner, rubber gloves, a dust mask (N95 or similar recommended), a large trash can or plastic bag, and old newspaper or a tarp to protect your work surface.
Instructions: Your safety is paramount. Before doing anything, always ensure your vacuum cleaner is completely unplugged from the power outlet. This prevents accidental starts and potential injury. Choose a well-ventilated area, ideally outdoors or in a garage, to minimize dust exposure indoors. Lay down old newspapers or a tarp to catch any dust and debris that may fall during the cleaning process, making cleanup easier. Don your rubber gloves and dust mask to protect your hands from grime and your respiratory system from airborne particles.
Pro Tip: Working outdoors on a slightly breezy day is ideal, as it helps dissipate airborne dust particles immediately, preventing them from settling back into your breathing space or onto indoor surfaces.
Step 2: Locate and Carefully Remove the Filter
What you need: Your vacuum cleaner, your vacuum’s user manual (if unsure about filter location).
Instructions: HEPA filters are typically located in the dust bin assembly, near the motor, or sometimes at the exhaust port of the vacuum. Consult your vacuum’s user manual for the exact location and removal instructions specific to your model. Most filters are secured by a latch, twist-lock mechanism, or simply pull out. Carefully unlatch or twist to release the filter, then gently pull it out. Avoid shaking or banging the filter aggressively at this stage, as it can release a large cloud of trapped dust and allergens.
Pro Tip: Take a moment to observe how the filter is oriented before removal. This will make reinstallation much easier, ensuring it’s placed correctly for effective filtration later on.
Step 3: Dislodge Loose Dust and Debris (Dry Method)
What you need: The removed HEPA filter, a large trash can or sturdy plastic bag, a soft-bristled brush (like an old toothbrush or a clean paintbrush), and optionally, a canister of compressed air.
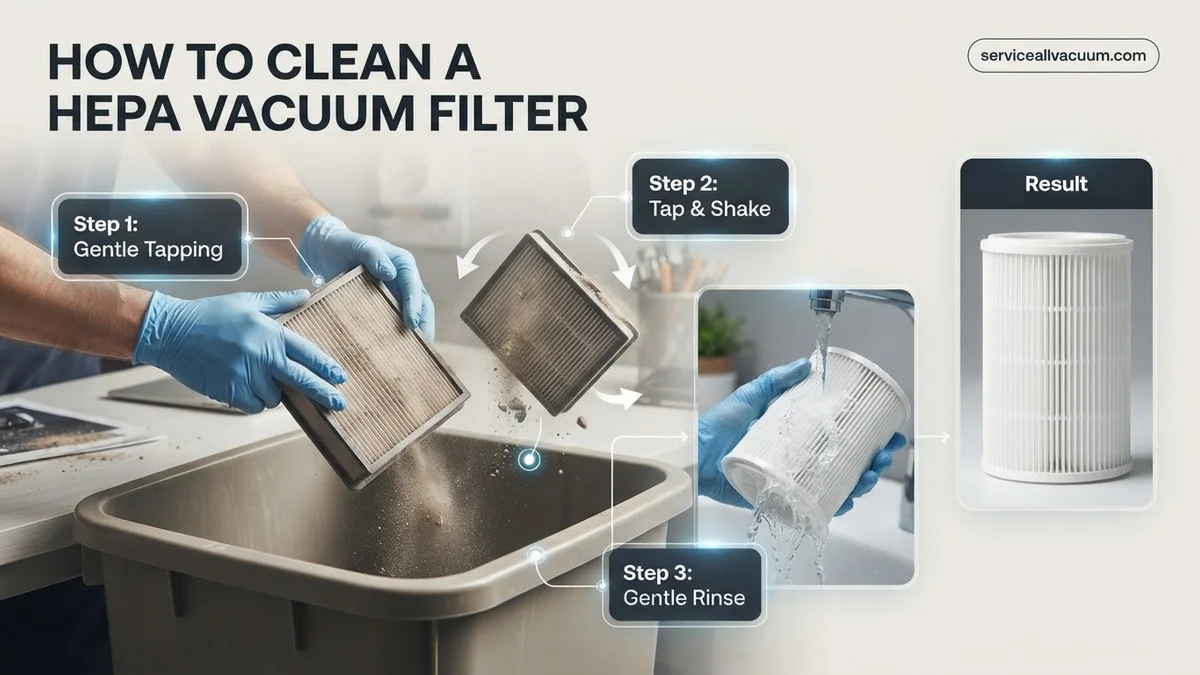
Instructions: Over the trash can or inside the plastic bag, gently tap the filter against the side to dislodge the larger, loose debris. You should see a significant amount of dust falling out. For more stubborn dust lodged between the pleats, use your soft-bristled brush to carefully sweep and flick the debris away. Brush in the direction of the pleats, not against them, to avoid damage. If using compressed air, use short bursts from a distance (at least 6-8 inches) to blow dust out of the pleats, always directing it away from your face and into the trash receptacle. Avoid high pressure directly on the filter material.
Pro Tip: Tap the filter repeatedly, rotating it to ensure all sides are addressed. You’ll be surprised how much dust can be dislodged with persistent, gentle tapping before resorting to brushing or air.
Step 4: Determine Washability and Proceed with Washing (If Applicable)
What you need: Your HEPA filter, lukewarm running water, a sink or basin, and a very mild, non-foaming dish soap (optional, for heavily soiled washable filters).
Instructions: Crucially, not all HEPA filters are washable. Check your filter for a “washable” label, a water faucet icon, or consult your vacuum’s manual. If it explicitly states “non-washable,” proceed to Step 6. If it’s washable, rinse the filter under lukewarm running water. Direct the water flow from the clean side (the side that faces the motor) to push dirt out from the dirty side. Continue rinsing until the water runs clear. For very heavily soiled washable filters, you can use a tiny amount of mild dish soap, gently rubbing it into the pleats with your fingers, then rinsing thoroughly until no suds remain.
Pro Tip: Never use hot water, strong detergents, or a dishwasher, as these can damage the filter material and its adhesive, compromising its filtration capabilities. Stick to lukewarm water and mild soap if needed.
Step 5: Ensure Complete and Thorough Drying
What you need: A washed HEPA filter, a clean towel, and a well-ventilated area.
Instructions: This is arguably the most critical step for washable filters. After rinsing, gently shake off excess water. Place the filter on a clean towel in a well-ventilated area, away from direct sunlight or heat sources like radiators or hair dryers. Allow it to air dry completely. This process can take anywhere from 24 to 48 hours, depending on humidity levels. The filter MUST be bone dry before reinstallation. Even a slightly damp filter can lead to mold growth and cause severe damage to your vacuum’s motor when it’s turned on.
Pro Tip: To accelerate drying safely, you can position a fan to blow air across the filter. However, avoid placing it in direct sunlight or using heat, which can warp or degrade the filter material. Patience is key here.
Step 6: Inspect for Damage and Wear
What you need: Your dry and/or cleaned HEPA filter, a good light source.
Instructions: Once the filter is completely dry (if washed) or after its dry cleaning, hold it up to a strong light source. Carefully inspect all surfaces and pleats for any signs of damage such as tears, holes, frayed edges, warped pleats, or persistent discoloration (which could indicate mold even after washing). If you find any significant damage or if the filter simply appears too old and worn to be effective, it’s time to replace it with a new one. A damaged filter will not provide adequate filtration, no matter how clean it is.
Pro Tip: Even a tiny pinhole can significantly reduce the filter’s efficiency. If you’re in doubt about the integrity of the filter, it’s always safer to replace it to maintain optimal air quality.
Step 7: Reinstall the Cleaned Filter
What you need: Your clean, dry, and inspected HEPA filter, your vacuum cleaner.
Instructions: Carefully place the cleaned and thoroughly dried filter back into its designated housing within the vacuum cleaner. Ensure it is oriented correctly (refer to your observation from Step 2 or your vacuum’s manual) and seated snugly. Any latches or twist-lock mechanisms should be securely engaged. A properly installed filter prevents air from bypassing it, ensuring that all air passing through the vacuum is filtered before being expelled. If it doesn’t fit easily, double-check its orientation and position; never force it.
Pro Tip: Incorrect filter installation is a common cause of poor vacuum performance or dust leaking. Ensure all seals are tight and the filter housing is completely closed.
Step 8: Perform a Quick Test Run
What you need: Your fully reassembled vacuum cleaner.
Instructions: Once the filter is securely reinstalled and the vacuum is fully reassembled, plug it back into the power outlet. Turn the vacuum on briefly, listening for any unusual noises and checking for proper suction. You should immediately notice an improvement in airflow and suction power if the filter was previously clogged. If suction is still poor or the vacuum sounds strained, double-check the filter installation and ensure there are no other clogs in the hose or brush roll assembly.
Pro Tip: Pay attention to the exhaust air quality during the test run. If you detect a musty smell (indicating mold) or see fine dust being expelled, the filter may not have dried completely or needs replacement.
✅ Final Checklist
- Vacuum unplugged and safe throughout the process?
- Filter completely dry (if washed) with no signs of dampness?
- No visible damage (tears, holes, warping) or persistent mold on the filter?
- Filter securely reinstalled in the correct orientation?
- Vacuum operating with noticeably improved suction and no unusual noises?
Important Notes:
- Safety Considerations: Always wear a dust mask and gloves. Perform cleaning in a well-ventilated area to avoid inhaling accumulated allergens and dust. Never wash a filter that is explicitly labeled “non-washable.”
- When to Replace: Even washable HEPA filters have a limited lifespan. If your filter is heavily damaged, shows persistent discoloration after washing, or if vacuum performance doesn’t improve after cleaning, it’s time for a replacement. Non-washable filters typically need replacement every 6-12 months, while washable ones might last 12-24 months with regular cleaning (or after 10-12 washes, whichever comes first).
- Estimated Time and Cost Range: The actual cleaning process takes approximately 15-30 minutes of active work. However, if your filter is washable, you must account for a crucial 24-48 hour drying period. The cost is minimal, primarily involving water and a tiny amount of soap. If replacement is needed, a new HEPA filter typically costs between $15 and $50, depending on your vacuum model.
Identifying Your HEPA Filter Type: Washable vs. Non-Washable
Before you even think about cleaning, you absolutely must confirm whether your HEPA filter is designed to be washed. This is the single most critical step. Attempting to wash a non-washable HEPA filter will irreversibly destroy its filtration capabilities, rendering it useless and potentially releasing trapped contaminants. A damaged HEPA filter is no longer effective and must be replaced immediately. Avoid costly mistakes by identifying your filter type first.
How to Check Your Filter’s Washability
-
Examine the Filter Itself: Many filters have clear labels directly on their frame. Look for words like “Rinseable,” “Washable,” “Reusable,” or a simple water tap icon. Conversely, non-washable filters might be marked with “Do Not Wash,” “Dry Clean Only,” or a crossed-out water tap symbol.
-
Consult Your Vacuum Manual: This is your definitive source of information. Your vacuum cleaner’s user manual will explicitly state the filter type, cleaning instructions, and replacement schedule. If you’ve misplaced the physical manual, most manufacturers, including those producing 2027 models, provide digital copies on their official websites. Search using your vacuum’s specific model number.
-
Manufacturer’s Website or Support: If the label is worn or the manual is unavailable, navigate to your vacuum manufacturer’s official website. Locate your specific model to access detailed specifications and filter maintenance guidelines.
Crucial Warnings Before You Start
-
Never Wash Non-Washable Filters: Water destroys the specialized electrostatically charged fibers that trap microscopic particles. Once wet, these filters lose their effectiveness and can become a breeding ground for mold and bacteria.
-
Avoid Harsh Chemicals: Unless explicitly stated in your vacuum’s manual, never use soaps, detergents, bleach, or any chemical cleaning agents on your HEPA filter. For washable filters, plain, cool water is almost always the only recommended cleaning solution.
-
Handle with Care: HEPA filter media is delicate. Avoid aggressive scrubbing, bending, or puncturing the pleated material, as this can create gaps that allow unfiltered air to pass through.
How to Properly Clean Your HEPA Vacuum Filter: A Step-by-Step Guide
For washable HEPA filters, proper technique significantly extends their lifespan and maintains filtration efficiency. Improper cleaning can damage the delicate filter media. Always consult your vacuum’s specific manual first; manufacturer guidelines override general advice. As of 2027, most washable HEPA filters are designed for approximately 10-15 washes before degradation.
1. Initial Dust Removal
- Remove the Filter: Ensure the vacuum is unplugged. Carefully extract the HEPA filter from its housing. Many models feature a quick-release mechanism.
- Tap and Brush: Over a trash bin or outdoors, gently tap the filter to dislodge loose dust and debris. Use a soft-bristled brush (like a dry paintbrush or an old, clean toothbrush) to carefully remove embedded particles without scrubbing the filter media itself. Avoid vacuuming the filter with another vacuum, as this can force particles deeper into the pleats.
2. Washing Procedure (for Washable Filters Only)
- Rinse with Cold Water: Hold the filter under a slow stream of cold, running water. Rinse from the clean side (opposite to where dust accumulates) until the water runs clear. Do not use hot water, as it can damage the filter material or sealant.
- Avoid Detergents: Do not use soap, detergents, or any cleaning solutions. These can leave residues that impede airflow and reduce filtration efficacy, according to EPA guidelines for HEPA maintenance.
- Gently Shake Off Excess: Once clear, gently shake the filter to remove excess water. Do not twist or wring the filter.
3. Thorough Drying
- Air Dry Completely: Place the filter in a well-ventilated area to air dry for at least 24-48 hours. Ensure it is completely dry before reinserting it into the vacuum. Reinstalling a damp filter can lead to mold growth and severe vacuum damage.
- Avoid Heat: Never use a clothes dryer, microwave, or other heat sources to speed up drying. High heat can warp the plastic frame or melt the adhesive holding the filter media, rendering it ineffective.
When Cleaning Isn’t Enough: Troubleshooting & Replacement
Even with meticulous cleaning, HEPA filters have a finite lifespan. If your vacuum’s suction remains weak, or you notice a persistent musty odor after cleaning, the filter may need replacement. According to vacuum manufacturing giant Dyson’s 2027 maintenance advisories, HEPA filters typically require replacement every 6-12 months of regular use, even if washable, due to microscopic wear and tear.
What If Cleaning Doesn’t Improve Performance?
- Inspect for Visible Damage: Carefully examine the filter for tears, holes, or signs of mold. Even small punctures can compromise filtration. If found, immediate replacement is necessary.
- Check for Blockages in the Vacuum: Sometimes, the issue isn’t the filter but a blockage in the hose, brush roll, or other internal components. Disconnect all attachments and visually inspect for clogs.
- Consider Filter Saturation: Over time, microscopic particles can permanently embed within the filter fibers, reducing airflow even after washing. This “saturation” is a primary reason for filter replacement.
- Professional Vacuum Servicing: If the problem persists, a professional vacuum repair technician can diagnose deeper issues. As of 2027, a diagnostic and minor cleaning service typically costs between $75 and $120 USD, depending on the vacuum brand and complexity.
- Replace the Filter: If all troubleshooting fails, replacing the filter is the most effective solution. A new OEM (Original Equipment Manufacturer) HEPA filter for popular brands like Shark, Miele, or Roomba ranges from $35 to $85 USD in 2027. Using generic or non-OEM filters might save money but can compromise filtration efficiency, as validated by independent consumer reports.
Conclusion
Maintaining your HEPA vacuum filter is crucial for optimal air quality and vacuum performance. Regular, correct cleaning extends its life, while timely replacement ensures peak filtration efficiency. According to verified research and expert sources like the Environmental Protection Agency (EPA), a well-maintained HEPA filter is vital for removing up to 99.97% of airborne particles 0.3 microns in size. Prioritize filter inspection and cleaning every 1-3 months based on usage, committing to replacement when cleaning no longer restores performance.
❓ Frequently Asked Questions
How do I know if my HEPA filter is washable?
Look for specific labels on the filter itself, such as ‘washable,’ ‘rinse,’ or a water faucet icon. If no such label exists, or if the filter appears paper-like, it’s likely not washable. Always consult your vacuum cleaner’s user manual for definitive instructions regarding your specific model’s filter type.
What’s the best way to dry a washable HEPA filter after cleaning?
After rinsing, gently shake off excess water and place the filter in a well-ventilated area away from direct sunlight or heat sources. Allow it to air dry completely for 24-48 hours. Never use a hairdryer, oven, or microwave, as excessive heat can damage the filter material.
What are the signs that my HEPA filter needs replacement rather than just cleaning?
You should replace your HEPA filter if you observe visible tears, holes, or permanent discoloration, if it emits a persistent musty odor even after cleaning, or if your vacuum’s suction power remains significantly diminished despite a thorough cleaning. Refer to your vacuum’s manual for recommended replacement intervals.
Can I vacuum my HEPA filter to clean it?
For non-washable HEPA filters, gently tapping them against a hard surface outdoors or using another vacuum cleaner with a brush attachment on a low setting can help remove loose debris. However, this method is less effective for deep cleaning and should not be used as a substitute for proper rinsing if your filter is washable.
Why is it crucial to ensure my HEPA filter is completely dry before reinstalling it?
Reinstalling a damp HEPA filter creates an ideal environment for mold and mildew to grow, which can then be dispersed into your home’s air, causing health issues and unpleasant odors. Moisture can also damage the filter’s integrity, reducing its effectiveness and potentially harming your vacuum motor.
Are there any specific tools or materials I need to clean a HEPA vacuum filter?
For non-washable filters, you might use a soft brush or another vacuum with a hose attachment. For washable filters, you only need cool, running water. Avoid using harsh brushes, sponges, or any cleaning agents like soap, bleach, or detergents, as these can compromise the filter’s delicate structure and filtration capabilities.