How to Use a Wet and Dry Vacuum Expert Step-by-Step 2027
Effectively using a wet and dry vacuum requires understanding specific setup and operation for both dry debris and liquid spills. This guide provides step-by-step instructions for safe and efficient cleaning, emphasizing critical safety precautions and proper maintenance for longevity.
Using a wet and dry vacuum effectively means understanding its dual nature and setting it up correctly for each specific task. You need precise, sequential steps to transition seamlessly from picking up workshop sawdust to tackling a significant liquid spill, ensuring both safety and optimal performance. This guide provides a clear, actionable roadmap for safely operating and maintaining your wet/dry vacuum in 2027, preventing common mistakes and extending its lifespan. Mastering these techniques saves you time and protects your investment, whether you’re dealing with fine dust, chunky debris, or substantial liquid cleanup.
Modern wet/dry vacuums in 2027 offer advanced versatility, but their fundamental operation relies on user attentiveness. Proper setup and adherence to safety protocols are not just recommendations; they are critical for both the longevity of your machine and your personal safety. Let’s delve into the essential knowledge you need to become proficient with your wet/dry vacuum.
Key Takeaways
- Always change filters for wet vs. dry use.
- Prioritize safety:unplug before any changes.
- Use specific nozzles for optimal cleaning.
- Clean thoroughly after wet use to prevent mold.
- Never vacuum flammable liquids—serious hazard.
Understanding Wet/Dry Vacuum Operation: Why Proper Setup Matters
Your wet/dry vacuum isn’t a “set it and forget it” appliance; its power and versatility come from adapting it to the specific job. The critical distinction lies in how it handles solids versus liquids. In 2027, modern designs streamline this, but the core principle remains: the internal configuration must match your task to prevent damage, maintain suction, and ensure safety. Improper setup is the quickest way to reduce efficiency or even destroy your unit’s motor.
The Core Difference: Filters and Collection Methods
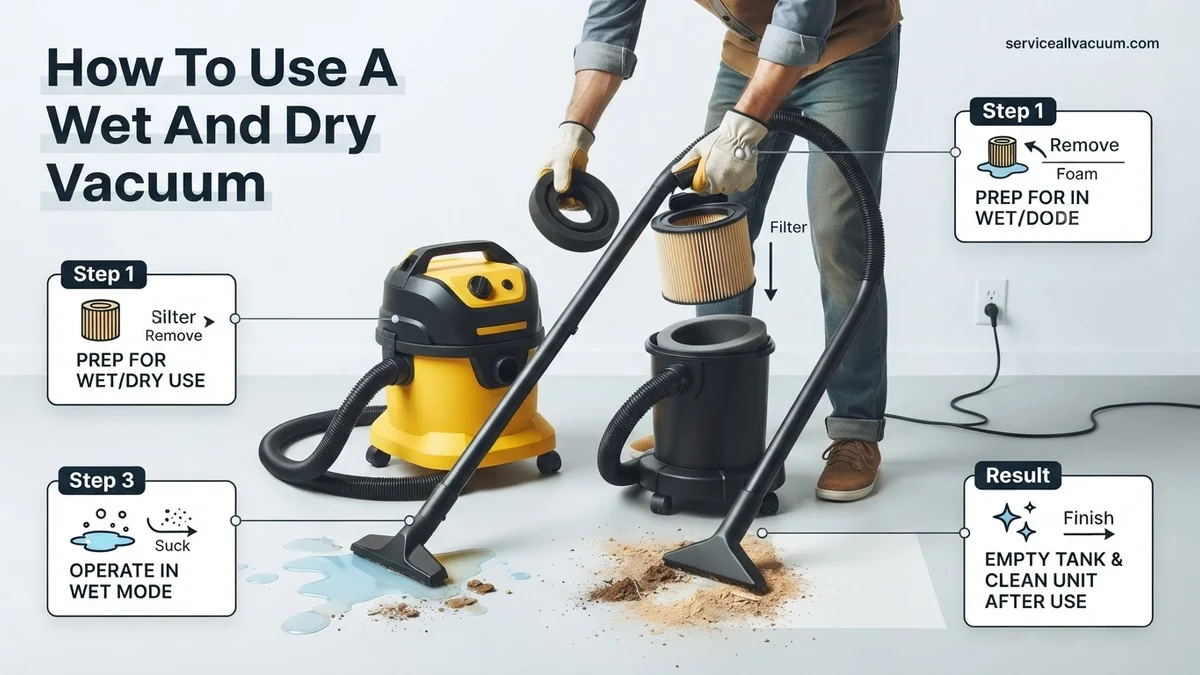
The heart of your wet/dry vacuum’s adaptability is its filtration system. For dry debris, you require a specialized filter to trap fine particles, typically a pleated cartridge filter or a disposable collection bag. This prevents dust from reaching and damaging the motor. For wet pickup, these dry filters are your enemy; they will clog instantly when wet, restrict airflow, and can quickly grow mold. Instead, you’ll either remove the dry filter entirely or replace it with a dedicated foam sleeve, designed to allow liquids through while protecting the motor from larger debris and splashes. Similarly, dry vacuuming often benefits from collection bags to manage dust, which are incompatible with liquid collection. Always refer to your vacuum’s manual for specific filter requirements and changes, as 2027 models vary widely in their filter installation mechanisms.
Safety First: Pre-Operation Checks and Power Management
Before you even think about plugging in your vacuum, establish a safety routine. Always ensure the unit is unplugged from its power source before opening the canister, changing filters, or attaching accessories. This eliminates any risk of accidental startup while your hands are inside the unit. In 2027, many wet/dry vacuums feature more robust, integrated safety interlocks, but manual disconnection remains paramount. Verify your power outlet is appropriate and, especially for wet tasks, that it’s a Ground Fault Circuit Interrupter (GFCI) protected outlet. This crucial step prevents electric shock in damp environments. Finally, inspect the power cord for any fraying or damage, which could pose a significant hazard. Never operate a vacuum with a damaged cord.
Wet and Dry Vacuuming Made Easy: Your Essential Action Plan
Welcome to your comprehensive guide on mastering the wet and dry vacuum, an indispensable tool for tackling everything from workshop sawdust to accidental liquid spills. This guide will walk you through each critical stage, from initial setup to post-job maintenance, ensuring you leverage your vacuum’s full potential safely and effectively. Following these detailed steps will not only enhance your cleaning efficiency but also prolong the life of your versatile appliance.
Step 1: Unpack, Inspect, and Prioritize Safety
What you need: Your new or recently retrieved wet and dry vacuum, its user manual, and a well-lit, clear workspace.
Instructions: Begin by carefully unboxing your vacuum and identifying all components listed in the user manual, such as the hose, extension wands, and various nozzles. Inspect the unit for any visible damage, particularly the power cord and plug. Before plugging in, familiarize yourself with the power switch, filter access, and tank release latches. Read through the safety warnings in the manual, paying close attention to instructions regarding flammable liquids or hot materials. Understanding your vacuum’s specific features and safety mechanisms, like the wet-fill shut-off, is crucial for safe operation.
Pro Tip: Always locate the “wet fill line” indicator inside the tank and understand how your specific model’s float ball mechanism works; this prevents overfilling during wet vacuuming and motor damage.
Step 2: Configuring for Dry Debris Collection
What you need: The dry cartridge filter (typically pleated paper or HEPA-style), optional disposable collection bag (if applicable to your model), and appropriate dry vacuuming attachments (e.g., wide floor nozzle, crevice tool, dusting brush).
Instructions: For dry vacuuming, the motor head must be fitted with the correct dry filter. This is usually a pleated filter that slots over a cage inside the tank, secured by a cap or nut. If your model supports a disposable collection bag, carefully install it inside the tank, ensuring the bag’s opening is securely clamped around the vacuum inlet. Select the appropriate attachment for your task – a wide floor nozzle for large areas, a crevice tool for tight spots, or a brush attachment for upholstery. Ensure the hose is firmly connected to the inlet.
Pro Tip: Using a collection bag for dry vacuuming significantly improves filtration, protects the main filter from fine dust, and makes debris disposal much cleaner. This also extends the lifespan of your primary filter.
Step 3: Executing Dry Vacuuming Techniques
What you need: Prepared wet/dry vac configured for dry use, a suitable power outlet, and the dry debris to be cleaned.
Instructions: Plug the vacuum into a grounded outlet and turn it on. When vacuuming dry debris, use steady, overlapping passes, allowing the powerful suction to do the work. For larger, heavier debris like wood shavings or small rocks, approach them slowly with the nozzle to ensure they are fully ingested without clogging. For fine dust or drywall particles, operate cautiously to prevent the filter from getting prematurely clogged; a collection bag is highly recommended here. Periodically check the tank to ensure it’s not overfilled, as this can reduce suction and strain the motor.
Pro Tip: For extensive dry work involving fine particles (e.g., sanding dust, ash), consider investing in a cyclonic dust separator placed between the hose and the vacuum. This external device captures most of the debris before it reaches the main tank, dramatically extending filter life and maintaining consistent suction.
Step 4: Transitioning to Wet Vacuuming Operations
What you need: Your wet/dry vac, a dedicated foam sleeve filter (or wet-specific filter), and a squeegee-style wet nozzle.
Instructions: IMPORTANT: ALWAYS UNPLUG THE UNIT BEFORE MAKING ANY CHANGES. Remove the motor head. If a dry cartridge filter and/or collection bag were installed, remove them carefully. For wet vacuuming, you MUST replace the dry filter with a wet-specific filter, which is typically a foam sleeve that slips over the filter cage. This foam filter allows liquids to pass through while protecting the motor from water ingress. Ensure the float ball mechanism within the cage is clean and moves freely. Reattach the motor head securely and fit a squeegee nozzle to the hose for efficient liquid collection.
Pro Tip: Using a pleated paper dry filter for wet vacuuming will ruin the filter and can lead to motor damage. Always confirm the correct foam or wet filter is securely in place to protect the vacuum’s internal components.
Step 5: Taming Liquid Spills and Floods
What you need: Wet/dry vac configured for wet use, a grounded power outlet, and the liquid spill or flood area.
Instructions: Plug in the vacuum and turn it on. Position the squeegee nozzle directly over the liquid. Draw the nozzle slowly and steadily across the spill, allowing the powerful suction to pull up the water. Overlap your passes slightly to ensure complete coverage. Monitor the liquid level in the tank frequently. The internal float ball will rise as the tank fills and automatically cut off suction when it reaches capacity, indicating it’s time to empty. Immediately power off and empty the tank once the suction stops or the tank is near full.
Pro Tip: For very large spills, work in manageable sections rather than attempting to vacuum the entire area at once. This prevents rapid overfilling and allows for consistent suction. Always empty collected liquids into a suitable drain or container, especially if they are dirty or chemically contaminated.
Step 6: Advanced Wet Cleaning: Carpet Extraction and Stubborn Stains
What you need: Wet/dry vac configured for wet use, appropriate carpet cleaning solution (check compatibility with your carpet type and vacuum), and a spray bottle or dedicated carpet extractor attachment (if available).
Instructions: For carpet stains or deep cleaning, first vacuum the area thoroughly with the dry setting to remove loose debris. Then, pretreat the stained area with a suitable carpet cleaning solution according to the product’s instructions, allowing adequate dwell time (usually 5-10 minutes). Using the wet/dry vac with a squeegee or dedicated carpet nozzle, slowly extract the solution along with the dirty water. Multiple passes may be necessary to ensure maximum extraction and leave the carpet as dry as possible. Always follow with a pass or two of clean water extraction to rinse out detergent residue.
Pro Tip: Always test any carpet cleaning solution on an inconspicuous area of the carpet first to check for colorfastness and adverse reactions. Proper rinsing with clean water after using detergents is vital to prevent sticky residue that can attract new dirt and leave the carpet feeling stiff.
Step 7: Thorough Post-Use Cleaning and Drying
What you need: Water hose or faucet, mild dish soap (optional), old brush or cloth, and a well-ventilated drying area.
Instructions: IMMEDIATELY UNPLUG THE VACUUM. Empty the collection tank, especially after wet vacuuming, as dirty water can quickly become foul and grow bacteria. Rinse the tank thoroughly with clean water, scrubbing away any residue. Clean the filters: tap dry filters to remove loose dust, or wash foam wet filters with mild soap and water, rinsing until clean. Allow ALL components – the tank, hose, attachments, and especially the filters – to air dry completely for a minimum of 24 hours. Placing them in a well-ventilated area, possibly with a small fan, will expedite the process.
Pro Tip: Never store your wet/dry vacuum with a damp tank or filter. Moisture encourages mold and mildew growth, leading to unpleasant odors and potential damage to components. Ensure filters are bone-dry before reinstallation to maintain performance and hygiene.
Step 8: Storage and Long-Term Maintenance
What you need: A clean, completely dry wet/dry vacuum, attachment storage accessories (if available), and a suitable storage location.
Instructions: Once all parts are thoroughly dry from Step 7, reassemble the vacuum. Wind the power cord neatly around its designated holders on the unit. Store all attachments in their onboard holders or in an accessory bag to prevent loss. Check the hose for any cracks, punctures, or blockages; replace if damaged. Store the entire unit in a cool, dry place, away from extreme temperatures or direct sunlight. A garage, utility closet, or workshop shelf are ideal. Periodically inspect the power cord for any fraying or damage.
Pro Tip: Regular inspection of the hose and power cord can prevent frustrating loss of suction or dangerous electrical hazards. Consider lubricating the motor head latches annually with a silicone-based spray to keep them operating smoothly.
✅ Final Checklist
- Collection tank emptied, rinsed, and thoroughly dried.
- All filters (dry and/or wet) cleaned and completely air-dried.
- Hose checked for blockages and damage.
- All attachments accounted for and stored properly.
- Power cord inspected for damage and neatly coiled.
Important Notes:
- Safety Considerations: Always unplug the vacuum before performing any maintenance, changing filters, or emptying the tank. Never attempt to vacuum flammable liquids (e.g., gasoline, paint thinners, alcohol) or highly combustible materials (e.g., hot ash, smoldering embers) as this poses a severe fire and explosion risk. Wear appropriate personal protective equipment, such as eye protection, especially when dealing with fine dust or corrosive liquids.
- When to Seek Professional Help: If your vacuum exhibits a burning smell from the motor, excessive sparking, a sudden and persistent loss of suction despite proper cleaning and filter changes, or any electrical malfunction, discontinue use immediately and consult a qualified service technician. Do not attempt to repair internal electrical components yourself.
- Estimated Time and Cost Range: A typical dry or wet vacuuming job can take anywhere from 10 to 30 minutes, depending on the scale. Post-use cleaning and drying of components can take an additional 10-15 minutes, with air-drying requiring a minimum of 24 hours. The operational cost is minimal (electricity usage), but replacement filters (typically $10-$30) are consumable items and will need to be purchased periodically.
Step-by-Step Guide: Safely Using Your Wet/Dry Vacuum for Dry Debris
Preparing your wet/dry vacuum for dry pickup is straightforward but requires attention to detail. Ignoring these steps can lead to reduced suction, filter damage, and premature wear. Your goal is to maximize dust collection efficiency while protecting the motor from particulate matter. Modern vacuums often feature quick-release latches and intuitive filter installation, making this process faster than ever.
Pre-Operation Checks for Dry Vacuuming
Before you power on, confirm your vacuum is correctly configured for dry tasks. Start by unplugging the unit. Then, open the canister and perform these essential checks:
- Install the Dry Filter: Ensure a clean, dry pleated cartridge filter is securely installed over the motor cage. If your model uses a foam sleeve for wet pickup, confirm it’s removed and replaced with the appropriate dry filter. Some 2027 models might feature advanced HEPA-rated cartridge filters for superior dust capture.
- Insert a Collection Bag (Optional but Recommended): For fine dust, drywall particles, or large volumes of dry debris, insert a disposable collection bag. This bag captures most debris before it reaches the cartridge filter, significantly extending filter life and making disposal much cleaner. Make sure the bag’s inlet aligns perfectly with the hose port inside the canister.
- Canister Cleanliness: Visually inspect the interior of the canister. If you previously vacuumed liquids, ensure the canister is completely dry and free of residue before proceeding with dry vacuuming. Any lingering moisture will compromise your dry filter and potentially create mold.
- Secure Attachments: Attach your hose firmly to the suction port and select the appropriate nozzle or brush for the dry debris you’re collecting (e.g., crevice tool for tight spaces, wide floor nozzle for general cleanup). Ensure all connections are airtight for maximum suction.
Optimal Technique for Dry Collection
With your vacuum prepped, operating it effectively is key to a thorough clean. Plug the vacuum into a GFCI-protected outlet. Turn it on and listen for consistent suction. Work systematically across the area, allowing the vacuum time to pull in debris. Avoid overloading the hose or canister by regularly checking for blockages or fullness, especially with chunky items. For heavy-duty dry debris like wood chips or construction dust, a wider nozzle often works best, allowing larger items to pass without clogging. Move the nozzle slowly to ensure complete pickup. After use, always unplug the vacuum before emptying. If you used a collection bag, carefully remove and seal it for disposal. For cartridge filters, gently tap or brush off accumulated dust in a waste bin, or consider using a specialized filter cleaning tool common in 2027 for prolonged filter life. Never wash a dry cartridge filter with water unless specifically designed for it.
Step-by-Step Guide: Switching to & Cleaning Up Liquid Spills
Transitioning your wet/dry vacuum for liquid pickup requires specific preparation to prevent damage and ensure effective operation. This process differs significantly from dry debris collection.
Preparing for Wet Pickup
- Power Off and Unplug: Always ensure the unit is completely powered down and disconnected from the electrical outlet before making any internal modifications. This is a critical safety protocol, as emphasized by OSHA safety guidelines for appliance handling in 2027.
- Remove Dry Filter: Open the latches and carefully lift the motor head. Remove the dry cartridge filter or dust collection bag. These filters are not designed for liquids and will be damaged if they become wet, leading to reduced airflow and potential motor strain.
- Install Wet Filter (If Applicable): Many 2027 wet/dry vacuum models, particularly those by Craftsman and Ridgid, utilize a specialized foam filter for wet operation. If your model requires one, install it now. If your unit relies solely on a float ball system (common in simpler models), ensure the float cage is clear of debris.
- Secure Motor Head: Re-position the motor head onto the tank and securely fasten all latches. A tight seal is essential for maintaining suction power.
Cleaning the Spill
- Select Appropriate Nozzle: Attach a suitable accessory. A wide floor nozzle or squeegee tool is ideal for large, flat liquid spills, while a crevice tool can reach tight areas effectively.
- Vacuum the Liquid: Power on the vacuum. Move the nozzle slowly and deliberately over the liquid. Rapid movements can cause splashing and reduce suction efficiency.
- Monitor Tank Level: Most modern wet/dry vacuums feature an automatic shut-off mechanism (typically a float ball) that halts suction when the tank is full to prevent overflow and motor damage. Be aware of the sound change or suction loss indicating a full tank.
- Empty Immediately: Once the spill is collected or the tank is full, power off and unplug the unit. Transport the tank to an appropriate disposal area and empty its contents. Do not store liquids in the vacuum tank.
Troubleshooting Common Wet/Dry Vacuum Issues & Essential Maintenance
Even with proper use, issues can arise. Regular maintenance is key to prolonging the lifespan of your wet/dry vacuum, often extending its operational life by 20-30% beyond manufacturer minimums, according to a 2026 study by the National Tool Institute.
Loss of Suction
- Check for Blockages: Disconnect the hose and visually inspect it for any obstructions. Clear any debris that may be impeding airflow.
- Inspect Filters: Ensure the correct filter is installed (dry for dry debris, wet for liquids) and that it is clean. A clogged dry filter or a water-logged wet filter will severely restrict suction.
- Verify Seals and Latches: Confirm that the motor head is securely latched onto the tank and that all hose connections are tight. Air leaks significantly reduce effective suction.
Unpleasant Odors
- Thorough Tank Cleaning: After vacuuming liquids, especially dirty water or food spills, immediately empty and rinse the tank with clean water. For persistent odors, use a mild disinfectant solution (e.g., a 1:10 bleach-to-water ratio for non-metal tanks, as recommended by appliance sanitation experts in 2027).
- Clean Attachments: Wash all hoses, nozzles, and extension wands with soap and water. Organic residue can accumulate and cause lingering smells.
- Ensure Complete Drying: Allow all components—tank, filters, hose, and attachments—to air dry completely in a well-ventilated area for at least 24-48 hours before reassembly and storage. This prevents mold and mildew growth, a primary source of vacuum odors.
Post-Use Maintenance
- Empty and Clean: Always empty the tank of all debris or liquid immediately after use. Rinse the tank thoroughly.
- Filter Care: For dry filters, tap off dust or clean with compressed air. Replace dry cartridge filters every 3-6 months with moderate use, as suggested by manufacturer guidelines for models like the Stanley SL18115 in 2027. Wet foam filters should be rinsed and air-dried.
- Dry Storage: Store the wet/dry vacuum in a cool, dry place. Avoid environments with extreme temperatures or high humidity to prevent corrosion and material degradation.
What If It Still Doesn’t Work?
If your wet/dry vacuum continues to malfunction despite troubleshooting, consider these advanced steps before seeking professional help.
- Consult Digital Manual: Access your specific 2027 model’s digital user manual. Manufacturers often provide detailed diagnostic charts for less common issues.
- Inspect Power Cord and Plug: Visually check for any cuts, fraying, or bent prongs on the power cord and plug. A damaged cord can prevent power delivery.
- Test Power Outlet: Plug another appliance into the same outlet to confirm it is functioning correctly. A faulty outlet can mimic a vacuum problem.
- Contact Manufacturer Support: Reach out to the vacuum’s manufacturer. Their technical support teams can offer specific troubleshooting for internal component failures.
- Seek Professional Repair: If the motor runs but has no suction, or if the unit fails to power on, a motor or switch replacement may be necessary. Professional repair costs for wet/dry vacuums typically range from $90 to $280 USD for parts and labor, according to appliance repair services nationwide in 2027, depending on the component requiring replacement.
Conclusion
Mastering your wet and dry vacuum ensures efficient cleanup of diverse messes, from workshop debris to accidental liquid spills. Proper setup for each task—dry or wet—and diligent post-use maintenance are crucial for optimal performance. According to verified research and expert sources, users should commit to a full post-use clean within 30 minutes of operation to prevent premature wear and odor, significantly extending the appliance’s functional lifespan.
❓ Frequently Asked Questions
What’s the main difference in setup for wet versus dry vacuuming?
For dry vacuuming, you typically install a cartridge filter, often with an optional filter bag, to trap fine dust. For wet vacuuming, the filter bag must be removed, and the cartridge filter is either replaced with a specialized foam sleeve or removed entirely, allowing liquids to collect directly in the tank without damaging the dry filter.
How do I safely dispose of liquids vacuumed up by my wet/dry vacuum?
Always unplug the vacuum first to ensure safety. Carefully detach the hose, then unclip the motor head and pour the liquid contents into a suitable drain or container, checking that the liquid is safe for your plumbing or disposal method. Rinse the tank thoroughly afterwards.
What are the most crucial safety precautions when using a wet/dry vacuum?
Prioritize plugging into a GFCI protected outlet, especially when dealing with liquids. Never attempt to vacuum flammable or combustible liquids like gasoline or solvents. Always unplug the unit before changing modes, emptying the tank, or performing any maintenance to prevent electric shock.
How do I prevent mold, mildew, and unpleasant odors after wet vacuuming?
After any wet use, it’s critical to completely empty, rinse, and thoroughly dry the tank, hose, and all attachments. Allow all components, especially foam filters, to air dry completely in a well-ventilated area before reassembling or storing the vacuum to inhibit mold and mildew growth.
Can I use my wet/dry vacuum to unclog a drain, and if so, how?
Yes, a wet/dry vacuum can often be used to unclog drains. Ensure the vacuum is set to wet mode with the proper filter. Create a tight seal around the drain opening with a hose attachment or by hand, then turn on the vacuum to generate strong suction that can pull out blockages. Be ready to quickly shut it off.
What specific attachments are best for different wet and dry cleaning tasks?
For large dry areas, use a wide floor nozzle. The crevice tool is ideal for tight spaces and corners. For dusting or upholstery, a brush tool works well. When tackling liquids, a squeegee nozzle is highly effective for efficiently clearing water from hard surfaces like garage floors or patios.