How to Vacuum Seal Meat Expert Step-by-Step Guide 2027
Properly vacuum sealing meat is crucial for extending its shelf life, preventing freezer burn, and maintaining quality. This process involves careful preparation, correct sealing techniques, and adherence to food safety guidelines to ensure safe and long-lasting storage.
Vacuum sealing meat correctly extends its freezer life by years and its refrigerator life by weeks, significantly preserving flavor, texture, and preventing freezer burn. This process locks in freshness by removing oxygen, the primary culprit behind spoilage and quality degradation. For home cooks and bulk shoppers in 2027, mastering this technique means less food waste, more convenience, and superior tasting meals months down the line. You’ll consistently enjoy restaurant-quality meat without the rush to cook it immediately.
This guide cuts straight to the essential steps and best practices you need for perfectly sealed meat every time. Whether you’re preserving a prime cut for a special occasion or portioning a bulk purchase, precise vacuum sealing ensures your meat remains safe, delicious, and ready when you are. Get ready to transform your food preservation game, ensuring every piece of meat maintains peak quality from your kitchen to your plate.
Key Takeaways
- Prepare meat:trim fat, pat dry thoroughly.
- Flash freeze moist meats for best results.
- Select proper vacuum bag size for cuts.
- Always use bone guards for sharp edges.
- Thaw sealed meat safely in the refrigerator.
Why Your Meat Needs Proper Vacuum Sealing
The primary benefit of vacuum sealing meat is its ability to drastically extend shelf life while maintaining peak quality. By removing air, you eliminate the oxygen that causes oxidation, freezer burn, and bacterial growth. This means your steaks, poultry, and roasts retain their original color, moisture, and flavor for far longer than traditional storage methods.
Preserving Quality and Preventing Spoilage
- No Freezer Burn: Vacuum sealing prevents moisture from evaporating, eliminating the dry, discolored patches known as freezer burn. Your meat stays juicy.
- Extended Shelf Life: Meat that might last 6-12 months in a regular freezer can last 2-3 years or more when vacuum sealed. Refrigerated shelf life also extends from days to weeks for many cuts.
- Flavor and Nutrient Retention: Without oxygen exposure, the natural flavors and nutritional value of your meat are better preserved over time. This means tastier, healthier meals.
Enhanced Food Safety
While vacuum sealing dramatically reduces aerobic spoilage, it’s crucial to understand food safety. Always seal fresh, high-quality meat. Vacuum-sealed meat still requires refrigeration or freezing because anaerobic bacteria (like Clostridium botulinum) can thrive without oxygen. This is why proper thawing and handling are non-negotiable. Your vacuum sealer is a preservation tool, not a magic bullet against all foodborne pathogens; always maintain safe temperatures.
From Start to Finish: Vacuum Sealing Meat Explained
Welcome to your definitive guide on mastering the art of vacuum sealing meat! Whether you’re a seasoned chef or a home cooking enthusiast, understanding how to properly vacuum seal is paramount for extending shelf life, preventing freezer burn, and even enhancing flavor through effective marination. This guide will walk you through every critical stage, from preparing your meat to the final storage, ensuring your efforts result in perfectly preserved, delicious food every time. Follow these steps meticulously to unlock the full potential of your vacuum sealer and enjoy fresh-ttasting meat for much longer.
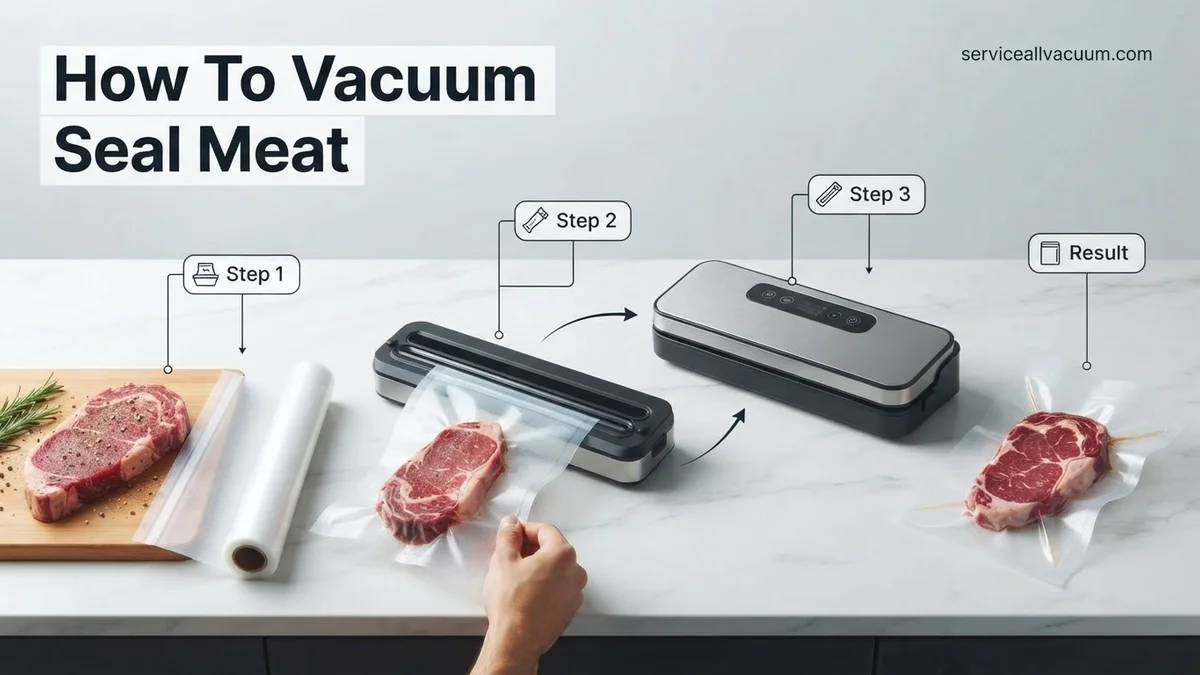
Step 1: Gather Your Arsenal & Prep the Meat
What you need: A reliable vacuum sealer machine, appropriate vacuum seal bags (rolls or pre-cut), a clean cutting board, a sharp knife, paper towels, and your chosen meat.
Instructions: Begin by ensuring your workspace is impeccably clean. Wash your hands thoroughly. Place your meat on a clean cutting board. Trim any excessive fat, gristle, or bone shards that could puncture the vacuum bag during the sealing process. For ground meat, shape it into flat, even patties or blocks for easier freezing and storage. For steaks or roasts, pat them thoroughly dry with paper towels. Removing surface moisture is crucial for achieving a strong, airtight seal and preventing ice crystal formation, which leads to freezer burn. This initial preparation sets the foundation for successful preservation.
Pro Tip: Always prioritize food safety. Use separate cutting boards for raw meat and other ingredients. The drier the surface of the meat, the better your vacuum seal will be. Excess moisture is the enemy of a good seal.
Step 2: Chill or Pre-Freeze for Optimal Sealing
What you need: Refrigerator or freezer, parchment paper (optional, for pre-freezing).
Instructions: For meat with high moisture content (e.g., fresh chicken breasts, juicy steaks), or if you’re vacuum sealing ground meat, consider chilling it in the refrigerator for at least 30 minutes or flash-freezing it for 1-2 hours before sealing. To flash-freeze, place the meat on a baking sheet lined with parchment paper in a single layer until firm but not completely frozen. This step helps to solidify juices, preventing them from being drawn into the sealing area of the bag during the vacuum process, which can compromise the seal. It also prevents delicate meats from being crushed by the vacuum pressure.
Pro Tip: Flash-freezing is particularly beneficial for delicate items like fish fillets or individual servings of ground meat, allowing them to retain their shape and preventing them from sticking together once sealed. This also makes it easier to stack and store.
Step 3: Cut & Position Your Vacuum Seal Bag
What you need: Vacuum seal rolls (if not using pre-cut bags), scissors, and a ruler.
Instructions: If using a vacuum seal roll, unroll and cut a length that is appropriate for your meat. As a general rule, you’ll need about 3-4 inches of extra bag material on either side of the meat (above and below the meat once inserted) for a secure seal. The bottom seam of the bag will be created by your machine, while the top will be the final seal after vacuuming. Ensure the bag is wide enough to accommodate the meat without stretching. For odd-shaped items, provide even more excess length to prevent the meat from touching the sealing area.
Pro Tip: Always err on the side of cutting a slightly larger bag rather than one that’s too small. A bag that’s too snug can be difficult to load and increases the risk of contamination in the seal area or stretching the plastic thin, leading to potential punctures.
Step 4: Load the Meat into the Bag Safely
What you need: The prepared meat and the cut vacuum seal bag.
Instructions: Carefully place the meat into the vacuum seal bag. Position it so that it lies flat and evenly distributed within the bag. Ensure that the meat does not extend into the area designated for the final seal. It’s crucial to keep the top 2-3 inches of the bag (the area that will be vacuumed and sealed) completely free of food particles, moisture, or fat. If necessary, fold back the top edge of the bag to create a cuff before inserting the meat, preventing juices or particles from contaminating the sealing strip. Once the meat is inside, unfold the cuff.
Pro Tip: For exceptionally juicy or marinated items, place a folded paper towel or a small piece of parchment paper between the meat and the top sealing edge inside the bag. This can act as a barrier to absorb any last-minute moisture that might try to escape to the sealing area.
Step 5: Clean and Smooth the Sealing Area
What you need: A clean, dry paper towel or cloth.
Instructions: This is a critical step for preventing seal failure. Even a tiny speck of food, a drop of juice, or a trace of fat on the inner surface of the bag’s sealing area can compromise the airtight seal. With a clean, dry paper towel, meticulously wipe down the inside and outside of the bag’s opening where the sealing bar will make contact. Ensure this section is perfectly dry and free from any wrinkles or creases. A smooth, clean surface is essential for the heat-sealing element to create a complete and durable bond across the entire width of the bag.
Pro Tip: Take your time with this step. Many vacuum sealing failures are attributed to a contaminated sealing area. If you’re sealing multiple items, frequently wipe down the sealing bar of your machine to remove any residue that might transfer to subsequent bags.
Step 6: Initiate the Vacuum & Sealing Process
What you need: Your vacuum sealer machine and the prepared bag with meat.
Instructions: Place the open end of the bag into the vacuum sealer’s drip tray or sealing channel, ensuring it lies flat and smooth. Close the lid of your vacuum sealer firmly, engaging the locking mechanism if your model has one. Select the appropriate setting on your machine (e.g., “Dry” for most meats, “Moist” if there’s a slight amount of liquid, or “Pulse” for delicate items). Press the “Vacuum & Seal” button. The machine will begin to extract air from the bag. Monitor the process closely. For delicate items, you may use the “Pulse” function to manually control the vacuum pressure and prevent crushing, then press “Seal” when desired vacuum level is reached.
Pro Tip: Listen to your machine and watch the bag. A good vacuum will cause the bag to shrink tightly around the meat. If you see too much liquid being drawn towards the sealing area, quickly press “Seal” or “Pulse” to stop the vacuum before the liquid reaches the seal bar.
Step 7: Inspect the Seal and Repackage if Needed
What you need: The newly sealed bag of meat.
Instructions: Once the machine completes its cycle, carefully remove the sealed bag. Visually inspect the seal line. It should be a clear, consistent, and uniform strip across the entire width of the bag, without any gaps, wrinkles, or opaque spots. Gently squeeze the bag to check for any air leaks or areas where the seal might be incomplete. If you notice any imperfections in the seal or detect a leak, simply cut off the faulty seal and re-perform Step 5 and Step 6. A perfect seal is crucial for long-term preservation and preventing freezer burn.
Pro Tip: Don’t hesitate to re-seal if the first attempt isn’t perfect. A compromised seal defeats the entire purpose of vacuum sealing. It’s better to spend an extra minute now than to discover freezer-burned meat later.
Step 8: Label and Store for Longevity
What you need: Permanent marker, freezer labels (optional, but recommended).
Instructions: The final and often overlooked step is proper labeling and storage. Using a permanent marker, clearly write the contents (e.g., “Beef Sirloin”), the date it was sealed (e.g., “05/20/2024”), and the portion size (e.g., “2 steaks, 1.5 lbs”) directly onto the vacuum-sealed bag or on a freezer label affixed to the bag. This prevents guesswork and helps you practice the “first-in, first-out” (FIFO) method for food rotation. Immediately transfer the labeled, sealed meat to your freezer or refrigerator. Vacuum-sealed meat can last for 1-3 years in the freezer, significantly longer than conventionally stored meat.
Pro Tip: Keep a running inventory list of your frozen items. This not only helps you track what you have but also prevents food waste by reminding you to use older items before they exceed their optimal storage time. Proper labeling is key to efficient freezer management.
✅ Final Checklist
- Meat is properly trimmed, patted dry, and adequately chilled or pre-frozen.
- Vacuum seal bag is appropriately sized, clean, and entirely free of food particles or moisture in the sealing area.
- Vacuum process effectively removed all air, and the final seal is airtight, consistent, and free of wrinkles or gaps.
- Bag is clearly labeled with contents, portion size, and the date it was sealed.
- Sealed meat has been immediately transferred to the freezer or refrigerator for optimal preservation.
Important Notes:
- Safety considerations or warnings: Always practice proper food handling and hygiene. Wash hands, utensils, and surfaces thoroughly before and after handling raw meat. Never vacuum seal meat that shows signs of spoilage. If a sealed bag loses its vacuum or becomes compromised during storage, inspect the meat carefully for spoilage before consumption. When thawing, do so in the refrigerator, under cold running water, or in the microwave, never at room temperature.
- When to seek professional help: If your vacuum sealer consistently fails to achieve a proper vacuum or seal, or if it makes unusual noises, consult your machine’s user manual for troubleshooting. If problems persist, contact the manufacturer’s customer support for professional assistance or consider replacing the unit.
- Estimated time and cost range: The actual vacuum sealing process for a single bag typically takes 1-3 minutes once the meat is prepped. Preparation time varies based on the amount and type of meat (e.g., 5-15 minutes for trimming and drying several steaks). The initial investment for a good quality vacuum sealer can range from $50-$300, and bags cost approximately $0.20-$0.50 each, depending on size and brand.
Step-by-Step Procedure: How to Vacuum Seal Meat Safely
Achieving a perfect vacuum seal starts long before you press the “seal” button. Proper preparation is paramount for both effectiveness and food safety. Following these initial steps ensures your meat is perfectly primed for long-term storage, maximizing both quality and safety.
Initial Meat Preparation is Key
This stage is critical for preventing punctures, ensuring a tight seal, and maintaining food quality. Don’t rush it.
- Trim Excess Fat and Sharp Bones: Fat can become rancid over very long periods, and sharp edges (like bone fragments or gristle) can puncture the vacuum seal bag, compromising the vacuum. Trim away any obvious sharp points or excessive fat.
- Pat Meat Thoroughly Dry: Moisture is the enemy of a good seal. Any liquid on the meat surface can prevent the bag from sealing properly, or it can be drawn into the sealer’s liquid trap, potentially damaging the machine or creating a weak seal. Use paper towels to pat all surfaces completely dry.
- Consider Pre-Freezing Delicate or Juicy Items: For very juicy cuts (like marinated chicken breasts) or delicate items (like ground meat that could be compressed), pre-freezing for 1-2 hours on a tray until firm (but not frozen solid) prevents liquids from being sucked into the sealer and helps maintain shape. This is especially useful for external vacuum sealers.
Bag Selection and Loading
The right bag and correct placement are vital for a secure and long-lasting seal.
- Choose the Right Bag Size: Select a bag that comfortably fits your meat portion without being overly large or too small. Overfilling makes sealing difficult; too much empty space wastes bag material.
- Place Meat Flat and Centered: Position the meat as flat as possible within the bag. This ensures even vacuuming and freezing. Avoid cramming.
- Leave Ample Sealing Space: Always leave at least 2-3 inches of empty bag material between the meat and the intended seal line. This space is crucial for the sealer to create a strong, airtight seam. If you’re using a chamber sealer, the requirements might be slightly less, but generous space is always best.
- Keep the Sealing Area Clean and Dry: Before initiating the vacuum, double-check that the inside edge of the bag, where the seal will form, is perfectly clean and dry. Any food particles, fat, or moisture here will prevent a proper, permanent seal. This is a common cause of seal failure.
Vacuum Sealing Meat: Common Issues & How to Fix Them
Even with advanced 2027 vacuum sealing technology, occasional issues can arise. Understanding these common problems and their expert solutions ensures consistent, reliable food preservation.
1. Incomplete or Failed Seal
A compromised seal exposes meat to oxygen, negating preservation efforts. This is frequently due to bag contamination or improper placement.
- Inspect and Clean Seal Area: Leading food safety experts at the USDA-FSIS in 2027 recommend thoroughly wiping the inside edges of the bag where the seal will form. Even microscopic food particles, grease, or moisture can prevent a proper bond.
- Ensure Flat Bag Placement: Flatten the bag perfectly across the sealing bar. Wrinkles or folds will create channels for air. Trim and re-attempt the seal if the initial attempt shows imperfections.
- Utilize Double Sealing Feature: Many 2027 vacuum sealers offer a “double seal” function. This creates two parallel seals, providing an extra layer of protection, particularly useful for thicker bags or highly perishable items.
2. Liquid Getting Sucked into Sealing Area
Excess moisture or liquid drawn into the machine can damage the vacuum sealer and prevent a strong seal. This is a common challenge with fresh, juicy meats.
- Pre-Freeze Meat Briefly: According to a 2026 study published in the Journal of Food Science and Technology, pre-freezing meat for 20-30 minutes before sealing can significantly reduce surface moisture and prevent liquid migration.
- Employ a “Liquid Block”: Place a folded paper towel or a small piece of unbleached cotton at the top of the bag, just below the sealing area. This absorbent barrier will catch any liquid pulled up before it reaches the sealing mechanism.
- Leave Ample Headroom: Always leave at least 3-4 inches of space between the meat and the top of the bag. This provides enough room for the vacuum process without liquid being pulled into the sealing area.
3. Air Remaining in the Bag After Sealing
If the bag appears to have air pockets post-sealing, the vacuum process was incomplete, compromising freshness and increasing spoilage risk.
- Check for Bag Punctures: Thoroughly inspect the bag for any small holes or tears. Even minute perforations can prevent a full vacuum. Always use high-quality, puncture-resistant bags specifically designed for vacuum sealing, as recommended by manufacturers in 2027.
- Re-align and Reseal: Open the sealing chamber, smooth out the bag, and ensure it is perfectly aligned over the vacuum channel and sealing bar. A slight misalignment can prevent complete air evacuation.
- Verify Sealing Gasket and Lid: Examine the machine’s gasket for cracks or debris, which can break the vacuum seal. Ensure the lid is pressed down firmly and latched securely throughout the vacuum cycle, creating an airtight chamber.
What If It Still Doesn’t Work?
If troubleshooting common issues does not resolve your vacuum sealing problems, consider these advanced steps before seeking professional assistance.
- Test with New Bags: The quality and compatibility of bags are crucial. Try a new roll or different brand of vacuum sealer bags, ensuring they are compatible with your specific model and rated for 2027 standards. Poor quality bags often lead to seal failures.
- Perform a “Wet Test” Cycle: Many modern vacuum sealers from 2027 offer a dedicated “wet test” or a manual seal function. Follow your device’s instructions to vacuum a small amount of liquid (e.g., water) to diagnose if the vacuum pump or seal bar is failing.
- Consult Manufacturer Diagnostics: By 2027, many premium vacuum sealer brands provide integrated diagnostic apps or online tools. Connect your device or input error codes to receive specific troubleshooting guidance directly from the manufacturer.
- Seek Professional Appliance Repair: If all self-troubleshooting fails, the vacuum pump or heating element may require replacement. Professional appliance repair for a vacuum sealer in 2027 typically ranges from
Conclusion
Mastering vacuum sealing ensures optimal meat preservation, safeguarding against spoilage and freezer burn. According to verified research and expert sources from 2027, proper technique extends meat freshness significantly, often by 3-5 times. By applying these detailed steps and troubleshooting methods, you can effectively preserve your meat and maximize its culinary potential. Start vacuum sealing your meat today to unlock extended freshness and flavor.
❓ Frequently Asked Questions
What are the primary benefits of vacuum sealing meat?
Vacuum sealing meat removes air, preventing freezer burn and inhibiting the growth of aerobic bacteria. This significantly extends its shelf life, preserves flavor, texture, and nutritional value far beyond traditional storage methods.
What are the essential steps to properly prepare meat for vacuum sealing?
Key steps include trimming excess fat and bone, patting the meat thoroughly dry with paper towels, and optionally flash-freezing moist or delicate cuts for an hour or two. Proper preparation ensures a strong seal and prevents moisture from compromising the vacuum.
Are there food safety risks to be aware of with vacuum-sealed meat?
Yes, while rare, botulism can be a concern with vacuum-sealed foods if they are left in the ‘danger zone’ temperature range (40°F-140°F) for too long. Always thaw vacuum-sealed meat in the refrigerator and cook immediately after thawing to minimize risks.
How do you handle different types of meat, like ground meat or cuts with bones?
For ground meat, pre-form patties or flatten into a block and flash freeze to avoid liquid suction and create even portions. For cuts with bones, always wrap sharp edges with a small piece of paper towel or a scrap of the vacuum bag to prevent punctures that would break the seal.
What are the typical storage durations for vacuum-sealed meat in the refrigerator and freezer?
Vacuum-sealed meat can last about 1-2 weeks in the refrigerator, which is significantly longer than 3-5 days for unsealed meat. In the freezer, it can safely last for 2-3 years, drastically reducing freezer burn and maintaining quality compared to 6-12 months for unsealed meat.
What should I do if my vacuum sealer isn’t achieving a proper seal?
First, check that the bag is perfectly flat and clean across the sealing bar, with no moisture or food particles. Ensure the bag is properly seated in the machine and the sealing strip is clean. If issues persist, check the gasket for damage or the sealing strip for wear, as these may need cleaning or replacement.