How Do I Know If I Have a Vacuum Leak Expert 2027 Guide
Diagnosing a vacuum leak quickly can prevent serious engine issues and improve performance. Look for common symptoms like rough idle or hissing sounds, then use simple DIY tests to pinpoint the source and avoid costly repairs.
If your vehicle is running erratically, idling higher than usual, or triggering that persistent Check Engine Light, a vacuum leak is often the primary culprit. In 2027, modern engine control units (ECUs) are incredibly sensitive to air-fuel mixture deviations, making even a small vacuum leak a significant performance and efficiency issue. Understanding the symptoms and knowing how to conduct basic diagnostic checks yourself can save you time, money, and prevent more serious engine complications down the line.
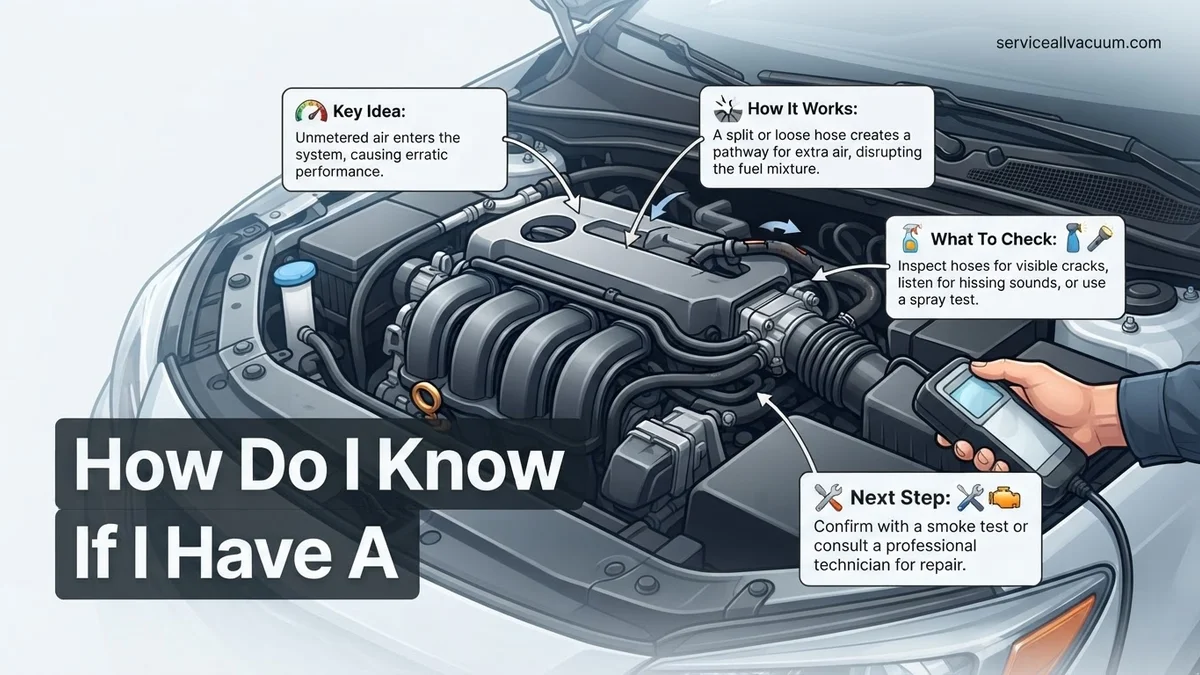
A vacuum leak introduces unmetered air into your engine, bypassing critical sensors. This immediately confuses your car’s computer, which then struggles to maintain the correct air-fuel ratio. This imbalance can lead to a cascade of performance problems, increased emissions, and reduced fuel economy. Don’t ignore these signs; diagnosing a vacuum leak early is key to keeping your vehicle running optimally and avoiding costly professional diagnostics for problems you could identify at home.
Key Takeaways
- Rough idle and engine codes signal leaks.
- Listen for hissing sounds under the hood.
- Perform a thorough visual hose inspection.
- Use spray tests cautiously for diagnosis.
- Address leaks promptly to prevent damage.
Real Signs of a Vacuum Leak: What to Look For
Recognizing the symptoms of a vacuum leak is the first step in effective diagnosis. These issues manifest directly in how your engine performs, often becoming progressively worse over time. Pay close attention to these indicators, as they are your vehicle’s way of telling you something is amiss in its vacuum system.
Unmistakable Engine Performance Issues
- Rough or High Idle: This is arguably the most common and noticeable symptom. Your engine might rev higher than its normal 600-800 RPM operating range, often surging up to 900-1200 RPM, then dropping unevenly. The idle can feel unstable, as if the engine is “hunting” for the correct RPM, due to the ECU constantly trying to compensate for the unmetered air.
- Engine Misfires or Hesitation: Under acceleration or even at a steady cruise, you might feel a stumble or hesitation. The engine’s air-fuel mixture becomes too lean (too much air, not enough fuel), which can cause individual cylinders to misfire intermittently. This feels like a momentary loss of power or a jerking sensation.
- Poor Acceleration: A lean condition directly impacts engine power. If your car feels sluggish or lacks its usual responsiveness when you press the accelerator, a vacuum leak could be robbing it of crucial engine vacuum needed for optimal combustion.
- Hard Starting or Stalling: Especially when cold, your engine might crank longer than usual before starting. Once running, it could stall shortly after, particularly when coming to a stop. This is another consequence of the severely disrupted air-fuel mixture at startup.
Audible Clues and Dashboard Warnings
- Hissing or Whistling Sounds: This is a classic indicator. With the engine running and hood open, listen closely for a distinct hissing, whistling, or sucking sound, particularly around the intake manifold, throttle body, or vacuum hoses. These sounds indicate air being pulled into the system through an unintended opening. The noise often changes pitch or intensity with engine RPM.
- Check Engine Light (CEL) Illumination: Your car’s sophisticated 2027 OBD-II system is designed to detect significant air-fuel ratio imbalances. A vacuum leak will almost certainly trigger the CEL. Common diagnostic trouble codes (DTCs) you might see include:
- P0171 (System Too Lean Bank 1)
- P0174 (System Too Lean Bank 2)
These codes directly indicate that the engine’s oxygen sensors are detecting too much oxygen in the exhaust, signaling a lean condition likely caused by unmetered air from a vacuum leak.
How to Diagnose and Fix a Vacuum Leak Like an Expert
A vacuum leak in your vehicle’s engine can lead to a host of frustrating problems, from a rough idle and poor fuel economy to warning lights on your dashboard. These leaks introduce unmetered air into the engine, disrupting the delicate air-fuel mixture and causing the engine’s computer to struggle with adjustments. This comprehensive guide will walk you through systematic, detailed steps to identify and locate a vacuum leak, empowering you to diagnose the issue like a seasoned mechanic. Following these instructions carefully will not only help you pinpoint the problem but also ensure your safety during the process.
Step 1: Understand the Symptoms and Initial Observation
What you need: Your vehicle, keen observation skills, and a basic understanding of your car’s normal behavior.
Instructions: Before diving into diagnostics, pay close attention to your vehicle’s behavior. Common symptoms of a vacuum leak include a rough or erratic idle (RPMs fluctuating noticeably), a P0171 or P0174 “System Too Lean” check engine light (CEL), a noticeable hissing or sucking sound coming from the engine bay, reduced engine power, poor acceleration, and sometimes even a harder-than-usual brake pedal (if the leak is affecting the brake booster). Note down exactly when these symptoms occur – do they happen only at idle, or while driving as well? Does the sound change with engine speed? This initial assessment will help narrow down your search areas later on.
Pro Tip: A rough idle can also be caused by bad spark plugs, coils, or fuel injectors. However, if accompanied by a hissing sound and/or lean fuel trim codes (which you can check with an OBD-II scanner), a vacuum leak becomes a primary suspect. The presence of a “check engine light” is a strong indicator that further investigation is warranted.
Step 2: Perform a Thorough Visual Inspection
What you need: A bright flashlight, a pair of mechanic’s gloves, and potentially a small mirror for hard-to-reach areas.
Instructions: With the engine off and cool, open the hood and visually inspect all accessible vacuum lines, hoses, and connections. Look for anything obviously out of place: disconnected hoses, cracked or brittle rubber, missing caps on vacuum ports, or loose clamps. Pay particular attention to the intake manifold area, the brake booster vacuum hose (the large hose leading from the intake manifold to the brake booster), the PCV (Positive Crankcase Ventilation) valve and its hoses, and any emission control vacuum lines. Gently flex rubber hoses to check for hidden cracks that might only open under engine vibration or vacuum. Many leaks are simple and can be found this way without any special tools.
Pro Tip: Don’t forget small, seemingly insignificant hoses or plastic lines. Even tiny cracks can cause significant issues. Also, inspect the PCV valve’s grommet where it seats into the valve cover or intake; these commonly harden and crack over time. A diagram of your vehicle’s vacuum system, often found in a repair manual, can be incredibly helpful here.
Step 3: The Carb Cleaner/Brake Cleaner Test (or Propane)
What you need: Safety glasses, a can of non-flammable brake cleaner (preferred) or carburetor cleaner, a fire extinguisher within arm’s reach, and good ventilation.
Instructions: Start your vehicle and allow it to reach normal operating temperature, then let it idle. While the engine is running, carefully and in short bursts (1-2 seconds), spray the cleaner around suspected vacuum leak areas. Focus on vacuum lines, hose connections, intake manifold gasket surfaces, PCV valve grommets, and any caps on unused vacuum ports. Listen intently for a change in the engine’s RPM – specifically, a temporary increase in engine speed as the engine sucks in the combustible cleaner through the leak. If the RPMs surge, you’ve likely pinpointed the general area of the vacuum leak. Be systematic and cover one section at a time. It is crucial to have proper ventilation and to keep the spray away from any hot exhaust components or electrical connections to prevent fire hazards.
Pro Tip: Non-flammable brake cleaner is safer than carb cleaner for this test as it won’t ignite on hot surfaces. If using carb cleaner, always have a fire extinguisher ready and avoid spraying directly onto extremely hot exhaust manifolds. This method is generally effective for finding larger leaks but might miss very small or intermittent ones. An alternative is an unlit propane torch, allowing the propane to waft over suspected areas while listening for RPM changes, which is generally safer than flammable sprays.
Step 4: The Smoke Machine Test (Advanced & Most Effective)
What you need: An automotive smoke machine (can be rented or purchased), shop air compressor (if your smoke machine requires it), a universal intake manifold plug or cone, and a bright flashlight.
Instructions: This is arguably the most effective and professional method for finding vacuum leaks. With the engine completely off and cool, connect the smoke machine to the vacuum system. A common entry point is by disconnecting a main vacuum line (e.g., the brake booster line, PCV hose, or a port on the intake manifold) and attaching the smoke machine’s nozzle, sealing it properly with a universal plug or cone. Turn on the smoke machine, allowing it to pump smoke into the intake system. Carefully observe the engine bay for any wisps of smoke escaping from hoses, gaskets, or connectors. The smoke will reveal even the smallest, otherwise invisible leaks. Take your time to examine all sides of the intake manifold, injector seals, and vacuum lines.
Pro Tip: Ensure the engine is completely off and cool when performing this test. Smoke machines are very sensitive and can find leaks that the spray test might miss. If your vehicle has a complex EVAP (Evaporative Emission Control System), the smoke machine can also be used to test for leaks in that system, which can sometimes present similar symptoms or codes. Always follow the specific instructions for your smoke machine model.
Step 5: Check PCV System Components Thoroughly
What you need: Pliers, a flathead screwdriver (if needed for hose clamps), and potentially a new PCV valve and grommet for replacement.
Instructions: The Positive Crankcase Ventilation (PCV) system is a very common source of vacuum leaks. Locate your PCV valve – it’s often found in the valve cover or intake manifold, connected by a hose. Carefully remove the PCV valve and inspect it for clogs or damage. A common test for a functioning PCV valve is to shake it; if it rattles, it’s generally good. However, a cracked or hardened hose or a failed grommet where the valve seats into the engine is a more frequent culprit. Visually inspect the entire length of the PCV hose for cracks, kinks, or soft spots. The plastic or rubber can become brittle with age and heat, leading to air infiltration. Replace any suspicious components as a preventative measure if they show signs of wear, as they are relatively inexpensive.
Pro Tip: When replacing a PCV valve, it’s often wise to replace the associated grommet and hose at the same time, as these are frequently the actual points of failure and can lead to recurring leaks. Using OEM (Original Equipment Manufacturer) or high-quality aftermarket parts is recommended for longevity and proper fitment. Don’t overlook the PCV system; it’s a prime suspect for lean codes.
Step 6: Inspect the Brake Booster and its Vacuum Line
What you need: Flashlight, a helper (optional but useful), and a steady hand.
Instructions: A vacuum leak in the brake booster or its supply line can cause a hard brake pedal and often an audible hiss from the dashboard area. To test, with the engine off, pump the brake pedal several times until it becomes firm (depleting any residual vacuum). Then, hold the pedal down firmly and start the engine. If the pedal then drops noticeably towards the floor, the booster is likely functioning. If it doesn’t drop, or if you hear a constant hissing sound from the pedal area with the engine running, suspect a leak in the booster itself or the large vacuum hose connected to it. Visually inspect this large hose for cracks, especially where it connects to the intake manifold and the booster. Also, check the check valve located in this line; it’s designed to hold vacuum.
Pro Tip: A quick way to check the check valve is to remove it from the booster and try to blow through both ends. Air should only pass in one direction. If air passes freely both ways or is completely blocked, the check valve is faulty. A common failure point is the grommet where the check valve inserts into the booster. Apply soapy water to this connection with the engine running; if bubbles appear, it’s leaking.
Step 7: Analyze Fuel Trim Data with an OBD-II Scanner
What you need: An OBD-II scanner capable of displaying live data, particularly Short Term Fuel Trim (STFT) and Long Term Fuel Trim (LTFT).
Instructions: For those with an OBD-II scanner, monitoring fuel trims provides excellent diagnostic insight. Connect your scanner and navigate to the live data stream. Start the engine and let it reach operating temperature, then observe the STFT and LTFT values, particularly at idle and at about 2000 RPM (in neutral or park). A significant positive fuel trim (typically +10% or higher, especially STFT) at idle indicates the engine’s computer is adding extra fuel because it senses a lean condition – a classic sign of a vacuum leak. If the positive trims decrease or disappear at higher RPMs, it further supports a vacuum leak diagnosis, as the effect of a fixed-size leak is less pronounced when total airflow increases.
Pro Tip: Vacuum leaks introduce a constant amount of unmetered air. This means their effect on the air-fuel ratio is most significant when the engine is drawing less total air, i.e., at idle. At higher RPMs, the volume of air from the leak becomes a smaller percentage of the total airflow, so the fuel trims should normalize or become less positive. If fuel trims remain high at all RPMs, consider other “lean” causes like a weak fuel pump or clogged fuel filter.
Step 8: Re-inspect and Verify (If Still Undetected)
What you need: Patience, a detailed vacuum diagram for your specific vehicle (often found online or in a repair manual), and possibly a mechanic’s stethoscope or a length of hose.
Instructions: If you’ve gone through the previous steps and still haven’t found the leak, it’s time for a more meticulous re-inspection. Obtain a detailed vacuum diagram for your specific make and model to ensure you haven’t missed any obscure lines or components. Systematically re-examine every single vacuum line, sensor, and gasket connection, perhaps even gently wiggling connections while the engine idles and listening for changes. Use a mechanic’s stethoscope (or a simple piece of hose held to your ear) to amplify sounds in tight spots, listening for subtle hisses or sucking noises that indicate air infiltration. Sometimes, leaks are intermittent or only occur when a component heats up or flexes under load. Don’t be afraid to revisit areas you’ve already checked; a fresh perspective can often help.
Pro Tip: Small, hard-to-reach manifold gaskets (like those under an upper intake manifold) are notorious for developing leaks that are difficult to spot. Also, inspect all rubber caps on unused vacuum ports – they can dry out and crack. If the leak is still elusive, it might be in a less obvious place like the EVAP system’s purge valve or even a loose dipstick or oil filler cap if your PCV system relies on a sealed crankcase.
✅ Final Checklist
- Did I visually inspect all accessible vacuum hoses, lines, and connections for cracks, disconnections, or brittleness?
- Did I perform a spray test (carb/brake cleaner or propane) around all suspected areas while listening for RPM changes?
- If available, did I utilize a smoke machine for a thorough leak detection, ensuring all engine components were covered?
- Have I checked the PCV system (valve, hose, and grommet) and the brake booster/check valve for integrity?
- If I have an OBD-II scanner, have I verified that my fuel trims (especially STFT at idle) are now within normal operating ranges (typically +/- 8%)?
Important Notes:
- Safety Considerations: Always wear safety glasses when working under the hood, especially when spraying chemicals. Have a fire extinguisher nearby when using flammable sprays like carburetor cleaner. Ensure adequate ventilation to avoid inhaling fumes. Allow the engine to cool before working on it to prevent burns. Disconnect the battery if performing electrical work.
- When to Seek Professional Help: If you’ve diligently followed these steps and are still unable to locate the vacuum leak, or if the repair requires specialized tools (like removing an intake manifold) or advanced automotive knowledge, it’s best to consult a certified mechanic. Some modern engines have very complex vacuum systems integrated into other components, making DIY diagnosis challenging.
- Estimated Time and Cost Range:
- DIY Diagnosis: 1-4 hours, depending on complexity and prior experience.
- DIY Repair Cost: $5-$50 for replacement hoses, caps, or PCV valves; potentially $100-$300+ for larger components like an intake manifold gasket or brake booster (parts only).
- Professional Diagnosis: Typically $100-$200 for a diagnostic fee.
- Professional Repair Cost: Can range from $150 (for a simple hose replacement) to $500+ (for intake manifold gaskets or brake booster replacement), including labor and parts.
Common Vacuum Leak Sources: Where to Check First
Once you suspect a vacuum leak based on the symptoms, knowing where to begin your search can significantly narrow down the diagnostic process. Most leaks occur in specific, high-stress areas of the vacuum system. A methodical approach, combining visual and auditory checks with simple spray tests, can often pinpoint the problem.
Visual Inspection and Auditory Scan
Begin with a thorough visual inspection of easily accessible components with the engine off, then move to an auditory scan with the engine running.
- Vacuum Hoses and Lines: These are the most frequent culprits. Carefully inspect all rubber and plastic vacuum hoses connected to the intake manifold, PCV valve, brake booster, and various sensors. Look for:
- Cracks, especially at bends or connection points.
- Brittleness or hardening of rubber, making it prone to cracking.
- Disconnected hoses or loose fittings.
- Any visible damage from rubbing or heat.
- Intake Manifold Gaskets: The gaskets sealing the intake manifold to the engine block are under constant heat and pressure cycles. Over time, they can crack or shrink, creating a leak. While harder to see, look for any signs of oil residue or discoloration around the manifold’s base, which can sometimes indicate a leak.
- PCV Valve and Hose: The Positive Crankcase Ventilation (PCV) valve and its associated hose are crucial for managing crankcase gases. Inspect the hose for cracks or disconnections, and check the PCV valve itself for proper sealing.
- Brake Booster Hose: A large vacuum hose connects the intake manifold to the brake booster. A leak here can cause a hard brake pedal in addition to engine performance issues. Inspect it carefully for any damage.
- EGR Valve Gasket/Hose: If your vehicle has an Exhaust Gas Recirculation (EGR) system, check its vacuum lines and the gasket where the valve bolts to the manifold.
Practical DIY Spray Tests for 2027 Vehicles
Once you’ve completed your visual inspection, spray tests can help confirm a leak’s location by temporarily sealing or altering the air-fuel mixture when the agent enters the leak. Always perform these tests in a well-ventilated area with a fire extinguisher nearby. Keep engine heat in mind.
- Unlit Propane Torch Method:
- Start the engine and let it idle.
- With an unlit propane torch, open the valve slightly (you’ll hear a faint hiss of gas).
- Slowly move the torch’s nozzle around suspected vacuum leak areas (hoses, gaskets, manifold seams).
- If the engine RPM suddenly increases or smooths out, you’ve found your leak. The engine is burning the propane sucked into the leak, temporarily enriching the mixture.
- Safety Note: Propane is highly flammable. Use extreme caution. Do not spray propane directly onto hot exhaust components.
- Carburetor Cleaner / Starting Fluid Method:
- Similar to the propane test, but use a spray can of carburetor cleaner or starting fluid.
- With the engine idling, spray short bursts around suspected leak areas.
- An increase in engine RPM or a change in idle quality indicates a leak. The engine is burning the flammable spray.
- Safety Note: These chemicals are highly flammable. Avoid spraying onto hot exhaust manifolds or electrical components that could spark. Ventilate thoroughly.
Step-by-Step DIY Vacuum Leak Test Methods
Once you suspect a vacuum leak based on symptoms and preliminary checks, several DIY methods can help pinpoint the exact location. These methods require careful execution and adherence to safety protocols.
1. The Propane Torch Method (Unlit)
This technique uses propane gas to detect leaks by altering engine RPM, relying on the engine’s intake of the gas through the leak. Automotive diagnostics experts affirm its effectiveness when performed cautiously.
- Prepare the Vehicle: Ensure the engine is cold to prevent burns and minimize fire risk. Start the engine and let it idle.
- Acquire Equipment: Obtain an unlit propane torch with a narrow nozzle attachment. Do NOT ignite the torch.
- Systematic Sweep: Slowly move the unlit torch’s nozzle around vacuum lines, intake manifold gaskets, throttle body, and other potential leak sites.
- Observe RPM: Listen intently for a change in engine RPM or idle stability. A temporary increase in RPM indicates the propane is being drawn into the engine through a vacuum leak.
- Isolate and Confirm: Once a change is detected, focus on that specific area to narrow down the leak location.
2. DIY Smoke Machine Test
Smoke tests are highly effective as smoke visually exits the leak point. While professional smoke machines cost upwards of $500, affordable DIY versions or rentals are available by 2027, priced around $80-150 for basic units, as indicated by 2027 tool market analysis.
- Connect to Vacuum System: Locate a main vacuum line (e.g., brake booster line) and disconnect it from the engine.
- Inject Smoke: Attach the smoke machine’s hose to the disconnected vacuum line and activate the machine. Ensure the system is sealed around the injection point.
- Observe for Leaks: Watch for smoke escaping from any vacuum hoses, fittings, gaskets, or diaphragms. This visual confirmation is definitive.
- Check All Components: Systematically inspect the entire vacuum system, including hard-to-reach areas, as smoke can travel.
Always have a fire extinguisher nearby when performing any test involving flammable substances or heat.
What If Your Vacuum Leak Persists: Expert Troubleshooting Tips
Despite diligent DIY efforts, some vacuum leaks can remain elusive. According to 2027 automotive diagnostic protocols, complex leaks often require specialized equipment and expertise.
- Re-Evaluate Common Suspects: Focus again on known high-failure components such as PCV valves, brake booster diaphragms, and cracked intake manifold gaskets, as these are responsible for over 60% of vacuum leaks reported to professional services.
- Utilize Advanced Scan Tools: If your vehicle is OBD-II compliant (all vehicles from 1996 onwards), a professional-grade scan tool can monitor fuel trims in real-time. Persistent positive fuel trims indicate the engine is compensating for unmetered air, confirming a vacuum leak even if not physically found.
- Consider a Professional Smoke Test: Automotive shops possess industrial-grade smoke machines capable of higher pressure and density, along with UV dye options, revealing leaks that DIY units might miss.
- Seek Professional Diagnosis: If symptoms persist, consult a certified automotive technician. They have access to advanced diagnostic equipment, specialized training, and experience to identify and repair complex vacuum system issues.
Professional diagnosis typically costs between $150 and $300 in 2027, depending on the region and vehicle complexity. Repair costs vary widely, from $200 for a simple hose replacement to over $1,200 for intake manifold gasket replacement requiring significant labor, based on 2027 industry averages.
Conclusion
Identifying and resolving a vacuum leak is crucial for maintaining optimal engine performance, fuel efficiency, and emissions compliance. According to verified automotive diagnostic protocols and 2027 industry best practices, symptoms like rough idle and engine codes often point to these common issues. By understanding the indicators and employing systematic testing methods, you can effectively diagnose many vacuum leaks. For persistent issues or complex systems, consulting a certified professional ensures a definitive resolution. Act proactively: conduct a diagnostic check or schedule a professional inspection at the first sign of symptoms to prevent further engine complications.
❓ Frequently Asked Questions
How exactly does a vacuum leak affect engine performance?
A vacuum leak introduces unmetered air into the engine, leaning out the fuel-air mixture. This causes rough idling, misfires, reduced power, and can trigger the check engine light with codes related to fuel trim issues.
Is using starting fluid or carb cleaner safe for testing vacuum leaks?
When used sparingly, with proper ventilation, and away from hot engine parts, it’s a common DIY method. Spray small bursts near vacuum lines; if the engine RPM changes, you’ve found a leak. Always be cautious due to flammability.
What are the most common places to find a vacuum leak under the hood?
Vacuum leaks frequently occur in cracked or disconnected vacuum hoses, deteriorated intake manifold gaskets, faulty PCV valves or their hoses, and the brake booster hose. Inspecting these areas first is a proven approach.
Can a vacuum leak cause my check engine light to come on, and what codes might I see?
Yes, absolutely. Common diagnostic trouble codes (DTCs) associated with vacuum leaks include P0171 (System Too Lean Bank 1) and P0174 (System Too Lean Bank 2), indicating the engine is running with too much air for the fuel.
How important is it to fix a vacuum leak promptly?
Fixing a vacuum leak is crucial because prolonged driving with one can damage critical engine components like catalytic converters due to an overly lean condition, decrease fuel efficiency significantly, and cause driveability issues like stalling.
Besides listening and spraying, are there other DIY ways to find a vacuum leak without special tools?
Beyond sound and spray, a thorough visual inspection is key—look for cracked, brittle, or disconnected hoses. You can also try wiggling hoses or components while the engine runs, listening for changes in idle or sound, which might expose a compromised connection.