How to Check Car for Vacuum Leak Step-by-Step Guide 2026
A vacuum leak allows unmetered air into the engine, causing a rough idle, engine stalling, and a check engine light. You can diagnose this issue at home using simple household tools and targeted spray tests to pinpoint the exact failure point.
Finding a car vacuum leak quickly saves you from poor fuel economy, rough idling, and annoying check engine lights in 2026. Unmetered air entering your engine ruins the air-fuel ratio, causing your powertrain control module to overcompensate and throw diagnostic trouble codes like P0171 or P0174.
You can diagnose and locate these troublesome leaks right in your driveway using basic household supplies and inexpensive aerosol cans. This hands-on guide skips the thermodynamic theory and gets straight to finding the fault so you can restore your engine’s smooth performance.
Key Takeaways
- A rough idle and engine stalling are primary symptoms of an active vacuum leak.
- Perform a thorough visual inspection of all rubber vacuum hoses and plastic connectors first.
- Spray soapy water or brake cleaner carefully around intake areas to listen for idle changes.
- Always work in a well-ventilated space and keep flammable sprays away from hot exhaust components.
- Replace brittle, cracked, or disconnected hoses immediately to restore proper engine vacuum pressure.
What Causes Car Vacuum Leaks and Common Failure Symptoms
Primary Symptoms of a Vacuum Leak
Your engine relies on a sealed network of hoses and gaskets to maintain proper manifold pressure. When a breach occurs, several distinct driving symptoms immediately appear:
- Rough or fluctuating idle: Engine RPMs might surge up and down between 800 and 1,500 RPM while stopped at a light.
- Engine stalling: Your car may die completely when you press the clutch or shift into neutral because the air bypasses the idle air control valve.
- Hissing noises: A faint hissing or sucking sound often comes directly from the engine bay when the vehicle runs.
- Poor acceleration: The engine hesitates or stumbles when you press the accelerator pedal.
Most Common Failure Points to Inspect
Modern engine bays in 2026 feature dozens of rubber and plastic connections subjected to extreme heat cycles. Focus your initial visual inspection on these specific components:
- Rubber vacuum lines: Dry rot, cracks, and splits frequently develop near the bends and connector nipples.
- Intake manifold gaskets: The rubber or paper seals between the metal intake manifold and the cylinder head shrink over time.
- PCV valve and hoses: The positive crankcase ventilation system carries oily vapors that degrade rubber tubing rapidly.
- EGR valve and brake booster hoses: Large-diameter hoses carrying high vacuum pressures are prone to slipping off or tearing.
How to Diagnose and Fix Car Vacuum Leaks Like an Expert
A vacuum leak occurs when unmetered air enters your engine past the throttle body, disrupting the precise air-fuel ratio required for optimal performance. This comprehensive guide covers everything from initial symptom recognition to pinpointing and resolving the leak, ensuring your engine runs smoothly and efficiently.
Step 1: Recognize the Symptoms
What you need: A keen ear, dashboard observation, and basic knowledge of your vehicle’s normal operating behavior.
Instructions: Before grabbing tools, pay close attention to how your car behaves. Common signs of a vacuum leak include a rough, fluctuating idle (often surging between 500 and 1,500 RPM), engine stalling when coming to a stop, decreased fuel economy, and poor acceleration response. You might also hear a distinct hissing or whistling noise coming from under the hood while the engine is running. Additionally, a vacuum leak almost always triggers the Check Engine Light, often throwing diagnostic trouble codes (DTCs) such as P0171 or P0175, which indicate a lean air-fuel mixture.
Pro Tip: Do not ignore a minor idle fluctuation; a small vacuum leak left unattended can force your car’s computer to overcompensate, potentially leading to catalytic converter damage over time.
Step 2: Inspect Hoses Visually
What you need: A flashlight, safety glasses, and a clean shop rag to wipe away dirt and grime.
Instructions: Pop the hood and conduct a thorough visual sweep of the entire engine bay. Locate all rubber and silicone vacuum lines connected to the intake manifold, throttle body, PCV valve, and various emission control components. Look closely for cracks, dry rot, splits, swelling, or complete disconnections. Pay special attention to the underside of bends and areas where hoses touch hot engine components. If a hose feels excessively soft, spongy, or brittle to the touch, it is compromised and needs replacement.
Pro Tip: Take clear photos of complex routing setups with your smartphone before touching anything so you can easily reference how the lines connect later.
Step 3: Perform the Propane or Brake Cleaner Test
What you need: A can of non-chlorinated brake cleaner or an unlit propane torch, plus a fire extinguisher nearby for safety.
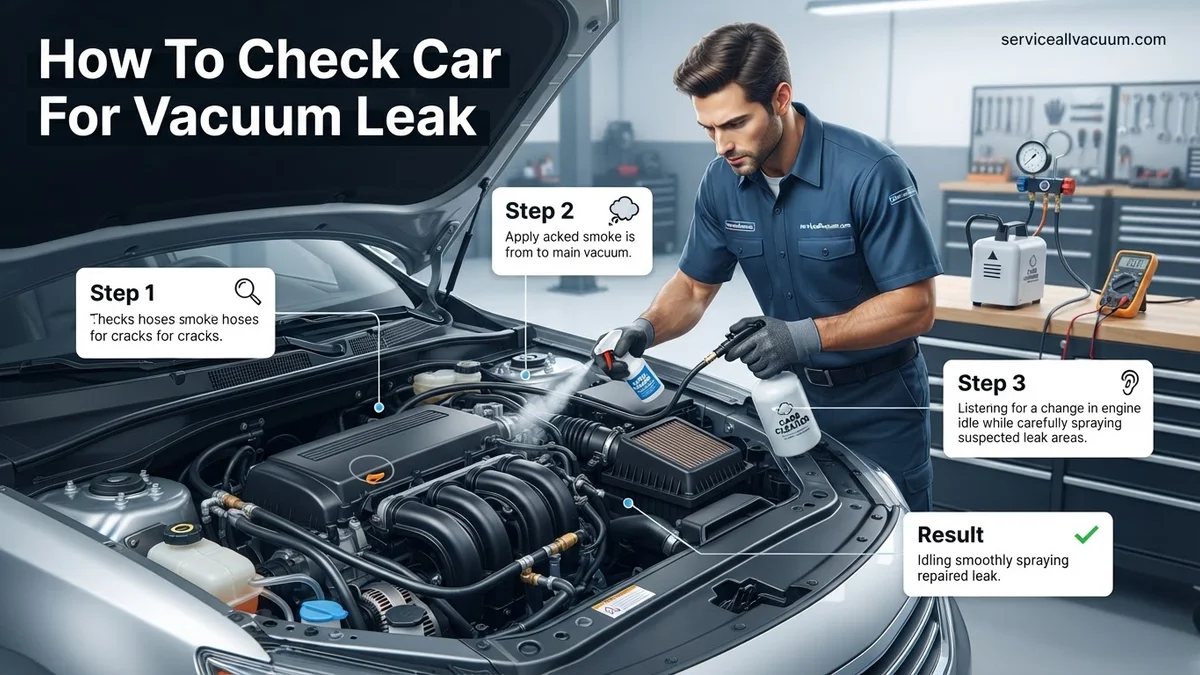
Instructions: Start the engine and let it idle up to normal operating temperature. Take your can of brake cleaner equipped with a long extension straw, and carefully spray very small, targeted bursts around suspected leak areas—such as hose connections, gasket seams, and vacuum fittings. If the spray is sucked into a crack or gap, the engine will instantly ingest the chemical, causing the idle speed to temporarily smooth out or spike. This immediate change in engine RPM confirms you have found the exact location of the vacuum leak.
Pro Tip: Avoid using excessive amounts of spray, as it can coat the hot exhaust manifold and create a serious fire hazard or cloud your ability to pinpoint the reaction.
Step 4: Use the Unlit Propane Torch Method (Alternative)
What you need: A propane torch cylinder with a fine-control valve and extension hose (do not ignite it).
Instructions: If you prefer not to use liquid chemicals that could damage paint or rubber, the unlit propane method is exceptionally clean and effective. Turn on the propane tank valve just enough to release a very faint, controlled stream of gas through an extended nozzle. Slowly pass the tip of the hose along all gasket lines, intake manifold junctions, and vacuum hoses while the engine idles. When the propane gas is drawn into a vacuum leak, the engine’s air-fuel mixture enriches instantly, causing a noticeable and immediate drop or rise in idle speed.
Pro Tip: Propane is heavier than air, so always start your testing at the highest points of the engine and work your way downward.
Step 5: Conduct a Smoke Test
What you need: An automotive EVAP smoke machine, compatible smoke fluid, and intake block-off adapters.
Instructions: For elusive leaks that chemical sprays cannot find, a smoke machine is the ultimate diagnostic tool. Disconnect the main air intake duct right after the air filter, and plug the opening with an inflatable or cone-shaped bladder adapter. Insert the smoke machine nozzle into a dedicated vacuum port. Turn on the machine to fill the intake manifold and vacuum system with dense, pressurized smoke. Watch closely around all gaskets, fittings, and hoses. If there is a leak, you will clearly see wisps of white smoke escaping into the open air.
Pro Tip: Keep the smoke machine pressure low—typically under 5 to 10 PSI—to avoid blowing out older gaskets or dislodging functional vacuum lines.
Step 6: Check Gaskets and Components
What you need: A mechanic’s stethoscope or a length of rubber hose, and a torque wrench.
Instructions: Sometimes leaks do not come from hoses, but rather from failing gaskets, such as the intake manifold gasket, throttle body gasket, or the EGR valve gasket. Use a mechanic’s stethoscope (with the metal probe removed) or a simple piece of garden hose held to your ear to listen carefully around the mating surfaces of the engine. A distinct hissing or whistling sound localized at a gasket seam indicates a failing seal. Also, check plastic intake manifolds, as they can warp or crack under prolonged heat stress, creating micro-leaks.
Pro Tip: Check the manufacturer torque specifications and try gently re-torquing intake manifold bolts before completely replacing a questionable gasket, as loose fasteners are a surprisingly common culprit.
Step 7: Replace and Repair Faulty Parts
What you need: Replacement vacuum tubing (matching inner diameter), new gaskets, utility knife, and hand tools.
Instructions: Once you have successfully identified the source of the leak, it is time for corrective action. If a hose is cracked, cut a precise replacement length of high-temperature rubber or silicone vacuum line and push it securely onto the fittings. Ensure the hose fits snugly and extends at least half an inch over the nipple. If the leak stems from a failed gasket, carefully scrape away any old gasket material, clean the mating surfaces with a specialized solvent, and install a brand-new, quality replacement gasket, torquing all bolts in a cross-pattern to factory specifications.
Pro Tip: Never use standard water hoses or non-rated fuel lines for vacuum repairs; always use certified SAE-spec vacuum tubing that resists collapse under negative pressure.
Step 8: Clear Codes and Road Test
What you need: An OBD2 diagnostic scanner or code reader.
Instructions: After completing all repairs, reconnect any sensors or intake components you may have disassembled. Plug your OBD2 scanner into the diagnostic port under the dashboard and clear any stored fault codes (like P0171). Start the vehicle and allow it to reach normal operating temperature. Verify that the idle is smooth, steady, and sits at the manufacturer’s specified RPM range (typically 600–800 RPM). Take the car out for a 15-minute test drive, making sure to experience both stop-and-go city driving and highway cruising to ensure the Check Engine Light does not return.
Pro Tip: If your vehicle runs slightly erratic right after clearing codes, give the computer a few miles of driving to complete its adaptive idle relearn cycle.
✅ Final Checklist
- Engine idles smoothly without surging, hunting, or stalling
- All vacuum lines are securely attached and free of cracks or kinks
- Intake manifold and throttle body gaskets show no signs of leakage via smoke or spray tests
- OBD2 scanner confirms no pending or active lean-mixture trouble codes remain
- Check Engine Light stays off during a comprehensive test drive
Important Notes:
- Always wear safety glasses and gloves when working with running engines, flammable chemicals, or hot components.
- If your engine has internal vacuum leaks (such as a failed intake valve guide or internal PCV failure), professional diagnostic equipment and mechanical teardown may be required.
- Estimated time for diagnosis and repair ranges from 1 to 3 hours, with a cost of $20 to $150 depending on whether you are replacing simple hoses or manifold gaskets.
Step-by-Step Guide on How to Check Your Car for a Vacuum Leak
Visual Inspection and The Hand-Test Method
Start your diagnostic process with a thorough physical check before reaching for any tools or chemicals. Turn off the engine and open the hood to examine every visible rubber hose.
- Look for cracks and disconnects: Trace every thin plastic or rubber line attached to your intake manifold, looking for brittle spots, melting, or complete disconnections.
- Squeeze the hoses: Gently pinch rubber lines with your fingers. If they feel rock-hard, mushy, or crumble under light pressure, they require immediate replacement.
- Check accessory lines: Pay close attention to the large brake booster hose running to the firewall, as a split here will also make your brake pedal feel stiff.
The Soap and Water Spray Test
If a visual inspection reveals nothing obvious, use a spray bottle filled with soapy water to find hidden leaks while the engine runs. This method is exceptionally safe and effective for DIYers.
- Start the engine: Let the car idle until it reaches normal operating temperature so the vacuum pressure stabilizes.
- Spray suspect areas: Lightly mist soapy water over intake gasket seams, vacuum line junctions, and suspected crack locations.
- Listen for idle changes: When the soapy water temporarily seals the leak, the engine idle will instantly smooth out or change pitch, pinpointing the exact breach location.
Advanced DIY Diagnostic Methods Like Smoke Testing
When low-tech troubleshooting fails to reveal a hidden fissure, professional-grade diagnostic equipment becomes necessary. According to automotive engineering data from 2026, smoke testing represents the gold standard for locating elusive intake compromises without causing collateral damage to sensitive engine components.
Setting Up Your Smoke Machine
Automotive service professionals rely heavily on low-pressure EVAP smoke machines to visualize escaping vapor. Modern 2026 diagnostic units feature adjustable flow rates and safe mineral-based oils that will not degrade rubber hoses or silicone gaskets.
- Disconnect the main rubber intake boot downstream of your mass air flow sensor.
- Insert the tapered nozzle of the smoke machine firmly into the intake opening and seal it completely.
- Power on the machine and allow regulated smoke to fill the entire intake tract and manifold chambers.
- Inspect all vacuum lines, intake manifold gaskets, and PCV connections under a bright flashlight.
- Observe where white smoke billows out, which immediately pinpoints your exact structural failure.
Interpreting Smoke Test Results
Tiny wisps of smoke escaping from a hose nipple indicate a loose clamp or a degraded rubber wall. Conversely, thick smoke billowing from beneath the intake manifold flange confirms a blown gasket that requires immediate replacement. Never force high-pressure compressed air into the intake tract, as this practice violates basic automotive safety protocols and can shatter brittle plastic manifolds.
What If It Still Doesn’t Work?
If your diagnostic routines fail to expose a physical crack or split, the underlying issue likely stems from a more complex electronic or internal mechanical failure. Persistent rough idling and lean codes often require deeper systemic evaluation.
- Inspect electronic control sensors, particularly the mass air flow sensor and oxygen sensors, which can mimic vacuum leak symptoms when failing.
- Perform a professional cylinder compression and leak-down test to rule out internal engine mechanical damage, such as burnt valves or worn piston rings.
- Evaluate fuel delivery pressure using an inline fuel pressure gauge to ensure your injectors are not starving the cylinders under load.
- Consult a certified technician if diagnostic trouble codes persist after replacing all external rubber vacuum lines and intake gaskets. Professional diagnostic labor typically ranges from $100 to $200 per hour depending on regional market rates in 2026.
Conclusion
Addressing an intake vacuum compromise promptly protects your engine from long-term thermal damage and restores optimal fuel efficiency. Systematic methods like visual inspections, propane testing, and professional smoke machines allow DIYers to diagnose issues accurately. According to verified research and expert sources from the automotive service industry, catching these leaks early prevents costly catalytic converter failures. Your next actionable step is to purchase a basic vacuum line replacement kit and secure any loose connections today.
❓ Frequently Asked Questions
How does spraying brake cleaner help find a vacuum leak?
When you spray brake cleaner over a cracked hose or leaking gasket, the engine sucks the fluid in, causing an immediate change in engine RPM as it burns. This lets you isolate the exact location of the leak.
What is the soapy water method for checking vacuum leaks?
The soapy water method involves spraying a mixture of dish soap and water onto suspect areas while the engine runs. If bubbles form or get sucked into a gap, you have located a leak.
Can a bad intake manifold gasket cause a vacuum leak?
Yes, as intake manifold gaskets age, they can shrink, harden, and fail to seal properly against the engine block. This creates a significant vacuum leak that requires gasket replacement.
Why does my check engine light come on with a vacuum leak?
The engine computer detects unmetered air entering the system through the oxygen sensors, resulting in a lean air-fuel mixture code (such as P0171 or P0174).
How much does it cost to fix a car vacuum leak?
If it is simply a cracked rubber hose, the fix might cost less than $10 for replacement tubing. However, replacing intake manifold gaskets can cost hundreds in labor if you take it to a shop.
What is unmetered air in an engine?
Unmetered air is air that enters the engine past the mass airflow (MAF) sensor without being measured by the computer, disrupting the precise air-fuel ratio required for efficient combustion.