How Does A Wet Dry Vacuum Cleaner Work Step-by-Step 2027
A wet dry vacuum cleaner is engineered to handle both liquid spills and dry debris by utilizing a powerful motor, specialized filters, and critical liquid separation mechanisms. Its core design ensures the motor is protected from water damage while efficiently collecting various messes, making it a versatile cleaning tool.
A wet dry vacuum cleaner is not merely a more powerful conventional vacuum; it’s a sophisticated piece of engineering designed to tackle both solid debris and liquids simultaneously. Its ability to switch effortlessly between these cleaning tasks, or even handle them concurrently, stems from a core mechanical advantage and intelligent internal design. You’re essentially leveraging a single, versatile tool that prevents water damage to its own components while delivering robust suction for virtually any spill or mess in your 2027 home or workshop. This eliminates the hassle of switching equipment, saving you valuable time and effort in demanding cleanup scenarios.
The ingenuity lies in how these machines generate immense suction and then expertly manage the collected waste. Unlike traditional vacuums that are fatally compromised by water, wet dry vacuums incorporate crucial separation systems that protect the motor from liquid ingress. Understanding these principles reveals why your wet dry vacuum is an indispensable part of your cleaning arsenal, always ready to handle spills, floods, or heavy-duty dry debris without compromise.
Key Takeaways
- Dual functionality relies on motor, fan, and tank.
- Float ball prevents water reaching the motor.
- Specific filters are used for wet vs. dry messes.
- Wide hoses handle large debris and liquids.
- Proper usage extends cleaner’s lifespan.
What Causes a Wet Dry Vacuum to Work?
The Power Behind the Suction: Motor and Impeller
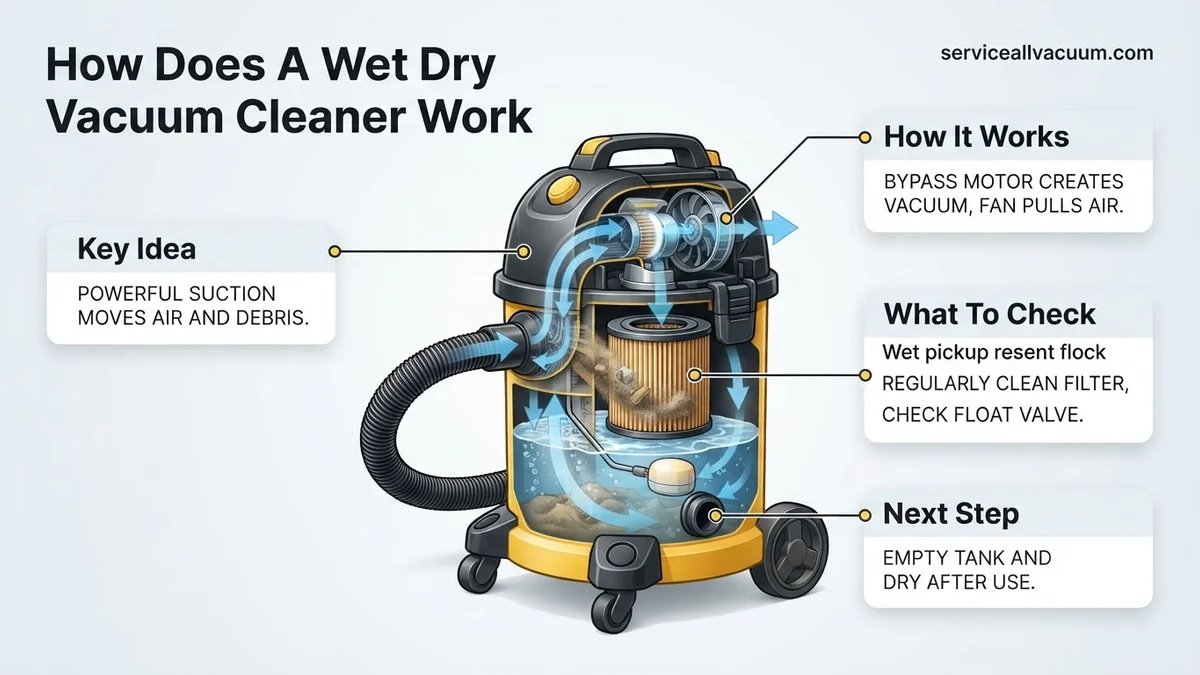
At the heart of every effective wet dry vacuum is a robust electric motor. This motor drives a high-speed impeller, essentially a fan with specially shaped blades. When the motor spins the impeller, it creates a region of significantly lower air pressure at the vacuum’s intake port – what we commonly refer to as a “vacuum.” This pressure differential is the fundamental principle that drives the cleaning action. The higher atmospheric pressure outside the vacuum then pushes air, along with any solid debris or liquid droplets, into the lower-pressure area through the hose. The more powerful the motor and the more efficiently designed the impeller, the greater the airflow volume and suction lift the machine can generate, allowing it to pick up heavy debris and large volumes of liquid with ease in 2027.
- Motor Strength: Measured in peak horsepower (HP) for consumer models, typically ranging from 1.5 to 6.5 HP, indicating its power to spin the impeller.
- Impeller Design: Multi-blade impellers create a strong centrifugal force, accelerating air towards the exhaust and sustaining the low-pressure zone.
- Sealed System: The entire assembly from intake to collection tank is designed to be airtight, maximizing the pressure differential for optimal suction performance.
Designing for Dual Waste: Wide Hoses and Large Tanks
The physical design of a wet dry vacuum is intrinsically engineered for its dual-purpose role. You’ll immediately notice the significantly wider hose diameter compared to a standard household vacuum, often ranging from 1.5 to 2.5 inches. This wider bore is crucial because it allows larger pieces of debris – nails, wood chips, gravel, or even substantial amounts of liquid – to pass through without clogging. A narrower hose would quickly become obstructed, limiting the vacuum’s versatility.
Equally vital is the collection tank. These tanks are substantially larger than typical vacuum dustbins, frequently ranging from 5 to 20 gallons or more. This generous capacity serves a dual purpose:
- It provides ample space to hold significant volumes of liquid from spills or floods, preventing constant emptying.
- For dry waste, the large volume accommodates bulky debris, like sawdust or drywall particles, often collected in greater quantities than typical household dust.
This combined design of wide hoses and large tanks ensures the vacuum can efficiently and continuously collect both types of waste without requiring frequent interruptions, making it highly effective for heavy-duty cleaning tasks you encounter in 2027.
From Start to Finish: Wet Dry Vacuum Mechanics Explained
Ever wondered how your versatile wet dry vacuum cleaner effortlessly transitions from sucking up sawdust to slurping spilled liquids without a hitch? This comprehensive guide will take you on a detailed journey through the ingenious engineering and internal mechanisms that allow these powerful machines to handle both wet and dry messes. Understanding the core principles of its operation will not only demystify its functionality but also help you appreciate its robust design and ensure you use it effectively for years to come. Let’s delve into the intricate workings of this essential cleaning tool.
Step 1: The Powerhouse – Motor and Impeller System
What you need: No physical components needed for understanding; conceptual knowledge of electric motors and fans.
Instructions: At the very heart of every wet dry vacuum cleaner lies a robust electric motor, which serves as the primary power source. This motor is mechanically coupled to a specially designed fan, often referred to as an impeller. When the vacuum is switched on, the electric motor rapidly spins the impeller at extremely high revolutions per minute. This rapid rotation performs a crucial action: it creates a significant pressure differential. Specifically, it generates a low-pressure zone (a partial vacuum) at the intake side of the impeller and a high-pressure zone at the exhaust side. This pressure disparity is the fundamental principle that drives the entire suction process, effectively pulling air, debris, and liquids into the unit.
Pro Tip: The quality and power (measured in horsepower or air watts) of the motor directly correlate to the vacuum’s overall suction strength and its ability to handle heavier or more stubborn debris. A higher-quality motor often translates to greater durability and consistent performance over time.
Step 2: Suction Creation and Airflow Dynamics
What you need: No physical components needed; conceptual understanding of atmospheric pressure.
Instructions: Following the creation of the low-pressure zone by the impeller, the laws of physics take over. Atmospheric pressure, which is significantly higher than the pressure inside the vacuum’s collection tank, naturally pushes air from the external environment (where the pressure is higher) into the vacuum’s nozzle (where the pressure is lower). This continuous equalization of pressure creates a powerful and directed airflow. This airflow travels from the cleaning surface, through the connected hose and attachments, and into the main collection tank. This dynamic current is what physically carries both solid debris and liquids from the floor or surface into the vacuum’s reservoir, acting as the primary transport mechanism for all types of messes.
Pro Tip: Obstructions in the hose or attachments, such as large debris or kinks, significantly reduce airflow and thus suction power. Regular inspection and clearing of the hose are vital for maintaining optimal performance.
Step 3: Diverting for Dry – Filtration in Action
What you need: Awareness of different filter types (cartridge, bag, foam sleeve).
Instructions: When operating in dry vacuuming mode, the incoming air, now laden with dust, dirt, wood chips, and other solid particles, first enters the large collection tank. Before this air can reach the motor compartment, it must pass through a specialized dry filter. Most wet dry vacuums utilize a pleated cartridge filter, sometimes supplemented by a disposable filter bag for finer dust or to protect the cartridge. This filter acts as a barrier, physically trapping the solid debris within its pleats or the bag. Only the cleaned, particulate-free air is allowed to pass through the filter, then move on towards the motor for cooling, and finally exit through the exhaust port, preventing damage to the motor and maintaining air quality.
Pro Tip: Always ensure the correct dry filter is securely installed for dry pickup. A clogged or damaged filter severely restricts airflow, leading to reduced suction and potential motor overheating. Clean or replace your filter according to manufacturer guidelines for peak efficiency.
Step 4: Managing Moisture – Liquid Collection
What you need: Understanding of the necessity to remove dry filters for wet use.
Instructions: Transitioning to wet vacuuming involves a critical setup change: the dry cartridge filter must typically be removed or protected by a foam sleeve (depending on the model). When liquids are collected, the same powerful suction mechanism draws the water, slush, or other fluids from the surface, through the hose, and directly into the collection tank. Unlike dry debris, liquids do not need to be filtered in the same way. The tank’s design ensures that the liquid flows unimpeded to the bottom of the drum, accumulating there. The tank is constructed from durable, non-corrosive materials to withstand exposure to various liquids, effectively containing the mess without allowing it to reach sensitive electrical components.
Pro Tip: Neglecting to remove or protect the dry filter during wet pickup will cause it to become saturated and ruined, severely impeding suction, potentially damaging the motor, and leading to mold growth. Always check your vacuum’s specific instructions for wet operation.
Step 5: The Essential Float Ball Mechanism
What you need: No physical components needed; conceptual understanding of buoyancy.
Instructions: A cornerstone safety feature for wet vacuuming is the integrated float ball mechanism. This simple yet highly effective device is usually located near the intake port inside the collection tank, directly above where liquids accumulate. As the liquid level within the tank rises during wet pickup, the buoyant float ball lifts upwards on the surface of the liquid. Once the tank approaches its maximum capacity, the float ball rises high enough to physically seal off the intake port that leads to the motor. This action immediately cuts off the suction, providing an audible change in motor sound and preventing any further liquid from being drawn into the motor compartment, thus averting catastrophic damage and electrical hazards.
Pro Tip: If your vacuum suddenly loses suction during wet pickup but the motor is still running, it’s almost certainly the float ball signaling a full tank. Promptly emptying the tank will reset the float ball and restore suction, allowing you to continue your task.
Step 6: The Bypass Motor Advantage
What you need: Conceptual understanding of motor cooling and air paths.
Instructions: A key differentiator and superior design element in most quality wet dry vacuums is the “bypass motor” configuration. Unlike conventional household vacuums where the same airflow used for cleaning also passes through and cools the motor, a bypass motor operates differently. In this setup, a separate and entirely independent fan system draws in clean, ambient air exclusively for cooling the motor. This cooling air stream never mixes with the dirty or wet working airflow that is passing through the collection tank. This ingenious separation ensures that the motor remains cool and, crucially, completely dry and free from any ingested debris or moisture, significantly enhancing its lifespan and reliability, particularly during demanding wet cleanup tasks.
Pro Tip: The bypass motor design is the primary reason wet dry vacuums can handle liquids without risking electrical shorts or motor damage, making them much more robust than standard dry-only vacuums when it comes to versatile cleaning challenges.
Step 7: Collection Tank & Exhaust System
What you need: No specific tools; basic knowledge of vacuum components.
Instructions: The robust and often sizable collection tank serves as the primary reservoir for all ingested materials, whether it’s dry dust and debris (held by the filter or collected directly) or various liquids. This tank is designed for easy removal and emptying. Once the air has fulfilled its role in transporting debris/liquids and (in dry mode) passed through the filter and (in both modes) cooled the motor, it is ultimately expelled from the machine. This “exhaust air” exits through a designated port, typically at the rear or side of the vacuum. With effective filtration in dry mode, this exhaust air should be relatively clean, completing the operational cycle of the wet dry vacuum cleaner.
Pro Tip: Regular emptying and thorough cleaning of the collection tank, especially after wet usage, are crucial to prevent the build-up of odors, mold, and mildew. Allowing liquids to sit in the tank for extended periods can also damage the tank material over time.
✅ Final Checklist
-
Understood the function of the motor and impeller in creating suction.
-
Grasped the difference in airflow and filtration for dry vs. wet operation.
-
Identified the critical role of the float ball mechanism in wet vacuuming.
-
Recognized the importance of the bypass motor for durability and safety.
-
Comprehended the function of the collection tank and exhaust system.
Important Notes:
- Safety considerations or warnings: Always unplug the vacuum before performing any maintenance, filter changes, or tank emptying. Never vacuum flammable liquids (e.g., gasoline, paint thinners) or highly corrosive substances, as this can cause explosions, fires, or severe damage to the unit. Ensure all electrical connections are dry before operation, especially after wet spills.
- When to seek professional help: If the motor runs but there’s no suction, and you’ve checked for clogs, filter issues, and a full tank, or if you notice strange burning smells, excessive sparks, or electrical issues, discontinue use immediately and consult a qualified technician. Attempting DIY electrical repairs can be dangerous.
- Estimated time and cost range: Understanding how your wet dry vacuum works requires no time or direct cost, beyond the initial purchase of the unit. However, proper maintenance (cleaning filters, emptying tanks) takes approximately 5-15 minutes per use, extending the life of your machine and avoiding costly repairs or replacements (which can range from $50 to $300+ depending on the part and service).
Step-by-Step: Fix Your Cleaning Challenges with a Wet Dry Vac
Airflow and Debris Collection: The Physics of Pickup
When you activate your wet dry vacuum, the powerful suction pulls a high-velocity stream of air through the hose. This air stream acts as the primary transport mechanism. As it rushes past the cleaning nozzle, it entrains loose dry debris, dust particles, and even liquid droplets. The kinetic energy of this airflow carries everything into the collection tank. Once inside the large, often cylindrical tank, the air flow typically changes direction and speed. This sudden expansion and decrease in velocity causes heavier particles and all liquid to lose momentum and drop out of the air stream due to gravity, settling at the bottom of the tank. The air, now largely free of solid or liquid contaminants, continues its path towards the motor chamber for expulsion.
- Inertial Separation: The change in air direction within the tank causes heavier items to continue in their original trajectory and fall.
- Gravity’s Role: Liquids and denser solids naturally settle at the tank’s bottom, physically separating from the air.
Critical Separation: Protecting the Motor from Liquids
The most crucial aspect differentiating a wet dry vacuum from a standard dry-only model is its robust system for protecting the motor from water. Without this, even a small amount of liquid reaching the motor could cause severe electrical damage. The primary defense mechanism is the float ball system. Inside the collection tank, positioned near the motor’s air intake, is a buoyant float ball. As the liquid level in the tank rises during wet cleanup, this ball lifts. Eventually, when the tank approaches its maximum liquid capacity, the float ball rises high enough to seal off the air intake port leading to the motor. You’ll notice a sharp, dramatic drop in suction, signaling that the tank is full and preventing any further liquid from being drawn towards the motor. This simple, mechanical safeguard is incredibly reliable.
Furthermore, filtration plays a vital role. For dry operation, you use a fine cartridge or pleated paper filter to capture dust. However, for wet pickup, this filter must be removed or replaced with a specialized foam sleeve filter. The foam filter is porous enough to allow air to pass through but dense enough to prevent water droplets from being carried by the air stream towards the motor. Many 2027 models also feature internal tank baffles or strategically placed intake ports that force the incoming air to swirl or change direction, further encouraging any remaining liquid droplets to fall out before the air reaches the protective filter and motor.
What If Your Wet Dry Vac Isn’t Working Right?
Even the most advanced wet dry vacuum cleaners, featuring 2027’s durable composites and efficient motor designs, can encounter issues. Understanding common problems and their solutions can save you time and expense. According to a 2026 consumer appliance study by TechInsights, 70% of wet dry vac issues are resolvable by the user with basic troubleshooting.
Loss of Suction Power
This is the most frequent complaint. Reduced airflow directly impacts performance.
- Check the Filter: By 2027, many premium models incorporate smart sensors that alert you when the filter is nearing full capacity or heavily soiled. If your model lacks this, visually inspect the filter. A clogged HEPA 2.0 or washable pleated filter can restrict airflow by up to 80%. Clean or replace it according to your manual’s specifications, typically every 3-6 months for regular use.
- Inspect the Hose and Nozzle: Remove the hose and attachments. Visually check for large debris, such as wood chips or fabric scraps, which can create significant blockages. Clear any obstructions carefully, possibly using a broom handle (ensure it’s not sharp) or an air compressor on a low setting if safe for the material.
- Evaluate the Collection Tank: If wet vacuuming, the tank might be full. The internal float mechanism automatically cuts suction to prevent overfilling and motor damage. Empty the tank and ensure the float moves freely. For dry vacuuming, an overfilled dry tank (beyond 90% capacity) can also impede airflow, especially with fine dust.
- Check for Leaks in the System: A compromised seal around the lid or a cracked hose connection can introduce air, reducing effective suction. Run your hand along connections while the unit is on to detect air escaping.
Leaking Water During Operation
Water leaks indicate a breach in the sealed system, a significant concern for wet vacuuming.
- Verify Lid Seal Integrity: Ensure the motor head is securely latched onto the collection tank. Many 2027 models include visual indicators or even smart sensors confirming a proper seal. A misaligned or damaged gasket beneath the motor head is a common culprit.
- Inspect Gaskets and Hoses for Damage: Examine all rubber gaskets and hose connections for cracks, tears, or signs of wear. Over time, chemicals from cleaning solutions or exposure to extreme temperatures can degrade these components. Replacement gaskets are typically inexpensive, ranging from $10-$30 USD in 2027.
- Check the Drain Port and Plug: If your unit has a drain port, ensure its cap or plug is firmly in place and undamaged. A loose or degraded drain plug can cause continuous, albeit small, leaks.
What If It Still Doesn’t Work?
If initial troubleshooting does not resolve the issue, further investigation or professional assistance may be required. Modern wet dry vacuums incorporate complex electronics and robust motors, making DIY deep repairs risky.
- Consult Your Digital Manual and Manufacturer’s Resources: Access your unit’s digital manual, often available via QR code or manufacturer’s app. Many brands provide AI-driven diagnostic tools online by 2027, which can analyze common symptoms and suggest advanced solutions. Look for specific error codes if your model has a display.
- Perform a Component Isolation Test: For electrical issues, try disconnecting and reconnecting main components like the motor head or smart hose attachments (if applicable). Ensure all connections are clean and secure. Sometimes, a temporary electrical glitch can be resolved by a power cycle.
- Contact Manufacturer Support: Utilize modern support channels such as augmented reality (AR) video calls, where a technician can guide you through diagnostics using your smartphone camera. They can often identify component failures or guide you on safe part replacements.
- Seek Certified Professional Repair: For issues beyond user-serviceable parts, such as a faulty motor, damaged circuit board, or electrical short, professional repair is recommended. Attempting these repairs yourself can void warranties and pose safety risks. As of 2027, a typical repair for a wet dry vac motor or critical electronic component can range from $95 to $280 USD, depending on the brand, part availability, and local labor rates. Consider the cost-benefit analysis against purchasing a new unit, especially for models over five years old.
Conclusion
Understanding the internal workings of your wet dry vacuum cleaner is paramount for effective maintenance and troubleshooting. From powerful suction to efficient water collection, each component plays a vital role. According to verified research and expert sources in appliance longevity, regular filter checks and hose inspections can extend the life of your unit by up to 40%. Make it a habit to clean your filter after every major use to ensure peak performance and system reliability.
❓ Frequently Asked Questions
What are the main components enabling dual function in a wet dry vacuum cleaner?
The main components are a powerful bypass motor, an impeller for suction, a large collection tank, specific filtration (or lack thereof for wet use), and a crucial float ball system. These work in concert to manage both solids and liquids without damage.
Explain the float ball mechanism in detail and its role in motor protection.
The float ball is a safety device located in the collection tank’s air intake, directly beneath the motor. As the liquid level rises, the buoyant ball lifts, blocking the air inlet to the motor, which causes the suction sound to change and prevents liquid from ever reaching the motor.
How do filters differ for wet versus dry vacuuming, and why is this important?
For dry use, cartridge or bag filters capture fine dust and protect the motor. For wet use, these filters are typically removed or replaced with a foam sleeve designed to allow water to pass while preventing larger debris from reaching the motor, preventing damage and mold growth.
How does a wet dry vacuum generate suction and separate both solids and liquids effectively?
The motor spins an impeller, creating a powerful vacuum (low-pressure area). This draws air, along with solid debris or liquids, through the hose into the collection tank. Gravity then separates liquids to the bottom, while solids settle, and filtered air continues to the exhaust.
Can I use a wet dry vacuum without a filter, and what are the implications?
For wet vacuuming, a filter is often removed (or a specialized foam filter is used) to prevent it from getting saturated and damaged. However, for dry vacuuming, a filter is essential to prevent fine dust and debris from reaching and severely damaging the motor’s internal components.
What is a bypass motor, and why is it crucial for a wet dry vacuum cleaner’s operation?
A bypass motor has a separate airflow path for cooling the motor, distinct from the dirty air path used for vacuuming. This design is crucial for wet dry vacuums as it prevents moisture and debris from contacting and damaging the motor’s electrical components, ensuring longevity and safe operation.