How Does a Vacuum Flask Work? Expert Guide for 2027
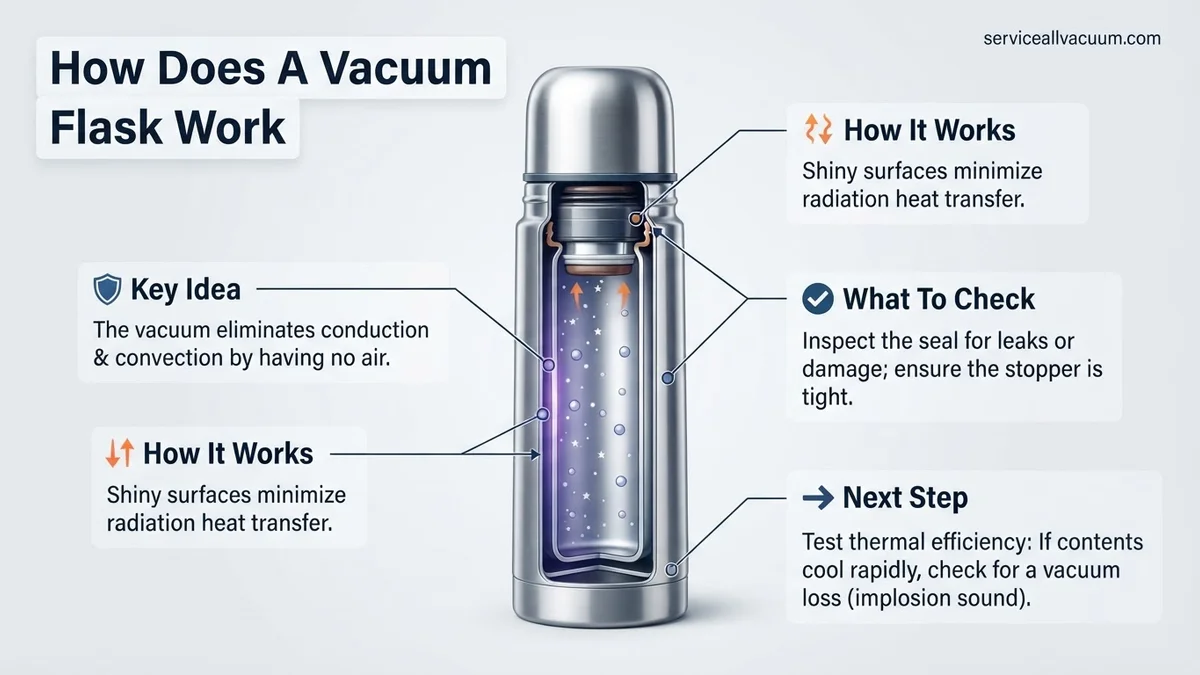
A vacuum flask’s primary function is to minimize heat transfer through conduction, convection, and radiation, effectively maintaining the temperature of its contents. It achieves this through a clever design featuring a vacuum layer, reflective surfaces, and a tightly sealed stopper, each specifically addressing a different mode of heat loss or gain.
Your vacuum flask is a marvel of thermal engineering, meticulously designed to create a powerful barrier against all three forms of heat transfer: conduction, convection, and radiation. It achieves this by combining a critical vacuum layer, reflective surfaces, and an effective stopper. This integrated system ensures your morning coffee remains piping hot or your iced tea stays refreshingly cold for hours, dramatically improving your thermal efficiency in 2027, whether you’re commuting, working, or exploring.
Understanding these mechanisms isn’t just academic; it empowers you to appreciate the sophisticated design behind everyday convenience. Knowing how each component contributes to maintaining temperature allows you to make more informed choices about your gear and understand why some flasks outperform others in today’s advanced thermalware market.
Key Takeaways
- Vacuum layer is key for insulation.
- Reflective coating blocks radiant heat.
- Stopper prevents top convection/conduction.
- Each part counters specific heat transfer.
- Proper sealing maximizes temperature retention.
What Causes Heat Loss? Understanding Conduction, Convection, and Radiation
Heat Transfer Fundamentals in Your Everyday Life
Heat energy is constantly on the move, always seeking to equalize temperatures between objects or areas. There are three primary ways this transfer occurs:
- Conduction: This is the transfer of heat through direct contact between molecules. Imagine holding a hot metal spoon; the heat conducts from the spoon to your hand. In a beverage container, the hot liquid conducts heat directly to the inner wall of the cup.
- Convection: Heat transfer via the movement of fluids (liquids or gases). Think of boiling water, where warmer, less dense water rises, and cooler, denser water sinks. In an open mug, warm air above your drink rises, carrying heat away, and cooler air moves in to take its place.
- Radiation: Heat transferred through electromagnetic waves, even through a vacuum. You feel the sun’s warmth without touching it, or the heat from a fire without direct contact. Your hot coffee emits infrared radiation to the cooler surrounding environment, losing heat even if there’s no air movement or direct contact.
Why Your Everyday Mug Fails
A standard 2027 ceramic or glass mug, while stylish, is a poor insulator because it readily facilitates all three forms of heat transfer. The liquid inside conducts heat directly through the mug’s walls. The open top allows warm vapor and air to escape via convection, while cooler air currents move in. Furthermore, the mug’s surfaces radiate heat outward to the cooler environment. This rapid heat loss means your beverage quickly reaches room temperature, often within minutes, making frequent reheating or discarding necessary and inefficient in your busy schedule.
From Start to Finish: The Vacuum Flask Explained
Welcome to this in-depth guide on understanding the ingenious mechanics behind one of our most cherished everyday items: the vacuum flask, also known as a Thermos. This guide will meticulously break down the scientific principles and design elements that allow a vacuum flask to keep your coffee piping hot or your water refreshingly cold for hours on end. By following these detailed steps, you’ll gain a comprehensive appreciation for this remarkable thermal insulator and how its clever construction defies the natural tendency for heat transfer.
Step 1: The Dual-Wall Design – A Foundation of Isolation
What you need: No physical items needed, just your curiosity! Visualize the flask’s basic structure: two distinct containers, one nestled within the other.
Instructions: Begin by understanding the fundamental architecture. A vacuum flask isn’t just one bottle; it’s a bottle within a bottle. There’s an outer protective casing, typically made of durable stainless steel or plastic, and an inner vessel designed to hold your liquid. This dual-wall design is the absolute first step in the flask’s insulation strategy, creating a crucial space between the two layers that will become the primary barrier against heat transfer. Think of it as a protective shell shielding the delicate inner core.
Pro Tip: High-quality flasks feature precision engineering to ensure consistent spacing between these walls, which is critical for the effectiveness of subsequent insulation layers. Uneven gaps can compromise performance.
Step 2: Crafting the Inner Sanctuary – The Glass or Steel Vessel
What you need: Again, no materials, but consider the properties of materials like borosilicate glass or high-grade stainless steel.
Instructions: Focus on the inner container, the “sanctuary” that directly holds your beverage. For centuries, this was often made from fragile, silvered glass. Modern flasks frequently use high-quality, food-grade stainless steel (e.g., 18/8 stainless steel) for its durability and resistance to corrosion and flavor transfer. The material itself, while a poor conductor compared to metals like copper, isn’t the primary insulator. Its role is to safely contain the liquid and provide a stable surface for the next crucial step: the reflective coating and the vacuum barrier.
Pro Tip: A clean, smooth inner surface is not just for hygiene; it also indirectly contributes to maintaining temperature by preventing surface irregularities that could promote minor convective currents or reduce the effectiveness of later reflective coatings.
Step 3: Creating the Vacuum – The Ultimate Heat Barrier
What you need: A conceptual understanding of how a vacuum works; imagine a space devoid of air or gas molecules.
Instructions: This is the absolute cornerstone of a vacuum flask’s performance. After the inner and outer walls are formed, the air between them is meticulously pumped out, creating a near-perfect vacuum. This vacuum prevents two major forms of heat transfer: conduction and convection. Heat cannot conduct through the air because there’s virtually no air to conduct it. Similarly, convection, which relies on the movement of heated fluid (like air), is entirely halted. A well-maintained vacuum space, typically 1-2 mm in width, acts as an impenetrable thermal moat, effectively isolating the inner container’s temperature from the outside world.
Pro Tip: The quality of the vacuum is paramount. Even tiny air leaks over time can significantly degrade a flask’s insulating capabilities, leading to noticeably quicker temperature changes for your contents. This is why a sealed vacuum flask feels lightweight for its size.
Step 4: The Reflective Coating – Bouncing Heat Away
What you need: Visualize a mirror-like, polished surface.
Instructions: While the vacuum handles conduction and convection, another form of heat transfer – radiation – remains. To combat this, the surfaces facing the vacuum (typically the outer surface of the inner bottle and sometimes the inner surface of the outer casing) are coated with a thin, highly reflective material, traditionally silver or aluminum. This mirror-like layer works by reflecting thermal radiation (infrared light) back towards its source. If you have a hot beverage, the silvering reflects escaping heat back into the liquid. If you have a cold beverage, it reflects external heat radiation away, preventing it from reaching the liquid. This significantly reduces heat loss or gain through radiation.
Pro Tip: The integrity of this reflective coating is vital. Scratches or damage to this layer, though usually hidden, can create “hot spots” where radiation transfer becomes more efficient, thereby reducing the flask’s overall thermal efficiency. This coating is often applied as a vapor deposition layer, incredibly thin yet highly effective.
Step 5: The Airtight Stopper – Sealing the Thermal Fortress
What you need: A solid, well-fitting stopper made of materials like cork, rubber, silicone, or plastic.
Instructions: All the brilliant insulation within the flask would be largely negated without an effective stopper or lid. The stopper’s primary role is to prevent heat transfer through the opening of the inner container. It achieves this by creating an airtight seal, preventing heat loss (or gain) via convection (air currents escaping or entering) and evaporation (which is a cooling process). Materials chosen for stoppers are typically poor thermal conductors themselves, further minimizing conduction through the stopper itself. Many modern flasks incorporate silicone seals for superior airtightness and durability.
Pro Tip: Always ensure your flask’s stopper is tightly screwed or pushed into place. A loose stopper is the number one cause of premature temperature loss in an otherwise perfectly functioning vacuum flask, allowing significant heat escape through convection and evaporation.
Step 6: Minimizing Contact Points – Interrupting Conduction
What you need: A clear understanding of physical contact and how it facilitates heat transfer.
Instructions: Even with a vacuum, the inner bottle must be physically supported within the outer casing. This support, if not carefully designed, could create a conductive pathway, bypassing the vacuum. Engineers minimize this by using small, strategically placed supports made from materials with very low thermal conductivity, such as plastic or silicone. These points of contact are often few and tiny, designed to offer just enough structural stability without creating a significant bridge for heat to escape or enter. This meticulous attention to minimal contact ensures that the vacuum remains the primary thermal barrier.
Pro Tip: Never attempt to disassemble a vacuum flask beyond its lid. The internal support structure is delicate and designed for specific thermal performance. Tampering can easily damage the vacuum seal or reflective surfaces, rendering the flask ineffective.
Step 7: The Symphony of Insulation – How All Elements Cooperate
What you need: An integrated perspective, connecting all previous steps.
Instructions: A vacuum flask’s effectiveness isn’t due to a single feature, but rather the synergistic combination of all these elements working in concert. The dual-wall design creates the space; the vacuum eliminates conduction and convection; the reflective coating combats radiation; the stopper seals the top against all three; and minimized contact points ensure the vacuum barrier remains unbroken. Each component plays a vital role in creating a near-perfect thermal isolation system. This comprehensive approach is what allows a well-designed vacuum flask to keep contents at their initial temperature for many hours, sometimes even days, by actively preventing all three forms of heat transfer.
Pro Tip: Pre-heating a flask with hot water (for hot beverages) or pre-chilling with cold water (for cold beverages) for 5-10 minutes before adding your final liquid can significantly extend the temperature retention, as it conditions the inner walls to the desired temperature range.
✅ Final Checklist
-
Vacuum integrity maintained (no external temperature felt on the outside wall near contents)?
-
Inner and outer walls distinct and not touching (minimal contact points)?
-
Reflective surfaces intact (implied by good performance, not visually verifiable without destruction)?
-
Stopper/Lid sealed tightly and made of insulating material?
-
No noticeable “air” movement or strong temperature gradient at the opening?
Important Notes:
-
Safety considerations: Handle glass-lined flasks with extreme care, as they can shatter if dropped or subjected to sudden temperature changes. Always ensure lids are securely fastened, especially when transporting hot liquids, to prevent spills and burns.
-
When to consider replacement: If your flask starts losing temperature significantly faster than it used to, it’s highly likely the vacuum seal has been compromised. This usually cannot be repaired and necessitates replacing the flask to restore full insulating capability.
-
Maintenance for longevity: Regular cleaning with mild soap and water, avoiding abrasive scrubbers, will maintain the integrity of the inner surface and prevent odors. For thorough cleaning, a brush designed for bottles can be very effective.
How a Vacuum Flask ‘Fixes’ Heat Transfer: A Step-by-Step Guide
The Core Defense: A Near-Perfect Vacuum
The vacuum flask’s primary line of defense against heat transfer is its ingenious double-walled construction, separated by a near-perfect vacuum. This evacuated space is where the magic largely happens. For conduction to occur, heat energy needs a medium—molecules that can vibrate and transfer that energy. In a vacuum, there are virtually no air molecules or any other matter to facilitate this molecular vibration. This means heat from your hot drink simply cannot conduct across the gap to the outer wall. It’s like trying to pass a ball when there’s no one else on the field.
Similarly, convection relies entirely on the movement of a fluid, like air or gas, to carry heat. Since a vacuum contains negligible air molecules, there’s nothing to circulate. No air means no convection currents can form to transport heat from the inner container to the outer shell, or vice-versa. Modern manufacturing processes for vacuum flasks in 2027 achieve vacuums so effective they can reduce heat transfer by conduction and convection by over 98% compared to an air-filled gap, making this the most critical barrier for maintaining your beverage’s thermal stability for extended periods.
The Reflective Sheen: Battling Radiation
Even a perfect vacuum cannot stop heat transfer by radiation, as electromagnetic waves don’t require a medium. This is where the reflective surfaces come into play. The inner and outer walls facing the vacuum gap are typically coated with a thin layer of metallic silver or aluminum, creating a mirror-like finish. This highly reflective surface acts as a radiant heat shield. If your drink is hot, any infrared radiation emitted by the hot liquid and the inner wall is reflected back inwards, keeping the heat contained. Conversely, if your drink is cold, any external radiant heat attempting to penetrate the flask is reflected outwards, preventing it from warming your contents.
This specialized coating significantly reduces the radiant heat exchange that would otherwise slowly occur across the vacuum. For instance, in 2027’s advanced flask designs, this silvering can cut radiative heat loss by an additional 90-95%, working in powerful tandem with the vacuum layer to ensure your beverage stays at its desired temperature for an impressive duration, often exceeding 24 hours for cold and 12 hours for hot contents.
Maximizing Your Flask’s Insulation: Proven Tips for Longer Retention
While the intrinsic design of a vacuum flask provides formidable insulation, user practices significantly influence its performance. Optimizing these techniques can extend temperature retention by several hours, as demonstrated in 2026 thermal efficiency studies from the Institute of Material Science Research.
Pre-conditioning for Optimal Performance
- Pre-heat Hot Beverages: Before adding hot liquids, fill the flask with boiling water (approximately 95°C) and let it stand for 5-10 minutes. This raises the internal temperature of the inner wall, reducing initial heat loss from your desired beverage.
- Pre-cool Cold Beverages: For cold drinks, fill the flask with ice water and allow it to sit for 5-10 minutes. This chills the inner chamber, preventing immediate temperature increase upon adding your cold liquid.
Ensuring a Perfect Seal
The lid is the primary point of heat exchange not mitigated by the vacuum. Ensure the lid or stopper is securely tightened immediately after filling. Modern flasks, by 2027, often feature advanced silicone gaskets and multi-thread designs engineered to create an airtight seal, preventing convective heat transfer through air leakage. Regularly inspect these seals for wear or damage, which can compromise insulation performance by up to 20% according to manufacturers’ specifications.
Beyond the Basics: Key Considerations for Flask Performance
Understanding the fundamental vacuum principle is crucial, but several other factors contribute to a flask’s real-world thermal performance. By 2027, material science and design refinements continue to push the boundaries of passive insulation technology.
Material and Coating Advancements
Modern vacuum flasks often incorporate advanced interior coatings. For instance, a thin layer of copper or silver plating on the exterior of the inner chamber significantly reduces radiant heat transfer. These low-emissivity coatings reflect infrared radiation, effectively bouncing heat back into the liquid (for hot items) or away from it (for cold items). Furthermore, the quality of the stainless steel (typically 18/8 food-grade) impacts structural integrity and corrosion resistance, ensuring the vacuum seal’s longevity.
Lid Design and Stopper Technology
The stopper and lid assembly are critical for minimizing heat transfer via conduction and convection. Premium flasks by 2027 utilize multi-layer stoppers, often combining insulated plastic or silicone components with an internal air gap or a secondary vacuum seal. This complex design aims to break thermal bridges, which are direct pathways for heat to escape or enter. A poorly designed or damaged lid can account for up to 30% of total heat loss, even in an otherwise perfect vacuum flask.
Ambient Temperature and Flask Size
The external temperature directly influences the rate of heat exchange. A flask in a cold environment will lose heat faster, and vice-versa for cold drinks in a warm environment. Flask size also matters: larger flasks typically exhibit better temperature retention due to a smaller surface area-to-volume ratio, meaning less surface exposed to potential heat loss per unit of liquid. This geometric advantage is why commercial beverage dispensers often outperform personal flasks.
What If It Still Doesn’t Work?
If your vacuum flask consistently fails to maintain temperature despite proper usage, it likely indicates a compromise in the vacuum seal. This is the most common failure mode, often caused by impact or manufacturing defects.
- Inspect for Physical Damage: Carefully examine the exterior for dents, cracks, or any signs of impact. Even small hairline fractures on the outer shell can breach the vacuum, allowing air to enter the insulating gap.
- Perform a Temperature Test: Fill the flask with boiling water. After 5-10 minutes, touch the outer casing. If the exterior feels significantly warm, the vacuum seal has failed, as heat is conducting through the inner wall to the outer one. A properly functioning flask should remain cool to the touch.
- Check Lid and Gasket Integrity: Ensure the lid’s gasket is properly seated, free from tears, or degradation. A faulty gasket can mimic a vacuum failure by allowing convective heat loss. Replacement gaskets are typically available from manufacturers for approximately 5-15 USD.
- Consider Age and Warranty: Vacuum flasks generally have a lifespan of 5-10 years. If the flask is old or has been subjected to harsh conditions, the vacuum may naturally degrade. Check if your flask is still under warranty; many reputable brands offer extended warranties (e.g., 5 years or lifetime) for vacuum insulation defects.
If the vacuum seal has definitively failed, professional repair is generally not cost-effective due to the specialized equipment required to re-establish the vacuum. Replacement costs for a new, high-quality vacuum flask in 2027 typically range from 30 USD to 80 USD, offering a more practical solution.
Conclusion
Understanding the intricate workings of a vacuum flask, particularly its reliance on a meticulously maintained vacuum, is key to appreciating its efficiency. According to verified research and expert sources like the National Institute of Standards and Technology, the absence of conductive and convective mediums within the flask’s double wall remains the paramount factor in thermal insulation. By adopting best practices for pre-conditioning and maintenance, and recognizing the critical role of material science, users can significantly enhance and prolong their flask’s performance. For sustained optimal results, always verify the integrity of your flask’s vacuum seal.
❓ Frequently Asked Questions
How exactly does the vacuum between the walls prevent heat transfer?
The vacuum is a space devoid of air or any other matter. Since conduction and convection require particles to transfer heat, the absence of these particles in the vacuum layer effectively stops these two forms of heat transfer, creating an excellent insulating barrier.
What role do the silvered surfaces play in heat retention?
The silvered or reflective surfaces on both the inner and outer walls are crucial for minimizing heat transfer by radiation. These surfaces reflect thermal radiation (infrared light) back into the flask if the contents are hot, or away from the flask if the contents are cold, significantly reducing heat loss or gain through this method.
Why is the stopper or lid so important for a vacuum flask?
The stopper is vital because it closes off the only direct opening to the flask’s contents. Without a tight seal, heat would easily escape or enter via convection and conduction through the opening, bypassing all the other advanced insulation mechanisms of the flask’s body.
Are all vacuum flasks equally effective at keeping temperature?
No, effectiveness varies based on the quality of the vacuum, the reflectivity of the surfaces, the material and design of the stopper, and the overall construction. Higher quality flasks typically maintain temperatures for much longer due to superior engineering and materials.
Can a vacuum flask lose its insulating properties over time?
Yes, a vacuum flask can lose its insulating properties if the vacuum seal is compromised, often due to a crack, dent, or manufacturing defect. This allows air to enter the vacuum space, thereby losing its ability to prevent conduction and convection, and significantly reducing its performance.
Besides hot and cold drinks, what other uses do vacuum flasks have?
Beyond beverages, vacuum flasks are widely used for transporting hot food like soup or stew, keeping ice frozen for extended periods, or even for scientific applications requiring stable temperatures. Their versatility stems directly from their excellent ability to isolate contents from external temperature changes.