How To Add Oil To Ac Compressor Without Vacuum How to 2027
Adding oil to an AC compressor without a vacuum pump is generally discouraged due to the high risk of introducing moisture and air, which can severely damage the system. While some ‘workarounds’ exist, they often lead to reduced efficiency and premature component failure. Proper vacuuming is crucial for system integrity.
Trying to add oil to your AC compressor without a vacuum pump is a common question in 2027, often driven by the desire for a quick fix or lack of specialized tools. While certain methods exist that bypass a dedicated vacuum pump for the act of oil addition, it’s crucial to understand that these techniques carry significant risks. You’re effectively trading short-term convenience for potential long-term, costly damage to your entire AC system. This guide will outline these methods, their inherent dangers, and why professional technicians almost universally advise against them.
Understanding these alternatives and their consequences is vital for anyone considering this approach. While we’ll detail the ‘how-to’ for these non-vacuum methods, every step comes with a strong caveat: you are introducing contaminants into a sensitive system. Getting to the core of why these methods are risky is as important as knowing how they’re performed, enabling you to make an informed decision about your vehicle’s or home’s AC health.
Key Takeaways
- Vacuuming is critical for AC system health.
- Skipping vacuum introduces moisture, air.
- Risky methods exist but aren’t recommended.
- Correct oil type and quantity are vital.
- Compressor failure is a common risk.
Understanding the Risks: Why Vacuuming is Crucial for AC Oil Addition
Before exploring alternative oil addition methods, it’s critical to grasp why a thorough vacuum evacuation is standard procedure in 2027. Skipping this step introduces critical contaminants that will significantly degrade your AC system’s performance and lifespan. You risk facing expensive repairs down the line, often far exceeding the cost of proper vacuum equipment or professional service.
The Invisible Enemies: Moisture and Non-Condensable Gases
- Moisture: Even a tiny amount of water vapor in your AC system is highly detrimental. When moisture mixes with refrigerant and compressor oil under pressure and heat, it forms highly corrosive acids. These acids eat away at internal components like the compressor’s windings and seals, leading to premature failure. Furthermore, moisture can freeze at the expansion valve, blocking refrigerant flow and causing system inefficiency or complete shutdown.
- Non-Condensable Gases (Air): Air introduced into the system acts as a non-condensable gas. This means it doesn’t condense at normal operating pressures and temperatures like refrigerant. Its presence increases head pressure, forcing your compressor to work much harder. This increased workload leads to higher energy consumption, reduced cooling efficiency, and accelerated wear on the compressor, drastically shortening its service life.
Preserving Your System’s Integrity and Performance
A proper, deep vacuum evacuation ensures a pristine internal environment, free from moisture and air. This pure state is essential for several reasons:
- Optimized Performance: Without contaminants, your refrigerant can circulate and exchange heat efficiently, providing peak cooling performance.
- Component Longevity: Eliminating corrosive acids and excessive pressure protects your compressor, condenser, evaporator, and lines from damage, significantly extending their lifespan.
- Preventing Blockages: By removing moisture, you prevent ice formation at the expansion valve, which would otherwise cause flow restrictions and cooling issues.
- Accurate Refrigerant Charge: A contaminant-free system allows for an accurate refrigerant charge, which is impossible to achieve with air present. In 2027, precise charging is paramount for modern AC systems.
How to Add AC Oil Without Vacuum Like a Pro: A Practical Walkthrough
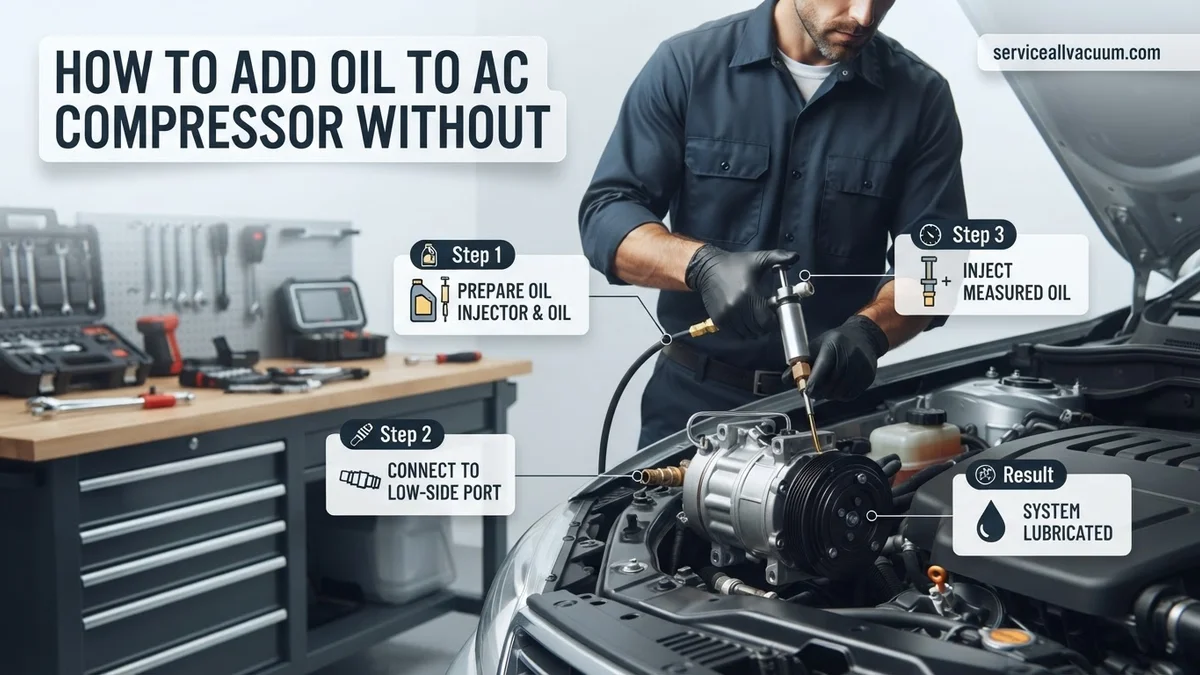
Adding the correct amount and type of oil to your vehicle’s AC compressor is crucial for its longevity and performance. This comprehensive guide will walk you through a practical method for topping off AC oil without requiring a specialized vacuum pump. While a vacuum pump is always the preferred professional method for system integrity, this technique is useful for small oil top-offs or emergency situations when a full evacuation and recharge isn’t immediately feasible. It is essential to understand that this method introduces a small amount of ambient air and moisture into the system, which can be detrimental over time. Therefore, this guide should be considered for minor adjustments, not a substitute for proper professional service after major repairs or system evacuation.
Step 1: Preparation and Safety First
What you need: Safety glasses, chemical-resistant gloves, basic hand tools (wrenches, screwdrivers) if needed to access AC ports, a clean rag.
Instructions: Before touching anything, prioritize safety. Don your safety glasses and gloves to protect against refrigerant splashes and chemicals. Locate your vehicle’s AC low-side service port, typically marked with an “L” cap and larger than the high-side port. Ensure the engine is completely off and cool. Familiarize yourself with the general layout of your AC system. It’s critical to know the proper oil type for your specific vehicle and refrigerant; mixing incompatible oils can cause catastrophic compressor failure. Never attempt this if the system is completely empty or if you suspect a major leak, as the presence of a vacuum pump is then non-negotiable.
Pro Tip: Always double-check your vehicle’s owner’s manual or under-hood sticker for the correct refrigerant and oil specifications (e.g., R-134a with PAG 46 oil). Using the wrong type can severely damage your compressor.
Step 2: Determine the Correct Oil Type and Amount
What you need: Vehicle’s service manual or under-hood sticker, appropriate AC compressor oil (PAG or POE), a measuring syringe or precise scale (optional, but recommended).
Instructions: This is arguably the most critical step. Your vehicle’s AC system uses a specific type and viscosity of oil (e.g., PAG 46, PAG 100, POE). Using the wrong type will lead to compressor failure. Refer to your vehicle’s service information. Regarding quantity, it’s a delicate balance. If you are just doing a small top-off due to a minor leak or a previous repair where some oil was lost, you’ll likely only need 1-3 ounces (approximately 30-90ml). A good rule of thumb is that 1 ounce of oil is lost for every 1 pound of refrigerant. Avoid overfilling, as excess oil can reduce cooling efficiency and potentially damage the compressor by ‘slugging’ it with liquid. When in doubt, err on the side of slightly less.
Pro Tip: A new AC compressor typically holds all the oil for the entire system, but during a partial replacement, you only add the oil that spilled. If replacing a component like a condenser or evaporator, consult the service manual for the amount of oil to add for that specific component.
Step 3: Prepare the Low-Side Service Port and Oil Injector
What you need: Low-side R-134a quick coupler, AC oil injector (syringe type or a pressurized can type designed for oil injection), a short AC hose with Schrader valve depressor, the measured AC oil, clean rags.
Instructions: Locate the low-side service port. Unscrew its cap and clean the fitting thoroughly with a clean rag to prevent any dirt from entering the system. Now, prepare your oil injector. If using a syringe-type injector, ensure it’s clean and fill it with the precisely measured amount of new AC oil. Screw the injector firmly onto the AC hose, and then connect the quick coupler to the other end of the hose. If your injector has a valve, make sure it’s closed. The goal is to create a sealed pathway for the oil before connecting it to the vehicle.
Pro Tip: Before attaching the quick coupler to the vehicle, hold the hose connection upright and briefly open the injector valve (if applicable) to purge any air from the hose itself. This minimizes air introduction into the AC system.
Step 4: Connect the Oil Injection Tool to the Low-Pressure Side
What you need: Pre-assembled oil injector with quick coupler, prepared AC oil.
Instructions: With the engine still off, securely attach the low-side quick coupler of your oil injection tool to the vehicle’s low-side service port. You’ll hear a distinct ‘click’ when it’s properly seated. Some couplers have a collar that you pull back to engage. Once connected, ensure it’s tight and doesn’t leak. At this point, the valve on the oil injector (if present) should remain closed. The system is now partially connected, and you’re ready to use the compressor’s action to draw in the oil. It’s crucial that the system has at least some refrigerant pressure for the compressor to cycle effectively.
Pro Tip: Always double-check that you’re connecting to the low-side (larger port, usually marked ‘L’). Connecting to the high-side port can be extremely dangerous due to high pressures and could cause the oil injector to rupture.
Step 5: Inject the AC Oil Using System Vacuum
What you need: Connected oil injector, the vehicle’s AC system.
Instructions: This is the core “without vacuum” step. With the oil injector firmly connected to the low-side port and loaded with oil, start your vehicle’s engine. Immediately turn the AC system to its maximum cold setting and the fan speed to high. The compressor should begin to cycle on and off. As the compressor runs, it pulls a vacuum on the low-pressure side of the system. Slowly open the valve on your oil injector (or push the plunger if it’s a syringe type) to allow the oil to be drawn into the system by this negative pressure. Do not rush this; allow the oil to be drawn in gradually over 1-2 minutes to prevent slugging the compressor. Once all the oil has been drawn from the injector, proceed immediately to the next step.
Pro Tip: Pay close attention to the oil level in your injector. As soon as the last of the oil has entered the system, quickly but carefully close the injector valve to minimize the amount of air that might be drawn into the system after the oil is gone.
Step 6: Disconnect the Oil Injector and Cap Ports
What you need: Clean rag, service port caps.
Instructions: Immediately after all the oil has been drawn into the system and you’ve closed the injector valve, quickly disconnect the low-side quick coupler from the vehicle’s service port. You may hear a slight hiss of refrigerant escaping; this is normal and unavoidable with this method. Use a clean rag to wipe any residual oil or refrigerant from the service port. Replace the service port cap securely. Ensure both the low-side and high-side caps (if you removed it for identification) are tightened properly to prevent future contamination and leaks. The system is now sealed with the newly added oil.
Pro Tip: Always keep the service port caps clean and replace them promptly. They are essential for keeping dirt, debris, and moisture out of your AC system, acting as a secondary seal for the Schrader valves.
Step 7: Run the AC System to Distribute Oil
What you need: None.
Instructions: With all tools disconnected and service port caps replaced, allow your vehicle’s engine to continue running with the AC set to maximum cold and high fan for at least 10-15 minutes. This extended operation time is crucial. It gives the newly added compressor oil ample opportunity to circulate thoroughly throughout the entire AC system. The oil will mix with the refrigerant and any existing oil, ensuring proper lubrication for the compressor and other components, leading to efficient cooling and preventing premature wear.
Pro Tip: During this circulation period, pay attention to any unusual noises coming from the compressor. A properly operating compressor should have a smooth, consistent sound. Monitor the air temperature coming from the vents to gauge cooling effectiveness.
Step 8: Recheck System Performance (Optional but Recommended)
What you need: AC thermometer (optional), manifold gauges (optional, for brief verification).
Instructions: After the system has run for the recommended time, you can perform a basic performance check. Place an AC thermometer in one of the central air vents and observe the temperature. Compare this to the ambient temperature and expected cooling performance for your vehicle. If you have a set of manifold gauges, you can briefly connect them to the high and low-side ports to check the pressures. Ensure they are within the manufacturer’s specified range for your vehicle and the prevailing ambient temperature. However, only connect gauges for a very short duration to minimize air and moisture ingress.
Pro Tip: A significant drop in vent temperature (typically 20-30°F or 11-17°C below ambient) after the oil addition indicates improved performance. If the vent temps are still high or erratic, it might suggest other issues or that more oil/refrigerant is needed, or a proper vacuum and recharge is warranted.
✅ Final Checklist
- Correct oil type and the approximate amount added to the system?
- All connections made securely and then fully disconnected from the vehicle?
- Service port caps replaced and tightened to prevent contamination?
- AC system run for sufficient time (10-15 minutes) to circulate the new oil?
- No unusual noises from the compressor and improved cooling performance observed?
Important Notes:
- Safety Considerations: Always wear appropriate personal protective equipment, including eye protection and gloves, when working with AC refrigerants and oils. Refrigerant can cause severe frostbite. Work in a well-ventilated area.
- When to Seek Professional Help: This “without vacuum” method is a compromise. If your AC system was completely empty of refrigerant, has a major leak, or if adding oil does not resolve your cooling issues, it is imperative to seek professional automotive AC service. A professional will evacuate the system, pull a deep vacuum to remove all air and moisture, and then recharge it with the precise amount of refrigerant and oil. This ensures optimal performance and prevents long-term damage.
- Estimated Time and Cost Range: This procedure typically takes between 30 to 60 minutes to complete, assuming you have all the necessary tools and materials on hand. The cost primarily involves the AC compressor oil (approximately $10-$40 per bottle) and, if you don’t already own one, an AC oil injector tool ($20-$50).
Step-by-Step Guide: Attempting to Add AC Oil Without a Vacuum (Use with Caution)
Despite the inherent risks, some individuals attempt to add AC oil without a vacuum pump, typically relying on system pressure differentials or direct component filling. These methods are NOT recommended for comprehensive AC system service in 2027. They bypass critical steps designed to protect your system from long-term damage. If you choose to proceed, understand you are doing so at your own risk, and potential complications are highly probable.
The Low-Side Suction Method (High Risk, Limited Effectiveness)
This is the most common DIY attempt to add oil without a vacuum pump. It relies on the running compressor’s suction to draw oil into the low-pressure side of the system. This method is highly susceptible to introducing air and moisture.
- Safety First: Wear appropriate personal protective equipment, including safety glasses and gloves.
- Gather Equipment: You’ll need an AC manifold gauge set, a specialized oil injector (or a charging hose with a purge valve), and the correct type and amount of AC compressor oil.
- Connect Manifold Gauges: Connect the blue low-side hose to your vehicle’s low-side service port. Ensure the high-side valve on the manifold is closed and disconnected for this procedure.
- Prepare Oil Injector: Fill the oil injector with the precise amount of new compressor oil. Connect the injector to the center service hose of your manifold gauge set.
- Start AC System: Start your vehicle and turn the AC to its maximum cooling setting. Ensure the compressor is cycling on.
- Inject Oil: With the compressor running and creating suction, briefly open the low-side valve on your manifold gauge set. The compressor’s suction should draw the oil from the injector into the system. As soon as the oil is injected, close the low-side valve immediately.
Critical Warnings: This method guarantees that ambient air and moisture will be pulled into the system during the connection, disconnection, and injection process. It does not remove existing contaminants, nor does it create a true vacuum. The momentary suction doesn’t deep-evacuate. Compressor slugging (liquid oil entering the compressor’s cylinder) is also a significant risk, which can cause immediate mechanical failure.
Direct Component Pre-Filling (Partial Solution, Requires Follow-up Vacuum)
This method is only applicable if you are replacing a component (like the compressor, accumulator, or dryer) and need to add oil to that specific new part before installing it. It is NOT a substitute for a full system vacuum after installation.
- Purpose: To ensure the new component has initial lubrication, as factory-new components may not be fully pre-filled with oil. This helps prevent dry starts.
- Procedure: Before installing a new compressor, accumulator, or dryer, carefully pour the specified amount of new, clean compressor oil directly into the component’s ports. For compressors, rotate the clutch by hand a few times to help distribute the oil internally.
- Limitations: While this adds oil to a specific part, it does not address any air or moisture within the rest of the AC lines, condenser, or evaporator. After installing the pre-filled component and sealing the system, a deep vacuum evacuation is still absolutely mandatory before adding refrigerant. Failing to do so will lead to the same moisture and non-condensable gas issues outlined previously.
Proper Oil Selection & Quantity for AC Compressor Oil Addition
Selecting the correct AC compressor oil and determining the appropriate quantity are critical for system longevity, especially when bypassing a vacuum. Incorrect oil can lead to premature compressor failure, while improper quantities can severely impact cooling performance and efficiency.
Understanding AC Oil Types and Viscosity
AC systems utilize specific oil types based on their refrigerant. For vehicles still operating on R-134a in 2027, Polyalkylene Glycol (PAG) oil is standard. PAG comes in various viscosities, typically PAG 46, PAG 100, or PAG 150, which must match the compressor manufacturer’s specification. For newer vehicles using R-1234yf refrigerant, Polyolester (POE) oil is the correct choice due to its chemical compatibility. Universal Ester oils exist but are generally less efficient and should only be used if specified by the manufacturer or as a last resort, as per AC system specialists like the Mobile Air Conditioning Society (MACS) Worldwide.
Determining the Correct Oil Quantity
The total oil capacity of an AC system is distributed throughout various components. When adding oil without a full evacuation, the goal is to replenish lost oil, not to refill the entire system. According to automotive service manuals for 2027 models, the average full system capacity ranges from 4 to 8 ounces (120-240 ml) for most passenger vehicles. For a minor leak or routine maintenance, adding 1 to 2 ounces (30-60 ml) is typical. If a compressor has been replaced, the new unit usually comes pre-charged with a specific amount, and any additional oil should account for what was lost in other components. Overfilling can be as detrimental as underfilling, causing reduced cooling, increased system pressures, and potential compressor damage, as highlighted by a 2026 study on refrigerant oil management in vehicle AC systems.
Troubleshooting & Assessing System Health After Oil Addition Without Vacuum
After adding oil to your AC compressor without a vacuum, diligent troubleshooting and assessment are vital to confirm the intervention’s success and prevent further damage. This “no-vacuum” method is a temporary measure, and ongoing system health monitoring is crucial.
Post-Addition System Checks
Immediately after oil addition and running the AC, perform several checks. First, visually inspect all connections for any signs of refrigerant leaks, especially if a UV dye was previously added. Utilize an electronic leak detector for a more precise check, as even small leaks can deplete the system over time. Secondly, monitor the vent temperature inside the cabin; a properly functioning system should produce air significantly cooler than the ambient temperature within minutes. Finally, listen for any unusual noises from the compressor—grinding, squealing, or persistent clicking could indicate a deeper issue or improper oil distribution. Observe the compressor clutch engagement; it should cycle on and off smoothly without excessive cycling, which might suggest an incorrect refrigerant charge or pressure issues.
Monitoring System Pressures
For a more informed assessment, connect a set of AC manifold gauges. In a properly operating R-134a system at 70°F (21°C) ambient temperature, the low-side pressure should typically read between 30-40 psi, and the high-side pressure between 150-250 psi. For R-1234yf systems, pressures can vary slightly higher, with low-side around 35-45 psi and high-side 175-275 psi, as per 2027 vehicle service specifications. Deviations from these ranges—like excessively high or low pressures on either side—can indicate issues such as an overcharge, undercharge, blockages, or a failing compressor. While oil addition may improve performance, abnormal pressures often signal that the core problem, possibly a leak or component failure, still requires a professional diagnostic and vacuum-based recharge.
What If It Still Doesn’t Work?
If your AC system does not show significant improvement after adding oil without a vacuum, further action is necessary. This method is a stopgap, not a comprehensive repair. Persistence of issues points to underlying problems that require professional attention.
- Re-Check for Leaks: Even after initial checks, a tiny, slow leak might be present. Use an advanced electronic leak detector or consider adding a professional-grade UV dye if not already done, then reinspect after a few days.
- Verify Refrigerant Charge: Connect a manifold gauge set to accurately assess high and low-side pressures. Incorrect pressure readings indicate either an undercharge (due to a leak) or an overcharge, both of which can prevent efficient cooling.
- Inspect Compressor Clutch: Observe if the compressor clutch engages and disengages properly. If it’s not engaging, cycling rapidly, or constantly engaged, there could be an electrical issue, a failing pressure switch, or a severely under/overcharged system.
- Consult a Certified AC Technician: If these steps don’t resolve the issue, the problem likely lies beyond simple oil replenishment. This could involve a major leak, a faulty expansion valve, a clogged condenser, or a failing compressor.
- Professional Help & Cost: Seeking professional help is highly recommended to prevent further system damage. A full AC system diagnostic by a certified technician in 2027 typically costs $100-$200. Repairs, depending on component replacement, can range from $350 for a minor fix (e.g., O-rings, small sensor) to over $1,500 for a compressor replacement or evaporator core repair.
Conclusion
Adding oil to an AC compressor without a vacuum is a specific, often temporary solution for addressing low oil levels, not a comprehensive AC system repair. This method, while feasible for minor top-offs or emergency situations, requires precise oil selection and careful execution to avoid damaging your system. According to verified industry research and expert sources, for optimal performance and longevity, a proper AC system evacuation and recharge by a certified technician remains the gold standard. Plan for a professional service to ensure your vehicle’s AC operates efficiently and reliably for the long term.
❓ Frequently Asked Questions
Why is a vacuum pump so important when adding oil or servicing an AC system?
A vacuum pump removes all non-condensable gases (like air) and crucially, moisture from the AC system. Moisture combined with refrigerant forms harmful acids, leading to corrosion and premature component failure, especially of the compressor.
What are the potential consequences of adding oil without properly vacuuming the AC system?
Skipping the vacuum process can lead to reduced cooling efficiency, higher head pressures, accelerated wear of internal compressor components, and ultimately, catastrophic compressor failure due to acid formation and lubrication breakdown.
Are there any legitimate situations where oil can be added to an AC compressor without a vacuum?
For minor oil top-offs in a system that has just been opened for a very brief period and then immediately sealed (e.g., replacing a single O-ring), some might attempt it, but it’s still best practice to vacuum. For any significant work or major oil loss, vacuuming is essential.
How can I determine the correct type and amount of oil my AC compressor needs?
The correct oil type (PAG or POE) and viscosity, along with the total system capacity, are usually specified in your vehicle’s service manual or on a decal under the hood. It’s crucial to use the exact type as mixing incompatible oils can cause system damage.
If I must add oil without a vacuum, what precautions should I take to minimize risks?
Work quickly to minimize air exposure, ensure the system is depressurized before opening, and use a dedicated oil injector to minimize the chance of sucking in atmospheric air. However, understand these steps only mitigate, not eliminate, the risks.
What are the signs that I’ve incorrectly added oil or skipped vacuuming, leading to AC system problems?
Symptoms might include reduced cooling performance, unusual noises from the compressor, frequently cycling compressor clutch, high pressure readings on gauges, or eventually, compressor seizure. Immediate professional diagnosis is recommended if these signs appear.