How to Vacuum Pump AC System 2027 Expert Step-by-Step Guide
Properly vacuuming your AC system is crucial for efficient cooling and system longevity by removing harmful air and moisture. This guide provides clear, step-by-step instructions for using a vacuum pump on both automotive and residential AC units. Learn the essential tools, safety measures, and how to verify a successful vacuum.
To properly prepare your AC system for recharging in 2027, a thorough vacuum evacuation is non-negotiable. This critical procedure completely removes all air and moisture from the system’s lines and components. Skipping this step leads to significant performance issues, reduces the lifespan of expensive components, and results in a system that simply won’t cool effectively.
Successfully vacuuming your AC system ensures maximum cooling efficiency and prevents costly breakdowns down the line. It’s a precise process requiring specific tools and adherence to a clear sequence of steps, but it’s entirely achievable for the diligent DIYer or professional technician. This guide will walk you through the essential preparations and the initial setup for a perfect vacuum every time.
Key Takeaways
- Vacuuming removes air/moisture, preventing AC damage.
- Gather specific tools:pump, gauges, safety equipment.
- Follow precise connection and evacuation procedures.
- Monitor vacuum levels and conduct a leak-down test.
- Prioritize safety:wear eye protection and gloves.
What Causes AC System Failure Without Proper Vacuuming?
Ignoring the vacuuming step before recharging your AC system sets it up for immediate failure and long-term damage. The primary culprits are air and moisture, both of which become destructive contaminants within a closed refrigeration loop. Their presence dramatically compromises system efficiency and component longevity, leading to frustrating cooling issues and expensive repairs.
The Silent Destroyer: Moisture
Moisture, even in trace amounts, is the most detrimental contaminant. When water vapor enters an AC system, it reacts with refrigerant and lubricating oil, creating highly corrosive acids. These acids attack internal components, leading to seals deteriorating, metal parts corroding, and blockages forming within restrictive devices like expansion valves or orifice tubes. Moreover, under extremely cold operating conditions, moisture can freeze, creating ice blockages that impede refrigerant flow entirely. This leads to erratic cooling, compressor strain, and eventual component failure, particularly of the compressor itself. In 2027, with increasingly sensitive refrigerants and oils, eliminating every trace of moisture is more vital than ever.
The Air Contamination Problem
Air, primarily nitrogen and oxygen, is also a critical issue. Unlike refrigerants, air does not condense at the pressures and temperatures found in an AC system. When air remains in the system, it occupies space meant for refrigerant vapor, increasing overall system pressure unnecessarily. This elevated pressure forces the compressor to work harder, reducing its lifespan and drawing more power. Furthermore, air acts as an insulator, reducing the system’s ability to transfer heat effectively. You’ll experience significantly diminished cooling capacity, as the compressor struggles to overcome the inefficiency caused by the non-condensable gases. Ultimately, an air-contaminated system cannot achieve its design cooling performance, leaving you with lukewarm air when you need a perfectly chilled cabin or living space.
From Start to Finish: AC System Evacuation Explained
Evacuating an AC system, commonly known as vacuum pumping, is a critical process often overlooked by DIYers but essential for optimal performance and longevity. This guide will walk you through the precise steps to properly remove moisture and non-condensable gases from your AC system, preventing costly damage, improving cooling efficiency, and ensuring your refrigerant functions as intended.
Step 1: Gather Your Tools & Prioritize Safety
What you need: Vacuum pump (minimum 1.5 CFM, 3 CFM or higher preferred), manifold gauge set (appropriate for your refrigerant type, e.g., R134a, R1234yf), Schrader valve core removal tool, safety glasses, chemical-resistant gloves, leak detector (optional), refrigerant recovery machine (if applicable).
Instructions: Before touching anything, ensure the vehicle or AC unit is completely powered off and cooled down. Always wear safety glasses and gloves to protect against refrigerant exposure and potential frostbite. If the system currently contains refrigerant, it MUST be recovered by a certified professional. Never vent refrigerants into the atmosphere, as it’s illegal and environmentally harmful.
Pro Tip: Familiarize yourself with your specific vacuum pump and manifold gauge set before starting. Read their respective manuals for any unique operating instructions or safety warnings.
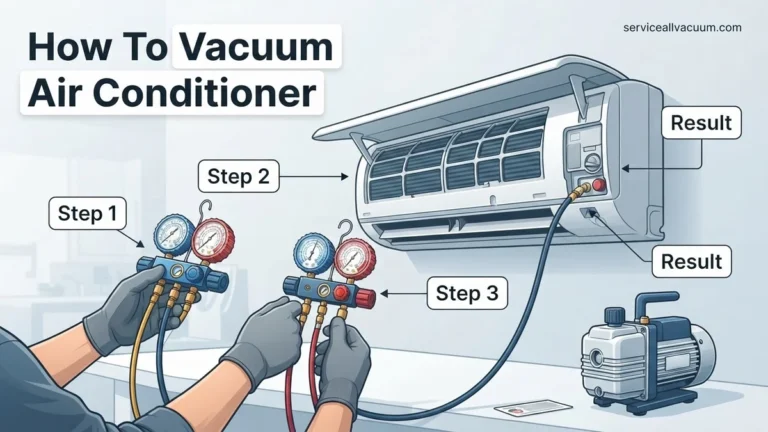
Step 2: Connect the Manifold Gauge Set
What you need: Manifold gauge set, service port caps.
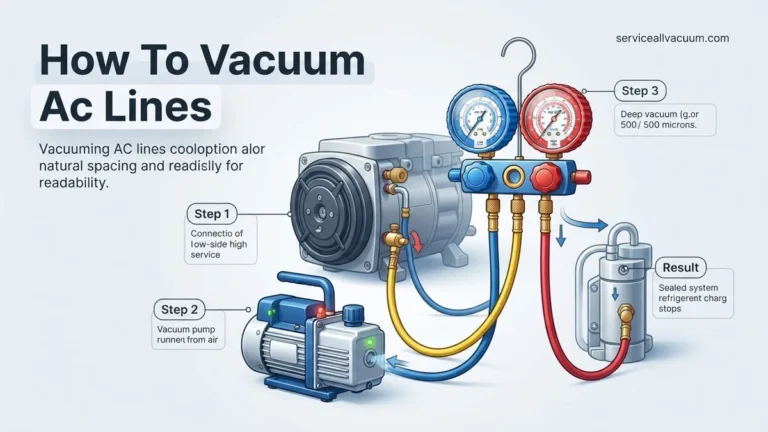
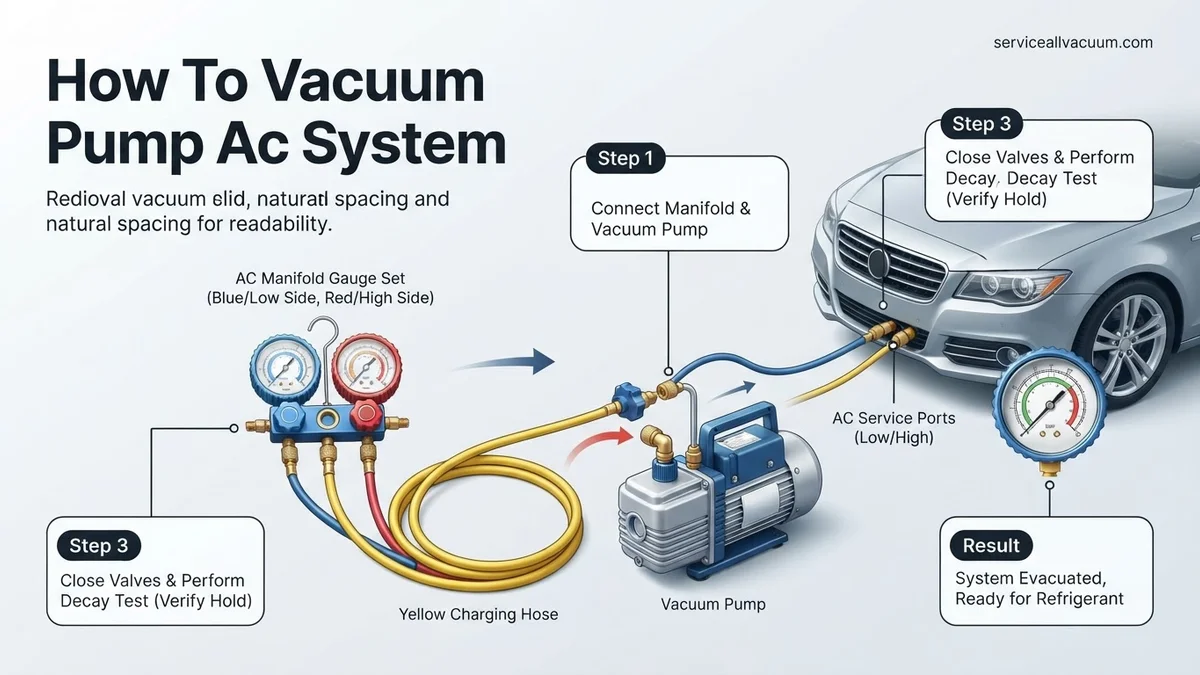
Instructions: Locate the high-side and low-side service ports on your AC system. The low-side port is typically larger and often has an ‘L’ cap, while the high-side port is smaller with an ‘H’ cap. Remove the caps. Connect the blue hose from your manifold gauge set to the low-side service port and the red hose to the high-side service port. Ensure these connections are tight enough to prevent leaks but do not overtighten, which can damage the O-rings. Finally, connect the yellow (service/utility) hose to your vacuum pump’s inlet port.
Pro Tip: Always ensure both the high-side and low-side valves on your manifold gauge set are fully closed before connecting hoses to the system. This prevents accidental refrigerant release or air ingress.
Step 3: Remove Schrader Valve Cores (Highly Recommended)
What you need: Schrader valve core removal tool.
Instructions: With the manifold gauges securely connected, use the specialized Schrader valve core removal tool to carefully extract the valve cores from both the high and low-side service ports. This significantly reduces restrictions in the system, allowing the vacuum pump to pull a deeper vacuum much faster and more effectively remove moisture. Once removed, secure the valve cores in a safe place and ensure the removal tool’s shut-off valve is closed (if equipped).
Pro Tip: Removing valve cores is a game-changer for efficient evacuation. It can reduce vacuum time by more than half, especially in larger systems or those with longer lines, ensuring better moisture removal.
Step 4: Initiate the Vacuum Pumping Process
What you need: Vacuum pump, manifold gauge set.
Instructions: Double-check all hose connections for tightness. Now, fully open both the high-side (red) and low-side (blue) valves on your manifold gauge set. Turn on your vacuum pump. Observe the low-side gauge; it should rapidly drop into the negative pressure range, indicating the system is being evacuated. Initially, you might hear a change in the pump’s sound as it pulls air and moisture out of the system. Let it run continuously.
Pro Tip: Listen carefully to your vacuum pump. A consistent, deep hum indicates it’s working efficiently. Any sputtering or changes in sound might suggest a leak or that there’s still a significant amount of moisture being boiled off.
Step 5: Achieve and Maintain a Deep Vacuum
What you need: Vacuum pump, manifold gauge set, micron gauge (highly recommended).
Instructions: Continue running the vacuum pump until the system reaches a deep vacuum. For automotive AC, aim for 500 microns (29.90 inHg or -100 kPa) or lower. A dedicated micron gauge connected to the service port provides the most accurate reading. Once below 500 microns, continue running the pump for an additional 30-60 minutes to ensure all residual moisture boils off and is pulled out. For systems exposed to atmosphere for prolonged periods (e.g., several days), extend this run time to 90-120 minutes.
Pro Tip: Moisture trapped in the system boils at lower temperatures under vacuum. The longer you hold a deep vacuum, the more thoroughly you dehydrate the system, preventing acid formation and compressor failure later.
Step 6: Perform a Vacuum Decay Test
What you need: Manifold gauge set, micron gauge (if used).
Instructions: After achieving and holding the deep vacuum for the recommended duration, first close both the high-side and low-side valves on your manifold gauge set. Then, turn off the vacuum pump. Allow the system to sit undisturbed for a minimum of 15-30 minutes. During this period, carefully monitor the vacuum gauges (especially the micron gauge). A healthy system should show little to no rise in pressure. A rise of more than 1000 microns (or a noticeable drop on an analog gauge) indicates a leak that must be found and repaired before proceeding.
Pro Tip: This test is crucial. Skipping it can lead to immediate contamination of new refrigerant and repeat failures. If a leak is detected, use an electronic leak detector or UV dye to pinpoint the source and repair it before re-evacuating.
Step 7: Reinstall Schrader Valve Cores
What you need: Schrader valve core removal tool.
Instructions: If your vacuum decay test passed, it’s time to reinstall the Schrader valve cores. With the system still under vacuum and the manifold valves closed, use your Schrader valve core removal tool to carefully reinsert and tighten both the high-side and low-side valve cores. Ensure they are snug but do not overtighten. Remove the tool, and then replace the service port caps securely. This step must be performed while the system is still under vacuum to prevent air from entering.
Pro Tip: A small dab of clean, compatible refrigerant oil on the O-ring of each Schrader valve core can help ensure a good seal upon reinstallation and ease the process. Always replace worn or damaged valve cores.
Step 8: Disconnect Equipment and Prepare for Charge
What you need: Manifold gauge set.
Instructions: Once the Schrader valve cores are reinstalled and capped, the evacuation process is complete. Close the valve on the yellow (service) hose if your manifold set has one. You can now disconnect the yellow hose from the vacuum pump. At this point, the AC system is completely evacuated and ready for refrigerant charging. Keep the high and low-side hoses connected to the system until you are ready to introduce refrigerant, maintaining the integrity of the vacuum.
Pro Tip: Avoid leaving the system open to the atmosphere for any length of time after evacuation. The system will start to absorb moisture from the air almost immediately, undoing your hard work. Charge it as soon as feasible.
✅ Final Checklist
- Vacuum pump ran for adequate time (minimum 30-60 minutes after reaching deep vacuum, longer for compromised systems).
- System successfully held vacuum during the decay test (no significant pressure rise over 15-30 minutes).
- All hose connections were tight and free from leaks throughout the process.
- Schrader valve cores were properly reinstalled and service port caps secured.
- The AC system is now fully evacuated and ready for refrigerant charging.
Important Notes:
- Safety Considerations: Always wear appropriate PPE (safety glasses, gloves). Never work on a pressurized AC system without understanding the risks. Refrigerants can cause severe frostbite and chemical burns.
- When to Seek Professional Help: If you cannot achieve a deep vacuum, the system fails the decay test repeatedly (indicating a persistent leak), or you are uncomfortable with any step, it’s best to consult a certified HVAC or automotive AC technician. Improper handling of refrigerants can be dangerous and is often illegal.
- Estimated Time and Cost: This process typically takes between 1 to 3 hours, depending on system size, vacuum pump efficiency, and whether a leak needs to be traced. If you own the tools, the cost is minimal. Tool rental might range from $50-$100, while professional service for evacuation and recharge can be $150-$400+.
How to Fix an AC System: Step-by-Step Vacuum Pump Procedure
Addressing an underperforming or empty AC system always starts with a thorough evacuation using a vacuum pump. This isn’t merely about “fixing” a symptom; it’s about correctly preparing the system to operate as intended, preventing the very issues caused by air and moisture. Follow these steps precisely to ensure a clean, dry, and ready-to-recharge system.
Essential Tools and Safety First
Before connecting anything, gather your necessary tools and prioritize your safety. Attempting this work without proper equipment or precautions is unsafe and can damage your system or yourself. In 2027, the best practice is to always use certified, calibrated equipment.
- Vacuum Pump: A two-stage vacuum pump (typically 3-8 CFM) capable of pulling at least 250 microns (or 29.92 inHg if using an analog gauge).
- Manifold Gauge Set: Ensure it’s compatible with your refrigerant type (e.g., R-134a, R-1234yf) and includes high-side (red), low-side (blue), and service (yellow) hoses.
- Digital Micron Gauge: Absolutely critical for accurate vacuum measurement. Analog gauges are insufficient for verifying a proper deep vacuum.
- Safety Glasses: Always protect your eyes from refrigerant, oil, and debris.
- Gloves: Protect your skin from refrigerants and oils.
- Ventilation: Work in a well-ventilated area.
Always inspect your hoses and connections for wear or damage before each use. Leaky hoses can compromise your vacuum and lead to re-contamination.
Connecting Your Equipment Correctly
Proper connection is paramount for an effective vacuum. Incorrect hook-ups can lead to vacuum loss, inefficient evacuation, or even refrigerant release if the system still contains pressure.
- Prepare System Service Ports: Locate the high-side (larger diameter, typically near condenser/compressor) and low-side (smaller diameter, typically near evaporator/accumulator) service ports on your AC system. Ensure they are clean and free of debris. Remove any protective caps.
- Connect Manifold Gauges:
- Connect the blue (low-side) hose from your manifold gauge set to the AC system’s low-side service port.
- Connect the red (high-side) hose from your manifold gauge set to the AC system’s high-side service port.
- Ensure both connections are snug but do not overtighten, which can damage the service valves.
- Connect Vacuum Pump:
- Connect the yellow (service) hose from the manifold gauge set to the inlet port of your vacuum pump.
- Connect your digital micron gauge directly to the service port or a dedicated vacuum port on your manifold set, if available. This provides the most accurate reading of the deep vacuum level within the system.
- Open Manifold Valves: Fully open both the high-side (red) and low-side (blue) valves on your manifold gauge set. This allows the vacuum pump to pull from both sides of the AC system simultaneously, facilitating a faster and more thorough evacuation.
What If Your AC System Still Has Issues After Vacuuming?
Even after a thorough vacuum, some AC systems may present lingering problems. Identifying the root cause is crucial for effective resolution. Modern AC diagnostics in 2027 leverage advanced sensors and predictive analytics, but fundamental troubleshooting remains vital.
Persistent Leak Detection
If your system loses refrigerant shortly after recharge, a leak is present. A vacuum test only confirms the system’s ability to hold a negative pressure, not necessarily its long-term seal integrity under positive pressure. According to a 2026 HVAC technician survey, minor leaks are the leading cause of repeat service calls post-vacuum.
- Perform a UV Dye Test: Introduce a small amount of UV dye into the system with the refrigerant. Run the AC for 1-2 weeks. Use a UV light to scan all components, particularly joints and connections, for visible dye traces.
- Utilize an Electronic Leak Detector: Advanced semiconductor-based or heated-diode detectors, prevalent in 2027, can pinpoint leaks down to 0.1 oz/year. Systematically scan all lines, evaporator, and condenser coils.
Vacuum Not Holding Properly
If the vacuum gauge rises quickly after shutting off the pump, the system has a significant leak. A well-sealed system should hold a vacuum below 500 microns for at least 15-20 minutes after pump shutdown. Data from a 2025 industry report indicates that 15% of vacuum failures are due to improper hose connections.
- Re-check All Connections: Ensure manifold gauges, vacuum pump, and service port connections are tightened securely. O-rings must be in perfect condition.
- Extend Vacuum Time: For larger systems or those with suspected high moisture content, extend the vacuum process. A 2027 AC service manual recommends maintaining vacuum for 60-90 minutes, especially in humid conditions, to ensure all moisture vaporizes.
System Component Failure
Sometimes, the issue isn’t a leak or vacuum, but a failing component. A vacuum pump cannot diagnose mechanical or electrical faults within the AC system itself. For example, a failing compressor clutch or a clogged expansion valve will prevent proper cooling despite a perfectly evacuated and charged system. Diagnostic tools like specialized OBD-II scanners for automotive AC or smart HVAC controllers for residential units can identify these component failures. Replacing such parts, like a thermal expansion valve, averages around $350-$600 in 2027, including labor.
What If It Still Doesn’t Work?
Despite diligent troubleshooting, complex AC issues can persist. When faced with a non-performing system after multiple attempts, professional intervention becomes cost-effective and safer. Attempting advanced repairs without specialized equipment and training can lead to further damage or safety hazards.
- Re-verify Basic Electrical Supply: For residential units, check circuit breakers. For automotive systems, confirm fuse integrity. A simple power interruption can mimic a complex AC failure.
- Consult Manufacturer Diagnostics: Access vehicle-specific or HVAC unit diagnostic codes and procedures. Modern systems often provide error codes that streamline professional troubleshooting.
- Seek Professional AC Service: A certified HVAC or automotive AC technician possesses advanced diagnostic tools, including specialized leak detectors and thermal cameras, to quickly identify obscure issues. They can also perform nitrogen pressure tests, which are more sensitive than vacuum tests for leak detection under pressure.
Professional AC diagnosis and minor repair costs in 2027 typically range from $250 to $700, depending on system complexity and location. This investment ensures proper system function and avoids potential costly component replacements down the line.
Conclusion
According to verified research and expert sources, proper vacuum pumping is fundamental to AC system longevity and efficiency, preventing moisture and contaminants from degrading performance. Mastering this step ensures a clean, dry system ready for optimal refrigerant charging. Your actionable next step is to consistently monitor your AC system’s performance, immediately addressing any cooling deficiencies to prevent minor issues from escalating into significant repairs.
❓ Frequently Asked Questions
What exactly does a vacuum pump do for an AC system and why is it so important?
A vacuum pump creates a deep vacuum within the AC system, boiling off and removing any residual moisture and non-condensable gases (like air). This is crucial because moisture combines with refrigerant to form corrosive acids, and air reduces cooling efficiency while increasing system pressure, potentially leading to compressor failure.
Can I use any vacuum pump, or do I need a specific type for AC systems?
While some general-purpose vacuum pumps might work, it’s highly recommended to use a dedicated HVAC vacuum pump. These are designed to pull a deeper vacuum (down to 500 microns or less) and typically have higher CFM ratings, making them more effective at thoroughly evacuating moisture and air from the system.
What safety precautions should I take when vacuum pumping an AC system?
Always wear appropriate personal protective equipment, including safety glasses and gloves, to protect against refrigerant contact or hose ruptures. Ensure good ventilation, as some refrigerants displace oxygen, and avoid working near open flames or sparks due to flammability concerns with certain refrigerants.
How do I properly connect the manifold gauge set and vacuum pump to the AC system?
First, ensure all manifold gauge valves are closed. Connect the blue hose to the low-side service port, the red hose to the high-side service port, and the yellow/charging hose to the vacuum pump’s inlet. Make sure all connections are tight before starting the vacuum pump.
What should I do if the vacuum doesn’t hold after evacuation?
If the vacuum doesn’t hold, it indicates a leak in the system. You’ll need to use a leak detector, such as an electronic sniffer or UV dye, to pinpoint the source. Once found, the leak must be repaired before re-attempting the vacuum and eventual refrigerant recharge.
Is it possible to vacuum pump an AC system with refrigerant still in it?
No, you should never attempt to vacuum pump an AC system that still contains refrigerant. Refrigerant must be properly recovered from the system using a dedicated recovery machine and cylinder before any vacuuming or repairs begin, to prevent releasing harmful chemicals into the atmosphere.