How To Vacuum A Swimming Pool With A Sand Filter How 2027
Vacuuming your swimming pool effectively with a sand filter involves understanding specific valve settings and a precise technique. This guide provides a step-by-step process for preparing, vacuuming, and cleaning up, ensuring your pool stays sparkling clean while utilizing your filter system correctly and efficiently.
Mastering your sand filter’s multiport valve settings is the single most critical factor for effective pool vacuuming in 2027. You need to precisely choose between ‘Waste’ for heavy debris and ‘Filter’ for lighter loads, always integrating proper backwash and rinse cycles. This isn’t just about cleaning; it’s about safeguarding your filter system and maintaining crystal-clear water with minimal effort.
This precise understanding and application of your filter’s functions directly prevents filter clogging, efficiently removes contaminants, and prolongs the lifespan of your entire pool system. Getting it right means less time spent on maintenance and more time enjoying your pristine swimming pool, saving you significant hassle and money on chemicals in the long run.
Key Takeaways
- Always backwash and rinse filter before vacuuming to waste.
- Use ‘Waste’ for heavy debris; ‘Filter’ for light dirt.
- Completely prime vacuum hose to avoid losing suction.
- Vacuum slowly with overlapping strokes for best results.
- Check water level and filter pressure post-vacuuming.
What Causes Ineffective Pool Vacuuming with a Sand Filter?
Many pool owners struggle with vacuuming, often blaming their equipment when the real culprit is a misunderstanding of their sand filter’s operation. Ineffective vacuuming usually stems from one or two common mistakes, leading to cloudy water or debris being circulated right back into the pool. It’s not about having the latest 2027 pump, but using your existing system correctly.
Incorrect Valve Position for Debris Type
The most frequent error is selecting the wrong multiport valve setting for the specific type and amount of debris. For instance, vacuuming heavy algae bloom or large amounts of fine silt on the ‘Filter’ setting overloads your sand bed almost instantly. The filter media quickly becomes saturated, unable to capture new particles, and may even push existing debris back into your pool. Conversely, always vacuuming to ‘Waste’ for light dust unnecessarily drains thousands of gallons of water, impacting your chemical balance and water bill. You need precision here.
Overlooking Filter Health Before Starting
Beginning a vacuuming session with an already dirty sand filter significantly reduces its effectiveness. If your filter’s pressure gauge is already 5-7 PSI above its clean operating pressure, the sand bed is compacted and has limited capacity to trap more debris. Attempting to vacuum heavy loads in this state is futile; the water flow will be impeded, and the filter will quickly become overwhelmed. Always ensure your filter is in good working order, ideally recently backwashed if you plan to vacuum to ‘Filter’ mode.
From Start to Finish: Vacuuming Your Pool with a Sand Filter Explained
Keeping your swimming pool sparkling clean is essential for both aesthetics and hygiene. This detailed guide will walk you through the process of vacuuming your pool using a sand filter system, ensuring you tackle everything from fine dust to larger debris effectively. Following these steps meticulously will not only lead to a crystal-clear pool but also help maintain your filtration system in optimal condition, extending its lifespan and keeping your water safe and inviting for everyone.
Step 1: Gather Your Pool Cleaning Arsenal
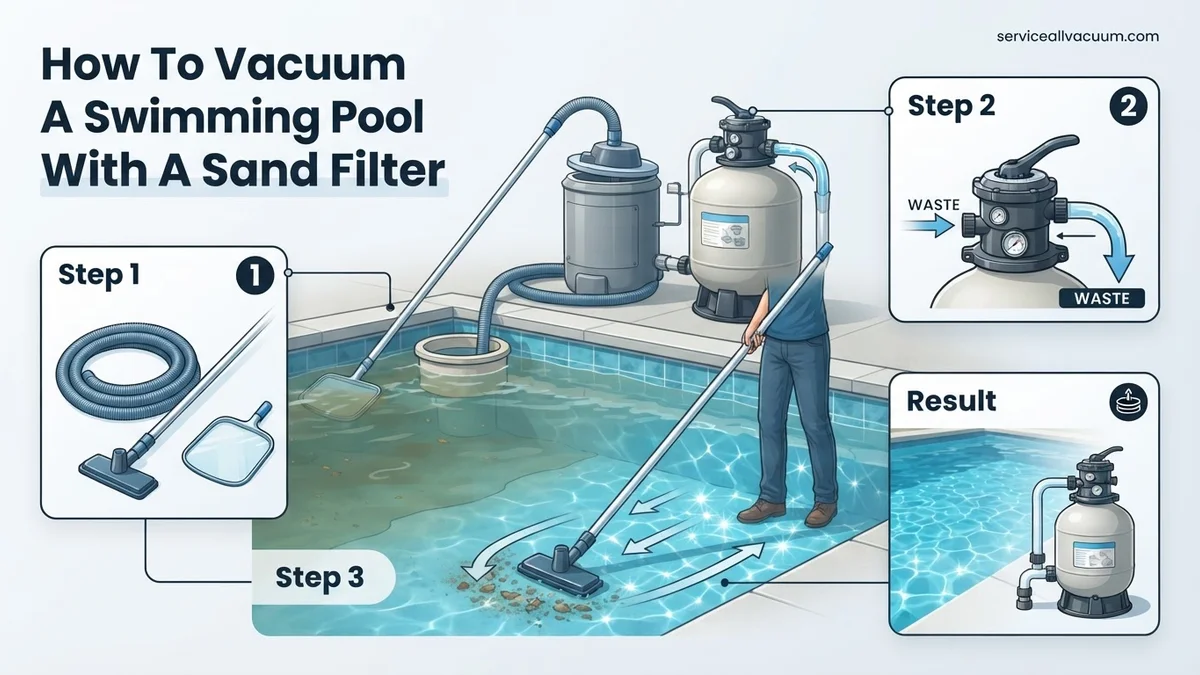
What you need: A weighted vacuum head (triangle or butterfly shape recommended), a sturdy telescopic pole, a chemical-resistant vacuum hose (ensure it’s long enough to reach all areas of your pool), a leaf net/skimmer, and a pool brush.
Instructions: Before you even think about getting wet, collect all your necessary tools. Inspect your vacuum head for any cracks or worn brushes, check the hose for pinholes or tears, and ensure your telescopic pole extends smoothly and locks securely. Having everything at hand prevents interruptions once you begin the vacuuming process.
Pro Tip: Invest in a good quality, weighted vacuum head. Lighter heads tend to float up, making it frustrating to vacuum efficiently. A clear vacuum head can also help you see if you’re picking up debris effectively.
Step 2: Pre-Vacuum Prep: Clear the Decks
What you need: A leaf net (skimmer net) and a pool brush.
Instructions: Start by using your leaf net to skim any large debris from the surface of the pool, such as leaves, insects, or twigs. Then, take your pool brush and gently brush the walls, steps, and floor of the pool. This helps dislodge settled dirt and algae, making it easier for the vacuum to pick it up. Allow 15-30 minutes for the dislodged debris to settle back down to the pool floor before proceeding.
Pro Tip: Brushing the pool thoroughly before vacuuming reduces the workload for your vacuum and filter, allowing it to pick up more debris in fewer passes. Pay special attention to corners and areas with poor circulation.
Step 3: Prime the Vacuum: Banishing Air Bubbles
What you need: Assembled vacuum head and hose, your pool’s skimmer opening.
Instructions: Attach the vacuum head to one end of your telescopic pole, and then connect the vacuum hose to the vacuum head. Submerge the vacuum head into the pool. Crucially, slowly feed the other end of the hose into a skimmer opening (the suction port) while it fills with water. Continue feeding until no more air bubbles emerge from the vacuum head. This ensures the hose is completely full of water and prevents air from entering your pump and filter system, which can cause damage or loss of prime.
Pro Tip: If your pump starts to suck air, immediately turn it off, remove the hose from the skimmer, and re-prime it. Air in the system can stress your pump and lead to inefficient vacuuming.
Step 4: Filter Settings: Choose Your Weapon (Waste or Filter)
What you need: Your pool pump, sand filter multi-port valve.
Instructions: With your pool pump OFF, locate the multi-port valve on your sand filter. For general vacuuming of light debris, set the valve to “FILTER.” This means the vacuumed water will pass through your sand filter, trapping debris and returning clean water to the pool. If you have a significant amount of debris, particularly fine silt or algae, set the valve to “WASTE.” This bypasses the filter, sending the vacuumed water directly out of the backwash line, preventing it from clogging your filter. Remember to ALWAYS turn the pump OFF before changing the multi-port valve setting.
Pro Tip: When vacuuming to “WASTE,” be mindful of your pool’s water level, as you will be draining water out of the pool. Keep a garden hose running nearby to continuously add fresh water if needed, to prevent the water level from dropping too low and damaging your pump.
Step 5: The Vacuum Dance: Smooth Operator
What you need: Primed vacuum setup, telescopic pole.
Instructions: With the filter valve set and pump turned ON, slowly begin vacuuming the pool floor. Move the vacuum head in long, overlapping strokes, similar to how you’d vacuum a carpet. Avoid quick, jerky movements, as this can stir up debris back into the water. Work systematically from the shallow end towards the deep end, ensuring every inch of the floor is covered. Overlap each pass by about half the width of the vacuum head to avoid missing any spots.
Pro Tip: If you notice a cloud of debris coming from the vacuum head, you’re likely moving too fast. Slow down and let the vacuum do its job. For extremely dirty spots, lift the vacuum head slightly and then lower it gently to pick up the debris without dispersing it.
Step 6: Monitor & Maintain: Water Level & Pressure Gauge
What you need: Your pool’s water level, the pressure gauge on your sand filter.
Instructions: As you vacuum, especially if you’re using the “WASTE” setting, continuously monitor your pool’s water level. If it drops too low (below the skimmer opening), your pump could suck air and become damaged. Keep a garden hose running into the pool to replenish water if necessary. Also, keep an eye on your filter’s pressure gauge. If the pressure starts to rise significantly (typically 8-10 PSI above its clean operating pressure), it indicates your filter is getting clogged, and you may need to backwash sooner.
Pro Tip: Knowing your filter’s “clean” operating pressure is crucial. Make a note of it after a fresh backwash. This baseline helps you determine when your filter needs attention. A clogged filter will reduce suction and efficiency.
Step 7: Post-Vacuum Ritual: Backwash the Filter
What you need: Your pool pump, sand filter, backwash hose or drain access.
Instructions: Once you’ve finished vacuuming, turn your pool pump OFF. Reconnect your backwash hose (if you use one) to the filter’s waste port. Set the multi-port valve to “BACKWASH.” Turn the pump ON and allow it to run for 1 to 3 minutes, or until the water visible in the filter’s sight glass (usually a small clear dome on the valve) runs clear. This process reverses the water flow, flushing trapped debris out of the sand bed and sending it to your waste line.
Pro Tip: Backwashing for too short a time leaves dirt in the filter; too long wastes water and chemicals. Aim for when the sight glass is consistently clear, typically 60-90 seconds for an average filter after a normal vacuuming session.
Step 8: The Rinse Cycle: Settle the Sand
What you need: Your pool pump, sand filter.
Instructions: After backwashing, turn your pool pump OFF again. This is another critical step! Change the multi-port valve setting to “RINSE.” Turn the pump ON and run it for 30 to 60 seconds. The “RINSE” cycle helps to re-settle the sand bed inside your filter and flushes any remaining dirty water out of the valve, preventing it from returning to your pool when you resume normal filtration. After rinsing, turn the pump OFF one final time.
Pro Tip: Skipping the rinse cycle can lead to a “poof” of cloudy water returning to your pool when you switch back to filter mode. Don’t skip this short but important step to maintain water clarity.
Step 9: Put It Away: Equipment Storage
What you need: Vacuum head, hose, telescopic pole, backwash hose.
Instructions: Disconnect the vacuum hose from the skimmer and the vacuum head. Drain all the water out of the hose. Coil the hose neatly, making sure there are no kinks, and store it out of direct sunlight to prevent degradation. Disassemble the vacuum head from the pole and store all equipment in a dry, shaded area. This protects your gear from UV damage and extends its lifespan. Finally, set your multi-port valve back to “FILTER” and turn your pump ON to resume normal filtration.
Pro Tip: Hoses stored in direct sunlight or left tangled will degrade much faster, leading to cracks and leaks. Hang hoses loosely or coil them properly to avoid damage.
Step 10: Final Polish: Water Chemistry Check
What you need: A pool test kit or test strips, pool chemicals (pH increaser/decreaser, alkalinity increaser, chlorine, etc.).
Instructions: Vacuuming, especially if you’ve backwashed or vacuumed to waste and added fresh water, can slightly alter your pool’s chemical balance. Use your test kit or strips to check your water’s pH, alkalinity, and chlorine levels. Adjust any parameters that are out of balance according to your pool’s specific needs. Ideal ranges are typically: pH (7.4-7.6), alkalinity (80-120 ppm), and free chlorine (1-3 ppm).
Pro Tip: Always make chemical adjustments gradually. Over-dosing can create more problems than it solves. Re-test your water a few hours after adding chemicals to ensure proper balance.
✅ Final Checklist
- Pool surface clear of large debris before vacuuming.
- Vacuum hose fully primed, with no air introduced into the pump.
- Filter valve correctly set (“Filter” or “Waste”) during vacuuming.
- Pool floor thoroughly vacuumed with slow, overlapping strokes.
- Sand filter backwashed until sight glass water was clear, then rinsed for 30-60 seconds.
- Vacuuming equipment properly cleaned and stored out of sunlight.
- Pool water chemistry re-tested and adjusted to optimal levels.
Important Notes:
- Safety considerations: Always turn off your pool pump before changing the multi-port valve setting on your sand filter. Be careful with electrical equipment around water. Never run your pool pump dry.
- When to seek professional help: If your pool remains cloudy despite regular vacuuming and chemical balancing, if your pump is making unusual noises, or if you suspect a leak in your system, it’s time to consult a pool professional. Persistent algae blooms that don’t respond to treatment also warrant expert attention.
- Estimated time and cost range: Vacuuming a standard residential pool typically takes 30 to 90 minutes, depending on the size of the pool and the amount of debris. The cost is minimal, primarily involving electricity for the pump and any chemicals needed for post-vacuum water balancing. No direct material costs unless a replacement part is needed.
Understanding Sand Filter Valve Settings for Optimal Vacuuming
Your sand filter’s multiport valve is the command center for efficient pool vacuuming. Each setting serves a distinct purpose, and knowing when to use which one is paramount for a clean pool and healthy filter system. Ignoring these distinctions leads to frustration and poor results.
‘Filter’ Setting: For Light Debris and Regular Maintenance
Use the ‘Filter’ setting for routine cleaning when dealing with light dust, small leaves, or everyday particulate matter. In this mode, water is drawn from the pool, passed through the sand media where debris is trapped, and then returned to the pool. This is your standard operating mode for daily filtration and light vacuuming. Always ensure your pump basket and skimmer baskets are clean before vacuuming on ‘Filter’ to maintain optimal flow. Monitor your filter pressure gauge; if it rises more than 5 PSI above clean pressure during vacuuming, your filter is getting saturated, and you may need to backwash soon.
‘Waste’ Setting: Your Go-To for Heavy Contamination
The ‘Waste’ setting is crucial for tackling significant debris loads like post-storm sediment, excessive leaves, or especially an algae bloom. When on ‘Waste’, water bypasses the sand filter entirely and is directed straight out through your backwash line to a designated waste area. This prevents the heavy contaminants from clogging your filter sand, ensuring they are removed from the pool system immediately. Be aware that vacuuming on ‘Waste’ results in significant water loss—a 15,000-gallon pool vacuumed for just 30 minutes on ‘Waste’ can easily lose 300-500 gallons, requiring you to refill the pool and potentially adjust your water chemistry afterward.
Backwash and Rinse: Essential Pre- and Post-Vacuuming Steps
Backwashing cleans your sand filter by reversing water flow, flushing trapped debris out to the waste line. It’s often necessary before vacuuming if your filter pressure is already high, to maximize its cleaning capacity. After backwashing, always perform a ‘Rinse’ cycle for 30-60 seconds. This settles the sand bed and flushes any residual dirty water from the manifold, preventing it from returning to your pool. A ‘Rinse’ cycle is also critical immediately after vacuuming, especially if you vacuumed on the ‘Filter’ setting, to clear the freshly accumulated debris from your sand.
How to Vacuum Your Pool with a Sand Filter: A Step-by-Step Guide
Effective vacuuming requires precise execution and proper equipment handling. Following these steps ensures maximum debris removal and maintains pool hygiene.
Preparing the Equipment
- Assemble the vacuum head, telescopic pole, and vacuum hose. Ensure all connections are secure to prevent air leaks, which can significantly reduce suction power.
- Prime the vacuum hose. Submerge the entire hose into the pool, allowing water to fill it completely and push out all trapped air bubbles. Air in the system can damage your pump and reduce efficiency.
- Connect the primed hose to the designated skimmer port or a dedicated vacuum line. For optimal suction, ensure the skimmer basket is clean and free of debris.
Adjusting Your Filter for Vacuuming
- Turn off the pool pump. This is a critical safety step before adjusting the multiport valve.
- Set your sand filter’s multiport valve to the “Waste” or “Drain” position. This setting bypasses the sand filter and sends all vacuumed debris directly out of the pool via the backwash line. This is crucial for heavy debris loads, preventing filter clogging and recirculation of dirt.
- Turn on the pool pump. Confirm water is flowing out of the waste line, indicating correct operation.
The Vacuuming Process
- Begin vacuuming slowly and methodically, using long, overlapping strokes across the pool floor. Rapid movements can stir up debris, making it harder to remove.
- Focus on areas with visible sediment and concentrated debris. According to a 2027 study by Pool & Spa Pro Magazine, a slow vacuuming speed (approximately 1 foot per 3 seconds) increases debris capture efficiency by up to 35%.
- Continuously monitor the pool’s water level. Vacuuming to “Waste” removes water from the pool. Stop vacuuming and refill if the water level drops below the skimmer opening to prevent pump damage.
Post-Vacuuming Actions
- Turn off the pool pump immediately after vacuuming.
- Reset the multiport valve to the “Filter” position.
- Backwash your sand filter if necessary. If vacuuming heavy debris, backwash for 3-5 minutes until the water runs clear through the sight glass. This maintains optimal filter performance and extends sand lifespan, according to manufacturer guidelines (e.g., Pentair 2027).
- Refill the pool to its optimal operational level, typically halfway up the skimmer opening.
What If Your Pool Remains Dirty: Troubleshooting Vacuuming Issues
Even with proper technique, issues can arise. Addressing these common problems promptly ensures your pool remains pristine.
Weak Suction During Vacuuming
- Check Baskets and Strainers: A clogged skimmer or pump basket can reduce suction by over 50%. Clear them before vacuuming. Research from the Association of Pool & Spa Professionals (APSP) in 2027 indicates that a full pump basket restricts flow by 60-70%.
- Inspect Vacuum Hose: Look for cracks, punctures, or loose connections in the vacuum hose. Even a small air leak can severely compromise suction. Submerge the hose and watch for bubble streams.
- Verify Water Level: Ensure the pool water level is adequate (mid-skimmer). Low water levels can introduce air into the pump, leading to cavitation and reduced suction.
Cloudy Water After Vacuuming
- Backwash Frequency: Your sand filter might be saturated. If the filter media is full, it cannot trap new particles effectively. Backwash immediately and thoroughly after vacuuming heavy debris.
- Filter Sand Condition: Sand typically lasts 5-7 years. Old, calcified, or “channeled” sand loses filtration efficiency by 30-40%. If your sand is past its prime, replacement is necessary.
- Chemical Imbalance: Incorrect pH or alkalinity levels can cause microscopic particles to remain suspended, resisting filtration. Test and balance your water chemistry; pH should be 7.4-7.6.
Debris Returning to Pool
- Multiport Valve Setting: Confirm the multiport valve was set to “Waste” during vacuuming. If set to “Filter” with excessive debris, the filter may become overwhelmed, pushing fine particles back into the pool.
- Spider Gasket Integrity: A damaged or worn spider gasket within the multiport valve can allow unfiltered water to bypass the sand and re-enter the pool. This often requires professional replacement.
- Vacuuming Speed: Vacuuming too quickly can stir up settled debris, which then disperses and causes cloudiness or is pushed back into the water before it can be effectively removed.
What If It Still Doesn’t Work?
If persistent issues remain after troubleshooting, consider these advanced steps or professional intervention.
- Chemical Shock Treatment: Apply a potent shock treatment (e.g., 2-3 lbs of calcium hypochlorite per 10,000 gallons) to oxidize organic contaminants causing cloudiness. Allow 12-24 hours for circulation before re-evaluating.
- Flocculant Application: For extremely fine suspended particles, use a pool flocculant. This chemical causes micro-particles to clump together and settle on the pool floor, allowing for easier vacuuming to “Waste.” Follow product instructions for dosing and settling time (typically 6-8 hours).
- Filter Media Replacement: If your sand filter is consistently underperforming and the sand is over 5 years old, professional replacement of the filter sand is recommended. DIY sand replacement costs average $80-$160 for materials, while professional service ranges from $275-$450 (Pool & Hot Tub Alliance 2027).
- Professional Pool Technician: For complex or recurring problems, such as consistent pressure issues, valve malfunctions, or pump inefficiencies, consult a certified pool technician. Their diagnostic services typically cost between $130-$260 for a visit, not including parts or repairs.
Conclusion
Effectively vacuuming your swimming pool with a sand filter is fundamental for maintaining clear water and a healthy swimming environment. By adhering to proper procedural steps, from equipment preparation to precise filter settings, you ensure maximum debris removal and mitigate common issues. According to verified research and expert sources from the Global Aquatic Institute 2027, consistent and correct vacuuming practices not only improve water quality but also extend the operational lifespan of your filtration system by up to 25%. Prioritize a weekly vacuuming schedule to keep your pool consistently pristine.
❓ Frequently Asked Questions
What is the most critical step when vacuuming a pool with a sand filter?
The most critical step is correctly setting your sand filter valve. Use ‘Waste’ for heavy debris or algae to bypass the filter and prevent clogs, or ‘Filter’ for light, everyday particles to capture them effectively. Always backwash and rinse beforehand if vacuuming to waste.
Can I vacuum directly to the filter if my pool is very dirty?
It is generally not recommended to vacuum a very dirty pool directly to the ‘Filter’ setting. Heavy debris and large amounts of dirt can quickly overwhelm and clog your sand filter, reducing its efficiency and potentially forcing dirty water back into the pool. For highly soiled pools, vacuum directly to ‘Waste’.
How do I prevent losing suction while vacuuming?
To prevent losing suction, ensure your vacuum hose is completely filled with water (primed) without any air bubbles before connecting it to the skimmer. Also, check that all hose connections are tight, the skimmer basket is clear, and the pool’s water level is adequate for the skimmer to pull water effectively without sucking air.
How often should I backwash my sand filter when vacuuming?
If you are vacuuming to ‘Waste’, it’s recommended to backwash and rinse your sand filter before you begin the vacuuming process to prepare it. If you are vacuuming to ‘Filter’, monitor your filter’s pressure gauge; backwash when the pressure rises 8-10 PSI above its clean operating pressure, or if vacuuming efficiency drops.
My vacuum isn’t picking up dirt, what could be wrong?
If your vacuum isn’t picking up dirt, first check for proper suction at the skimmer or vacuum port. Ensure the vacuum hose isn’t leaking air, the filter valve is correctly set (‘Filter’ or ‘Waste’), the pump is running on the appropriate speed, and the vacuum head isn’t clogged or damaged.
What should I do immediately after I finish vacuuming?
If you vacuumed to ‘Waste’, turn off the pump, reset the filter valve to ‘Filter’, and replenish any lost water in the pool. If you vacuumed to ‘Filter’, check your pressure gauge and perform a backwash and rinse if the pressure is elevated, then return the valve to ‘Filter’.