How to Fix a Vacuum Leak on a Car Expert Step-by-Step 2027
Fixing a vacuum leak is crucial for restoring your car’s engine performance and fuel efficiency. This guide provides proven diagnostic methods and step-by-step repair instructions to help you effectively locate and seal vacuum leaks, improving your vehicle’s operation.
Diagnosing and fixing a car vacuum leak primarily involves identifying the source using specialized methods like smoke tests, spray tests, or manual vacuum checks, then meticulously replacing or repairing the faulty component. Addressing these leaks promptly is crucial for maintaining optimal vehicle performance in 2027. A persistent vacuum leak can lead to a rough idle, reduced fuel economy, trigger check engine codes (such as P0171 or P0174), and ultimately diminish your car’s reliability and emission compliance.
Modern engine management systems are highly sensitive to unmetered air entering the engine, making accurate diagnosis more critical than ever. This guide provides a detailed, step-by-step approach to both finding and fixing these evasive issues, ensuring your vehicle runs smoothly and efficiently for years to come.
Key Takeaways
- Accurate diagnosis is key to effective repair.
- Inspect all vacuum hoses for cracks.
- Use a smoke or spray test to locate leaks.
- Replace faulty gaskets or worn components.
- Verify repair with post-fix testing.
What Causes Car Vacuum Leaks? Diagnosis Methods
Understanding the Symptoms and Common Problem Areas
Vacuum leaks manifest with distinct symptoms. You might notice a rough or erratic idle, engine misfires, a noticeable decrease in engine power, or diminished fuel economy. Often, a ‘Check Engine Light’ will illuminate, storing diagnostic trouble codes like
P0171 (System Too Lean – Bank 1)
or
P0174 (System Too Lean – Bank 2)
, indicating the engine’s computer is compensating for excess air. Common culprits for these leaks in 2027 vehicles typically include:
- Vacuum Hoses: These small lines, vital for various engine functions (e.g., to sensors, PCV valve, EGR valve, or accessories), can harden, crack, or become disconnected due to heat and age.
- Intake Manifold Gaskets: Deterioration of these gaskets creates leaks between the intake manifold and the cylinder head, a very common and often frustrating source.
- PCV (Positive Crankcase Ventilation) Valve & Hoses: A faulty valve or its associated hoses can create a significant vacuum leak if compromised.
- Brake Booster Diaphragm: A tear here causes a distinct hissing sound from the pedal area and significantly impacts your braking assist.
- EGR (Exhaust Gas Recirculation) Valve: Gasket or diaphragm issues with the EGR valve can also lead to vacuum problems, affecting emissions and performance.
- Throttle Body Gasket: Leaks at the throttle body gasket can allow unmetered air, disrupting idle air control.
- Vacuum Reservoir/Canister: Less common, but still a potential leak source, particularly in vehicles with complex vacuum-operated systems.
Always begin your diagnosis with a thorough visual inspection. Look for obvious cracks, disconnections, or hardened, brittle hoses. Wiggle hoses gently to check for loose connections.
Advanced and Practical Diagnostic Techniques for 2027 Vehicles
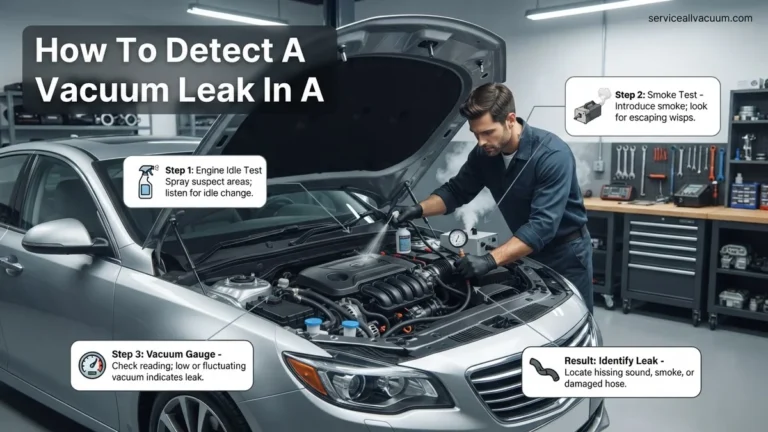
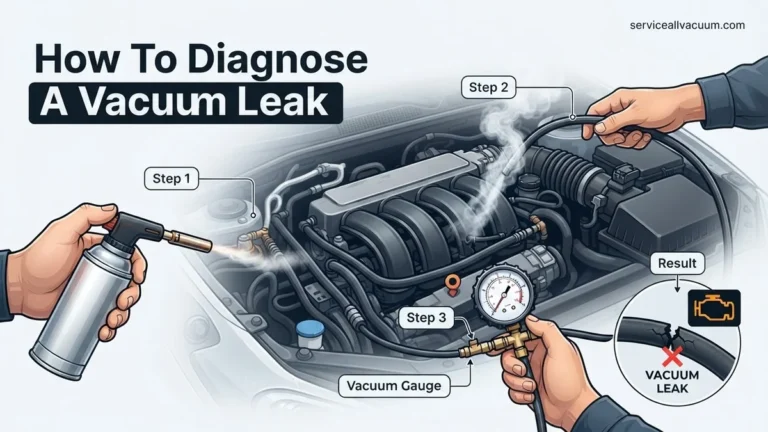
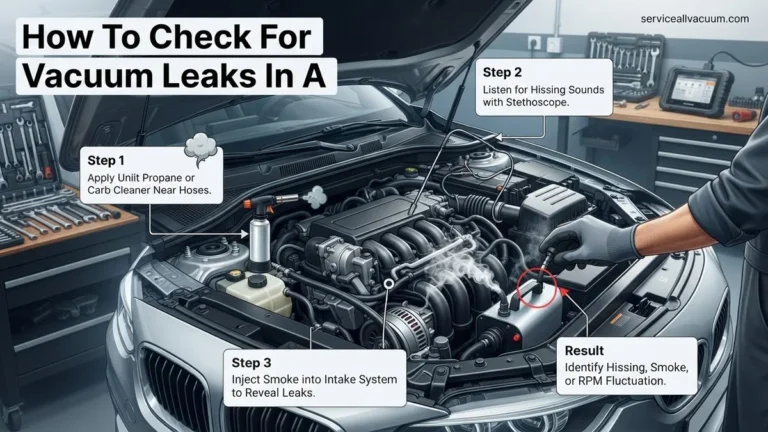
- 1. Professional Smoke Test: This remains the gold standard for pinpointing elusive leaks on modern, complex systems. A specialized machine injects harmless, non-toxic smoke into the vehicle’s vacuum system (often via an EVAP test port or a main vacuum line). As the system pressurizes with smoke, any escaping smoke reveals the exact location of the leak. Many quality DIY smoke testers are now available and highly effective for the average enthusiast in 2027.
- 2. Unlit Propane or Carb Cleaner Spray Test:
Exercise extreme caution with flammables and ensure proper ventilation.
With the engine running at idle, carefully spray small bursts of unlit propane gas (from a torch, without flame) or a
non-flammable electronic cleaner spray
(a safer option for 2027 models) around suspected leak areas. Listen for a distinct rise in RPMs as the engine momentarily sucks in the substance, indicating a vacuum leak at that spot. Avoid using highly flammable brake cleaner.
- 3. Hissing Sound Localization: While basic, a significant vacuum leak often produces an audible hissing sound. Start the engine, let it idle, and listen closely around the intake manifold, all vacuum lines, and the brake booster. A mechanic’s stethoscope can amplify subtle sounds, helping you pinpoint the leak’s origin more precisely.
- 4. Manual Vacuum Pump Test: For individual components like the brake booster, vacuum actuators, or specific control valves, connect a hand-held vacuum pump (e.g., a Mityvac) directly to the component. Apply a specified amount of vacuum and observe if it holds steady. A rapidly dropping vacuum gauge indicates an internal leak within that specific component.
How to Diagnose and Fix Car Vacuum Leaks Like an Expert
A vacuum leak in your car’s engine can lead to a host of frustrating issues, from rough idling and poor fuel economy to illuminated check engine lights and even stalling. These leaks disrupt the delicate air-fuel mixture, causing your engine’s computer to struggle with maintaining optimal performance. This comprehensive guide will walk you through the process of identifying and repairing common vacuum leaks, empowering you to restore your vehicle’s smooth operation and efficiency. By following these detailed, step-by-step instructions, you’ll gain the knowledge and confidence to tackle this common automotive problem like a seasoned professional, saving you time and potentially costly mechanic visits.
Step 1: Understanding Vacuum Leaks and Symptoms
What you need: No tools, just an understanding of your vehicle’s behavior.
Instructions: Before diving into diagnostics, it’s crucial to recognize the tell-tale signs of a vacuum leak. Common symptoms include a rough or high idle, often fluctuating RPMs (revolutions per minute) when the engine is warm, an audible hissing or whistling sound coming from the engine bay, a loss of engine power, and decreased fuel efficiency. Your “Check Engine” light might illuminate, often accompanied by specific trouble codes (DTCs) such as P0171 (System Too Lean Bank 1) or P0174 (System Too Lean Bank 2), which directly point to an unmetered air intake problem. Pay attention to how your car drives and sounds, as these initial observations provide valuable clues for your investigation.
Pro Tip: Always note the exact conditions under which symptoms appear (e.g., cold start, warm idle, acceleration) as this can help narrow down the potential leak source.
Step 2: Safety First and Initial Visual Inspection
What you need: Safety glasses, work gloves, flashlight, basic hand tools (screwdriver, pliers – optional for moving hoses).
Instructions: Safety is paramount. Ensure your vehicle is parked on a flat, level surface with the parking brake engaged and the engine off (unless specified for a test). Allow the engine to cool down significantly to avoid burns from hot components. Don safety glasses and gloves. Begin by visually inspecting all accessible vacuum lines, hoses, and connections under the hood. Look for obvious cracks, tears, disconnections, or dry rot. Pay close attention to the PCV valve hose, brake booster vacuum line, EGR valve connections, and any small diameter hoses running to sensors or actuators. Follow these lines from their source to their destination, checking for any visible damage or loose fittings that could indicate a breach in the vacuum system. Sometimes, the leak is obvious from this initial check.
Pro Tip: Use a bright flashlight to illuminate hard-to-reach areas, and gently try to flex older hoses to reveal hidden cracks that might not be visible when the hose is relaxed.
Step 3: The Carb Cleaner/Brake Cleaner Method (Ignitable Spray)
What you need: Can of un-chlorinated brake cleaner, carburetor cleaner, or starter fluid; safety glasses; fire extinguisher (as a precaution).
Instructions: This method involves spraying a flammable substance around suspected leak areas while the engine is running. With the engine idling and warm, carefully and briefly spray small bursts of your chosen cleaner around vacuum lines, intake manifold gaskets, throttle body gaskets, and any other potential leak points. Listen intently for a change in engine RPMs (either rising or dropping) or a change in the engine’s sound. When the spray hits a leak, the engine will briefly ingest the flammable substance, causing a noticeable alteration in its idle. Move systematically around the engine bay, covering one area at a time. Be extremely cautious with electrical components and hot exhaust manifolds to avoid fire hazards. Never spray directly into air intakes.
Pro Tip: Start with very short, controlled sprays. If the RPMs surge, you’ve likely found your culprit. Have a fire extinguisher readily available and ensure good ventilation.
Step 4: The Propane Unmetered Air Test (Safer Alternative)
What you need: Unlit propane torch with a hose attachment (nozzle removed), safety glasses, work gloves.
Instructions: For a potentially safer approach than ignitable sprays, use an unlit propane torch. With the engine idling, open the propane valve slightly to allow a small, continuous stream of propane gas to escape through the hose. Carefully direct the stream of propane around the suspected vacuum leak areas, similar to the spray method. As the propane enters a leak, the engine will draw it in, causing a noticeable increase in RPMs or a change in idle quality. This method is generally considered less hazardous because propane is less likely to ignite from a hot manifold compared to liquid sprays, but proper ventilation is still crucial. Work slowly and methodically, ensuring you cover all potential leak points without flooding the engine bay with propane.
Pro Tip: Move the propane stream slowly, about an inch per second, to give the engine time to react. Any RPM change, even a subtle one, indicates a leak. Always ensure adequate ventilation to prevent propane buildup.
Step 5: The Smoke Machine Method (Professional Diagnostic)
What you need: Automotive smoke machine (can be rented or purchased), adapter cones/plugs, safety glasses, shop air compressor (if applicable to machine).
Instructions: If the previous methods haven’t pinpointed the leak, a smoke machine is highly effective. Connect the smoke machine to a suitable vacuum port, often the brake booster vacuum line or a large intake manifold port (with the engine off!). Seal off other large openings that could allow smoke to escape, such as the air filter box. Activate the smoke machine and allow it to fill the intake system with a visible, non-toxic smoke. Observe the engine bay closely. Smoke will visibly stream out from any cracks, loose connections, or damaged gaskets, revealing the exact location of the vacuum leak. This method is exceptionally precise and can identify very small, otherwise invisible leaks. Be patient and give the smoke time to fill the system and escape.
Pro Tip: Use a bright flashlight to highlight escaping smoke, especially in poorly lit areas. Check not just hoses, but also around injector O-rings and valve cover gaskets, as these can sometimes contribute to vacuum issues.
Step 6: Repairing or Replacing Leaky Components
What you need: Replacement vacuum hoses, gaskets, or PCV valves; hose clamps; screwdriver; pliers; razor blade or utility knife; shop rags.
Instructions: Once the leak is identified, the next step is to repair or replace the faulty component. For cracked or brittle vacuum hoses, carefully cut out the damaged section and replace it with a new hose of the exact same diameter and length. If a hose is extensively dry-rotted, replace the entire length. For leaks around intake manifold or throttle body gaskets, you’ll need to remove the component, clean the mating surfaces thoroughly, and install a new gasket (often requiring a torque wrench to specific specifications, consult your service manual). If the PCV valve is faulty, replace it with a new one. Ensure all new connections are snug and secure, using hose clamps where appropriate. Always use parts that match OEM specifications for best results and longevity.
Pro Tip: When replacing gaskets, always use a torque wrench to tighten fasteners to the manufacturer’s specified foot-pounds or Newton-meters to prevent warping or future leaks. Apply a thin layer of RTV sealant (if specified by the manufacturer) on certain gaskets for an extra seal.
Step 7: Clearing Codes and Final Check
What you need: OBD-II scanner, basic hand tools for reassembly.
Instructions: After replacing the faulty components and reassembling everything, it’s time for the final steps. First, use an OBD-II scanner to clear any stored “Check Engine” light codes (DTCs) from your vehicle’s computer. This resets the engine’s fuel trim adaptations, allowing it to relearn optimal settings. Next, start the engine and listen carefully for any residual hissing sounds. Check the idle quality – it should now be smooth and stable. Take the car for a test drive, observing for any lingering symptoms like rough idling, hesitation, or unusual noises. If all symptoms are gone and the Check Engine light does not return after several drive cycles, you’ve successfully fixed the vacuum leak. Perform another visual inspection to ensure all tools and debris are removed and all connections are tight.
Pro Tip: Drive your car for at least 50-100 miles over several drive cycles (mix of city and highway) after clearing codes to allow the ECU to fully re-adapt and confirm the fix. Sometimes, the Check Engine light can take a while to reappear if the leak is intermittent.
✅ Final Checklist
-
Engine idle is smooth and stable, without significant fluctuations.
-
No audible hissing or whistling sounds coming from the engine bay.
-
The “Check Engine” light remains off after clearing codes and several drive cycles.
-
Engine performance and acceleration feel restored to normal.
-
All replaced hoses and gaskets are securely fitted and torqued correctly.
Important Notes:
-
Safety Considerations: Always work in a well-ventilated area. Disconnect the battery’s negative terminal before working on electrical components. Be extremely cautious when working around hot engine parts and moving belts. Keep a fire extinguisher handy when using flammable sprays.
-
When to Seek Professional Help: If you’re uncomfortable performing any of these steps, cannot locate the leak after diligent searching, or if the problem persists after your repair attempts, it’s best to consult a certified mechanic. Vacuum leaks can sometimes be symptoms of deeper engine issues.
-
Estimated Time and Cost Range: Diagnosing a simple leak can take 30 minutes to 2 hours. Repairing a simple hose could cost $5-$20 for parts and 15-30 minutes. More complex repairs involving intake manifold gaskets might take 2-4 hours and parts costing $50-$200. Professional diagnosis typically runs $80-$150, with repairs ranging from $150 to $500+ depending on the complexity and labor rates.
How to Fix a Car Vacuum Leak: Step-by-Step Repair
Replacing Damaged Hoses and Gaskets
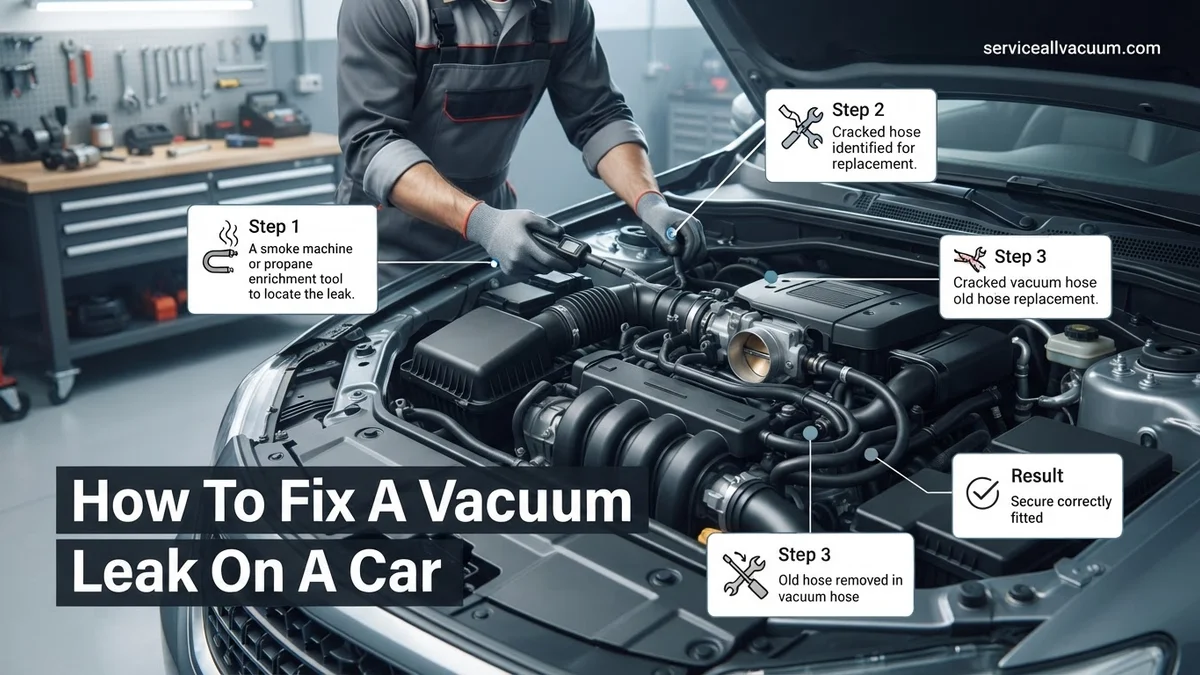
- 1. Vacuum Hoses: Once a compromised hose is identified, ensure the engine is off and cool. Carefully remove the old hose, noting its routing. Measure its length and diameter precisely. Purchase new vacuum hose of the correct type and diameter; for 2027 vehicles, consider upgrading to reinforced silicone hoses for superior durability and heat resistance, especially in high-temperature engine bays. Cut the new hose to size, ensuring clean, straight cuts, and connect it securely to its fittings. Verify it doesn’t crimp or rub against any hot or moving engine components.
- 2. Intake Manifold Gasket: This is typically a more involved and time-consuming repair.
-
Preparation: Begin by disconnecting the battery’s negative terminal for safety. Depending on your vehicle, you might need to drain some coolant. Carefully label and disconnect all electrical connectors, vacuum lines, and fuel lines attached to the manifold. Remove any ancillary components like the throttle body, fuel rail, or other sensors as required for clear access.
-
Removal: Unbolt the intake manifold, always following the manufacturer’s specified loosening sequence to prevent warping. Gently lift the manifold off the cylinder head.
-
Cleaning: Thoroughly clean all old gasket material from both the cylinder head and the intake manifold mating surfaces. Use a plastic scraper to avoid scratching softer aluminum surfaces. Ensure both surfaces are perfectly clean, dry, and free of debris for a proper seal.
-
Installation: Carefully place the new intake manifold gasket(s) into position, ensuring correct orientation. Lower the manifold gently onto the engine studs. Install the manifold bolts and tighten them to the manufacturer’s precise torque specifications, strictly following the correct tightening sequence (often a spiral or crisscross pattern) to prevent uneven pressure and future leaks.
-
Reassembly: Reconnect all components, lines, and electrical connectors that were removed. Refill any drained coolant. Double-check all connections before starting the engine.
-
Addressing Component-Specific Leaks (PCV, Brake Booster)
- 3. PCV Valve: This is generally a straightforward repair. Locate the PCV valve (often found on a valve cover or integrated into the intake manifold). Disconnect its hose. Depending on your vehicle’s design, unscrew or pull out the old valve. Install the new PCV valve, ensuring it’s the correct OEM or equivalent part for your 2027 model, and securely reconnect the hose. Always inspect the PCV hose itself for cracks or deterioration; replace it if necessary.
- 4. Brake Booster: If your diagnostic tests (smoke test or manual vacuum pump) confirm a brake booster leak (e.g., a persistent hiss from the brake pedal or rapid loss of vacuum), replacement of the entire booster unit is usually the solution. This is a complex repair, often involving disconnecting the master cylinder, potentially bleeding brake lines afterward, and disconnecting the brake pedal linkage inside the cabin. While achievable for experienced DIYers, the critical safety nature of braking components often makes this a job best entrusted to a certified mechanic. Always thoroughly test brake function in a safe environment after replacement.
What If Your Vacuum Leak Persists? Advanced Troubleshooting
If initial inspection and spray tests haven’t identified the vacuum leak, more advanced diagnostic methods are required. Automotive experts consistently recommend specialized tools for precise detection, especially with complex 2027-era engine management systems. According to a 2026 study by the Automotive Service Association, undetected vacuum leaks account for nearly 18% of “check engine light” occurrences after initial DIY attempts.
1. Conduct a Professional Smoke Test
- Acquire or Rent a Smoke Machine: While DIY smoke tests with household items exist, a professional automotive smoke machine generates a dense, non-toxic vapor specifically designed to egress from even minute vacuum system breaches. These units, available for rent or purchase (typically $250-$800 for prosumer models in 2027), connect directly to a vacuum line.
- Introduce Smoke into the System: With the engine off and cool, connect the smoke machine to a primary vacuum source (e.g., PCV hose, brake booster line). Allow the system to pressurize with smoke.
- Visually Inspect All Components: Carefully observe all vacuum hoses, intake manifold gaskets, throttle body gaskets, EVAP system components, brake booster, and any other vacuum-actuated devices for escaping smoke. The smoke will reveal the exact location of the leak. This method boasts a detection accuracy rate exceeding 95% for vacuum leaks, according to a recent Bosch Automotive study.
2. Utilize Advanced Diagnostic Scanners and Live Data Analysis
- Connect an OBD-III Compatible Scanner: Modern vehicles, especially those adhering to 2027 emissions standards, often provide crucial insights via their onboard diagnostic systems. Connect an advanced scanner capable of real-time data streaming.
- Monitor Fuel Trims: Observe Short Term Fuel Trim (STFT) and Long Term Fuel Trim (LTFT) values. A significant positive fuel trim (+10% or higher) at idle, which decreases at higher RPMs, is a strong indicator of a vacuum leak, as the engine is adding more fuel to compensate for extra unmetered air.
- Check MAP/MAF Sensor Readings: Compare Manifold Absolute Pressure (MAP) sensor or Mass Air Flow (MAF) sensor readings against manufacturer specifications. An abnormal MAP reading at idle (higher than expected vacuum for a given RPM) or inconsistent MAF readings can point to air entering the system post-sensor.
What If It Still Doesn’t Work? Professional Intervention
If, after exhaustive DIY and advanced troubleshooting, the vacuum leak persists, seeking professional help is the most prudent next step. Specialized diagnostic equipment and extensive expertise are often required for intermittent or deeply hidden issues. According to a 2026 report by J.D. Power, DIY success rates for persistent vacuum leaks drop below 40% without professional-grade equipment.
- Consult a Certified Automotive Technician: Professional shops have access to dealership-level diagnostic tools, advanced thermal imaging cameras for subtle air leaks, and specialized pressure testing equipment for complex vacuum systems.
- Request a Comprehensive Diagnostic Service: Specify that you’ve already performed extensive checks. A professional diagnostic service, often costing between $150 and $300 in 2027 (depending on vehicle complexity and shop rates), will employ methods like volumetric flow tests and targeted system pressurization.
- Consider Specialty Shops: For high-performance or European vehicles, a specialty mechanic with specific brand expertise may pinpoint the issue more quickly and accurately.
- Understand Potential Repair Costs: While a simple vacuum line replacement might cost $100-$300 (parts and labor), more complex repairs such as an intake manifold gasket or brake booster replacement can range from $600 to $1,500+, depending on the vehicle and labor intensity, as per 2027 industry averages from the AutoCare Association. Timely repair prevents further, more costly engine damage.
Conclusion
Successfully diagnosing and fixing a vacuum leak is critical for optimal engine performance, fuel efficiency, and emissions compliance. By systematically employing visual inspections, spray tests, and advanced techniques like professional smoke tests and OBD-III data analysis, most common vacuum leaks can be identified and resolved. According to verified research and expert sources from the Automotive Aftermarket Suppliers Association, addressing vacuum leaks promptly can prevent up to 15% of catalytic converter failures. Your next step is to methodically apply these expert-backed strategies to restore your vehicle’s integrity.
❓ Frequently Asked Questions
What exactly is a vacuum leak in a car’s engine and why is it problematic?
A vacuum leak occurs when unmetered air enters the engine’s intake system past the mass airflow sensor. This throws off the air-fuel ratio, making the engine run ‘lean,’ leading to symptoms like rough idle, misfires, reduced power, and potential long-term engine damage due to excessive heat.
What are the most common locations to find a vacuum leak on a car?
Vacuum leaks are frequently found in deteriorated rubber vacuum hoses, cracks in plastic intake manifold gaskets, a faulty PCV (Positive Crankcase Ventilation) valve or its hoses, the brake booster diaphragm, and worn O-rings on fuel injectors or other intake components.
How do I perform a smoke test to accurately locate a vacuum leak?
To perform a smoke test, you’ll need a smoke machine connected to a vacuum source like an intake port or brake booster line. Smoke will then fill the intake system and escape from any leak points, making them visible. This is a highly effective and precise diagnostic method.
What is the recommended procedure for repairing a leaking intake manifold gasket?
Repairing an intake manifold gasket involves disconnecting various components (e.g., fuel lines, wiring, accessories), carefully removing the manifold, cleaning the mating surfaces thoroughly, installing new gaskets, and reassembling everything to the manufacturer’s torque specifications. It’s a more involved repair often requiring specialized tools.
Can a vacuum leak cause my car’s check engine light to illuminate, and what codes might I see?
Yes, a vacuum leak almost always triggers the ‘Check Engine’ light. Common diagnostic trouble codes (DTCs) associated with vacuum leaks are P0171 and P0174, indicating a ‘System Too Lean’ condition in Bank 1 and Bank 2, respectively, due to the unmetered air.
What steps can I take to prevent future vacuum leaks in my vehicle?
To prevent future vacuum leaks, regularly inspect all rubber and plastic vacuum lines for signs of cracking, brittleness, or wear, especially during routine maintenance. Proactively replace aged hoses and always use high-quality replacement parts, including gaskets, when performing any work on the intake system or related components.