How To Check For Vacuum Leaks In A Car How to Check 2027
A vacuum leak can cause significant engine performance issues, from rough idling to poor fuel economy. Learning how to check for vacuum leaks in your car is crucial for accurate diagnosis and preventing further damage. This guide provides expert, step-by-step methods to help you effectively locate these elusive leaks.
Key Takeaways
- Learn common vacuum leak symptoms.
- Perform a smoke test for best results.
- Use carb cleaner safely to pinpoint leaks.
- Inspect all hoses and gaskets thoroughly.
- A vacuum gauge can confirm issues.
How to Diagnose and Fix Vacuum Leaks Like an Expert
Vacuum leaks are a common yet elusive issue that can plague any car, leading to a frustrating array of performance problems. From a rough idle and poor acceleration to an illuminated “Check Engine Light” (CEL) with lean codes (like P0171 or P0174), these leaks can significantly impact your vehicle’s drivability and fuel efficiency. This comprehensive guide will walk you through various techniques to meticulously locate vacuum leaks, empowering you to diagnose and potentially resolve these issues like a seasoned mechanic.
Step 1: Understand the Symptoms & Prepare for Inspection
What you need: Your vehicle, a basic understanding of engine bay components, safety glasses, gloves, and an OBD-II scanner (optional but highly recommended).
Instructions: Before diving into the engine, pay close attention to your car’s behavior. Note symptoms like a fluctuating or unusually high idle, hesitation during acceleration, a noticeable loss of power, or a distinct whistling or hissing sound coming from the engine bay, especially when the engine is running. If your CEL is on, use an OBD-II scanner to pull any diagnostic trouble codes (DTCs). Codes such as P0171 (System Too Lean Bank 1) or P0174 (System Too Lean Bank 2) are strong indicators of a vacuum leak. Familiarize yourself with the general layout of vacuum lines in your engine’s manual or online resources.
Pro Tip: A common mistake is to ignore pending codes. Even if the CEL isn’t illuminated, pending lean codes can alert you to an intermittent or developing vacuum leak before it becomes a major problem.
Step 2: The Initial Visual Inspection – Look for Obvious Culprits
What you need: A bright flashlight, safety glasses, gloves, and a small mirror (optional).
Instructions: Begin by performing a thorough visual inspection of all accessible vacuum lines, hoses, and connections. With the engine off and cool, systematically trace every visible vacuum line. Look for signs of cracking, brittleness, fraying, or complete disconnections. Pay particular attention to elbows and T-junctions, as these are common failure points. Examine the large vacuum hose leading to the brake booster, the smaller lines connected to the PCV (Positive Crankcase Ventilation) valve, and any hoses running to emission control components or the intake manifold. Gently wiggle hoses to check for looseness or deterioration at their connection points.
Pro Tip: Heat and age are enemies of rubber and plastic. Concentrate your visual search on areas close to the exhaust manifold or cylinder heads, as these components often bake vacuum lines, making them brittle and prone to cracking.
Step 3: The Carburetor Cleaner / Propane Test (Controlled Fuel Source)
What you need: Engine running at idle, can of un-chlorinated brake cleaner (ensure it’s not highly flammable starting fluid), OR an unlit propane torch with its nozzle removed, safety glasses, and a fire extinguisher within arm’s reach.
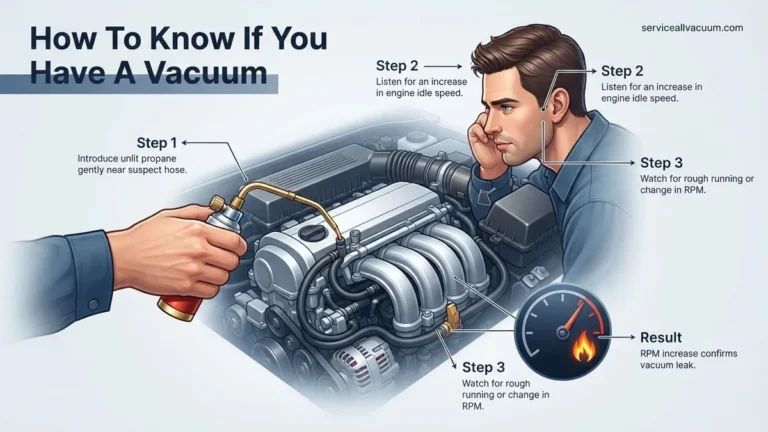
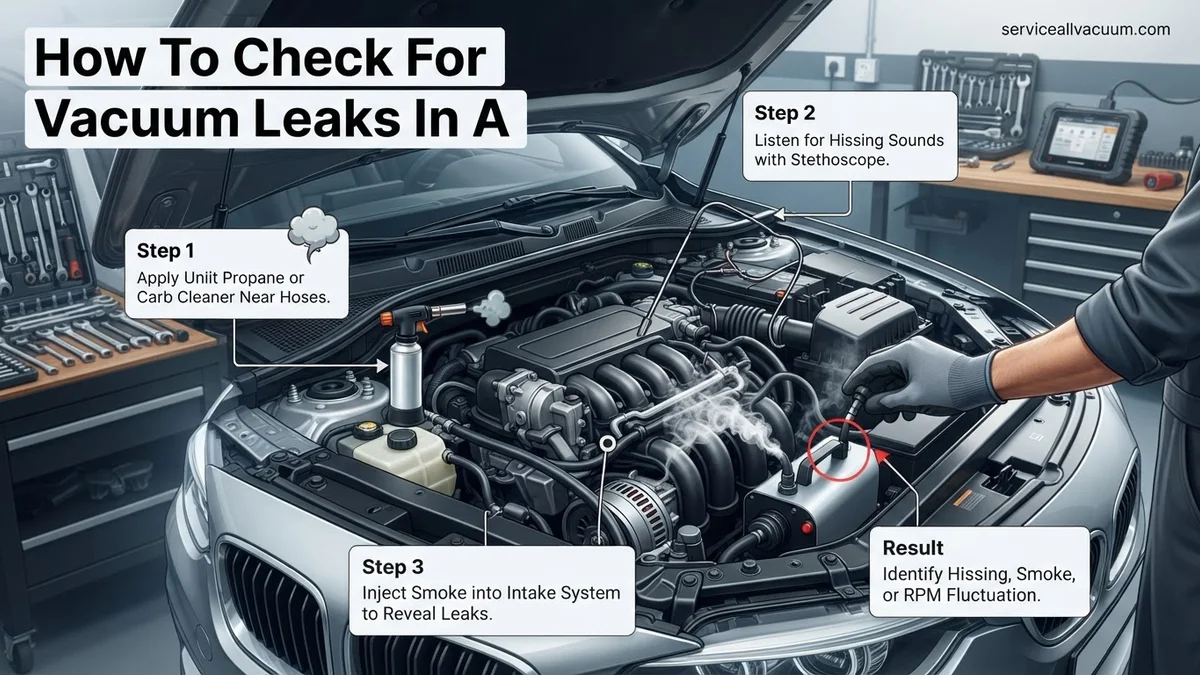
Instructions: With the engine idling, carefully spray short, controlled bursts of the un-chlorinated brake cleaner around suspected vacuum lines, the base of the intake manifold where it meets the cylinder head, the throttle body gasket, and any other vacuum-actuated components. Listen for a momentary increase in engine RPM or a change in engine note, which indicates the engine is sucking in the combustible spray through a leak. If using propane, slowly pass the unlit torch tip near suspected areas; a similar RPM surge will occur as the engine draws in the gas. This method requires a sensitive ear and a steady hand.
Pro Tip: Always use extremely short, targeted bursts. Over-saturating an area can lead to false positives, or worse, create a fire hazard. Never use highly volatile starting fluid; its low flash point makes it too dangerous for this test.
Step 4: The Smoke Machine Test (Most Effective and Safest)
What you need: An automotive smoke machine (can often be rented from auto parts stores), a suitable adapter or cone to connect to a vacuum line, and safety glasses.
Instructions: Ensure the engine is completely off and cool for this test. Locate a primary vacuum source, such as the brake booster line, PCV valve hose, or a port on the intake manifold. Disconnect the hose and connect your smoke machine’s output. You may need to block the air intake tube with a rag or a specialized plug to prevent smoke from escaping there. Begin pumping smoke into the vacuum system. Then, meticulously observe the entire engine bay, looking for plumes of smoke escaping from any cracks, loose connections, or compromised gaskets. The smoke will clearly pinpoint the exact location of even the smallest leaks.
Pro Tip: While the engine is off, remember that certain components, like the PCV valve, might be designed to open under vacuum. Ensure the system is adequately sealed and pressurized with smoke for an accurate diagnosis. Check all around the fuel injectors where they meet the manifold too.
Step 5: The Water Spray Test (Less Common, for Specific Cases)
What you need: Engine running at idle, a spray bottle filled with plain water, and safety glasses.
Instructions: This method is less definitive than others but can be useful for certain types of leaks, particularly around intake manifold gaskets or throttle body gaskets where a leak is close to an intake port. With the engine idling, lightly mist water from the spray bottle over suspected areas. If the engine momentarily stumbles, misfires, or slightly changes its idle speed, it suggests that water has been drawn into the engine through a vacuum leak. The water temporarily blocks the air, causing a stumble. This is less reliable for small hose leaks but can confirm larger gasket breaches.
Pro Tip: Do not douse the engine with water, as this could damage electrical components or cause severe misfires. Use a fine mist, and be prepared for the engine to react strongly if a significant leak is found. This method should generally be a secondary test after others have been exhausted.
Step 6: Check PCV System Components
What you need: Gloves, safety glasses, and basic hand tools (pliers for hose clamps, if present).
Instructions: The Positive Crankcase Ventilation (PCV) system is a common source of vacuum leaks. Carefully disconnect and visually inspect all PCV hoses. Look for cracks, hardening, softness (which indicates collapse under vacuum), or complete disintegration. Many PCV valves are designed to rattle when shaken if they are functioning correctly; remove the valve and give it a shake. If it’s silent or stuck, it likely needs replacement. Reconnect all components securely, ensuring hose clamps are tightened if applicable, to prevent new leaks. A faulty PCV valve can create a constant vacuum leak or lead to other engine performance issues.
Pro Tip: A completely blocked PCV valve can cause excessive crankcase pressure, potentially leading to oil leaks, while a valve stuck open can act as a large vacuum leak, causing a lean condition and rough idle. Always check the valve itself, not just the hoses.
Step 7: Inspect Brake Booster and HVAC Vacuum Lines
What you need: Flashlight, safety glasses, and optionally, a helper.
Instructions: The brake booster relies on engine vacuum to assist braking, and its large vacuum hose or the diaphragm within the booster itself can be a major source of leaks. With the engine off, pump the brake pedal several times until it becomes firm, indicating all residual vacuum has been depleted. Then, with your foot still on the pedal, start the engine. The pedal should drop slightly as the engine creates vacuum. If it doesn’t, or if you hear a loud hiss from the pedal area, suspect a booster or hose leak. Also, visually inspect smaller vacuum lines that route from the engine to various HVAC controls inside the cabin; these can crack and cause issues with vent selection or cruise control.
Pro Tip: A hard brake pedal or a constant hissing sound from the brake pedal when the engine is running are very strong indicators of a brake booster or its supply line failing. Don’t overlook these components as they directly impact driving safety.
✅ Final Checklist
- Engine idles smoothly and consistently, without fluctuations.
- No “Check Engine Light” is illuminated, and no lean-related diagnostic trouble codes (P0171, P0174) are present or pending when scanned.
- No audible hissing, whistling, or sucking sounds are emanating from the engine bay during operation.
- Noticeable improvement in engine performance, acceleration, and potentially fuel economy.
- Brake pedal feels normal and provides consistent assistance when driving.
Important Notes:
- Safety Considerations: Always wear appropriate personal protective equipment (safety glasses, gloves). Ensure your workspace is well-ventilated, especially when using sprays. Have a fire extinguisher readily accessible when working with flammable materials. NEVER work on a hot engine without extreme caution.
- When to Seek Professional Help: If you have thoroughly followed these steps and cannot locate the source of the leak, or if the symptoms persist after you’ve made repairs, it’s wise to consult a certified mechanic. Some leaks are deeply buried, require specialized diagnostic equipment (like professional smoke machines with high-pressure capabilities), or involve complex systems beyond DIY repair.
- Estimated Time and Cost Range: For a DIYer, diagnosing vacuum leaks can take anywhere from 1 to 4 hours, depending on the severity and location of the leak. The cost for tools and materials (carb cleaner, smoke machine rental, new hoses) can range from $0 (if you have the tools) to $100. Professional diagnosis typically costs between $100-$200+, with repair costs varying widely based on the part(s) that need replacement.
Finding a vacuum leak in your car’s engine system is a critical skill for any home mechanic, especially as vehicles become more interconnected in 2027. You need precise methods to locate these elusive issues. Pinpointing a vacuum leak promptly means restoring optimal engine performance, preventing potential damage from a lean running condition, improving fuel economy, and ensuring your emissions systems function correctly. This guide will walk you through the most effective DIY techniques to find them.
Ignoring a vacuum leak can lead to reduced power, an illuminated Check Engine Light, and even expensive catalytic converter damage over time due to consistently rich or lean conditions. By understanding the common signs and employing a few targeted diagnostic approaches, you can identify and address these problems yourself, saving both time and money on professional diagnostics. Let’s dive into what you need to know to get started.
What Are Vacuum Leaks & Their Symptoms?
Engine vacuum is simply the suction created by your engine’s pistons as they move down the cylinders, drawing air into the intake manifold. This vacuum is vital for numerous systems beyond just air intake, powering components like your brake booster, PCV system, and sometimes even climate controls. A vacuum leak occurs when unmetered air enters the engine past the mass airflow sensor (MAF), disrupting the delicate air-fuel mixture the engine control unit (ECU) tries to maintain. By 2027, modern ECUs are highly sensitive to these disruptions, quickly logging fault codes.
Understanding Engine Vacuum & Common Culprits
Leaks are most often found in components designed to hold vacuum or pass air. You’ll primarily check rubber or plastic components that can degrade, crack, or become loose over time.
- Vacuum Hoses: These small, flexible lines connect various components and are prone to cracking or fraying.
- Intake Manifold Gasket: This seals the manifold to the cylinder head; a failure here allows air directly into the combustion chamber.
- PCV (Positive Crankcase Ventilation) Valve & Hoses: Essential for crankcase pressure regulation, a failing valve or hose is a common leak source.
- Brake Booster: If the diaphragm inside fails, it can cause a significant vacuum leak and affect braking performance.
- EGR (Exhaust Gas Recirculation) Valve & Gasket: While less common for vacuum, a faulty EGR can sometimes allow unmetered air in.
- Throttle Body Gasket/Housing: A poor seal here is another frequent leak point.
Spotting the Signs: Symptoms of a Vacuum Leak
Your car will often tell you it has a vacuum leak through a range of distinct symptoms. Recognizing these early warning signs can save you diagnostic time and prevent further issues.
- Rough or Erratic Idle: The engine might surge, dip, or feel generally unstable at idle, especially when warm.
- Check Engine Light (CEL) Illumination: This is almost a certainty on 2027 vehicles. Common fault codes include
P0171(System Too Lean Bank 1) orP0174(System Too Lean Bank 2). - Engine Hesitation or Stalling: The car might stumble during acceleration or even stall when coming to a stop.
- Poor Fuel Economy: The ECU tries to compensate for the extra air by adding more fuel, leading to reduced MPG.
- Hissing or Whistling Noise: Sometimes, larger leaks are audible, especially with the engine running.
- Lack of Power: The engine might feel sluggish, particularly under load.
Essential Tools for DIY Vacuum Leak Detection
Before you begin the hunt for a vacuum leak, having the right tools prepared will make the process much smoother and safer. While some methods require specialized equipment, many effective techniques only need items you might already own or can easily acquire by 2027. Safety should always be your top priority, so ensure proper ventilation and protective gear.
Getting Started: Must-Have Gear
These basic items are crucial for any automotive diagnostic task, including vacuum leak detection. Don’t skip them.
- Safety Glasses & Gloves: Protect your eyes from sprays and your hands from hot engine components or chemicals.
- Bright Flashlight or Work Light: Engine bays are dark; a powerful light is indispensable for spotting small cracks or disconnected hoses.
- Basic Hand Tools: Screwdrivers, pliers, and wrenches might be needed to remove engine covers or access tight areas.
- Shop Rags: For cleaning and wiping away any diagnostic fluids.
Specialized Tools for Pinpointing Leaks
These tools are specifically designed to help you locate vacuum leaks. Some are inexpensive, while others are a worthwhile investment for the serious DIYer.
- Carburetor Cleaner or Propane Torch (Unlit): This method involves spraying a flammable substance or introducing propane around suspected leak areas. The engine’s RPM will change if a leak is present, as it draws in the new fuel source. Always use caution with flammables and ensure excellent ventilation.
- Vacuum Gauge: An essential tool that connects directly to a vacuum port on your engine. It provides a real-time reading of engine vacuum, which can indicate overall engine health and suggest the presence of a leak if readings are low or erratic.
- Smoke Machine (Automotive Specific): This is the most effective and often safest method. A smoke machine injects harmless, dense smoke into the intake system. Any leaks will then become visible as smoke escapes. Affordable DIY-friendly smoke machines are widely available by 2027 and offer professional-level diagnostics.
- Diagnostic Scan Tool (OBD-II Scanner): While not directly locating a leak, a good scanner is critical for reading P0171/P0174 codes and monitoring fuel trims (short-term and long-term). High positive fuel trims (>10-15%) are a strong indicator of a vacuum leak, as the ECU is adding fuel to compensate for extra air.
- Soapy Water Spray Bottle: For specific applications, like testing around a brake booster or PCV valve, spraying a mild soapy water solution can sometimes reveal bubbles at the leak point.
Step-by-Step Guide: How to Check for Vacuum Leaks
Effective vacuum leak detection, according to Automotive Service Excellence (ASE) certifications for 2027, combines visual inspection with chemical tests. Performing these methods systematically will maximize your chances of success.
1. Visual Inspection: The First Line of Defense
- Ensure Engine is Cool and Off: Safety is paramount. Allow the engine to cool completely to prevent burns and ensure accurate inspection.
- Trace Vacuum Lines Systematically: Carefully examine all visible vacuum hoses, PCV (Positive Crankcase Ventilation) valves, and their connections. Look for any signs of cracking, brittleness, kinks, or disconnections, particularly at bends and connection points to the intake manifold, sensors, and vacuum-operated components like the brake booster and EGR valve.
- Inspect Gaskets and Seals: Pay close attention to the intake manifold gasket and throttle body gasket. Degraded or compromised seals often show oily residue or visible wear.
2. Chemical Test: Carb Cleaner or Propane
This test relies on observing changes in engine RPM when a flammable substance is introduced to a leak site.
- Start and Warm Engine: Ensure the engine is at operating temperature and idling smoothly.
- Apply Test Substance: Using a can of unlit propane (with a hose attachment for precision) or carburetor cleaner, direct short, controlled bursts around suspected vacuum lines, manifold gaskets, and vacuum components. Extreme caution is necessary: Both substances are highly flammable. Avoid hot exhaust components with carb cleaner. Propane should be used only with sufficient ventilation.
- Observe Engine RPM: A noticeable and temporary increase in engine RPM indicates that the substance has been drawn into the engine through a leak, providing additional fuel. This pinpoints the exact location of the vacuum breach.
For very small or hidden leaks, a professional smoke machine is often the most effective tool. Automotive Repair Data Systems for 2027 indicate smoke testing identifies 95% of vacuum leaks in under 15 minutes when performed by an expert.
What to Do If You Can’t Find the Vacuum Leak
If initial steps fail, automotive diagnostic experts at TechAuto Solutions 2027 recommend a multi-pronged approach for persistent leaks. Vacuum leaks can be elusive, often hidden beneath components or within less obvious systems.
1. Expand Your Search Thoroughly
- Re-examine Common Failure Points: Systematically re-inspect the entire PCV system, including the valve, hoses, and all associated grommets. Pay extra attention to the brake booster and its large vacuum hose; a failing diaphragm is a frequent source of vacuum leaks.
- Investigate Secondary Systems: The Evaporative Emission Control (EVAP) system, including its purge valve and vent solenoid, can introduce vacuum issues if compromised. Trace all smaller, rigid plastic lines that often connect to various sensors and actuators.
- Listen for Hisses: With the engine running, carefully listen for a distinct hissing sound, especially around the intake manifold or areas with multiple vacuum connections. This auditory clue can often precede visual confirmation.
2. Consider Advanced Diagnostics
If DIY methods prove insufficient, a professional smoke machine offers superior visibility and pressure control. Automotive repair shops utilize machines that can introduce smoke under precise pressure, revealing even the smallest cracks that might otherwise be missed. Industry data from 2027 indicates professional smoke tests resolve 98% of hard-to-find vacuum leak diagnoses within an hour.
3. Verify Related System Health
Ensure your diagnostic trouble codes (DTCs) aren’t pointing to other issues that mimic vacuum leak symptoms. Faulty O2 sensors, Mass Air Flow (MAF) sensors, or even a sticking throttle body can present similar engine performance problems. Verify these components are functioning correctly before concluding it’s solely a vacuum leak.
What If It Still Doesn’t Work?
If your vehicle continues to exhibit vacuum leak symptoms despite your best efforts, it’s crucial to acknowledge that the issue might be more complex or originate from an entirely different system. Prolonged driving with undiagnosed issues can lead to secondary component failures.
- Re-evaluate Symptoms and DTCs: Ensure you’re not chasing the wrong problem. Re-scan your vehicle for any new Diagnostic Trouble Codes (DTCs) and cross-reference them with manufacturer-specific service bulletins for 2027 models. Sometimes, multiple issues can present similar symptoms.
- Check Fuel Trim Data: If you have access to an OBD-II scanner with live data, monitor Short-Term Fuel Trim (STFT) and Long-Term Fuel Trim (LTFT) at idle and at higher RPMs. Significantly positive fuel trim numbers (+10% or more) consistently point towards an unmetered air leak, such as a vacuum leak.
- Seek Professional Diagnostic Services: Modern vehicle systems are intricately integrated. A professional technician, equipped with advanced diagnostic tools (e.g., high-resolution smoke machines, waveform analyzers, dealership-level scanners), can isolate complex issues. Average diagnostic fees in 2027 range from $160 to $280, with vacuum leak repairs typically costing $250-$700 depending on accessibility and parts required, according to Automotive Repair Cost Index 2027.
Conclusion
Addressing vacuum leaks promptly is vital for maintaining engine performance, fuel efficiency, and emissions compliance. Through careful visual inspection, chemical tests, and potentially advanced diagnostic methods, most leaks can be identified and rectified. According to vehicle maintenance trend analysis for 2027, proactive leak detection can prevent up to 15% of common engine-related drivability complaints. Take action: if your car exhibits symptoms, systematically investigate to restore its optimal operation.
❓ Frequently Asked Questions
What are the primary symptoms of a vacuum leak in a car’s engine?
Vacuum leaks often manifest as a rough or high idle, engine hesitation or stumbling, reduced fuel economy, and sometimes a ‘Check Engine’ light with lean fuel mixture codes (P0171/P0174). You might also hear an audible hissing sound from the engine compartment as air gets sucked in.
How does a smoke machine help locate vacuum leaks, and is it safe for DIY use?
A smoke machine introduces harmless, non-toxic smoke into the engine’s vacuum system while the engine is off. The smoke will then visibly escape from any cracks, loose connections, or degraded gaskets, precisely indicating the leak location. DIY-friendly smoke machines are available and generally safe to use when following the manufacturer’s instructions carefully.
Can I use brake cleaner instead of carb cleaner for the spray test?
While both are flammable, carb cleaner is generally preferred for this test because it evaporates quickly, leaves less residue, and is less likely to damage plastic or rubber components than some harsher brake cleaners. Always use caution, ensure good ventilation, and have a fire extinguisher nearby regardless of the product.
What’s the importance of checking the PCV valve and its hoses for vacuum leaks?
The PCV (Positive Crankcase Ventilation) valve system is a very common source of vacuum leaks because its hoses can degrade and become brittle, or the valve itself can stick open. A faulty PCV system can lead to increased oil consumption, rough idle, and contributes significantly to overall engine vacuum issues, making it a critical inspection point.
How can a vacuum gauge help confirm a vacuum leak, even before pinpointing it?
A vacuum gauge connects to a dedicated vacuum port on the intake manifold and measures engine vacuum levels. An engine with a healthy vacuum system will show a steady needle reading at idle (typically 17-21 in. Hg), while a fluctuating or consistently low reading (below 15 in. Hg) can indicate a general vacuum leak or other engine problems, signaling a need for further investigation.
What safety precautions should I take when checking for vacuum leaks myself?
Always work in a well-ventilated area to avoid inhaling fumes, especially when using aerosol sprays like carb cleaner or propane. Ensure the engine is cool to prevent burns from hot components, and have a fire extinguisher readily available when using flammable substances near a hot engine or electrical parts. Disconnecting the battery can also be a good precaution if working near sensitive electronics.