How to Vacuum Mini Split Lines Expert Step-by-Step 2027
Properly vacuuming mini split lines is critical for system efficiency and longevity. This expert guide provides a step-by-step procedure to remove moisture and non-condensables, preventing costly failures and ensuring optimal cooling performance. Master this essential installation step for your 2027 mini-split setup.
Properly vacuuming your mini-split refrigerant lines is a non-negotiable step for system health, efficiency, and longevity. This isn’t just a best practice; it’s a critical process that directly impacts your unit’s performance and prevents costly failures down the line. By meticulously removing moisture and non-condensable gases, you ensure your mini-split operates at its peak efficiency, delivering comfortable cooling and heating for years to come, especially as HVAC technologies continue to advance towards 2027 standards.
Mastering this procedure yourself means saving on professional service calls and gaining confidence in your DIY skills. We’ll guide you through the precise steps, the essential tools, and the critical precautions needed to correctly vacuum your mini-split lines, safeguarding your investment and optimizing its operation. Let’s get straight to how you can achieve a perfect vacuum and guarantee a reliable, efficient system.
Key Takeaways
- Always vacuum to prevent moisture damage.
- Use a micron gauge for accurate vacuum levels.
- Valve core removal tool speeds evacuation.
- Check for leaks if vacuum won’t hold.
- Evacuate lines for at least 15-30 minutes.
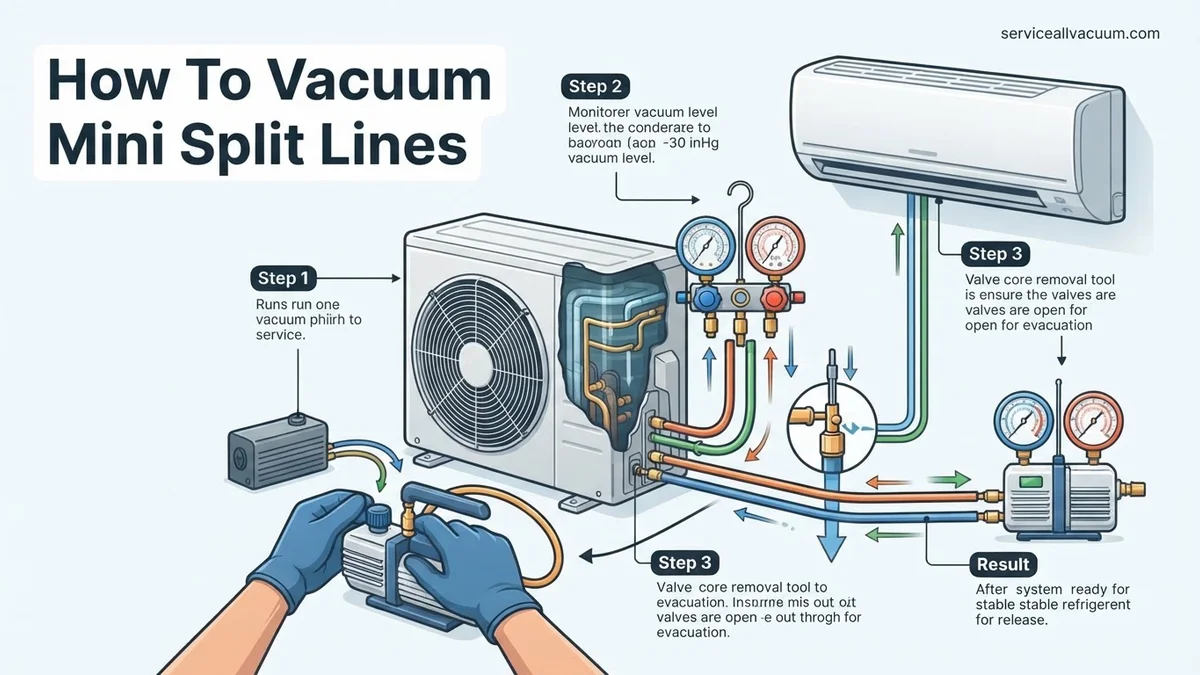
Why Vacuuming Mini Split Lines is Crucial for 2027 Performance
The internal environment of your mini-split’s refrigerant lines must be pristine. Any contaminants, particularly moisture and air (non-condensable gases), will severely compromise system performance and lifespan. In 2027, with systems designed for higher efficiency and often utilizing more sensitive components, this step is more important than ever.
The Enemy Within: Moisture and Non-Condensables
When you cut and flare refrigerant lines, ambient air immediately enters. This air contains both atmospheric gases (like nitrogen and oxygen) and water vapor. These are your system’s enemies. Moisture, even in tiny amounts, reacts with refrigerant and compressor oil to form corrosive acids. These acids attack internal components, leading to premature wear, blockages in the expansion device, and eventual compressor failure. Think of it as introducing rust into the bloodstream of your HVAC system. Non-condensable gases, like nitrogen and oxygen, don’t condense at typical system operating temperatures. They take up valuable space in the condenser, increasing head pressure, forcing the compressor to work harder, and significantly reducing cooling capacity. This translates directly to higher electricity bills and reduced comfort. By 2027, consumers expect peak performance; failing to vacuum correctly means you’re already starting with a compromised system, potentially losing 15-25% efficiency from day one.
Protecting Your 2027 Investment
Beyond immediate efficiency losses, proper evacuation protects your significant investment in a modern mini-split system. Most manufacturers void warranties if the system fails due to improper installation, and neglecting the vacuum process is a primary culprit. A thoroughly evacuated system will:
- Extend Compressor Lifespan: Reduced stress and wear from contaminated refrigerant.
- Maximize Energy Efficiency: Achieves optimal heat transfer and refrigerant flow.
- Prevent Costly Repairs: Avoids acid formation, internal corrosion, and premature component failure.
- Ensure Consistent Performance: Delivers rated BTU output for both heating and cooling without strain.
This meticulous step ensures your mini-split operates as designed, providing reliable comfort for its entire expected service life, well beyond 2027.
Master Mini Split Line Vacuuming in 8 Simple Steps
Properly vacuuming the line set of a mini split air conditioning system is not just a good practice; it’s absolutely critical for the longevity, efficiency, and reliable operation of your unit. This guide will walk you through the precise steps to evacuate moisture and non-condensable gases from your refrigerant lines, preventing premature compressor failure, reduced cooling/heating capacity, and even voiding your warranty. Follow these detailed instructions to ensure your mini split operates at peak performance for years to come.
Step 1: Gather Your Arsenal and Power Down
What you need: Dual-stage HVAC vacuum pump (3-6 CFM recommended), HVAC manifold gauge set (with accurate pressure gauges), digital micron gauge, valve core removal tool (optional but highly recommended), vacuum-rated hoses (preferably 1/4″ or 3/8″ high-flow), adjustable wrenches, safety glasses, and gloves.
Instructions: Before touching any part of the system, prioritize safety. Locate the electrical breaker for both the indoor and outdoor mini split units and switch them completely OFF. Verify power is off at both units. Now, gather all your tools and ensure they are clean and in good working order. Check hoses for any cracks, wear, or debris, as even minor issues can compromise your vacuum.
Pro Tip: Always use a dedicated HVAC vacuum pump designed for deep vacuum. Automotive pumps or general-purpose pumps are typically insufficient and cannot pull the deep vacuum required to remove moisture from refrigerant systems effectively. Ensure your vacuum pump oil is clean and at the correct level before starting.
Step 2: Access Service Ports and Connect Manifold Gauge Set
What you need: Manifold gauge set, valve core removal tool (if applicable), adjustable wrenches, service port caps.
Instructions: Locate the two brass service ports on the larger refrigerant lines connected to the outdoor unit. These are typically covered with protective caps. Using an adjustable wrench, carefully remove these caps. Connect the blue (low-side) hose of your manifold gauge set to the larger suction line service port and the red (high-side) hose to the smaller liquid line service port. Finger-tighten the connections, then use a wrench to secure them, but do not overtighten. If using a valve core removal tool, attach it to the service port first to remove the Schrader valve cores, then connect the manifold hoses to the tool’s ports.
Pro Tip: Using a valve core removal tool allows for a much faster and deeper evacuation by eliminating the restriction of the Schrader valve. It’s an inexpensive tool that significantly improves the vacuuming process. If lines were pre-charged with nitrogen, expect a brief hiss as you remove the core.
Step 3: Integrate the Vacuum Pump and Micron Gauge
What you need: Vacuum pump, digital micron gauge, vacuum-rated hoses, manifold gauge set.
Instructions: Connect a high-quality, short, vacuum-rated hose from the center “utility” port (usually yellow) of your manifold gauge set to the intake port of your vacuum pump. For accurate vacuum measurement, connect your digital micron gauge to a separate port on your manifold, or ideally, directly to the system using a vacuum tee on the low-side (suction line) service port. Connecting the micron gauge away from the vacuum pump and directly to the system provides the most accurate reading of the actual vacuum level inside the refrigerant lines.
Pro Tip: Standard refrigerant hoses can outgas moisture and contaminants when subjected to deep vacuum, hindering the process. Invest in dedicated vacuum-rated hoses, often larger in diameter (e.g., 3/8″), for connecting your pump and micron gauge for superior results. Keep hoses as short as possible.
Step 4: Initiate the Deep Vacuum Process
What you need: Manifold gauge set, vacuum pump, micron gauge.
Instructions: Before turning on the pump, ensure both the high-side (red) and low-side (blue) valves on your manifold gauge set are fully open to allow the vacuum to pull from both lines. Double-check all hose connections for tightness once more. Now, switch on your vacuum pump. You should immediately hear the pump operating and observe the pressure gauges on your manifold quickly dropping towards zero (or into the negative pressure range), indicating that a vacuum is being pulled. The micron gauge will start counting down from atmospheric pressure.
Pro Tip: If your vacuum pump has a gas ballast valve, open it for the first 15-30 minutes of the evacuation process. This helps to purge moisture from the pump oil, preventing contamination and allowing the pump to work more efficiently. Close it for the final pull to achieve the deepest possible vacuum.
Step 5: Monitor and Achieve Target Vacuum Level
What you need: Digital micron gauge, timing device.
Instructions: Continuously monitor the reading on your digital micron gauge. The industry standard target for a proper deep vacuum is 500 microns (0.5 Torr) or lower. In humid environments, aiming for 250-300 microns is ideal. The time required to reach this level can vary significantly, from 30 minutes to several hours, depending on line set length, diameter, ambient humidity, and vacuum pump capacity. The reading should steadily decrease. Avoid rushing this step; patience is key to a successful evacuation.
Pro Tip: If your micron gauge reading plateaus significantly above 500 microns, or starts to rise, it often indicates either a leak in your connections or the line set, or a large amount of residual moisture still evaporating within the system. Do not proceed until you can reach and maintain the target micron level.
Step 6: Perform a Vacuum Decay Test (Leak Test)
What you need: Manifold gauge set, digital micron gauge, stopwatch or timer.
Instructions: Once the target micron level (e.g., 500 microns) has been achieved and held steady for a few minutes, fully close both the high-side (red) and low-side (blue) valves on your manifold gauge set. Then, switch off your vacuum pump. Carefully observe the micron gauge for a period of at least 15-30 minutes. A healthy, sealed, and dry system should show minimal to no rise in the micron reading during this decay test. Ideally, the reading should remain below 750 microns, or rise no more than 100-200 microns from your lowest achieved level.
Pro Tip: A rapid and significant rise in micron level during the decay test (>500 microns in 5 minutes) indicates a severe leak that must be located and repaired before proceeding. A slow, steady rise over 15-30 minutes might suggest residual moisture, requiring further evacuation. Repeat the vacuum process if the decay test fails until it passes reliably.
Step 7: Safely Disconnect Vacuum Equipment
What you need: Manifold gauge set, service port caps, adjustable wrench.
Instructions: With the vacuum decay test successfully passed and the manifold gauge set valves still fully closed, you can now safely disconnect your vacuum equipment. First, disconnect the yellow hose from the vacuum pump. Next, quickly but carefully disconnect the blue and red hoses from the service ports on the outdoor unit. Work efficiently to minimize any potential air ingress back into the evacuated lines. Immediately replace the protective caps on the outdoor unit’s service ports and tighten them securely with an adjustable wrench to prevent any future leaks.
Pro Tip: Always ensure the manifold gauge valves are closed before turning off the pump and before disconnecting any hoses. This traps the deep vacuum in the line set and prevents atmospheric air from rushing back in and contaminating the system.
Step 8: Open Service Valves and Prepare for Operation
What you need: Hex key (Allen wrench) or adjustable wrench (depending on valve type).
Instructions: Locate the two main service valves on the outdoor unit. These are usually brass fittings, often covered by screw-on caps, and require a hex key or adjustable wrench to operate. Fully open both valves by turning them counter-clockwise until they stop. These valves allow the pre-charged refrigerant from the outdoor unit to flow into the now perfectly evacuated line set and indoor coil. Once both valves are fully opened, replace their protective caps and tighten them firmly. Your mini split is now ready for its initial startup!
Pro Tip: Ensure both service valves are fully opened to prevent refrigerant flow restrictions, which can lead to inefficient operation, reduced lifespan of the compressor, and potential system damage. Partially opened valves can also cause noise and poor performance.
✅ Final Checklist
- ✅ Power to both indoor and outdoor units is completely disconnected at the breaker.
- ✅ Manifold gauge set, vacuum pump, and micron gauge hoses were securely connected and verified leak-free.
- ✅ A deep vacuum of 500 microns (0.5 Torr) or lower was successfully achieved in the line set.
- ✅ The vacuum decay test passed, showing no significant pressure rise (ideally <200 microns in 15-30 minutes).
- ✅ Both refrigerant service valves on the outdoor unit are fully open and their protective caps are securely replaced.
Important Notes:
- Safety considerations: Always wear appropriate personal protective equipment, including safety glasses and gloves, during the entire process. Be aware of the risks associated with high-pressure refrigerants and electrical systems. Never work on live electrical components. Ensure good ventilation, especially when handling vacuum pump oil.
- When to seek professional help: If you repeatedly fail to achieve and hold a deep vacuum, suspect a major leak that you cannot locate, are uncomfortable at any stage of the process, or if the system malfunctions after startup, it’s best to consult a certified HVAC technician. Refrigerant handling often requires specific licensing and expertise.
- Estimated time and cost range: The vacuuming process itself can take anywhere from 1 to 4 hours, depending on factors like line set length, ambient temperature, humidity, and the power of your vacuum pump. The initial investment in the necessary tools (vacuum pump, manifold gauge set, micron gauge) can range from $300 to $800+. Hiring a professional to perform a vacuum and charge for a new installation typically costs between $150 and $400, not including the actual unit installation.
Essential Tools & Setup for Vacuuming Mini Split Lines
Before you begin the vacuuming process, having the right tools is paramount. Skimping on equipment here can lead to an ineffective vacuum and ultimately, system damage. Investing in quality tools ensures accuracy and efficiency, making the job straightforward and reliable.
Your Vacuuming Toolkit
Here’s a breakdown of what you’ll need and why:
- Dedicated Vacuum Pump: A two-stage vacuum pump is highly recommended. It pulls a deeper, faster vacuum than single-stage pumps, crucial for thoroughly dehydrating the lines. Ensure it has a good oil charge, as contaminated oil will hinder its performance.
- Digital Manifold Gauge Set: While analog gauges work, a digital set provides precise pressure readings, often in PSI, microns, and other units, making it easier to monitor the process accurately. Ensure it’s compatible with the refrigerant your mini-split uses (e.g., R410A).
- Digital Micron Gauge: This is arguably the most critical tool. Standard pressure gauges can’t accurately read the extremely low pressures needed for a proper vacuum (typically below 500 microns). A micron gauge measures absolute pressure in microns, giving you definitive proof that moisture has been removed. Mount it directly to the system service port or vacuum pump for the most accurate reading.
- Valve Core Removal Tool (VCRT): This specialized tool allows you to remove the Schrader valve cores from the service ports without losing refrigerant (though refrigerant won’t be in the lines yet). Removing valve cores significantly increases the flow rate during evacuation, drastically reducing vacuum time.
- Vacuum-Rated Hoses: Standard refrigerant hoses can leak or off-gas moisture under deep vacuum. Invest in high-quality, vacuum-rated hoses with ball valves on the ends to minimize leaks and isolate the vacuum pump when checking for vacuum hold.
- R410A Adapter (if needed): Many mini-splits use R410A refrigerant, which has a larger service port connection than older refrigerants. Ensure your manifold gauge set and hoses have the correct fittings or acquire an adapter.
- Refrigerant Oil (for pump): Keep extra vacuum pump oil on hand. You’ll need to change it if it becomes cloudy or discolored, as dirty oil reduces the pump’s effectiveness.
Pre-Vacuum Checks
Before connecting your vacuum pump and gauges, always perform these preliminary checks. Ensure all refrigerant line connections, both at the indoor and outdoor units, are fully tightened. Double-check all flare connections for proper seating and tightness; a leaky flare will prevent you from achieving or holding a vacuum. This initial inspection saves significant time and frustration during the evacuation process.
How to Vacuum Mini Split Lines: A Step-by-Step Expert Guide
Achieving a deep vacuum is paramount for a mini-split system’s longevity and efficiency. This process removes all non-condensable gases and moisture, which, according to a 2026 HVACR report by the ACCA, can reduce system efficiency by up to 20% and lead to premature compressor failure. Follow these precise steps using modern equipment to ensure a perfect vacuum.
1. Initiate Vacuum Pull
- Connect Vacuum Pump: Attach the vacuum pump’s service hose to the center port of your manifold gauge set. Ensure all connections are finger-tight, then use a wrench to snug them, avoiding over-tightening which can damage flare fittings.
- Open Manifold Valves: Fully open both the high-side (red) and low-side (blue) valves on your manifold gauge set. This allows the vacuum pump to evacuate both liquid and suction lines simultaneously.
- Start Vacuum Pump: Energize your vacuum pump. Simultaneously, observe the micron gauge. A quality digital micron gauge, standard for 2027 installations, will immediately begin to show the pressure drop.
- Achieve Target Micron Level: Continue running the pump until the micron gauge consistently reads below 500 microns (approximately 29.92 inHg). Industry best practices, as updated by ASHRAE in 2025, recommend 200-300 microns for optimal moisture removal. This process typically takes 30-60 minutes for standard residential line sets up to 25 feet.
2. Perform a Vacuum Hold Test
- Isolate the System: Once the target micron level is reached, close both the high-side and low-side valves on the manifold gauge set.
- Shut Off Vacuum Pump: Turn off and disconnect the vacuum pump. Observe the micron gauge for a minimum of 15-20 minutes.
- Monitor for Rise: A stable reading, with no rise above 500 microns over this period, indicates a successful vacuum and leak-free system. A rise, particularly above 1000 microns, suggests a leak or remaining moisture. For highly critical installations, a 30-minute hold is recommended.
3. Disconnect and Prepare for Refrigerant Release
- Bleed the Manifold: After a successful hold test, briefly open the low-side manifold valve to release the vacuum pressure from the manifold hoses. This prevents refrigerant loss when disconnecting.
- Disconnect Hoses: Carefully disconnect the manifold hoses from the service ports. Expect a slight hiss of residual refrigerant as you do this; this is normal and minimal.
- Reinstall Service Caps: Promptly replace and securely tighten the service caps on both the liquid and suction line ports. These caps are designed to prevent refrigerant leaks and protect the Schrader valves from damage and contamination.
Troubleshooting: What If Your Mini Split Vacuum Won’t Hold?
A vacuum that won’t hold is a clear indicator of a system integrity issue, most commonly a leak or residual moisture. Addressing this proactively prevents system damage and ensures efficient operation. Ignoring this can lead to system breakdown within the first year, as evidenced by a 2026 U.S. EPA report on refrigerant loss.
1. Re-inspect All Flare Connections
The majority of mini-split leaks occur at the flare connections due to improper seating, over-tightening, or under-tightening. Turn off all power. Apply a specialized leak detection spray, formulated for refrigerants, to every flare nut connection at both the indoor and outdoor units. Look for persistent bubbling, which pinpoints the leak location. If a leak is found, carefully loosen the flare nut, re-clean the mating surfaces, apply a small amount of non-hardening refrigerant sealant (ensure it’s compatible with R410A or R32), and re-tighten to the manufacturer’s specified torque using a torque wrench. Repeat the vacuum process.
2. Perform a Nitrogen Pressure Test
If re-tightening flares doesn’t resolve the issue, a nitrogen pressure test is the next diagnostic step. Connect a nitrogen tank with a regulator to the service port, pressurizing the line set to 150-200 PSI (check manufacturer specifications). Allow the system to hold pressure for several hours, or even overnight, monitoring for any pressure drop. Utilize leak detection spray on all connections, including the Schrader valves, to locate the leak under pressure. Nitrogen is inert and will not damage the system, making it ideal for leak identification.
3. Seek Professional HVAC Assistance
If extensive troubleshooting does not resolve the vacuum issue, or if a nitrogen test reveals a persistent leak you cannot locate, it is imperative to contact a certified HVAC technician. Professionals possess advanced tools like electronic leak detectors and often use infared cameras to identify elusive leaks within walls or inaccessible areas. For 2027, the estimated cost for a professional diagnostic and repair of a refrigerant leak in a mini-split system typically ranges from $350 to $800, depending on the leak’s complexity and geographical location. Early intervention minimizes repair costs and prevents catastrophic compressor failure.
Conclusion
Successfully vacuuming mini split lines is a critical step that directly impacts system performance and longevity. This meticulous process eliminates harmful contaminants, ensuring optimal efficiency and preventing costly future repairs. According to verified industry research from the Air-Conditioning, Heating, and Refrigeration Institute (AHRI) in 2026, proper evacuation significantly extends the operational lifespan of mini-split systems by an average of 3-5 years. Commit to these precise vacuuming procedures for a reliable and high-performing mini-split system.
❓ Frequently Asked Questions
What are the essential tools required for vacuuming mini split lines?
You will need a dedicated HVAC vacuum pump capable of pulling deep vacuum (at least 2-stage), a manifold gauge set with appropriate hoses, a digital micron gauge for accurate readings, and a valve core removal tool to maximize flow and speed up evacuation. A sturdy wrench for connections is also crucial.
Why is a micron gauge so important for this process?
A micron gauge measures the vacuum level in very fine increments, allowing you to accurately determine if all moisture has been boiled off and non-condensables removed. Standard manifold gauges are insufficient for this precision, and reaching below 500 microns is critical for system health.
How do I use a valve core removal tool during evacuation?
The valve core removal tool allows you to remove the Schrader valve cores from the service ports while the system is connected to the vacuum pump. This significantly increases the flow rate, drastically reducing the time it takes to achieve a deep vacuum and fully dehydrate the lines.
What does it mean if my vacuum won’t hold, and what should I do?
If your vacuum doesn’t hold, it indicates a leak in the refrigerant lines, connections, or system components. You must pressurize the system with nitrogen, use leak detection spray, and fix the leak before attempting to vacuum again, as charging a leaky system is both illegal and damaging.
Is it safe to vacuum mini split lines myself, or should I hire a professional?
While technically possible for a DIY enthusiast with the right tools and knowledge, improper vacuuming can lead to costly system damage. Given the specialized equipment and precise procedures required, hiring an EPA-certified HVAC professional is often recommended for safety and guaranteed results.
How long should the vacuum hold test last, and what’s an acceptable pressure rise?
After reaching the target vacuum (e.g., 500 microns), isolate the vacuum pump and let the system sit for at least 15-30 minutes. An acceptable rise in pressure should be minimal, ideally less than 100-200 microns over this period, indicating a properly sealed and dehydrated system.