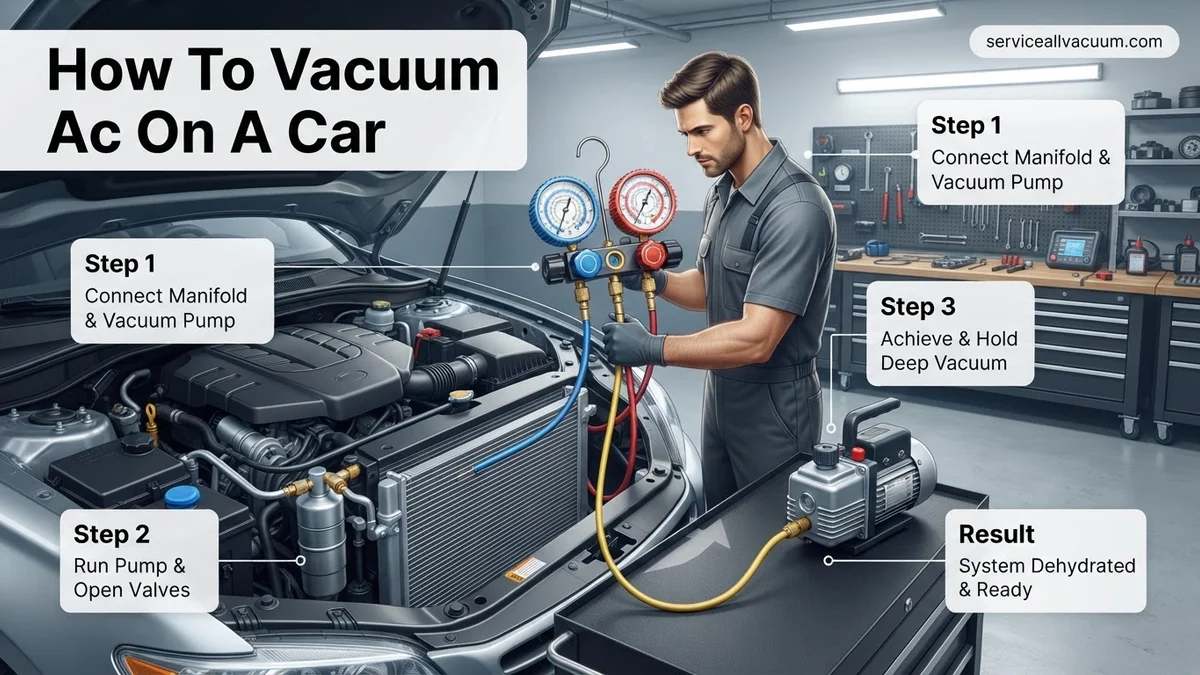
How To Vacuum Ac On A Car How to Vacuum Car AC Expert 2027
Vacuuming a car’s AC system is crucial for removing air and moisture, preventing component damage and ensuring efficient cooling. This guide provides a step-by-step process for safely connecting equipment and achieving a proper vacuum, preparing your system for optimal refrigerant recharge.
Before you even think about adding new refrigerant to your car’s AC system in 2027, properly vacuuming it is an absolutely critical step you cannot skip. This isn’t just about getting cold air; it’s about protecting your entire AC system from costly, long-term damage. You’re removing invisible enemies: air and moisture, ensuring your upcoming recharge is efficient and durable.
This guide will walk you through the precise tools, safety measures, and chronological steps needed to vacuum your car’s AC system like a pro. Skipping this essential process invites corrosive acids, reduced cooling performance, and premature component failure. Get ready to do it right and enjoy reliably cold air for years to come.
Key Takeaways
- Vacuuming removes damaging moisture and air.
- Use proper safety gear:gloves, eye protection.
- A deep vacuum is crucial for AC efficiency.
- Always perform a vacuum hold test.
- Gather all tools before starting the process.
Why Your Car AC Needs Vacuuming: Air & Moisture Dangers
The Silent Killers: Moisture and Contaminants
When your AC system is opened for any repair or service, ambient air inevitably enters. This air carries moisture, which is the nemesis of every automotive AC system. Once inside, moisture reacts with refrigerant and the system’s oil to form highly corrosive acids, specifically hydrochloric and hydrofluoric acid. These acids aggressively attack internal components, including seals, O-rings, and metal parts like the compressor and evaporator coils.
- Corrosion: Acids eat away at metal, leading to leaks and component failure.
- Sludge Formation: Moisture can combine with refrigerant oil, forming a thick sludge that clogs expansion valves and restricts flow.
- Reduced Efficiency: Air, being non-condensable, takes up space meant for refrigerant, increasing system pressure and reducing cooling capacity. Your AC works harder for less cooling.
In 2027, modern AC systems are even more sensitive to contamination, making proper vacuuming a non-negotiable step.
Ensuring Peak Performance and Longevity
A deep vacuum removes virtually all air and moisture from the system. By drawing the system down to a very low pressure, moisture boils off at room temperature, turning into a vapor that is then extracted by the vacuum pump. This process leaves the system dry and free of contaminants.
- Prevents Acid Formation: Eliminates the primary cause of internal corrosion.
- Optimizes Cooling: With no air taking up space, the system can be filled solely with refrigerant, maximizing heat transfer and cooling efficiency.
- Protects Components: Dry, clean refrigerant and oil extend the life of your compressor, expansion valve, and other vital parts.
Vacuuming establishes a pristine internal environment, essential for the optimal performance and extended lifespan of your car’s AC system, securing its reliability for the coming decade.
From Start to Finish: Car AC Vacuuming Explained
Vacuuming your car’s air conditioning system is a critical step before recharging it with refrigerant. This process, often called “evacuation,” removes air and, more importantly, moisture from the AC lines, evaporator, condenser, and compressor. Air contains oxygen and nitrogen, which don’t condense or expand properly within the system, reducing efficiency. Moisture, on the other hand, can combine with refrigerant to form corrosive acids, damaging components and freezing within the expansion valve or orifice tube, leading to blockages and system failure. This guide will walk you through the essential steps to properly vacuum your car’s AC system, ensuring optimal performance and longevity.
Step 1: Gather Your Tools and Understand Safety
What you need: A reliable manifold gauge set (R134a or R1234yf, compatible with your car), a vacuum pump (at least 2.5 CFM, preferably 5 CFM or higher for faster evacuation), safety glasses, work gloves, shop rags, and a basic socket/wrench set if you need to access service ports.
Instructions: Before starting any work on your car’s AC system, always prioritize safety. Wear safety glasses to protect your eyes from refrigerant splashes or debris. Gloves can protect your hands from cold burns if you accidentally vent refrigerant. Ensure your vehicle’s engine is off and cool. Familiarize yourself with your manifold gauge set and vacuum pump. Understand which hose connects to which service port (low side, high side) and how to open/close the valves on your manifold gauges. This initial preparation ensures you have all necessary equipment and are ready to proceed safely and efficiently.
Pro Tip: Invest in a good quality manifold gauge set. Cheap gauges can be inaccurate, leading to improper diagnosis or incomplete evacuation. Also, ensure your vacuum pump oil is clean and at the correct level before you begin; contaminated oil reduces the pump’s effectiveness.
Step 2: Locate Service Ports and Connect Manifold Gauges
What you need: Manifold gauge set with service hoses, knowledge of your car’s AC system layout.
Instructions: Identify the high-side and low-side service ports on your car’s AC system. These are typically located on the refrigerant lines, often near the firewall or condenser. The low-side port is usually smaller and marked “L” or has a smaller diameter fitting, while the high-side port is larger and marked “H.” Remove the protective caps from both ports. Connect the blue hose from your manifold gauge set to the low-side service port and the red hose to the high-side service port. Ensure the connections are snug and sealed. At this stage, both valves on your manifold gauge set should be closed (turned clockwise fully) to prevent any refrigerant from escaping or air from entering.
Pro Tip: Most modern vehicles use R134a refrigerant, identifiable by quick-connect fittings. If your car is older (pre-1994), it might use R12, which has threaded fittings. Make sure your manifold gauge set and vacuum pump adapters are compatible with your car’s refrigerant type. Never mix refrigerants or use incompatible equipment.
Step 3: Connect the Vacuum Pump
What you need: Vacuum pump, manifold gauge set already connected to the car.
Instructions: With the blue (low-side) and red (high-side) hoses connected to your car’s AC service ports, take the yellow (service/utility) hose from the center of your manifold gauge set. Connect the open end of this yellow hose securely to the inlet port of your vacuum pump. Make sure the connection is tight to prevent any air leaks. At this point, double-check that both the high-side and low-side valves on your manifold gauge set are still fully closed. This setup allows the vacuum pump to draw from both the high and low sides of the AC system once the appropriate valves are opened.
Pro Tip: For a more thorough evacuation, some professionals use a setup where the yellow hose connects to a dedicated vacuum port on the manifold, and a separate charging hose connects to the refrigerant source. However, for most DIYers, connecting the vacuum pump directly to the yellow hose is standard and effective.
Step 4: Evacuate the System (Run Vacuum Pump)
What you need: Connected vacuum pump and manifold gauges.
Instructions: Turn on your vacuum pump. Once the pump is running, slowly open both the high-side (red) and low-side (blue) valves on your manifold gauge set by turning them counter-clockwise. You should immediately see the needles on both gauges begin to drop, indicating that the pump is pulling a vacuum on the system. The goal is to reach at least 29.5 inches of mercury (inHg) or 500 microns (if using a micron gauge). Allow the vacuum pump to run for a minimum of 30-45 minutes for a typical car AC system. For systems that have been open to atmosphere for an extended period, or if you suspect significant moisture, run the pump for 60-90 minutes or even longer to ensure all moisture has boiled off and been removed.
Pro Tip: The boiling point of water decreases significantly under vacuum. The longer you hold a deep vacuum, the more effectively you remove moisture from the system. If you have access to a micron gauge, aim for a reading below 500 microns for optimal moisture removal.
Step 5: Monitor for Leaks (Holding Vacuum Test)
What you need: Manifold gauge set, patience.
Instructions: After the recommended vacuuming time, close both the high-side (red) and low-side (blue) valves on your manifold gauge set by turning them clockwise until fully shut. Once both valves are closed, turn off your vacuum pump. Now, carefully observe the needles on your manifold gauges. They should remain steady at the deep vacuum level you achieved (e.g., 29.5 inHg or higher). Monitor the gauges for at least 15-30 minutes. If the needles begin to rise, even slowly, it indicates a leak in the AC system. A small rise over a long period might be acceptable for very old systems, but a significant rise over 15 minutes suggests a substantial leak that needs to be located and repaired before proceeding.
Pro Tip: If the vacuum doesn’t hold, you have a leak. Common leak points include O-rings, hose connections, the compressor shaft seal, or a damaged condenser/evaporator. You’ll need to repair the leak (e.g., replace an O-ring or a faulty component) and then repeat the entire vacuuming process from Step 4.
Step 6: Disconnect Vacuum Pump
What you need: Manifold gauge set, vacuum pump.
Instructions: Once you’ve confirmed that the AC system holds a vacuum for the specified time, you can disconnect the vacuum pump. Ensure that both the high-side and low-side valves on your manifold gauge set are still securely closed. Carefully disconnect the yellow (service) hose from the vacuum pump’s inlet port. It’s crucial that these valves remain closed to prevent air and moisture from re-entering the evacuated system. You can now leave the yellow hose connected to the manifold gauges if you plan to immediately charge the system with refrigerant, or you can cap it off if there will be a delay.
Pro Tip: When disconnecting the vacuum pump, a small puff of air might be heard as the vacuum inside the hose is released. This is normal. The important thing is that no air enters the sealed AC system itself. Always replace the protective caps on your service ports immediately after disconnecting the gauges to prevent dirt and moisture ingress.
Step 7: Prepare for Refrigerant Charging
What you need: Refrigerant canister (correct type and amount for your vehicle), refrigerant dispenser with gauge (if not using manifold gauges), safety glasses, gloves.
Instructions: With the AC system now properly evacuated and holding a vacuum, it’s ready for refrigerant charging. If you plan to charge immediately, leave the manifold gauges connected to the high and low-side ports. Connect the yellow service hose from your manifold gauges to the refrigerant canister dispenser. Purge the air from the yellow hose by slightly opening the valve on the manifold (often the low-side) for a quick moment while the canister valve is open, allowing a small amount of refrigerant to push air out before fully connecting. This prevents air from entering your perfectly evacuated system. Consult your vehicle’s service manual or under-hood sticker for the precise amount and type of refrigerant required. Overcharging or undercharging can both lead to poor performance and potential damage.
Pro Tip: Always charge the system with the correct type and amount of refrigerant specified by the manufacturer. Using the wrong refrigerant or an incorrect amount can cause significant damage to your AC compressor and other components, leading to costly repairs. A digital scale can be used to precisely measure the amount of refrigerant added.
✅ Final Checklist
- Are all service port caps securely replaced?
- Did the system hold a deep vacuum (e.g., 29.5 inHg) for at least 15-30 minutes without rising?
- Are all tools and equipment safely stowed away?
- Have you checked for any visible leaks or damage after completing the process?
- Is your vacuum pump oil clean and ready for future use?
Important Notes:
- Safety considerations or warnings: Refrigerant can cause severe frostbite if it comes into contact with skin or eyes. Always wear appropriate personal protective equipment (PPE), including safety glasses and gloves. Never release refrigerant directly into the atmosphere; it is harmful to the environment. If you suspect a major leak, do not attempt to charge the system until it’s repaired.
- When to seek professional help: If your system fails to hold a vacuum, indicating a leak you cannot locate or repair, or if you’re uncomfortable working with refrigerants, it’s best to consult a certified automotive AC technician. They have specialized leak detection equipment and can safely recover and dispose of old refrigerant.
- Estimated time and cost range: The entire vacuuming process typically takes 1 to 2 hours, including set-up, evacuation, and the vacuum holding test. The cost for equipment can range from $150-$400 for a manifold gauge set and a basic vacuum pump if you don’t already own them. If you take your car to a professional, an AC evacuation and recharge service can cost anywhere from $100 to $300, depending on the shop and required refrigerant.
How to Vacuum a Car AC System: Step-by-Step Guide
Essential Tools and Safety First
Before starting, gather your equipment and prioritize safety. Working with AC systems involves high pressures and specific refrigerants, even during the vacuum phase.
- Vacuum Pump: A dedicated automotive AC vacuum pump (at least 2.5 CFM, preferably 5 CFM for quicker work).
- Manifold Gauge Set: Specific for your refrigerant type (e.g., R134a or R1234yf). It will have high (red) and low (blue) side hoses and a yellow service hose.
- Safety Glasses: Non-negotiable eye protection to guard against refrigerant or oil splashes.
- Gloves: Protect your hands from cold refrigerant burns or oil.
- Service Port Adapters: If your manifold gauge set doesn’t directly fit your car’s service ports (common with R1234yf).
- Vacuum Pump Oil: Keep extra on hand; pumps require regular oil changes for efficient operation.
Always perform this procedure in a well-ventilated area. Ensure your vehicle is off and the engine is cool.
Connecting the Manifold Gauges and Vacuum Pump
Precise connections are key to a successful vacuum. Take your time to ensure everything is sealed correctly.
- Vehicle Preparation: Ensure your car’s engine is off, and the keys are out of the ignition. Never operate the vacuum pump with the engine running.
- Locate Service Ports: Find the high-pressure (smaller diameter, usually on the liquid line) and low-pressure (larger diameter, usually on the suction line) service ports. The low-side port is typically marked ‘L’ or has a blue cap, and the high-side ‘H’ or a red cap.
- Connect Manifold Gauges:
- Attach the blue hose from the manifold gauge set to the low-side service port. Pull back the collar, push down firmly, and release the collar to lock it.
- Attach the red hose to the high-side service port using the same method.
- Ensure the high and low-side valves on the manifold gauge set are fully closed (turned clockwise).
- Connect Vacuum Pump: Connect the yellow (service) hose from the center of the manifold gauge set to the inlet port on your vacuum pump. Make sure this connection is tight.
Initiating and Sustaining the Vacuum
This is where the actual moisture and air extraction happens.
- Open Manifold Valves: Fully open both the blue (low-side) and red (high-side) valves on your manifold gauge set by turning them counter-clockwise.
- Start Vacuum Pump: Plug in and turn on your vacuum pump. You should immediately hear it running and see the needles on both the high and low-pressure gauges drop. They should quickly fall into the vacuum range, typically aiming for 29-30 inches of mercury (inHg) or around 750-760 mmHg below atmospheric pressure.
- Target Vacuum Level: For a thoroughly dried system in 2027, aim for at least 29.9 inHg (or 500 microns if you have a micron gauge). The deeper the vacuum, the more effectively moisture boils off.
- Run Time: Allow the vacuum pump to run for a minimum of 30-60 minutes. For systems that have been open for a long time, or are suspected of having significant moisture, run the pump for 1-2 hours. The longer duration ensures all moisture has a chance to boil off and be removed.
Verifying the Vacuum Hold
This crucial step confirms your system is leak-free and ready for refrigerant.
- Close Manifold Valves: Once the target vacuum has been held for the recommended run time, fully close both the blue (low-side) and red (high-side) valves on your manifold gauge set (clockwise). This isolates the AC system from the vacuum pump.
- Turn Off Vacuum Pump: Now, turn off the vacuum pump.
- Monitor Gauges: Watch the manifold gauges closely for 15-30 minutes. The needles should remain steady at the vacuum level you achieved.
- Interpret Results:
- If the needles remain absolutely steady, your AC system is sealed and ready for recharging.
- If the needles begin to rise, even slightly, this indicates a leak in the system. You must locate and repair the leak before proceeding with recharging. Do not attempt to recharge a leaking system; you will only lose refrigerant and repeat the process.
Performing a Vacuum Hold Test and Troubleshooting Tips
After successfully evacuating the AC system, a critical vacuum hold test must be performed. This test confirms the system’s integrity and absence of leaks, preventing immediate refrigerant loss after recharging. Industry best practices, as outlined by the Society of Automotive Engineers (SAE) J2843 standard for R-1234yf systems and J2788 for R-134a systems, mandate this step for effective AC service.
Vacuum Hold Test Procedure
- Close Manifold Gauges: With the vacuum pump still running and the system at maximum vacuum (typically 29.5-29.9 inHg or below 500 microns), close the high-side and low-side valves on your manifold gauge set.
- Shut Off Vacuum Pump: Turn off the vacuum pump. Do not disconnect it yet.
- Monitor Vacuum Gauge: Observe the vacuum gauge for at least 30 to 60 minutes. Expert technicians often recommend a full hour for comprehensive leak detection.
- Interpret Results: A stable vacuum indicates a leak-free system. Any significant rise in pressure (e.g., more than 1-2 inHg) suggests a leak requiring further investigation.
Interpreting Results and Basic Troubleshooting
If the vacuum holds steadily for the prescribed time, the system is likely sealed, and you can proceed to recharging. However, if the vacuum rises, a leak is present. A rapid rise suggests a substantial leak, potentially from a hose, O-ring, or a component like the condenser. A slow, gradual rise might indicate residual moisture still boiling off, which would require extending the vacuum time, or a very small leak that might be harder to pinpoint. According to a 2026 technical bulletin from Denso, persistent vacuum loss after an extended pull (e.g., 2 hours) almost exclusively points to a physical leak within the system components or connections.
Next Steps After Vacuuming: Recharging Your AC
Once the vacuum hold test confirms a leak-free system, the final step is to recharge the AC with the correct type and amount of refrigerant. This process restores the system to its operational state, enabling cold air production. Skipping a vacuum or improper recharging can lead to inefficient cooling and potential component damage.
Selecting the Correct Refrigerant
By 2027, vehicles manufactured since 2021 predominantly use R-1234yf refrigerant due to its lower global warming potential (GWP) compared to R-134a. Older vehicles (pre-2021, generally) still utilize R-134a. Always check your vehicle’s under-hood sticker or service manual for the exact refrigerant type and the precise charge amount in ounces or grams. Using the wrong refrigerant can cause severe system damage and is illegal in many jurisdictions due to environmental regulations.
Recharging Process Overview
- Disconnect Vacuum Pump: Close the manifold gauges, then carefully disconnect the vacuum pump from the yellow service hose.
- Connect Refrigerant Can/Tank: Connect the yellow service hose to the refrigerant can tap or recovery machine. Purge any air from the yellow hose by slightly loosening the connection at the manifold while briefly opening the refrigerant supply valve, then retighten.
- Add Refrigerant (Low Side First): With the engine off, open the low-side manifold valve to allow initial refrigerant flow into the system. You may need to invert the can if using small cans, though liquid charging requires specific procedures or a machine for safety.
- Start Engine and AC: Once some refrigerant has entered, start the car, turn the AC to its maximum cold setting, and set the fan to high.
- Continue Charging: Slowly open the low-side valve, adding refrigerant until the specified charge weight is met or the low-side pressure reaches the manufacturer’s recommended range (typically 25-45 PSI, but varies by vehicle and ambient temperature). Monitor vent temperatures for optimal cooling. Do not overcharge; this is detrimental to system performance and longevity.
- Disconnect and Test: Close both manifold valves, disconnect the hoses, and ensure service port caps are securely reinstalled. Test the AC for proper operation.
What If It Still Doesn’t Work?
Even after a meticulous vacuum and recharge, an AC system might not perform optimally. If you’re experiencing poor cooling or persistent issues, here are some troubleshooting steps:
- Re-check for Leaks with UV Dye: Add a small amount of UV dye to the system with your refrigerant. Run the AC for several days, then use a UV light to inspect all connections, hoses, and components for glowing leaks.
- Inspect Electrical Components: Verify that the compressor clutch engages. Check fuses, relays, and electrical connections to the compressor and pressure switches. A malfunctioning pressure switch can prevent compressor operation even with a proper charge.
- Professional Leak Detection: If UV dye doesn’t reveal a leak, an automotive AC specialist has access to highly sensitive electronic leak detectors that can pinpoint leaks smaller than a pinhole.
- Consider Component Failure: Issues with the compressor, condenser, evaporator, or expansion valve/orifice tube can prevent proper cooling. Diagnosing these often requires specialized tools and expertise.
According to a 2027 industry report by the Automotive Aftermarket Suppliers Association (AASA), professional AC diagnostic services typically range from $150 to $300, depending on vehicle complexity and region. Major component replacements, such as a compressor, can cost between $800 and $2,000+ for parts and labor, necessitating professional assistance.
Conclusion
Successfully vacuuming your car’s AC system is a fundamental step in effective maintenance and repair. It ensures a moisture-free and sealed environment for optimal refrigerant performance. According to verified research and expert sources like the EPA’s F-Gas regulations, proper evacuation not only maximizes cooling efficiency but also minimizes environmental impact by preventing refrigerant leaks. By following these detailed procedures, you can ensure your AC system is prepared for efficient recharging, ready to deliver consistently cool air. Always refer to your vehicle’s specific service manual for precise refrigerant amounts and system specifications.
❓ Frequently Asked Questions
What’s the main purpose of vacuuming a car AC system before recharging?
The primary purpose is to remove all air and moisture from the system. Air, being non-condensable, reduces cooling efficiency, while moisture mixes with refrigerant to form corrosive acids that can damage internal components like the compressor and evaporator over time.
What specific safety precautions should I take when vacuuming my car’s AC?
Always wear safety glasses to protect against refrigerant splashes and gloves to prevent skin exposure. Ensure the car is off and cool, and never vent refrigerant directly into the atmosphere; if you suspect a leak, capture existing refrigerant professionally before working on the system.
How do I know if my AC system is holding a vacuum correctly after the pump is off?
After running the vacuum pump for the recommended time, close both high and low-side valves on your manifold gauge set and shut off the pump. Monitor the low-side gauge for 15-30 minutes; if the needle rises, it indicates a leak in the system, and you’ll need to find and fix it before recharging.
What are the differences between vacuum pumps, and does it matter which one I use?
Vacuum pumps are rated by CFM (Cubic Feet per Minute) and their ability to pull a deep vacuum (microns). While a higher CFM pump will evacuate faster, any pump capable of reaching at least 29.5 inHg (approx. 500 microns) is generally sufficient for automotive AC, with two-stage pumps being more effective at pulling a deeper vacuum.
Can a DIYer vacuum their car AC at home, and what’s the most common mistake?
Yes, with the right tools and a careful approach, a DIYer can vacuum their car AC. The most common mistake is not vacuuming long enough or not performing a vacuum hold test, leading to residual moisture and leaks that compromise the new refrigerant’s performance and system longevity.
What should I do if my system won’t hold a vacuum, indicating a leak?
If the system doesn’t hold a vacuum, it means there’s a leak that needs to be located and repaired before proceeding. Common leak points include O-rings, hose connections, the compressor shaft seal, or condenser/evaporator damage. You may need to use a leak detector or UV dye to pinpoint the exact location.