How To Use A/C Vacuum Pump How To Use A C Vacuum Pump 2027
Properly evacuating an A/C system with a vacuum pump is crucial for its longevity and efficiency. This guide provides a detailed, step-by-step procedure for connecting, operating, and disconnecting your pump, ensuring you achieve the necessary vacuum for optimal performance and preventing costly system failures.
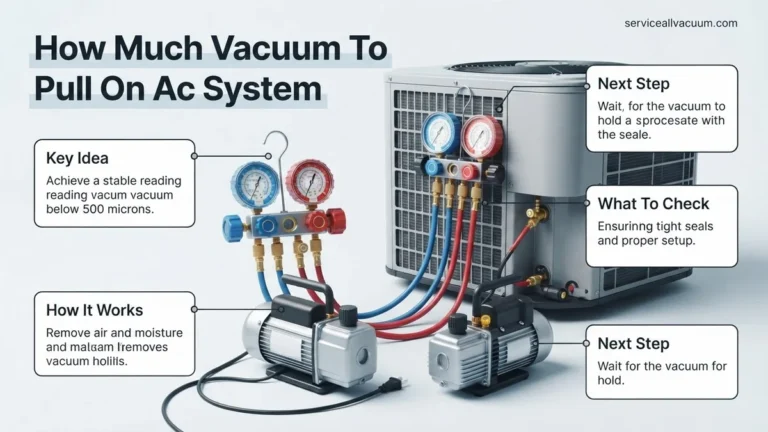
Properly vacuuming an A/C system is a non-negotiable step for ensuring peak performance and longevity, whether you’re working on a vehicle or an HVAC unit. This process involves connecting a vacuum pump via a vacuum-rated manifold gauge set, pulling the system down to a deep vacuum—typically below 500 microns—and then holding that vacuum to confirm the system’s integrity before refrigerant charging. Skipping this critical stage inevitably leads to premature component failure and inefficient cooling, wasting your time and money.
Mastering this procedure ensures that your A/C system operates flawlessly, removing damaging moisture and non-condensable gases. For any automotive or residential system in 2027, where refrigerants are more sensitive and tolerances are tighter, understanding the precise steps for connecting, operating, holding, and disconnecting your vacuum pump is essential for reliable, long-lasting cooling performance.
Key Takeaways
- Use vacuum-rated manifold gauges and hoses for evacuation.
- Achieve 500 microns or lower for effective moisture removal.
- Perform a vacuum hold test to confirm system integrity.
- Always wear PPE (gloves, safety glasses) during the process.
- Change vacuum pump oil frequently for peak performance.
What Makes A/C Vacuuming Critical for System Health?
Evacuating an A/C system is far more than just “sucking out air.” It’s a precise process designed to eliminate two primary contaminants: moisture and non-condensable gases. Both are detrimental to an A/C system’s efficiency and lifespan, a fact amplified by the advanced refrigerants and tighter specifications prevalent in 2027.
Eliminating Moisture: The Silent Killer
- Moisture, even in trace amounts, is highly damaging. When mixed with refrigerant, it forms corrosive acids that attack internal components like the compressor and expansion valve.
- During operation, moisture can freeze at the expansion device, causing blockages and restricting refrigerant flow, leading to poor cooling.
- A deep vacuum below the boiling point of water (around 25,000 microns at room temperature, but much lower for thorough dehydration) is the only effective way to vaporize and remove all moisture. Your target should be significantly lower for complete dehydration.
Purging Non-Condensable Gases
- Non-condensable gases, primarily air, do not condense into a liquid state within the A/C system’s operating pressures and temperatures.
- Their presence increases head pressure, forcing the compressor to work harder, which raises energy consumption and shortens compressor life.
- These gases displace refrigerant, reducing the system’s overall cooling capacity and efficiency. A proper vacuum ensures these gases are completely removed, allowing only pure refrigerant to circulate.
From Start to Finish: A/C Vacuum Pump Operation Explained
Mastering the use of an A/C vacuum pump is crucial for anyone performing maintenance or repairs on automotive or residential air conditioning systems. This guide will walk you through the entire process, from initial setup to safely disconnecting your equipment, ensuring your A/C system is free of damaging moisture and non-condensable gases. A proper vacuum is the cornerstone of an efficient and long-lasting A/C system, preventing premature component failure and maximizing cooling performance. Follow these detailed steps to achieve professional results every time.
Step 1: Gather Your Gear and Prioritize Safety
What you need: Safety glasses, work gloves, A/C manifold gauge set (with R134a or R1234yf specific hoses), A/C vacuum pump, vacuum pump oil (if needed for your pump type), service port caps, valve core removal tool (optional but recommended), micron gauge, appropriate refrigerant service ports (e.g., R134a quick couplers).
Instructions: Before touching any part of the A/C system, ensure you’re wearing safety glasses and gloves. Inspect your vacuum pump; check its oil level and clarity, topping it off or changing it if necessary according to the manufacturer’s specifications. Ensure all your hoses are in good condition, free of cracks or damage, and that your manifold gauge set’s valves operate smoothly. Verify that the A/C system you are working on is fully depressurized and any remaining refrigerant has been safely recovered by a certified technician. Never vacuum a system under pressure.
Pro Tip: Always use new vacuum pump oil if you’re unsure of its condition. Dirty or contaminated oil can severely reduce the pump’s efficiency and ability to pull a deep vacuum, ultimately leaving moisture in your system.
Step 2: Connect the Manifold Gauge Set to the A/C System
What you need: Manifold gauge set with service couplers, A/C system with accessible low-side and high-side service ports.
Instructions: Locate the low-side (usually larger diameter, marked ‘L’ or blue cap) and high-side (usually smaller diameter, marked ‘H’ or red cap) service ports on your A/C system. With both manifold gauge valves (red for high, blue for low) fully closed (turned clockwise), connect the blue hose from your manifold gauge set to the low-side service port. Then, connect the red hose to the high-side service port. Ensure the connections are snug but do not overtighten, as this can damage the service port valves. The gauges should read zero, confirming the system is empty and the valves are closed.
Pro Tip: Always clean around the service ports before connecting hoses to prevent dirt and debris from entering the system. If using a valve core removal tool, extract the valve cores from the service ports now to allow for faster evacuation and a deeper vacuum. Just be sure to reinstall them before charging!
Step 3: Connect the Vacuum Pump to the Manifold Gauge Set
What you need: Manifold gauge set connected to the A/C system, A/C vacuum pump.
Instructions: Take the yellow (or sometimes clear) center hose from your manifold gauge set. This hose is the service hose. Connect one end of this yellow hose to the service port on your vacuum pump. Make sure this connection is tight. If you are using a dedicated micron gauge (highly recommended for accurate readings), connect it to the remaining service port on your manifold gauge set, or use a T-fitting to connect it in-line with the yellow hose, ensuring it’s as close to the system as possible for the most accurate vacuum reading. Double-check all connections to ensure they are secure and leak-free.
Pro Tip: Using a dedicated micron gauge directly at the manifold or system is critical. The gauges on the manifold set are not precise enough to accurately measure the deep vacuum levels required (typically below 500 microns). Position the micron gauge away from the direct suction of the pump for stable readings.
Step 4: Prepare and Initiate the Vacuum Process
What you need: All connections secured, vacuum pump plugged in.
Instructions: Before turning on the vacuum pump, fully open both the low-side (blue) and high-side (red) valves on your manifold gauge set by turning them counter-clockwise. This allows the pump to draw vacuum from both sides of the A/C system. Ensure the vacuum pump is properly plugged into a grounded electrical outlet. Once everything is set, switch on the vacuum pump. You should immediately hear the pump operating and see the manifold gauges (if they read vacuum) start to drop, and the micron gauge (if connected) will begin its descent towards lower values. Monitor for any unusual noises or vibrations from the pump.
Pro Tip: Some technicians prefer to open only the low-side valve initially for a few minutes, then open the high-side valve. While not strictly necessary, it can sometimes help identify if a strong restriction exists on one side, but for general evacuation, opening both simultaneously is standard practice.
Step 5: Achieve and Monitor Deep Vacuum
What you need: Running vacuum pump, micron gauge.
Instructions: Allow the vacuum pump to run continuously. The goal is to reach a deep vacuum, typically below 500 microns (approximately 29.90 inches of mercury on a standard gauge). The time it takes will vary depending on the system size, ambient temperature, and the pump’s capacity. For most automotive systems, expect 30-60 minutes, but larger or contaminated systems may require 1-2 hours. Monitor the micron gauge closely. If it struggles to drop below 1000 microns, you might have a leak or significant moisture within the system. Continue pumping until a stable reading below 500 microns is achieved for at least 15-20 minutes.
Pro Tip: During evacuation, tapping on the refrigerant lines and components (evaporator, condenser) with a rubber mallet can help dislodge trapped moisture, converting it to vapor for easier removal. Warming the system gently with a heat gun (carefully, not to overheat) can also help evaporate moisture more quickly.
Step 6: Perform a Vacuum Decay Test
What you need: System under deep vacuum, micron gauge.
Instructions: Once your system has achieved and held a stable deep vacuum (e.g., 200-300 microns for 15 minutes), it’s time to check for leaks. First, fully close both the high-side (red) and low-side (blue) valves on your manifold gauge set (turn clockwise). This isolates the A/C system from the vacuum pump. Then, turn off the vacuum pump. Watch your micron gauge for a period of 15-30 minutes. A healthy system with no leaks should show a minimal rise in micron level (e.g., less than 100-200 microns over 15 minutes). A rapid or significant rise indicates a leak, which must be found and repaired before proceeding.
Pro Tip: A slight rise in microns initially (e.g., 50-100 microns in the first 5 minutes) might indicate residual moisture still boiling off. If the rise stabilizes or slows considerably, it’s usually acceptable. However, a continuous, rapid rise always indicates a leak that needs addressing.
Step 7: Disconnect Equipment Safely
What you need: Vacuum pump off, manifold gauge valves closed, system holding vacuum.
Instructions: With the vacuum pump off and both manifold valves closed, the system is now holding a vacuum. You can now safely disconnect your equipment. First, disconnect the yellow service hose from the vacuum pump. Next, carefully disconnect the blue hose from the low-side service port and the red hose from the high-side service port. As you disconnect, you might hear a slight hiss from the hoses releasing their vacuum, which is normal. Immediately replace the service port caps on your A/C system to prevent contamination. Your A/C system is now ready for refrigerant charging.
Pro Tip: To minimize air ingress when disconnecting, some technicians will slightly crack open the high-side valve on the manifold (while still connected to the system but disconnected from the pump) to bleed off any residual vacuum in the hoses, then quickly disconnect. This is usually unnecessary if you work swiftly after closing the manifold valves.
✅ Final Checklist
- System held a deep vacuum (e.g., below 500 microns) for at least 15 minutes.
- Vacuum decay test showed minimal or no pressure rise (within acceptable limits for 15-30 minutes).
- All manifold gauge valves were opened during evacuation and closed before pump shutdown/disconnection.
- Vacuum pump oil level was checked and maintained throughout the process.
- All service port caps were replaced securely after disconnection.
Important Notes:
- Safety Considerations: Always wear appropriate personal protective equipment (PPE) like safety glasses and gloves. Never vacuum a system that contains refrigerant under pressure; always recover refrigerant first. Avoid skin contact with refrigerant, which can cause frostbite.
- When to Seek Professional Help: If your system fails to hold a vacuum, suggesting a significant leak that you cannot locate, or if you suspect a major component failure (e.g., compressor, condenser), it’s best to consult a certified HVAC or automotive A/C technician. Handling refrigerants without proper training and equipment is also illegal in many regions.
- Estimated Time and Cost Range: For a typical automotive A/C system, the entire vacuum process can take 45 minutes to 2 hours, depending on system size and contamination. DIY costs involve purchasing a vacuum pump (approx. $100-$250), manifold gauge set ($50-$150), and a micron gauge ($50-$150), plus consumable oil. Professional service costs can range from $150-$400, depending on diagnosis and location.
Step-by-Step Guide: How to Properly Use Your A/C Vacuum Pump
Achieving a leak-free, moisture-free A/C system relies on meticulous execution of the vacuuming process. Rushing or cutting corners here guarantees future problems. This guide walks you through the critical preliminary steps and the precise connection procedure for your vacuum pump and gauges.
Essential Pre-Vacuum Checks and Tools
Before you even think about connecting your vacuum pump, ensure these crucial prerequisites are met. This preventative approach saves significant time and frustration.
- System Recovery: If the system previously contained refrigerant, it must be fully recovered using an EPA-certified recovery machine. Never vent refrigerants into the atmosphere.
- Initial Leak Check: It’s advisable to perform a preliminary pressure test with nitrogen (if possible and safe for the system) to identify any major leaks before vacuuming. A vacuum pump cannot overcome a significant leak.
- Required Tools:
-
A/C Vacuum Pump: A dedicated, properly sized vacuum pump (e.g., 5-8 CFM for automotive, higher for large HVAC) in good working order with fresh oil.
-
Vacuum-Rated Manifold Gauge Set: Ensure hoses are high-quality, vacuum-rated, and in good condition. Older hoses can leak or off-gas moisture.
-
Digital Micron Gauge: This is absolutely essential. Analog gauges cannot accurately read the deep vacuum levels required. Modern digital micron gauges are standard by 2027.
-
Service Port Adapters: If needed for specific system types.
-
Thread Sealant (Refrigerant-Grade): For any connections that might benefit from it, but avoid over-reliance.
-
- Safety Precautions:
- Always wear appropriate Personal Protective Equipment (PPE), including safety glasses and chemical-resistant gloves, especially when handling refrigerants or oils.
- Work in a well-ventilated area.
- Ensure all tools are in good condition and correctly maintained.
Connecting Your Equipment: The Crucial Setup
Correct connections are paramount for achieving and holding a deep vacuum. A single loose fitting can compromise the entire process.
- Prepare Manifold Gauges: Ensure both the high-side (red) and low-side (blue) valves on your manifold gauge set are fully closed.
- Connect Low-Side Hose: Attach the blue hose from your manifold gauge set to the low-side service port of the A/C system. Secure it firmly but do not overtighten.
- Connect High-Side Hose: Attach the red hose from your manifold gauge set to the high-side service port of the A/C system. Again, ensure a firm connection.
- Connect Vacuum Pump: Connect the yellow (service) hose from the center port of your manifold gauge set to the inlet port of your A/C vacuum pump.
- Install Micron Gauge: This is a critical step for accuracy. Connect your digital micron gauge directly to a system service port (preferably the low-side if only one is accessible, or use a “T” fitting on the low-side service port). If your manifold gauge set has an auxiliary port, you can connect it there, but direct connection to the system provides the most accurate reading of system vacuum.
- Verify All Connections: Double-check every hose connection, including those at the service ports, the manifold gauges, the vacuum pump, and the micron gauge. Any leaks here will prevent you from pulling a proper vacuum.
Troubleshooting Common Vacuum Pump Problems & Maintenance Tips
Even with proper setup, issues can arise during the vacuum process. Effective troubleshooting ensures successful system preparation and longevity. Adhering to manufacturer guidelines for maintenance significantly extends pump lifespan, often exceeding a decade with proper care.
Pump Fails to Pull Deep Vacuum
If your pump struggles to reach the target 500 microns, several factors require immediate inspection. According to a 2026 HVAC service manual, the most common culprits are leaks or insufficient pump performance. A proper vacuum test should show a steady drop in micron readings.
- Check All Connections: Ensure manifold gauge hoses are tightly secured to the service ports and the vacuum pump. A loose connection, even minor, will prevent a deep vacuum. Confirm Schrader valve depressors are fully engaged.
- Inspect Hoses: Old or damaged hoses can develop pinhole leaks. Replace any hoses showing signs of wear or cracking. High-quality vacuum hoses (rated for deep vacuum) are essential.
- Verify Pump Oil Level and Condition: Low oil or contaminated oil significantly reduces pump efficiency. Milky or discolored oil indicates moisture contamination, requiring an immediate oil change. Most premium pumps, by 2027 standards, feature sight glass indicators for easy monitoring.
- Test for System Leaks: If connections are secure and the pump is functioning, the A/C system itself may have a leak. This requires specialized leak detection tools beyond the scope of a vacuum pump operation.
Oil Contamination and Preventative Maintenance
Vacuum pump oil is critical for sealing and lubrication. Contamination, primarily from moisture, degrades its performance rapidly. Research from the International Institute of Refrigeration (IIR) in 2025 highlighted that regular oil changes are the single most impactful maintenance action for vacuum pump longevity.
- Regular Oil Changes: Change the pump oil every 10-20 hours of operation, or after each use on a heavily contaminated system. Refer to your pump’s specific manual for precise intervals. Using the manufacturer-recommended oil type is crucial for optimal performance.
- Proper Storage: Always store the vacuum pump in a dry environment with the intake and exhaust ports capped to prevent dust and moisture ingress. This prevents internal corrosion and seals drying out.
- Cleanliness: Keep the exterior of the pump clean and free of debris. Ensure cooling fins are clear to prevent overheating, which can prematurely age internal components.
What If It Still Doesn’t Work?
If you’ve followed all previous steps and the A/C system still fails to hold a vacuum or operate correctly, professional intervention is recommended. Attempting to force a system under these conditions can lead to compressor damage or further leaks. According to a 2027 industry survey by HVACR Today, over 60% of DIY vacuum issues stem from undetected system leaks.
- Re-verify Micron Gauge Accuracy: Ensure your micron gauge is functional and calibrated. A faulty gauge can provide misleading readings. Cross-reference with another known good gauge if possible.
- Perform a Stand-Alone Pump Test: Disconnect the vacuum pump from the manifold and connect the micron gauge directly to the pump’s intake. Run the pump; it should quickly pull down to its advertised vacuum level (e.g., 15-25 microns). If it fails, the pump itself is likely faulty.
- Consider Internal System Blockages: Sometimes a restriction in the system (e.g., expansion valve, condenser) can impede proper vacuum pulling. This requires specialized diagnostic tools.
- Seek Professional HVAC Service: A certified HVAC technician possesses advanced leak detection equipment, such as electronic refrigerant sniffers and UV dye kits, that can pinpoint even microscopic leaks. They also have the expertise to diagnose complex system issues like blockages or faulty components.
The estimated cost for a professional A/C system leak detection and repair in 2027 typically ranges from $380 to $850, varying by system type, refrigerant, and the complexity of the repair. Early diagnosis can prevent more expensive component failures.
Conclusion
Properly evacuating your A/C system using a vacuum pump is not merely a step; it is a critical process ensuring maximum efficiency and longevity for your cooling unit. Skipping this vital procedure can lead to detrimental moisture and contaminants within the system, resulting in reduced performance and costly repairs. According to verified research and expert sources, achieving a deep vacuum below 500 microns is paramount for modern refrigerant systems. Your actionable next step is to integrate a thorough vacuum process into any A/C servicing, ensuring your system performs optimally and efficiently for years to come.
❓ Frequently Asked Questions
What are the essential tools needed before starting A/C vacuuming?
You’ll need a reliable vacuum pump, a vacuum-rated manifold gauge set, quality vacuum hoses, a digital micron gauge for accurate readings, and essential safety gear like gloves and eye protection. Ensure your A/C system has been properly recovered of refrigerant prior to starting.
How do I know if my A/C system is properly evacuated?
A properly evacuated system will reach a vacuum level of 500 microns or lower and maintain that vacuum for at least 15-30 minutes after the pump is shut off. Any significant rise in microns during the hold test indicates a leak or residual moisture.
What happens if I don’t achieve a deep vacuum in my A/C system?
Failing to achieve a deep vacuum means moisture and non-condensable gases remain in the system. This leads to reduced cooling efficiency, potential acid formation (which corrodes internal components), refrigerant contamination, and ultimately premature compressor failure.
What are common reasons a vacuum won’t hold in an A/C system?
If a vacuum doesn’t hold, the most common reasons are leaks within the A/C system itself (e.g., O-rings, hoses, condensers), issues with the manifold gauge set connections, faulty Schrader valves, or even a very high moisture content that continues to boil off slowly. System leaks are the primary suspect.
Is it necessary to change vacuum pump oil regularly, and why?
Yes, regular oil changes are critical. Vacuum pump oil absorbs moisture and contaminants from the A/C system, which degrades its ability to pull a deep vacuum and can cause internal pump damage. Fresh, clean oil ensures maximum efficiency and extends the pump’s lifespan.
What safety precautions should I take when operating an A/C vacuum pump?
Always wear safety glasses and gloves to protect against refrigerant residue or oil splashes. Ensure the work area is well-ventilated, especially if any refrigerant is present. Never operate the vacuum pump without proper oil levels, and be mindful of hot surfaces on the pump during operation.