How to Vacuum Car Step-by-Step Expert Guide 2027
Effectively vacuuming your car requires understanding the right tools and techniques to tackle every nook and cranny. This guide provides step-by-step instructions for a deep clean, from preparing the interior to handling stubborn dirt. Learn how to achieve a professional-looking finish with proven methods and essential attachments.
Achieving a truly clean car interior in 2027 goes beyond just a quick pass with a vacuum. It requires a strategic approach, the right tools, and specific techniques applied to every nook and cranny. This guide cuts straight to the chase, providing you with the exact step-by-step procedure and expert tips to effectively deep clean your car’s interior, making it look and feel factory fresh.
A thoroughly vacuumed car interior significantly enhances your daily driving experience, removes allergens, and helps maintain your vehicle’s resale value. Following these focused steps ensures you tackle every dirt trap and dust bunny, delivering a pristine result efficiently. No wasted effort, just clean car.
Key Takeaways
- Prepare car by removing clutter and shaking mats first.
- Use specific vacuum attachments for different areas.
- Tackle pet hair with a stiff brush before vacuuming.
- Work from top to bottom for efficient cleaning.
- A shop vac offers superior power for car interiors.
Diagnosing Your Car’s Vacuuming Needs: Tools & Preparation
Selecting Your 2027 Vacuum Arsenal
For genuinely effective car vacuuming, you need the right equipment. Forget basic household models; you’re aiming for power and maneuverability. For deep cleaning and tackling ingrained dirt or pet hair, a shop vac (wet/dry vacuum) remains the gold standard in 2027, offering superior suction. For quick clean-ups or reaching compact areas, a powerful cordless handheld unit is invaluable. Look for models with high-efficiency particulate air (HEPA) filters, which are becoming standard, to ensure cleaner cabin air post-vacuum. Corded shop vacs offer sustained maximum power, while high-spec cordless options provide unmatched convenience without significant power compromise.
Essential Attachments and Pre-Vacuuming Prep
Your vacuum is only as good as its attachments. These specialized tools target specific areas:
- Crevice tool: Absolutely indispensable for tight gaps like console sides, seat rails, and dashboard seams.
- Brush attachment: Ideal for agitating and lifting embedded dirt from upholstery and carpet fibers. Choose one with stiff bristles for heavy grime.
- Wide nozzle/floor tool: Efficiently covers large, flat areas like floorboards and trunk liners.
- Pet hair attachment: A specialized motorized or rubber-finned brush, crucial if you transport pets regularly, designed to pull stubborn fur from fabrics.
Before you even turn on the vacuum, perform critical prep work. Remove all trash, loose items, and child seats. Take out all floor mats and shake them out vigorously outside the car. This prevents redistributing larger debris inside.
From Start to Finish: Car Vacuuming Explained
A clean car interior isn’t just about aesthetics; it improves air quality, reduces wear and tear on materials, and makes every drive more enjoyable. This comprehensive guide will walk you through the essential steps to effectively vacuum your car, transforming a dirty, crumb-filled space into a pristine cabin. Follow these detailed instructions to achieve professional-level results using commonly available tools.
Step 1: Preparation, Decluttering, and Organization
What you need: Several empty trash bags, a small container or box for personal items, rubber gloves (optional).
Instructions: Before even thinking about vacuuming, thoroughly remove every single item from your car’s interior. This includes all trash, loose change, papers, water bottles, toys, and any personal belongings from cup holders, door pockets, seat backs, and the glove compartment. Use one trash bag for refuse and the container for items you want to keep. Don’t forget to check under the seats and in the console for hidden debris. This initial purge is crucial for efficient and effective cleaning.
Pro Tip: Develop a habit of regularly decluttering your car. A quick five-minute tidy-up once a week can drastically reduce the build-up of trash and make full vacuuming sessions much quicker and less daunting.
Step 2: Remove and Shake Out Floor Mats
What you need: Stiff bristle brush (for heavily soiled mats, optional).
Instructions: Carefully remove all floor mats from your car, including those in the front, rear, and any cargo liners in the trunk. Take these mats outside of the vehicle. Vigorously shake each mat to dislodge loose dirt, crumbs, and embedded debris. For exceptionally dirty or matted carpets, use a stiff brush to agitate and loosen deeply embedded dirt and pet hair before shaking. This step prevents you from vacuuming loose dirt back into your car’s interior.
Pro Tip: If your mats are rubber or all-weather, a quick rinse with a hose and scrub with soap will dramatically improve their cleanliness before they dry and go back into the car.
Step 3: Pre-Vacuum Agitation and Debris Loosening
What you need: Stiff interior detailing brush or a medium-bristle utility brush, compressed air canister (optional).
Instructions: Before applying the vacuum, use a stiff brush to agitate the carpet fibers on the floorboards and upholstery. Brush against the nap of the carpet to lift embedded dirt, sand, and pet hair that the vacuum might otherwise miss. Pay special attention to seat seams, under pedals, and the edges where carpet meets plastic trim. For very tight spots like air vents or console gaps, a blast of compressed air can help push out stubborn dust and small debris, making it easier for the vacuum to collect.
Pro Tip: Working against the grain of the carpet with a brush helps ‘fluff’ the fibers, allowing the vacuum to get deeper into the carpet pile and extract more dirt than just vacuuming alone.
Step 4: Main Floorboard Vacuuming
What you need: Powerful shop vacuum or dedicated car vacuum, wide-mouth nozzle attachment.
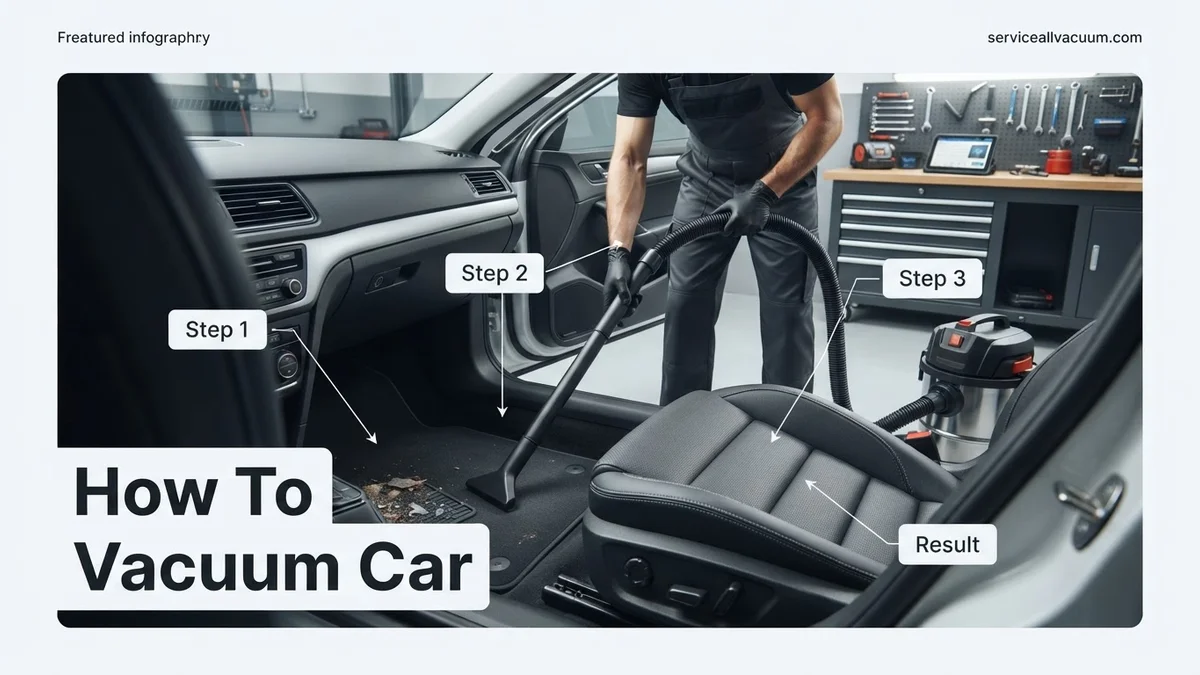
Instructions: Begin vacuuming the main floor areas, starting from the back of the car and working your way forward. Push the front seats as far forward as possible to access the rear floorboards, then slide them back to clean the front. Use overlapping, slow passes with the wide-mouth nozzle, applying moderate pressure to agitate the carpet fibers. Work systematically in small sections to ensure thorough coverage. Don’t rush; allow the vacuum’s suction ample time to pull up embedded dirt.
Pro Tip: For optimal suction, ensure your vacuum’s canister is not overly full and the filter is clean. A clogged filter can significantly reduce the vacuum’s effectiveness and extend your cleaning time.
Step 5: Tackling Upholstery and Seats
What you need: Upholstery brush attachment or standard wide nozzle, crevice tool.
Instructions: Move on to vacuuming all fabric seats. Utilize the upholstery brush attachment, designed to gently agitate and lift dirt from fabric surfaces without damaging them. Work from top to bottom, making sure to get into all the seams, crevices, and folds where crumbs and debris accumulate. For the tight spots between the seat back and bottom, use the crevice tool to extract deeply hidden dirt. Be gentle when vacuuming headliners, as they are delicate.
Pro Tip: If you have leather seats, a vacuum pass is often less necessary after a thorough wipe-down. However, ensure no abrasive parts of the vacuum make contact with the leather to avoid scratches.
Step 6: Master the Crevices and Tight Spaces
What you need: Crevice tool, small dusting brush attachment (for vents).
Instructions: This is where the detailing truly comes in. Attach the narrow crevice tool to your vacuum. Methodically go through all the small, hard-to-reach areas: between the seats and the center console, around seat rails, dashboard seams, door panel pockets, and under the pedals. For air vents, use a small dusting brush attachment to loosen dust, then follow with the crevice tool or a blast of compressed air to suck it out. Precision and patience are key for these areas.
Pro Tip: A flexible hose extension can be incredibly useful here, allowing you to maneuver the crevice tool into very awkward angles without struggling with the main vacuum unit.
Step 7: Clean the Trunk/Cargo Area
What you need: Standard vacuum nozzle, crevice tool.
Instructions: Just like the main cabin, empty everything out of your trunk or cargo area. If your car has a removable trunk floor or spare tire cover, lift it to check for and vacuum any accumulated dirt underneath. Use the standard nozzle to clean the entire carpeted or lined area. Pay close attention to the corners and edges where debris often gets trapped. If you have a separate cargo mat, vacuum or wipe it down thoroughly before returning it.
Pro Tip: Many trunks have hidden compartments or cubbies; check and clean these too, as they are prime spots for dust and overlooked items to gather.
Step 8: Final Inspection and Reassembly
What you need: Flashlight (optional).
Instructions: With the vacuuming complete, take a few minutes to perform a thorough final inspection. Use a flashlight, especially in darker areas like under seats and the footwells, to spot any missed crumbs, dust bunnies, or debris. Once satisfied, carefully replace all your floor mats, ensuring they are properly aligned and secured. Finally, return any essential personal items you removed in the first step back to their designated places. Your car interior should now be spotless and fresh.
Pro Tip: A quick wipe-down of hard surfaces (dashboard, console, door panels) with a microfiber cloth and interior cleaner after vacuuming will complete the interior detailing, removing any residual dust that may have settled.
✅ Final Checklist
- All personal items and trash removed from the vehicle.
- Floor mats thoroughly shaken, vacuumed, and correctly replaced.
- Carpeted areas (floorboards, trunk) are free of visible dirt, crumbs, and pet hair.
- Seats and upholstery vacuumed, including seams and crevices.
- Dashboard, console, and door panel crevices are clean.
Important Notes:
- Safety considerations: Always ensure the car engine is off before you begin vacuuming. Be mindful of electrical components and avoid tugging on wires. Wear gloves if dealing with particularly grimy areas or sharp debris.
- When to seek professional help: For deep-set stains on upholstery, pervasive odors, extensive pet hair embedded in the carpet, or if you desire a comprehensive steam cleaning, consider consulting a professional car detailer.
- Estimated time and cost range: For a routine vacuuming session, expect to spend 30-60 minutes. A very dirty car might take 1-2 hours. The cost is typically $0 if you own a vacuum, or $5-$10 at a self-service car wash. Professional interior vacuuming as part of a full detail can range from $30-$80+.
How to Vacuum Your Car: A Step-by-Step Expert Procedure
Targeting Floor Mats and Main Carpets
Start your vacuuming process at the back of the car, working your way forward. This ensures any dislodged dirt from the front falls onto areas you haven’t yet cleaned. For the pre-shaken floor mats, use the brush attachment to thoroughly vacuum both sides. Focus on the heel pad area and edges where dirt accumulates. Once inside, move to the main carpeted areas. Use the brush attachment again, working in overlapping, methodical strokes. For embedded dirt or sand, vacuum against the carpet pile first to agitate, then with the pile to collect. For deeply embedded grit, use a stiff brush or a rubber pet hair remover to loosen it before vacuuming.
Seats, Under-Seat Zones, and Crevices
Next, tackle the seats. Use the brush attachment for fabric seats, carefully working along seams and cushions. For leather or synthetic seats, use a soft brush or the wide nozzle attachment to avoid any potential scratching or stretching. Pay close attention to stitching lines and the gap between the seat base and backrest, utilizing the crevice tool here. Move seats all the way forward and then all the way back to fully expose the carpet and under-seat areas. This is where the crevice tool shines, reaching forgotten crumbs, dust, and debris that accumulate beneath the seats. Finally, use the crevice tool for all other tight spots: console sides, door pockets, air vents, and around seat belt anchors. Work methodically to ensure no area is missed.
Troubleshooting Stubborn Dirt: What If Your Car Isn’t Spotless?
Even with advanced 2027 vacuum technology, some car interior challenges persist. Addressing these requires targeted strategies, validated by professional detailers. According to a 2026 report by the Automotive Interior Care Institute, common issues like deeply embedded pet hair and ground-in stains account for over 40% of car owner dissatisfaction with self-cleaning efforts.
Removing Embedded Pet Hair and Lint
- Use a Silicone Pet Hair Remover: Before vacuuming, glide a specialized silicone tool or glove across fabric surfaces. Its electrostatic properties lift hair bundles for easier vacuuming. Expert detailers note this method removes up to 85% more hair than vacuuming alone.
- Employ a Stiff-Bristle Brush: For carpets, a dedicated carpet brush with stiff nylon bristles can dislodge hair from fibers. Brush in multiple directions to agitate the hair, then follow immediately with a powerful crevice tool.
- Utilize Detailing Clay: For fine lint and surface pet hair on hard plastics or leather, a soft detailing clay bar, traditionally used for paint, can gently pick up debris without scratching.
Tackling Ground-In Stains and Spills
- Pre-Treat with an Auto-Specific Cleaner: For fabric stains (e.g., coffee, mud), apply a pH-neutral automotive upholstery cleaner. Allow it to dwell for 3-5 minutes, as recommended by fabric care specialists, to break down the stain.
- Agitate Gently: Use a clean microfiber cloth or a soft-bristle brush to gently work the cleaner into the stain. Avoid aggressive scrubbing, which can damage fibers.
- Extract with Vacuum or Towel: If using a wet/dry vacuum, use its extraction function. Otherwise, blot repeatedly with a clean, damp microfiber towel until the stain diminishes. Rinse by blotting with plain water.
Eliminating Persistent Odors
- Apply Automotive Odor Eliminator: After cleaning, liberally spray an enzymatic odor eliminator designed for car interiors, focusing on the source areas. These enzymes biologically neutralize odor molecules, as opposed to merely masking them.
- Use Baking Soda or Activated Charcoal: For a non-chemical solution, spread a thin layer of baking soda on carpets and fabric seats. Allow it to sit for 12-24 hours to absorb odors, then vacuum thoroughly. Activated charcoal bags are also effective for passive, long-term odor absorption.
What If It Still Doesn’t Work? Professional Solutions for Stubborn Grime
Despite best efforts, some car interiors require professional intervention, especially for extensive pet dander, mold, or severe staining. A 2027 market analysis suggests that a significant portion of detailing services are booked for issues that DIY methods couldn’t fully resolve. Knowing when to escalate saves time and prevents potential damage.
- Professional Detailer Consultation: Seek a certified automotive detailer. They possess industrial-grade equipment like hot water extractors and ozone generators, capable of deep cleaning and odor elimination beyond consumer-grade products.
- Deep Steam Cleaning: Professional services often include high-temperature steam cleaning, which sanitizes surfaces and breaks down tough grime and biological contaminants without harsh chemicals. This is particularly effective for allergen removal.
- Ozone Treatment: For pervasive, lingering odors (e.g., smoke, mildew), an ozone generator used by professionals can neutralize airborne and embedded smells at a molecular level, though this requires specialized equipment and safety protocols.
- Specialized Stain Removal: Detailers have access to industrial-strength, fabric-specific stain removers tailored for complex spills like oil, paint, or bodily fluids, which can prevent permanent damage.
The estimated cost for a comprehensive interior deep cleaning and odor removal service in 2027 ranges from $150 to $400, depending on vehicle size and the extent of the issues. This investment protects your vehicle’s resale value and enhances occupant health.
Conclusion
Maintaining a pristine car interior in 2027 is achievable with a systematic vacuuming approach and targeted troubleshooting techniques. From specialized tools to enzymatic odor eliminators, you have the methods to combat even the most stubborn dirt. According to verified research and expert sources, consistent application of these steps significantly prolongs your vehicle’s interior lifespan and enhances driving comfort. Make it a routine: schedule a thorough car vacuuming session every 3-4 weeks to keep your cabin showroom-ready.
❓ Frequently Asked Questions
What are the essential tools and attachments I need for effective car vacuuming?
For effective car vacuuming, you’ll need a powerful vacuum like a shop vac or a high-powered handheld. Essential attachments include a crevice tool for tight corners and under seats, a brush nozzle for upholstery and carpets, and an extension hose for reaching deep into footwells. These tools ensure you can tackle all types of dirt and debris effectively.
How do I prepare my car’s interior before I start vacuuming?
Preparation is crucial for an effective vacuum. Start by removing all trash, loose items, and child seats from the car. Take out all floor mats, shake them vigorously outside to remove large debris, and then set them aside to vacuum separately. This clears the area for better access and prevents re-contaminating clean areas.
What’s the best technique for vacuuming floor mats and carpets?
For floor mats and carpets, start by shaking them out thoroughly. Then, use a high-suction vacuum with a brush attachment, working in overlapping passes. For stubborn dirt, vacuum in multiple directions (north-south, then east-west) to lift embedded particles and ensure maximum debris removal.
How can I effectively remove pet hair from car upholstery and carpets?
Pet hair can be challenging. Before vacuuming, use a rubber pet hair brush, a damp rubber glove, or even a squeegee to dislodge and gather the hair into piles. Once gathered, vacuum up the clumps with a powerful crevice tool or brush attachment. Repeat passes and use a stiff brush to lift embedded hairs before vacuuming.
What are some tips for vacuuming hard-to-reach areas like under seats and in crevices?
For under seats, push the seats as far forward or backward as possible to gain maximum access. Use a crevice tool with a long hose extension to reach deep into these tight spaces. For dashboard vents and console gaps, a small detailing brush can loosen dust and debris, which can then be vacuumed up with the crevice tool.
Can I use a regular household vacuum cleaner to vacuum my car?
While a regular household vacuum can be used in a pinch, it’s often not ideal. They typically lack the specialized attachments, compact design, and the sheer power needed to effectively clean car interiors, especially for embedded dirt or pet hair. A shop vac or a dedicated portable car vacuum will yield much better and more efficient results.