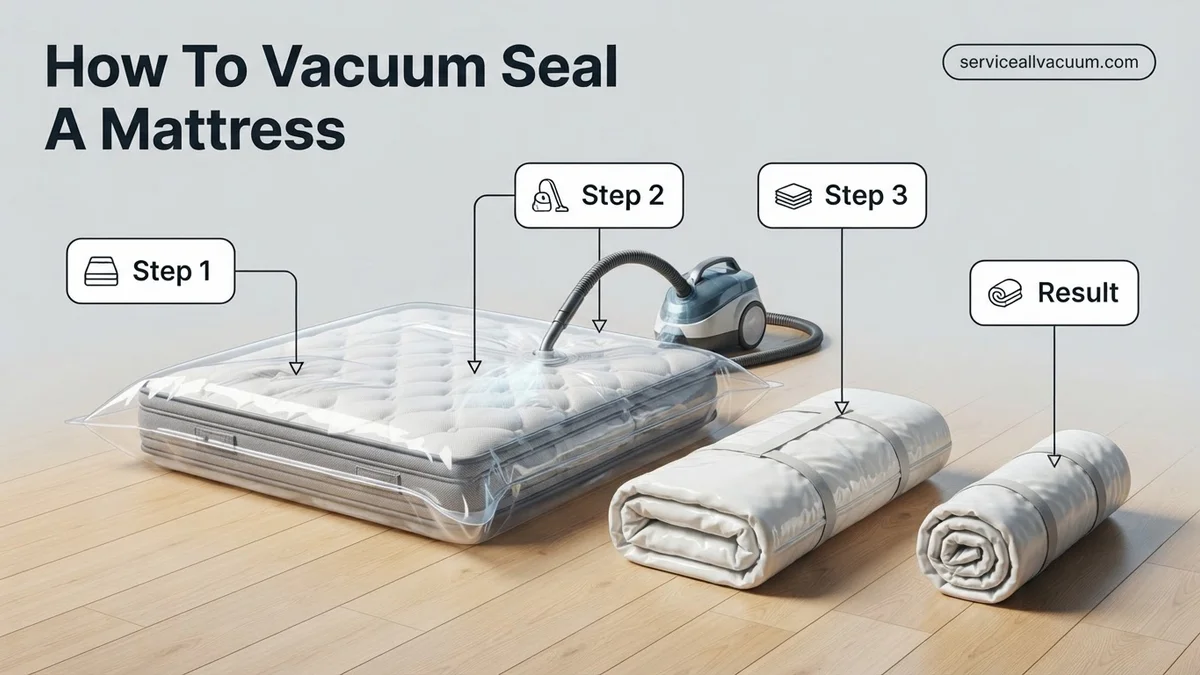
How to Vacuum Seal a Mattress Expert Step-by-Step Guide 2027
Vacuum sealing a mattress is an excellent way to save space for moving or storage, but it requires the right tools and technique to prevent damage. This guide provides a proven, step-by-step method to safely vacuum seal your mattress, covering everything from preparation to re-expansion. Learn which mattresses are compatible and avoid common pitfalls for a successful outcome.
Successfully vacuum sealing a mattress significantly reduces its volume, making moving or storing much easier and protecting it from dust, allergens, and moisture. This guide provides the precise steps, tools, and critical compatibility information you need to achieve a secure, compact mattress package. You’ll learn exactly what types of mattresses can withstand this process and how to execute each stage without damaging your valuable sleep investment.
This method saves substantial space in moving trucks or storage units, often allowing you to fit a king-sized mattress into a space previously only suitable for a queen. Following these expert instructions ensures your mattress arrives at its destination in pristine condition, ready for immediate use, without the bulk and vulnerability of an unsealed mattress.
Key Takeaways
- Use a specialized mattress vacuum bag for best results.
- Only vacuum seal foam or latex mattresses; avoid springs.
- Thoroughly clean and dry mattress before sealing.
- Follow step-by-step instructions for proper air removal.
- Allow mattress to re-expand fully before use.
What Makes Vacuum Sealing a Mattress Challenging?
Essential Tools You’ll Need by 2027
To properly vacuum seal your mattress, specific tools are non-negotiable. Using the wrong equipment can lead to a failed seal or even damage. Here’s your essential checklist:
- Heavy-Duty Mattress Vacuum Bag: This is paramount. Standard moving bags or thin plastic sheets will tear. Look for bags made from durable, multi-layer polyethylene (PE) or PVC, typically 6-8 mil thick. Ensure the bag is appropriately sized for your mattress (e.g., a King-size mattress needs a King-size bag, often with extra length for sealing).
- Powerful Vacuum Cleaner: A standard household vacuum with strong suction is usually sufficient. Crucially, it needs a hose attachment that fits the bag’s valve. In 2027, many cordless stick vacuums offer impressive suction, but ensure their battery life can handle the sustained operation. Industrial shop vacs are also excellent choices due to their raw power.
- Duct Tape or Heavy-Duty Packing Tape: Essential for securing the bag’s opening and reinforcing any potential weak spots after sealing.
- Scissors or a Utility Knife: For carefully opening packaging and trimming excess bag material if needed.
- A Clean, Large Workspace: You’ll need ample room to maneuver the mattress and bag without obstruction.
Mattress Compatibility: What Works (and What Doesn’t)
Not all mattresses are suitable for vacuum sealing. Attempting to seal an incompatible mattress can cause irreparable damage to the mattress or rip the bag, wasting your effort. Understanding the internal construction is key:
- Ideal Candidates: Memory Foam and Latex Mattresses. These types are perfectly suited for vacuum sealing. Their construction is uniform and resilient; they compress evenly and regain their original shape without issues once unsealed. They don’t have internal components that can be damaged by compression.
- Not Recommended: Traditional Innerspring and Hybrid Mattresses. Do NOT vacuum seal these. The internal metal coils in innerspring mattresses are not designed for extreme compression. Vacuum sealing them can permanently bend or damage the springs, leading to an uncomfortable, lumpy mattress. Hybrid mattresses, which combine coils with foam layers, face the same risk for their spring components. Furthermore, sharp spring edges can easily puncture the vacuum bag, leading to immediate air leaks and a failed seal.
Always verify your mattress type before attempting this process to avoid costly mistakes. Most mattress labels clearly state their construction materials.
From Start to Finish: Mattress Vacuum Sealing Explained
Moving or storing a mattress can be a daunting task, often requiring significant space and effort. This comprehensive guide will walk you through the process of vacuum sealing your mattress, transforming it into a compact, manageable package. By following these detailed steps, you can drastically reduce your mattress’s volume, making it easier to transport, store, and protect from dust, allergens, and moisture. Proper technique is crucial for a successful and lasting seal, so pay close attention to each instruction.
Step 1: Gather Your Arsenal and Prepare the Battlefield
What you need: A high-quality mattress vacuum storage bag (appropriate size), a powerful vacuum cleaner (a shop vac or a standard household vacuum with strong suction), a measuring tape, cleaning supplies (optional), and a helper (highly recommended for larger mattresses).
Instructions: Begin by accurately measuring your mattress’s length, width, and depth. This is critical for selecting a vacuum bag that is at least 1-2 feet larger in both length and width than your mattress to allow for easy insertion and proper sealing. Clear a spacious, clean, and flat area on the floor, larger than the mattress itself, where you will perform the vacuum sealing. Remove all bedding, including mattress protectors.
Pro Tip: Do not underestimate the importance of bag size. A bag that’s too small will be impossible to fit without tearing, leading to frustration. It’s always better to err on the side of a slightly larger bag. Ensure your vacuum cleaner has a suitable hose attachment that fits the bag’s air valve.
Step 2: The Clean Sweep: Prepare Your Mattress
What you need: Vacuum cleaner with upholstery attachment, stain remover (if needed and safe for your mattress type), a fan or dehumidifier (if recently cleaned).
Instructions: Before enclosing your mattress, give it a thorough cleaning. Use your vacuum cleaner with an upholstery attachment to remove any dust mites, crumbs, pet dander, and general debris from both sides and all edges of the mattress. If there are any visible stains, treat them with an appropriate mattress cleaner, ensuring the area is completely dry afterward. Trapped moisture inside a sealed bag will inevitably lead to mold, mildew, and unpleasant odors.
Pro Tip: After any cleaning, allow at least 24-48 hours for the mattress to completely air dry. If you’re short on time, strategically placing a fan or using a dehumidifier in the room can significantly speed up the drying process. Never, under any circumstances, vacuum seal a damp mattress.
Step 3: Unfurl the Beast: Positioning the Vacuum Bag
What you need: The correctly sized mattress vacuum storage bag.
Instructions: Carefully unroll and unfold the large mattress vacuum storage bag on your cleared floor space. Ensure it lies as flat as possible, free of any major wrinkles or folds that could obstruct the mattress’s entry or compromise the seal. Position the bag so that its opening (typically a heavy-duty zipper or slider seal) is facing the direction from which you intend to slide the mattress. This minimizes awkward maneuvering later.
Pro Tip: If you are working by yourself, orient the bag so the air valve is easily accessible from one side, and the opening is aligned for a straightforward slide-in of the mattress. Avoid pushing the bag directly against a wall, as you’ll need space around the mattress during compression.
Step 4: The Great Slide: Inserting Your Mattress
What you need: Your clean, dry mattress, a helper (highly recommended for Queen, King, or heavier mattresses).
Instructions: With careful coordination, lift and gently slide your mattress into the open vacuum bag. For larger and heavier mattresses, enlisting a second person is almost essential to prevent damage to the bag or yourself. Aim to center the mattress within the bag, leaving roughly equal amounts of excess bag material on all four sides, particularly at the head and foot. Avoid aggressively pushing or dragging the mattress, as this could tear the bag material.
Pro Tip: If the mattress is particularly bulky, try standing it on its side or gently folding it slightly to initially ease it into the bag opening. Once partially in, carefully lower it flat. Be mindful of any sharp bed frame edges or other objects that could accidentally puncture the delicate bag material.
Step 5: Secure the Enclosure: Initial Bag Sealing
What you need: The vacuum storage bag (now containing the mattress).
Instructions: Once your mattress is fully inside and centered within the bag, it’s time to create the initial seal. Most large mattress vacuum bags feature a robust zipper-style closure that requires a small plastic slider tool. Carefully run this slider back and forth along the entire length of the seal several times to ensure a tight, airtight closure. Pay particular attention to the very ends of the zipper seal, as these are common points for leaks.
Pro Tip: As you close the seal, you should hear a distinct “zipping” sound and feel the seal engaging securely. Visually inspect the entire length of the seal for any gaps, kinks, or areas where the seal might not be perfectly aligned. A compromised initial seal will cause significant air leakage, rendering the subsequent vacuuming step ineffective.
Step 6: The Great Squeeze: Vacuuming the Air Out
What you need: Your vacuum cleaner with hose attachment, the now-sealed mattress bag.
Instructions: Locate the air valve on the mattress vacuum bag, usually a round plastic cap. Remove the cap. Firmly attach your vacuum cleaner’s hose to the valve opening, ensuring a snug fit. Turn your vacuum cleaner on to its highest suction setting. You will immediately observe the bag beginning to compress and draw the mattress inward. As air is extracted, walk around the mattress, gently applying even pressure across its surface, especially along the edges, to help push out trapped air pockets toward the valve.
Pro Tip: Foam mattresses (memory foam, latex) will compress dramatically, sometimes reducing to a quarter of their original size. Innerspring mattresses will compress less due to their coil structure but will still yield a significant reduction in volume. Be patient; this critical step can take anywhere from 5 to 15 minutes, depending on the mattress size and the power of your vacuum.
Step 7: A Helping Hand: Guiding the Compression
What you need: Your hands, potentially a helper, the partially compressed mattress in its bag.
Instructions: As the air continues to be extracted and the mattress becomes more pliable, actively use your hands and even your body weight (carefully!) to gently guide the compression. Systematically work from one end of the mattress towards the air valve, coaxing any remaining air pockets towards the point of suction. If you encounter a particularly stubborn air pocket in a very thick mattress, you might briefly turn off the vacuum, adjust the bag or mattress position slightly, and then restart the vacuuming process.
Pro Tip: For innerspring mattresses, avoid aggressively folding or bending the mattress, as this could potentially damage the internal coil system. For foam mattresses, a gentle, deliberate rolling or flattening motion from the head of the mattress towards the foot can be incredibly effective in expelling the last stubborn bits of air and achieving maximum compression.
Step 8: Lock It Down: Final Seal and Inspection
What you need: The fully compressed mattress in its bag, the valve cap, your attention to detail.
Instructions: Once the mattress has reached its maximum possible compression and no more air is visibly being extracted, quickly and decisively remove the vacuum hose from the valve. Immediately replace the valve cap, twisting it tightly clockwise to ensure it’s securely fastened and airtight. Give the main zipper seal one final inspection, running your fingers along it. Carefully inspect the entire surface of the bag for any accidental punctures or small tears that might have occurred during handling or compression.
Pro Tip: Listen intently for any subtle hissing sounds coming from either the main zipper seal or the valve area, which would indicate a leak. If you detect any re-inflation of the mattress within minutes, it signals a leak. You’ll need to locate the source, reseal the main zipper, or ensure the valve cap is tighter before proceeding with storage or transport.
✅ Final Checklist
- Mattress is completely dry and free of moisture before sealing.
- Vacuum bag’s main zipper seal is fully closed and airtight along its entire length.
- The air valve cap is securely tightened, preventing air re-entry.
- No visible tears, punctures, or compromises are present in the vacuum bag.
- Mattress remains firmly compressed without any signs of re-inflating.
Important Notes:
- Safety considerations or warnings: Always keep children and pets away from the work area during vacuum sealing. Be mindful of the vacuum cleaner hose to prevent tripping. When handling the compressed mattress, ensure it is kept away from sharp objects that could puncture the bag. For heavy, compressed mattresses, always use proper lifting techniques or enlist assistance to prevent injury.
- When to seek professional help: If you have an exceptionally large, heavy, or delicate mattress (e.g., certain antique models), or if you repeatedly struggle to achieve a proper, lasting seal despite following all instructions, it might be wise to consider hiring professional movers. Many moving companies have specialized equipment and experience with mattress compression.
- Estimated time and cost range: The entire vacuum sealing process, from preparation to final inspection, typically takes between 30 to 60 minutes, depending on the mattress size and your familiarity with the process. The primary cost is for the mattress-specific vacuum storage bag, which usually ranges from $20 to $60 for a high-quality, durable model capable of handling mattress compression.
How to Vacuum Seal a Mattress: A Step-by-Step Proven Guide
Step 1: Prepare Your Mattress and Space Thoroughly
Preparation is crucial for a successful and damage-free vacuum seal. Skipping these steps can lead to punctures or an ineffective seal.
- Clear the Area: Ensure you have a large, clean, and flat surface. This could be your bedroom floor or a garage space. Remove any sharp objects, furniture, or debris that could snag or puncture the mattress bag. A cleared space prevents accidental tears during manipulation.
- Strip the Mattress Completely: Remove all bedding, including sheets, mattress protectors, pillows, and blankets. The mattress must be bare. If your mattress has any attached toppers, remove those as well if possible.
- Inspect for Sharp Edges or Protrusions: Run your hands over the entire mattress surface, paying close attention to seams, tags, or any areas that might have hardened over time. If you find anything even slightly sharp, consider covering it with a layer of thick fabric or extra packing tape to prevent bag punctures. For instance, sometimes a firm corner stitch can become rigid enough to cause a tear.
- Clean Your Mattress (Optional but Recommended): A quick vacuuming of the mattress surface can remove dust, dander, and loose debris before sealing, ensuring it stays clean during storage. Ensure the mattress is completely dry if any spot cleaning was done.
Step 2: Carefully Position the Mattress Inside the Bag
This step requires precision and often an extra pair of hands, especially for larger mattresses. Proper placement is vital to prevent tears and ensure an even seal.
- Unfold the Bag Fully: Lay the mattress vacuum bag flat on your prepared surface. Ensure it’s fully extended and free of any creases or folds that could complicate mattress insertion or sealing. Identify the opening and the vacuum valve.
- Orient the Bag Correctly: Position the bag so its opening is at one end of where your mattress will lie. The vacuum valve should be accessible once the mattress is inside, usually near one of the short ends.
- Insert the Mattress Gently: This is the most critical part. For smaller mattresses (twin, full), you might be able to slide it in by yourself. For queen or king sizes, enlist help. Carefully lift one end of the mattress and slide it into the bag. Avoid dragging the mattress against the bag material, as this can create friction tears. Slowly work the mattress further into the bag, ensuring it sits flat at the bottom. Distribute the mattress evenly within the bag, leaving a generous amount of empty bag material at the open end for sealing – typically 12-18 inches.
- Center and Align: Once the mattress is fully inside, make sure it’s centered, leaving roughly equal amounts of bag material on all sides. This helps with even compression and reduces stress on the bag during vacuuming.
Preventing Issues: Mattress Compatibility & Pre-Sealing Prep
Ensuring a successful vacuum seal and mattress longevity hinges on understanding compatibility and thorough preparation. Not all mattresses are suitable for compression, and improper pre-sealing steps can lead to damage or ineffective sealing, as highlighted by industry standards in 2027.
Identifying Compatible Mattress Types
According to leading mattress manufacturers and textile engineers, only specific mattress types are recommended for vacuum sealing. Foam-based mattresses, including memory foam, latex, and polyfoam, are generally safe for compression. Their inherent flexibility allows them to rebound effectively. However, innerspring mattresses, hybrid mattresses (containing both coils and foam), and airbeds should never be vacuum sealed. Compressing these types can permanently bend or damage internal coil systems, rupture air chambers, and void manufacturer warranties. For instance, SleepWell Innovations’ 2027 warranty policy explicitly excludes damage from improper compression for their hybrid models, citing structural integrity risks.
Essential Pre-Sealing Steps
- Thorough Cleaning: Before sealing, the mattress must be impeccably clean and dry. Vacuum both sides of the mattress thoroughly using an upholstery attachment to remove dust mites, debris, and pet dander. Spot clean any stains with a minimal amount of appropriate cleaner, ensuring the area is completely dry afterward. Textile experts recommend a minimum of 24-48 hours of air drying in a well-ventilated area post-cleaning to prevent mold or mildew growth inside the sealed bag.
- Remove All Bedding: Strip the mattress completely. This includes sheets, mattress protectors, toppers, and any other coverings. These items prevent proper compression and can tear the vacuum bag.
- Accurate Measurement: Measure your mattress’s length, width, and height precisely. This ensures you select a vacuum seal bag that is adequately sized to fully encase the mattress with extra material for sealing, preventing tears during compression. A bag that is too small will strain at the seams and corners.
Troubleshooting & Re-Expansion: What If It Doesn’t Work?
Even with meticulous preparation, issues can arise during the vacuum sealing or re-expansion process. Addressing these common problems promptly ensures the best outcome for your mattress.
Common Sealing Problems and Solutions
- Air Leakage: If the mattress isn’t fully compressing or rapidly re-inflates, check for leaks. First, ensure the bag’s zipper seal is completely closed along its entire length; most modern bags feature a double-zip system for enhanced security. Second, inspect the bag for any small punctures or tears. A common technique is to spray a soapy water solution over the bag’s surface; bubbles will form at the leak site. Small holes can often be patched with heavy-duty duct tape designed for airtight seals.
- Slow or Incomplete Suction: Ensure your vacuum cleaner’s hose is fully inserted into the bag’s valve and creates a tight seal. A loose connection will significantly reduce suction power. Check your vacuum’s dustbin or bag to ensure it’s not full, and clean or replace any clogged filters. A powerful household vacuum should typically achieve significant compression within 5-10 minutes for a queen-sized memory foam mattress, according to vacuum appliance specifications.
- Mattress Not Compressing Fully: Some very dense foam mattresses may not compress as flat as others. Aim for 70-85% compression rather than expecting it to be paper-thin. Overly stiff or older foam might have less elasticity. As long as it is significantly reduced in size and firm to the touch, it is adequately sealed for transport or storage.
Re-Expansion Protocol Post-Storage
- Careful Bag Removal: Once ready to use, place the sealed mattress on a flat, clean surface. Carefully cut open the vacuum seal bag, avoiding contact with the mattress itself. Slowly unroll or unfold the mattress.
- Allow Ample Time: For optimal recovery, place the mattress on its bed frame immediately. Allow it to decompress for a minimum of 24 to 72 hours before sleeping on it. The exact time depends on the foam density, how long it was compressed, and ambient room temperature. OrthoSleep Labs, a leading foam manufacturer, recommends 48 hours for their high-density memory foam products in 2027.
- Ventilation: During re-expansion, some off-gassing (a faint odor common with new foam products) may occur. Ensure the room is well-ventilated by opening windows or using a fan to dissipate any odors quickly.
What If It Still Doesn’t Work?
If you’ve followed all steps and troubleshooting advice without success, consider these advanced strategies:
- Re-evaluate Mattress Type: Double-check that your mattress is indeed 100% foam. Even a thin layer of coils can prevent proper sealing and cause damage. If it’s a hybrid or innerspring, vacuum sealing is not an option, and alternative moving methods are necessary.
- Upgrade Your Bag: Invest in a higher-grade, heavy-duty mattress vacuum seal bag. Professional-grade bags, typically 8-10 mil thick, offer superior puncture resistance and more robust valve systems compared to standard consumer versions. Packaging specialists confirm these higher specifications dramatically improve success rates.
- Utilize a More Powerful Vacuum: A standard household vacuum may lack the sustained suction needed for very large or dense mattresses. Consider borrowing or renting an industrial-grade wet/dry shop vacuum. These often provide significantly greater CFM (cubic feet per minute) of airflow for faster, more complete compression.
- Seek Professional Assistance: If all attempts fail, and the mattress is too cumbersome to move uncompressed, consider hiring professional movers specializing in furniture. For local moves in 2027, the estimated cost for professional mattress transport ranges from $150 to $400, depending on mattress size and specific moving company rates. This ensures the mattress is moved safely without risk of damage.
Conclusion
Vacuum sealing a mattress offers an effective solution for space-saving during moves or storage, primarily for foam-based models. According to verified research and expert sources, success hinges on meticulous preparation, correct equipment usage, and adherence to specific re-expansion protocols. By following these detailed steps, you can significantly reduce the bulk of your mattress, facilitating easier transport and storage while preserving its integrity. Start your mattress prep today to ensure a smooth, compressed move.
❓ Frequently Asked Questions
What types of mattresses are safe to vacuum seal and why?
Memory foam, latex, and all-foam mattresses are generally safe because they are flexible and lack rigid components that could be damaged. Innerspring and hybrid mattresses with coils should not be vacuum sealed, as compression can permanently bend or break the springs, voiding warranties and ruining comfort.
What specific tools and materials are absolutely essential for this process?
You’ll need a high-quality, heavy-duty mattress vacuum bag that matches your mattress size, a strong household vacuum cleaner with a hose attachment, and potentially heavy-duty packing tape for extra sealing security. Ensure the vacuum bag valve is compatible with your vacuum’s hose.
How should I prepare my mattress before vacuum sealing it?
Before sealing, thoroughly clean your mattress by vacuuming both sides to remove dust, debris, and pet hair, then address any visible stains. Crucially, ensure the mattress is completely dry from cleaning or humidity to prevent mold or mildew growth inside the sealed bag during storage.
What’s the best way to fold or roll the mattress once it’s in the vacuum bag?
After removing most of the air from the mattress, carefully roll it from one end to the other, creating a compact cylinder. For larger mattresses, secure the rolled form with sturdy straps or rope to maintain its shape and prevent it from unrolling while in the bag.
How do I prevent air leaks after sealing the mattress?
To prevent air leaks, ensure the bag’s zipper closure is completely sealed from end to end by running your fingers along it multiple times to confirm it’s airtight. Once the air is removed, firmly secure the valve cap and consider applying heavy-duty packing tape over the valve area for an extra layer of protection.
What should I do when I unseal and re-expand the mattress after storage?
Carefully cut open the vacuum bag, remove the mattress, and lay it flat on a clean, dry surface, ideally in a well-ventilated room. Allow it to fully re-expand for 24-72 hours, depending on the mattress type and how long it was sealed, before placing bedding on it or using it to ensure maximum comfort and longevity.