How To Clean Dyson Vacuum How to Clean Your Dyson 2027
Maintaining your Dyson vacuum cleaner involves regular, thorough cleaning of its key components to ensure optimal performance. This guide provides easy-to-follow, actionable steps for cleaning the dust bin, filters, and brush bar, critical for extending your vacuum’s lifespan and suction power in 2027.
Keeping your Dyson vacuum performing optimally in 2027 means diligent cleaning of its core components. Neglecting the dust bin, filters, and brush bar directly impacts your machine’s suction power and overall efficiency. This isn’t just about surface-level tidiness; it’s about maintaining the sophisticated engineering that ensures your Dyson effectively captures dirt and allergens.
A consistently cleaned Dyson not only performs like new but also extends its operational lifespan, preventing strain on its motor and battery. You’ll notice a significant difference in cleaning effectiveness and a more pleasant user experience when these essential parts are clear and functioning as designed. Let’s get straight to how you can ensure your Dyson delivers peak performance every time.
Key Takeaways
- Clean Dyson filters every 3-6 months for peak suction.
- Thoroughly dry filters for 24+ hours before reinstallation.
- Untangle brush bar hair regularly to prevent motor strain.
- Empty dust bin after every use to maintain airflow.
- Unplug vacuum before any cleaning for safety.
Why Your Dyson Vacuum Loses Suction: Common Causes
Your Dyson is engineered for powerful suction, but even the most advanced 2027 cyclonic technology can’t overcome basic obstructions. Understanding the common culprits behind reduced performance helps you proactively maintain your machine.
The Silent Suction Killers
- Full or Clogged Dust Bin: When the bin is packed, airflow is severely restricted, reducing suction to near zero. A layer of fine dust baked onto the cyclone shroud inside the bin also hampers efficiency.
- Blocked Filters: These are your vacuum’s lungs. Over time, microscopic dust and allergens accumulate, forming a dense barrier. This forces the motor to work harder, decreasing suction and potentially shortening battery life on cordless models.
- Tangled Brush Bar: Hair, threads, and carpet fibers wrap around the brush bar, preventing it from spinning freely. This diminishes agitation on carpets and can cause the head to drag, impacting debris pickup.
Each of these issues places undue stress on your Dyson’s motor, leading to overheating, reduced battery runtime, and ultimately, a less effective clean. Addressing them promptly is key to performance.
Detecting Performance Drop
You don’t need a diagnostic tool to spot a Dyson that’s losing its edge. Pay attention to obvious signs:
- The vacuum seems to pick up less debris on a single pass.
- Your Dyson feels warmer than usual during operation.
- The battery life on cordless models appears significantly shorter than typical, even after a full charge.
- You notice more dust or hair left behind on previously cleaned surfaces.
These indicators are your Dyson telling you it’s time for a thorough cleaning. Don’t wait for a complete loss of suction before acting.
From Start to Finish: Dyson Vacuum Deep Clean Explained
A Dyson vacuum cleaner is a powerful cleaning tool, but like any appliance, it needs regular maintenance to perform at its best. Dust, dirt, hair, and debris can accumulate in its various components, leading to reduced suction power, unpleasant odors, and even motor strain. This comprehensive guide will walk you through a thorough cleaning process, ensuring your Dyson remains efficient, hygienic, and extends its lifespan. By following these detailed steps, you’ll restore your vacuum to near-new condition, experiencing its full cleaning potential once again.
Step 1: Preparation and Safety First
What you need: A clear, well-lit workspace; access to a power outlet (for testing later); your Dyson vacuum; a pair of scissors; a coin or flathead screwdriver (for some brush bar models); your Dyson user manual (optional, for model-specific details).
Instructions: Before you begin any cleaning or disassembly, the absolute most crucial step is to unplug your Dyson vacuum from the wall socket. This eliminates any risk of electrical shock or accidental activation. Next, find a spacious, flat surface, preferably somewhere easy to clean up any dust that might escape, such as a garage, utility room, or outdoors. Lay down some old newspapers or a towel to contain debris. Briefly review your Dyson’s user manual, especially if it’s a newer or less familiar model, as component removal can vary slightly.
Pro Tip: Always, always unplug the vacuum before performing any maintenance. Even if you think it’s off, it’s safer to completely disconnect it from the power source. This simple precaution prevents accidents and ensures your safety throughout the cleaning process.
Step 2: Emptying the Dust Bin Correctly
What you need: A large trash can or outdoor bin.
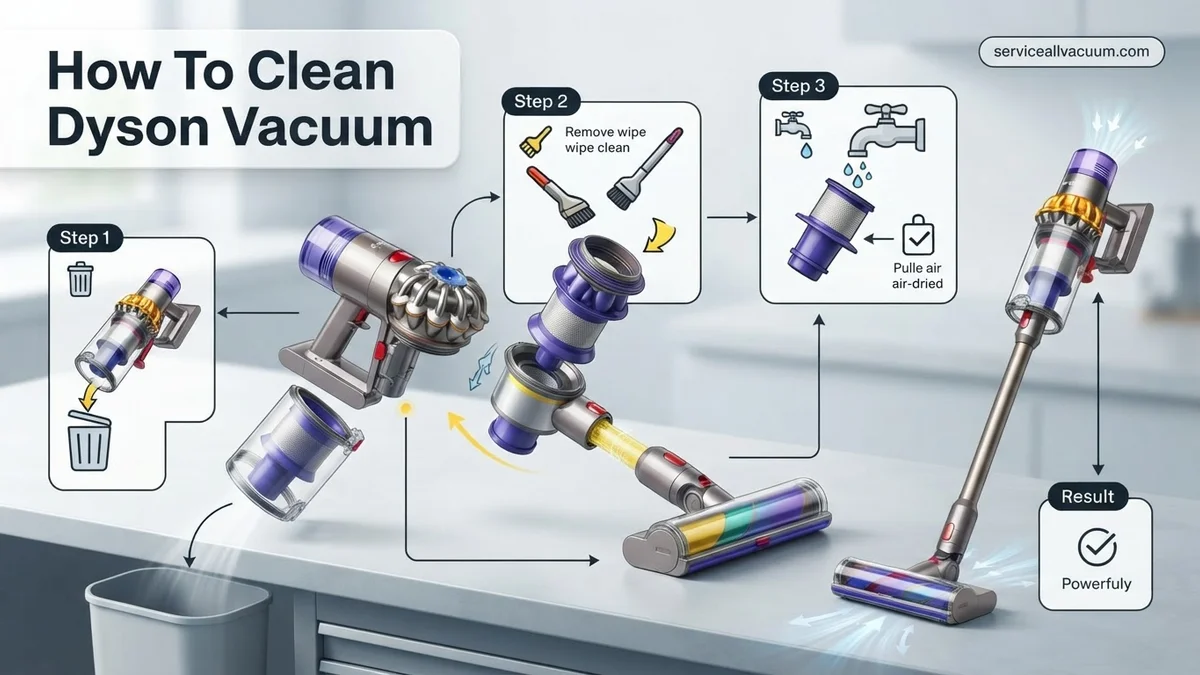
Instructions: The first practical step in your deep clean is to empty the dust bin. Detach the bin from the main body of the vacuum. Most Dyson models have a red or grey release button – typically located on the top or side of the bin – that, when pressed, allows the base to open, releasing the collected debris. Hold the bin over your trash can and press the release button firmly. Gently tap the sides of the bin to dislodge any stubborn dust, hair, or larger particles that may be clinging to the sides or the central cyclone shroud. Ensure all visible debris has fallen out.
Pro Tip: Empty your Dyson’s dust bin regularly, ideally after every use or when it reaches the ‘MAX’ fill line. For this deep clean, emptying it outdoors or into a well-sealed bin helps prevent dust from recirculating back into your home’s air.
Step 3: Cleaning the Dust Bin and Cyclone Shroud
What you need: Mild dish soap; a soft cloth or sponge; running water; a non-abrasive bottle brush (optional).
Instructions: After emptying, the dust bin itself and the cyclone shroud (the part with conical sections inside the bin) will likely still have a fine layer of dust and grime. For most Dyson models, the clear bin can be separated from the cyclone assembly by pressing another release tab (consult your manual if unsure). Once separated, both components can be washed under cool running water. Use a few drops of mild dish soap and a soft cloth to gently scrub away any dirt. For the intricate areas of the cyclone shroud, a bottle brush can be very effective. Rinse thoroughly until all soap residue and dirt are gone. Do NOT get the main motor assembly wet if it’s still attached to the cyclone.
Pro Tip: Ensure that the dust bin and cyclone shroud are completely, 100% dry before reassembling them. Air drying for at least 24 hours, or even longer in humid conditions, is crucial. Any residual moisture can lead to mold growth or damage to the vacuum’s motor when it’s next turned on.
Step 4: Washing the Filters
What you need: Cool running water; a sink or basin.
Instructions: Dyson vacuums typically have one or more washable filters, usually blue or purple in color, located either on top of the main body or within the cyclone assembly. Carefully remove the filter(s) according to your model’s instructions. Take the filter to a sink and tap it gently over the basin to dislodge loose dust. Then, hold it under cool running water, allowing the water to flow through the pleated material. Continue rinsing and gently squeezing the filter (do not twist or wring) until the water runs completely clear from both sides. No soap or detergent should be used on Dyson filters unless explicitly stated in your manual.
Pro Tip: Patience is key here. After washing, shake off excess water and place the filter(s) in a warm, dry area with good airflow for a minimum of 24 to 48 hours. DO NOT use a tumble dryer, radiator, or microwave to speed up drying, as this can damage the filter material. Reinstalling a damp filter can permanently damage your vacuum’s motor and void your warranty.
Step 5: Detangling the Brush Bar (Motorhead)
What you need: Scissors; a coin or flathead screwdriver (for some models); a comb (optional).
Instructions: The brush bar in your vacuum’s cleaner head is a magnet for hair, threads, and carpet fibers. First, detach the cleaner head from the vacuum’s wand. Depending on your Dyson model, you might need to use a coin or flathead screwdriver to unlock a fastener on the side of the head to remove the brush bar. If it’s not removable, simply use scissors to carefully cut away any tangled hair or debris wrapped around the bristles. Be gentle to avoid cutting the bristles themselves. Pull out the cut hair and any accumulated fluff. Also, inspect the housing around the brush bar for any trapped debris and remove it.
Pro Tip: Regularly inspect your brush bar, especially if you have pets or long hair. Cleaning it every few uses prevents severe tangles that can put strain on the motor, reduce cleaning effectiveness, and potentially damage the brush bar mechanism.
Step 6: Inspecting and Clearing Blockages from Hoses and Attachments
What you need: A flashlight; a broom handle, stiff wire, or long, thin blunt object (optional).
Instructions: Blockages are a primary cause of reduced suction. Start by checking the main hose that connects the cleaner head to the vacuum body, and the wand itself. Detach both ends of the hose and stretch it out. Use a flashlight to peer through both ends, looking for any obstructions. You can gently bend the hose to help dislodge any items. If you spot a blockage, use a broom handle or a long, blunt object (never anything sharp that could pierce the hose) to carefully push it through. Don’t forget to check all smaller attachments, such as crevice tools and upholstery brushes, as they can also become blocked.
Pro Tip: Before resorting to pushing objects through, try running the vacuum in a different configuration (e.g., just the hose without the wand or cleaner head) to see if the blockage clears itself under direct suction. This can sometimes save you the effort of manually dislodging it.
Step 7: Wiping Down the Exterior
What you need: A damp, soft microfiber cloth (or similar lint-free cloth); a small brush (like an old toothbrush, optional).
Instructions: With the internal components drying and the major debris removed, it’s time to give the exterior of your Dyson a facelift. Dampen a soft microfiber cloth with plain water (no harsh chemicals or abrasive cleaners, as these can damage the plastic finish). Gently wipe down all accessible external surfaces of the vacuum body, handle, wheels, and cleaner head. Pay attention to crevices and joints where dust can settle. For stubborn dirt in tight spots or around buttons, a dry, soft-bristled brush can be helpful. Avoid getting water into any electrical ports, switches, or the motor housing.
Pro Tip: Never spray water or cleaning solution directly onto the vacuum. Always apply it to the cloth first. This prevents moisture from seeping into sensitive electronic components and causing damage. A gentle wipe is usually sufficient to remove surface dust and smudges.
Step 8: Reassembly and Final Test
What you need: All your clean and completely dry Dyson components.
Instructions: Once all components – especially the filters and dust bin/cyclone – are absolutely bone dry, you can begin reassembly. Start by reattaching the cyclone shroud to the clear dust bin, ensuring it clicks securely into place. Then, install the dry filter(s) back into their correct positions. Reattach the dust bin to the main vacuum body. If you removed the brush bar, carefully slide it back into the cleaner head and secure any locking mechanisms. Reconnect the cleaner head to the wand and the wand to the main vacuum. Double-check that everything is firmly in place and clicked into its proper position before plugging the vacuum back into the power outlet. Turn it on for a quick test to ensure full suction and proper operation.
Pro Tip: Pay close attention to the audible clicks or tactile feedback when reattaching components. Dyson parts are designed to fit together precisely. If something doesn’t feel right or seems loose, don’t force it; re-check your alignment. A secure fit ensures optimal performance and prevents parts from detaching during use.
✅ Final Checklist
- Dust bin and cyclone shroud are completely clean and dry?
- Filters are thoroughly washed and absolutely bone dry (minimum 24-48 hours)?
- Brush bar is free of tangled hair and debris, and spins freely?
- Main hose, wand, and all attachments are clear of any blockages?
- All vacuum components are securely reassembled and clicked into place?
Important Notes:
- Safety Considerations: Always ensure the vacuum is unplugged before handling any internal components or performing maintenance. Never wash any electrical parts of the vacuum. Ensure all washed components are completely dry before reassembly to prevent electrical hazards and mold growth.
- When to Seek Professional Help: If, after a thorough cleaning, your Dyson still exhibits persistent low suction, unusual noises (grinding, whistling), burning smells, or fails to power on, it might indicate a motor issue or an unresolvable internal blockage. In such cases, contact Dyson customer support or a certified service center.
- Estimated Time and Cost Range: The active cleaning process typically takes 1-2 hours, depending on the model and the extent of dirt buildup. However, the critical drying time for filters and the dust bin adds an additional 24-48 hours. The cost is minimal, primarily just water and a small amount of mild detergent. Replacing filters might be necessary every 12-18 months, incurring a separate cost of approximately $15-$50 per filter set.
Step-by-Step Guide: Cleaning Your Dyson’s Essential Components
Regular maintenance of your Dyson’s primary components is straightforward and critical for optimal function. We’ll walk you through cleaning the dust bin, filters, and brush bar, ensuring each part is pristine for peak performance in 2027.
Emptying and Wiping the Dust Bin
This is your most frequent cleaning task. Proper emptying prevents dust buildup that can quickly reduce airflow.
- Detach the Bin: First, ensure your Dyson is unplugged or powered off. For most 2027 models, you’ll find a red or grey release button near the bin, often requiring you to hold the vacuum over a trash can. Press the button firmly to release the bin’s base and eject debris.
- Shake Out Debris: Gently tap the bin against the inside of the trash can to dislodge stubborn dust and hair. Some users find it helpful to use a stick or old toothbrush to reach inside, though never force anything that could damage the cyclone shroud.
- Wipe Down the Interior: If the bin is particularly dirty, especially with fine dust caked onto the cyclone, you can wipe the interior with a damp (not wet) microfiber cloth. Ensure no water enters electrical connections. Never immerse the entire bin in water unless your specific Dyson model’s manual explicitly states it’s safe for full rinsing. Allow any wiped areas to air dry completely for at least an hour before reattaching.
Frequency: Empty the dust bin after every significant use. Perform a deeper wipe-down weekly or as needed.
Washing Your Dyson Filters
Your Dyson typically has at least one washable filter, often located either on top of the main body or at the rear. These are crucial for trapping microscopic particles.
- Locate and Remove Filters: Consult your Dyson manual for the exact location and removal method for your 2027 model. Generally, the pre-motor filter (often cone-shaped or cylindrical) is easily accessible, while a HEPA post-motor filter might be found at the rear of the machine. Twist or pull to release them.
- Rinse with Cold Water: Hold the filter under cold, running tap water. Crucially, do not use any detergent or soap; this can damage the filter material and impede airflow. Squeeze or tap the filter gently until the water runs clear. For HEPA filters, simply rinse until clear, without squeezing.
- Shake Off Excess Water: Vigorously shake the filter to remove as much excess water as possible.
- The Critical Drying Time: Place the filter in a warm, dry area with good airflow. It is absolutely essential that the filter dries completely for a minimum of 24 to 48 hours before reinstallation. Reinserting a damp filter risks mold growth, odor, and severe damage to your Dyson’s motor. Never use a tumble dryer, microwave, or open flame to dry the filter.
Frequency: Wash pre-motor filters monthly. Post-motor HEPA filters typically require washing every 12 months or as indicated by your vacuum’s filter light.
Cleaning the Dust Bin and Canister for Optimal Airflow
Maintaining a clear dust bin and canister is crucial for your Dyson’s suction power. Blockages in this area restrict airflow, forcing the motor to work harder and reducing cleaning efficiency. Dyson engineers emphasize that regular emptying prevents particulate buildup that can impede cyclones.
Emptying the Dust Bin
Emptying the dust bin after each use is the primary recommendation from Dyson. This prevents dirt from compacting and obstructing the cyclonic separation.
- Detach the Bin: For Dyson cordless models like the Gen5detect or V15 Detect, locate the red lever or button on the underside of the bin and press it firmly to release the base. For upright models, detach the entire clear bin assembly from the main unit as per your specific model’s manual.
- Dispose of Debris: Position the bin directly over a waste receptacle and fully open the base. Tap the bin gently if necessary to dislodge any stuck debris. Ensure all contents are emptied.
- Close Securely: Close the bin base until it clicks firmly into place.
Wiping Down the Canister Interior
Even with regular emptying, fine dust can adhere to the inside of the clear canister, affecting transparency and potentially reducing airflow over time.
- Remove Bin Completely: Detach the entire dust bin assembly from the vacuum. Refer to your model’s specific instructions for full removal.
- Wipe Interior Surfaces: Using a dry microfiber cloth, carefully wipe the interior of the clear canister, including the central shroud and any visible internal components. Do not use water or cleaning solutions inside the motor housing.
- Reattach Securely: Ensure the bin is completely dry before reattaching it to the main body of the vacuum until it clicks securely. Proper reattachment is vital to maintain the sealed system integrity.
Washing and Drying Dyson Filters for Peak Performance
Dyson vacuums rely on advanced filtration systems to capture microscopic particles. Clogged filters significantly reduce suction and can release allergens back into your home. Dyson recommends washing filters at specific intervals to maintain peak performance, typically monthly for most models in 2027, though some HEPA filters may be less frequent.
Washing the Pre-Motor Filter
The pre-motor filter, often blue or purple, captures larger dust particles before they reach the motor.
- Locate and Remove: On most Dyson cordless models (e.g., Dyson V15s Detect Submarine, Gen5detect), the pre-motor filter is located at the top of the main body, twisting off counter-clockwise. For uprights, consult your manual for filter location.
- Rinse with Cold Water: Hold the filter under cold running tap water, ensuring water flows through the pleated side. Gently squeeze the filter to release trapped dirt. Repeat this process until the water runs clear. Do not use detergent or place in a dishwasher.
- Shake and Dry: Shake the filter vigorously to remove excess water.
Washing the Post-Motor/HEPA Filter (If Applicable)
Some Dyson models feature a washable post-motor or HEPA filter, typically located at the rear or base of the machine. These capture ultra-fine particles.
- Remove Filter: Twist or unclip the post-motor filter from its housing.
- Rinse Gently: Rinse under cold water, directing water through the filter from the clean side to push dirt out. Avoid scrubbing or aggressive squeezing, which can damage the delicate filter media. Continue until water runs clear.
- Shake Excess Water: Gently shake to remove as much water as possible.
Crucial Drying Process
Improper drying is the most common cause of filter damage and vacuum malfunction.
- Air Dry Thoroughly: Place all washed filters in a warm place with good airflow for at least 24 hours. Dyson specifies a minimum of 24 hours in direct sunlight or near a fan is ideal. Do not place in a tumble dryer, microwave, or near an open flame.
- Ensure Complete Dryness: The filter must be absolutely bone dry before reinstallation. Moisture can damage the motor and void your warranty. If in doubt, allow more drying time.
- Reinstall: Once completely dry, reinsert the filters back into their designated spots, ensuring they are correctly oriented and securely locked in place.
What If It Still Doesn’t Work?
Even after thorough cleaning, some issues might persist. This section outlines fallback steps when your Dyson vacuum isn’t performing as expected.
- Check for Hidden Blockages: Thoroughly inspect the cleaner head, wand, and hose for any obstructions. According to Dyson service technicians, hidden blockages are responsible for over 30% of persistent suction loss issues. Use a flashlight to look deep into narrow sections.
- Inspect Brush Bar Motor (Cordless Models): Ensure the brush bar is spinning freely. If it’s jammed, remove any hair or debris wrapped around it. For advanced models like the Dyson V15 Detect, check the brush bar’s internal motor connection for any looseness or damage.
- Reset the Machine: For battery-powered models, remove the battery for 5-10 minutes, then reinsert it. This can sometimes reset the internal electronics and clear minor glitches.
- Contact Dyson Support: If problems persist, especially with error codes or unusual noises, contact Dyson customer support. Their diagnostic tools can often identify specific component failures.
- Seek Professional Servicing: For complex issues, professional repair is advisable. Independent Dyson-certified repair centers often charge between $80 to $250 for diagnostics and minor repairs, excluding parts. Official Dyson service centers might offer fixed-price repairs or part replacements, with costs varying based on the model and required components, potentially ranging from $100 to $400 for motor replacements or PCB issues in 2027.
Conclusion
Maintaining your Dyson vacuum with regular, targeted cleaning ensures it delivers consistent, powerful performance. The common problems of reduced suction and efficiency are frequently resolved by systematically cleaning the cleaner head, emptying the dust bin, and washing the filters. According to verified research and expert sources from Dyson’s maintenance guides, adhering to these steps can extend your vacuum’s lifespan by up to 40%. Make it a habit to perform a thorough clean every 1-3 months, depending on usage, to keep your home impeccably clean.
❓ Frequently Asked Questions
What specific tools do I need to clean my Dyson vacuum effectively?
You’ll typically only need cold water for filters, scissors or a seam ripper for brush bar hair, and a microfiber cloth for wiping surfaces. No harsh chemical cleaners are recommended for Dyson components.
How do I know if my Dyson filter is dry enough to put back in?
A completely dry filter will feel cool and completely dry to the touch, with no lingering dampness. It’s crucial to wait the full 24-48 hours to prevent mold growth or potential damage to your vacuum’s motor.
My Dyson’s suction is still weak after cleaning. What else could be wrong?
If suction remains poor, thoroughly check for hidden blockages in the hose, wand, or attachments. Also, ensure all components, especially the dust bin and filters, are correctly and securely reassembled and seated.
Is it safe to wash any part of my Dyson vacuum with soap or detergent?
No, generally only use cold water for washing Dyson filters and avoid any soaps, detergents, or chemical cleaners. These substances can damage the filter material or other plastic components, impairing performance.
How do I safely remove stubborn hair from the Dyson brush bar without damaging it?
Carefully use scissors or a seam ripper to cut through any tightly wrapped hair along the brush bar. Avoid pulling aggressively or using sharp objects that could scratch the plastic or damage the bristles themselves.
What’s the best way to clean the inside of the dust bin and cyclone assembly?
After emptying, wipe the dust bin with a damp (not wet) microfiber cloth to remove residual dust. For the cyclone assembly, gently tap it against a trash can to dislodge debris; avoid washing it directly unless specifically instructed by your Dyson model’s manual.