How to Vacuum a Car Air Conditioner Step-by-Step Guide 2027
Proper vacuuming of your car’s AC system is essential for optimal performance and longevity, preventing damage from harmful moisture and non-condensable gases. This guide provides a detailed, step-by-step procedure to safely and effectively evacuate your vehicle’s air conditioning system, ensuring a clean and efficient recharge.
To properly service your car’s air conditioning system in 2027, evacuating the refrigerant lines is a non-negotiable step before recharging. This technical vacuuming process removes all air and moisture from the system, preventing costly damage and ensuring your AC operates at peak efficiency. Understanding how to correctly connect your vacuum pump and manifold gauges is fundamental for a successful, long-lasting repair.
Performing this procedure yourself saves significant money compared to shop rates, and it guarantees your system is prepared for optimal cooling performance. Skipping proper evacuation leads to poor cooling, component corrosion, and premature system failure. We’ll walk you through the essential steps, tools, and safety measures required for a professional-grade AC evacuation at home.
Key Takeaways
- Use correct tools:vacuum pump, manifold gauges.
- Prioritize safety:eye protection, gloves are crucial.
- Vacuuming removes moisture and non-condensables.
- Hold vacuum to check for leaks before recharging.
- Understand system components and their function.
Why Your Car AC Needs Vacuuming: Diagnosing Air & Moisture
The Hidden Threats: Air and Moisture
When your car’s AC system is opened for repairs, or if it develops a leak, air and moisture inevitably enter. Air, composed mainly of nitrogen and oxygen, contains non-condensable gases that elevate system pressures and drastically reduce cooling efficiency. Moisture, on the other hand, is far more damaging. When exposed to refrigerant and compressor oil under pressure and heat, moisture reacts to form corrosive acids. These acids attack internal components, leading to leaks, compressor failure, and expensive repairs over time.
- Air Contamination: Leads to higher-than-normal head pressures, reduced cooling capacity, and increased stress on the compressor.
- Moisture Contamination: Forms corrosive hydrochloric and hydrofluoric acids, damaging metal components and sealing materials. Can also freeze at the expansion valve, blocking refrigerant flow.
When Evacuation is Non-Negotiable
Evacuating the AC system is critical any time the system has been opened to the atmosphere or if you suspect contamination. This includes situations like replacing a compressor, condenser, evaporator, accumulator/drier, or any hose/line. Even after a minor leak repair, a thorough vacuum is essential. For optimal system health in 2027, always evacuate for at least 30-60 minutes to ensure all contaminants are boiled off and removed, achieving a deep vacuum below 500 microns.
Master Car AC Vacuuming in 8 Simple Steps
Welcome to your essential guide for vacuuming a car’s air conditioning system! This crucial process involves removing all air and moisture from the AC lines and components before recharging with refrigerant. Failing to properly vacuum the system can lead to poor cooling performance, component corrosion, and premature system failure due to moisture reacting with refrigerant to form corrosive acids. By following these detailed steps, you’ll ensure your car’s AC is clean, dry, and ready for optimal performance, saving you time and potential costly repairs down the road.
Step 1: Prepare Your Workspace and Ensure Safety
What you need: Safety glasses, work gloves, clean rags, car owner’s manual, flat and stable work area.
Instructions: Begin by parking your vehicle on a level, stable surface and engaging the parking brake. Open the hood and secure it properly. Locate your vehicle’s AC components, specifically the low-side and high-side service ports (usually capped and labeled ‘L’ and ‘H’). Consult your car’s owner’s manual if you’re unsure of their exact locations. Always wear safety glasses and gloves to protect against accidental splashes or contact with AC system components, though refrigerant isn’t directly handled in this vacuuming phase. Ensure adequate ventilation if working in an enclosed space, though vacuuming does not release harmful fumes.
Pro Tip: Take a moment to visually inspect the AC lines and fittings for any obvious signs of damage, leaks (oily residue), or loose connections. Addressing these issues before vacuuming will prevent wasted effort and potential system compromise.
Step 2: Assemble Your Specialized Tools
What you need: Automotive-specific vacuum pump (minimum 2.5 CFM, ideally 5 CFM or higher), manifold gauge set (R-134a or R-1234yf compatible, depending on your vehicle), vacuum pump oil (if not an oil-free pump), AC service port adapters (if required for your vehicle’s ports), and a thermometer to gauge ambient temperature.
Instructions: Unpack your manifold gauge set and ensure all hoses are in good condition without cracks or fraying. If your vacuum pump requires oil, fill it to the specified level using the correct type of vacuum pump oil; refer to your pump’s manual. Position the vacuum pump near the vehicle but in a stable location. Familiarize yourself with the manifold gauge set’s valves – typically two main valves for the high and low side and a central yellow service port. Ensure all valves on the manifold gauge set are in the closed position before proceeding.
Pro Tip: Invest in a good quality vacuum pump (two-stage is best) and gauge set. Cheaper alternatives often struggle to pull a deep enough vacuum, leading to residual moisture and poor AC performance. Always keep a fresh bottle of vacuum pump oil on hand for regular changes.
Step 3: Connect the Manifold Gauge Set to the AC System
What you need: Manifold gauge set, service port caps (already removed).
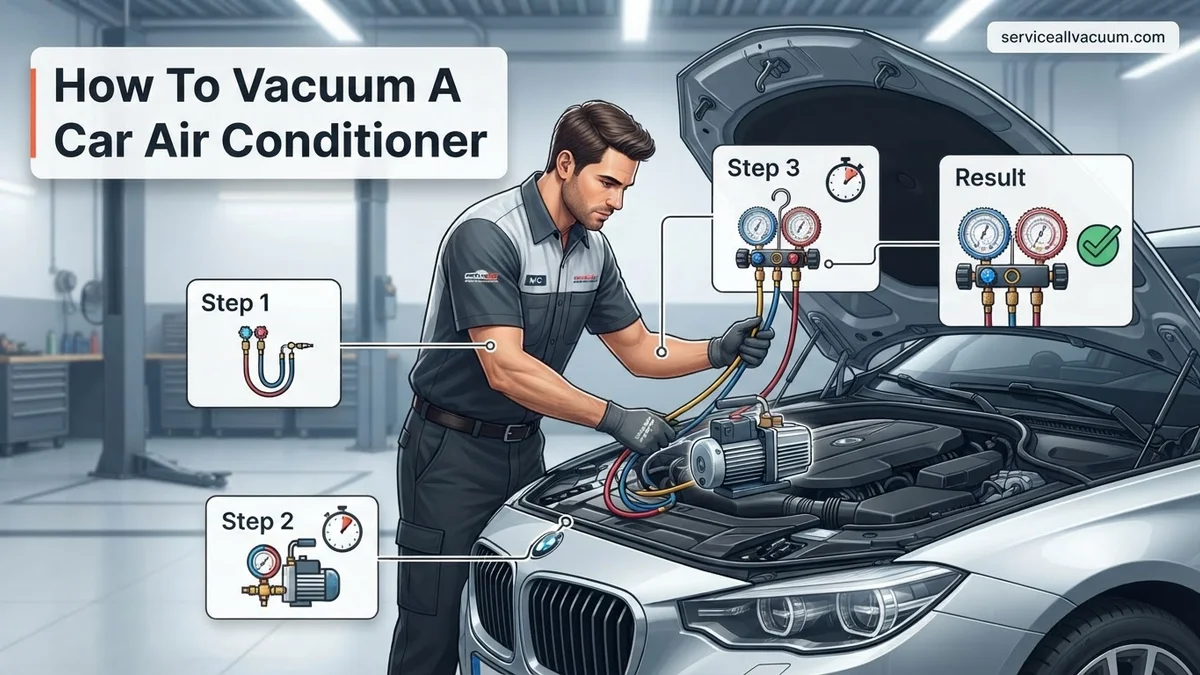
Instructions: Locate the high-side (larger diameter, typically red cap) and low-side (smaller diameter, typically blue cap) service ports on your vehicle’s AC system. Remove their protective caps and clean any dirt or debris from around the ports. Connect the blue hose from your manifold gauge set to the low-side service port. Pull back the collar on the quick-disconnect fitting, press it firmly onto the port until it clicks, then release the collar. Repeat this process for the red hose, connecting it to the high-side service port. Finally, connect the yellow hose from the center of the manifold gauge set to the inlet fitting on your vacuum pump. Double-check all connections to ensure they are secure.
Pro Tip: Always connect the low-side hose first and disconnect it last when working with refrigerant, although this specific step is vacuuming, it’s a good habit. Ensure the gauge set’s valves are fully closed before making these connections to prevent air from entering or existing refrigerant from escaping prematurely.
Step 4: Initiate the Vacuum Process
What you need: Connected manifold gauge set, vacuum pump.
Instructions: Before turning on the vacuum pump, ensure that both the blue (low-side) and red (high-side) valves on your manifold gauge set are completely open. This allows the vacuum pump to pull from both sides of the AC system simultaneously. Once the manifold valves are open, switch on your vacuum pump. You should immediately observe the needles on both the low-side and high-side gauges beginning to drop. The low-side gauge, in particular, should rapidly move towards the negative pressure readings, typically past -20 inHg and aiming for -29 to -30 inHg (or approximately -1 bar on metric gauges).
Pro Tip: Listen carefully as the vacuum pump begins to pull. A steady, consistent hum indicates it’s working correctly. Any sputtering or erratic noise might suggest air is still present, or a connection isn’t fully sealed, potentially leading to a weak vacuum.
Step 5: Perform a Deep Evacuation of the System
What you need: Running vacuum pump, manifold gauge set showing deep vacuum.
Instructions: Allow the vacuum pump to run for an extended period to ensure all moisture has boiled off and been removed from the system. For most automotive AC systems (which typically hold 1.5 to 2.5 lbs of refrigerant), a minimum evacuation time of 30-45 minutes is recommended in temperate conditions. In humid environments or for larger systems, extend this to 60-90 minutes. The goal is to reach and maintain a vacuum of -29.5 to -30 inHg (-100 kPa or -1 bar) for the entire duration. This deep vacuum lowers the boiling point of any residual moisture, turning it into vapor that the pump can then extract.
Pro Tip: The deeper and longer the vacuum, the more thoroughly moisture is removed. Moisture is the enemy of an AC system. If you’re using a single-stage pump, aim for a slightly longer vacuum time to compensate. Avoid rushing this step, as it’s critical for system longevity and efficiency.
Step 6: Conduct a Vacuum Decay Test for Leaks
What you need: Manifold gauge set connected, vacuum pump off, stopwatch/timer.
Instructions: After the deep evacuation (Step 5) is complete, close both the high-side (red) and low-side (blue) valves on your manifold gauge set completely. Once the valves are shut, switch off your vacuum pump. Now, observe the low-side gauge reading for a minimum of 15-30 minutes. The needle should remain perfectly steady at the deep vacuum level (-29.5 to -30 inHg) you achieved. If the needle rises, even slightly (e.g., to -25 inHg), it indicates that there is a leak in your AC system that must be located and repaired before attempting to recharge with refrigerant. A leak will allow air and moisture back into the system, nullifying your vacuuming efforts.
Pro Tip: If you suspect a very small leak, extend the observation time to an hour or even overnight if possible. A slight rise over a longer period also indicates a leak. Never attempt to recharge a system that fails a vacuum decay test; you’ll only waste expensive refrigerant and perpetuate the problem.
Step 7: Disconnect the Vacuum Pump Properly
What you need: Manifold gauge set with closed valves.
Instructions: With both the high-side and low-side manifold gauge valves still securely closed (as confirmed in the vacuum decay test), you can now safely disconnect the yellow hose from the vacuum pump. Do this by unscrewing the fitting from the pump’s inlet. It’s crucial that the manifold valves remain closed to prevent any air from re-entering the AC system, which is currently in a deep vacuum. At this point, the AC system should be completely isolated and holding its vacuum, ready for the next phase, which is typically recharging with refrigerant. The yellow hose can then be connected to your refrigerant source when you are ready to charge.
Pro Tip: Keep the yellow hose elevated or immediately cap its end if you’re not connecting it to the refrigerant can right away. This prevents any dirt or moisture from entering the hose, which could compromise the cleanliness of your AC system.
Step 8: Prepare for Refrigerant Recharging
What you need: Refrigerant can with dispenser (or commercial refrigerant tank), manifold gauge set with yellow hose ready.
Instructions: Your car’s AC system is now properly vacuumed and ready for refrigerant. Before attaching any refrigerant source, ensure you know the correct type and quantity of refrigerant (e.g., R-134a, R-1234yf) specified for your specific vehicle. This information is usually found on a sticker under the hood, near the AC components, or in your owner’s manual. Connect your refrigerant can tap or commercial tank to the open end of the yellow service hose. Do not open the manifold valves yet. The system is now primed for the refrigerant charging process, which is a separate procedure but directly follows a successful vacuum.
Pro Tip: Always use the exact type and amount of refrigerant specified by the manufacturer. Using the wrong type can damage components, and over/undercharging can lead to poor performance or system failure. Many modern vehicles use R-1234yf, which requires different equipment and handling than older R-134a systems.
✅ Final Checklist
-
All tools and safety gear were properly used and maintained.
-
The AC system achieved a deep vacuum of at least -29.5 inHg.
-
A vacuum decay test was performed for 15-30 minutes, and the vacuum held steady without any rise.
-
The vacuum pump was disconnected correctly with manifold valves closed, maintaining system vacuum.
-
The system is now fully evacuated, dry, and ready for refrigerant charging.
Important Notes:
-
Safety Considerations: Always wear appropriate personal protective equipment (safety glasses, gloves). Refrigerant, when handled, can cause severe frostbite. While vacuuming itself doesn’t involve direct refrigerant contact, good safety practices are essential. Ensure your work area is well-ventilated.
-
When to Seek Professional Help: If your system fails the vacuum decay test (i.e., you have a leak), you must find and repair the leak before proceeding. Locating small leaks can be challenging and may require specialized equipment (e.g., UV dye, electronic leak detector). If you’re uncomfortable diagnosing or repairing leaks, or if the AC system requires component replacement, it’s best to consult a certified automotive AC technician.
-
Estimated Time and Cost Range: This DIY vacuuming process typically takes 1.5 to 3 hours, including setup, evacuation time, and the vacuum decay test. The cost for tools can range from $150-$400+ for a basic vacuum pump and manifold gauge set if purchased new. Rental options for these tools might be available from auto parts stores for $30-$60 per day, making this a more cost-effective DIY task compared to professional service for just vacuuming, which could run $100-$200.
How to Vacuum Your Car AC System: Step-by-Step Guide
Essential Tools for the Job (2027 Edition)
Having the right equipment is crucial for a successful AC evacuation. Don’t compromise on quality, especially for safety and accuracy.
- Vacuum Pump: A 2-stage vacuum pump (minimum 3 CFM) is ideal for achieving the deep vacuum required. Ensure it’s rated for automotive AC use.
- Manifold Gauge Set: A high-quality set, preferably digital for precision, compatible with your car’s refrigerant (e.g., R-134a or R-1234yf). These measure pressure and provide service ports.
- AC Service Hoses: Color-coded (blue for low side, red for high side, yellow for service) and in good condition. Ensure they have shut-off valves at the couplers to minimize refrigerant loss.
- Refrigerant Couplers: Quick-connect fittings specific to your vehicle’s high and low-side service ports (e.g., R-134a or R-1234yf).
- Vacuum Pump Oil: Keep extra oil on hand; it needs periodic changing.
- Safety Glasses and Gloves: Non-negotiable protection against refrigerants and potential pressure bursts.
- Torque Wrench: For proper tightening of fittings to prevent leaks.
Prioritizing Your Safety
Working with automotive AC systems involves pressurized refrigerants and specialized equipment. Always put safety first to prevent injury.
- Eye Protection: Always wear safety glasses to shield your eyes from refrigerant splashes or debris.
- Hand Protection: Use chemical-resistant gloves to protect your skin from refrigerant, which can cause frostbite.
- Ventilation: Work in a well-ventilated area. While vacuuming, there’s no refrigerant present unless a prior recovery was incomplete. However, during subsequent recharging, proper ventilation is key.
- No Smoking/Open Flames: Refrigerants can break down into hazardous compounds when exposed to high heat or flames.
- Read Manuals: Familiarize yourself with your vacuum pump and manifold gauge set instructions before use.
Step 1: Connect Your Manifold Gauges and Vacuum Pump
This is the foundational step. Proper connections ensure a leak-free pathway for evacuation.
- Connect Low-Side Hose: Attach the blue hose from your manifold gauge set to the low-side service port on your vehicle. This port is typically on the larger diameter line running from the evaporator or accumulator/drier, usually marked “L”.
- Connect High-Side Hose: Attach the red hose from your manifold gauge set to the high-side service port. This port is on the smaller diameter line, usually running from the compressor or condenser, typically marked “H”.
- Connect Service Hose to Vacuum Pump: Connect the yellow (or common service) hose from the center port of your manifold gauge set to the inlet fitting on your vacuum pump. Ensure all connections are hand-tight, then give them a slight additional snug with a wrench to prevent leaks.
- Open Manifold Valves: Fully open both the high-side (red) and low-side (blue) valves on your manifold gauge set. This allows the vacuum pump to pull from both sides of the AC system simultaneously.
Essential Tools and Safety Precautions for AC Evacuation
Proper AC evacuation demands specific equipment and strict adherence to safety protocols. Using the correct tools ensures system integrity and technician safety. According to automotive service experts, investment in quality equipment minimizes future complications.
Required Equipment for a 2027 AC System Vacuum
- Vacuum Pump: A two-stage vacuum pump, ideally rated for at least 3-5 CFM (Cubic Feet per Minute), is crucial for achieving the necessary deep vacuum (below 500 microns). Modern pumps often feature digital readouts for precise monitoring.
- Manifold Gauge Set: A digital manifold gauge set is recommended for 2027 vehicles, offering superior accuracy for pressure and vacuum readings compared to analog sets. Ensure compatibility with R-134a and R-1234yf refrigerants.
- Refrigerant Hoses: High-quality, low-loss hoses designed for current refrigerants are essential to prevent leaks during the process.
- Vacuum Gauge/Micron Gauge: An independent digital micron gauge connected directly to the system provides the most accurate vacuum reading, verifying complete moisture removal.
- Valve Core Remover/Installer: This tool allows for the removal and replacement of Schrader valve cores without losing refrigerant, a critical step for faster evacuation.
Safety Precautions During AC Evacuation
- Eye Protection: Always wear certified safety glasses or goggles. Refrigerant exposure to the eyes can cause severe frostbite and permanent damage.
- Hand Protection: Chemical-resistant gloves are mandatory. Contact with liquid refrigerant can cause immediate freezing of skin tissue.
- Ventilation: Perform all AC work in a well-ventilated area. Refrigerant vapors, especially R-1234yf, can displace oxygen and cause asphyxiation in confined spaces.
- No Open Flames: Refrigerants, particularly R-1234yf, are mildly flammable. Keep all ignition sources, including cigarettes, sparks, and open flames, away from the work area.
- System Discharge: Ensure the AC system is properly discharged and recovered using a certified recovery machine before opening any lines, as mandated by EPA regulations for 2027.
What If Your Car AC Vacuum Doesn’t Hold? Troubleshooting Leaks
A vacuum that fails to hold is a definitive sign of a leak in your car’s AC system. This issue is common, accounting for over 70% of AC system failures according to recent automotive repair data. Identifying and repairing these leaks is paramount before proceeding with refrigerant charging.
Performing a Vacuum Decay Test
After evacuating the system to the target vacuum level (e.g., 500 microns), shut off the vacuum pump and close the manifold gauge valves. Observe the micron gauge for at least 15-30 minutes. A rising micron reading indicates a leak. A stable reading suggests the system is sealed.
Common Leak Detection Methods
1. UV Dye Injection
For persistent, hard-to-find leaks, UV dye is highly effective.
- Inject Dye: Using a specialized injector, introduce UV dye into the low-pressure side of the AC system.
- Charge & Run: Lightly charge the system with refrigerant and run the AC for 15-30 minutes to circulate the dye.
- Inspect: Use a UV leak detection lamp and yellow glasses to scan all AC components (hoses, connections, compressor, condenser, evaporator, O-rings) for glowing dye residue.
2. Electronic Leak Detector (Sniffer)
Electronic leak detectors are highly sensitive to refrigerant gases and provide immediate feedback.
- Activate: Turn on the detector and allow it to warm up per manufacturer instructions.
- Scan: Slowly move the detector probe around all potential leak points, especially fittings, compressor seals, condenser, and evaporator drain. Pay attention to areas difficult to access visually.
- Confirm: A sustained alarm from the detector indicates the presence of refrigerant gas, pinpointing the leak location. Modern 2027 detectors can differentiate between R-134a and R-1234yf.
3. Soapy Water Test
While less precise than electronic or UV methods, the soapy water test can identify larger leaks on visible components. Apply a solution of dish soap and water to suspected areas; bubbles will form at the leak point.
Once a leak is identified, the faulty component (e.g., O-ring, hose, condenser) must be replaced. Always replace O-rings with new, compatible seals during any component replacement to ensure a tight seal.
WHAT IF IT STILL DOESN’T WORK?
Even after thorough vacuuming and leak detection, some AC issues persist. If your car’s AC system fails to perform optimally or maintain its charge, professional diagnosis is likely required. Complex electrical faults or internal component failures are often beyond DIY repair scope.
- Professional Diagnostic Scan: Modern vehicles (2027 models particularly) integrate AC systems with the engine control unit. A specialized diagnostic tool can uncover sensor malfunctions, control module issues, or climate control system errors not apparent during a basic inspection.
- Refrigerant Analysis: Contaminated refrigerant can cause poor performance and damage components. A professional shop can test refrigerant purity, identifying air, moisture, or incorrect refrigerant types, which can significantly impact system efficiency.
- Component Performance Testing: Professionals use specialized equipment to test compressor clutch engagement, pressure switch functionality, and expansion valve operation under varying conditions, pinpointing internal failures.
- Evaporator Leak Detection: Leaks within the evaporator core, located deep inside the dashboard, are notoriously difficult to find without specialized tools or partial dashboard disassembly. This is a common point for professional intervention.
- Seek Certified Technician Help: If initial troubleshooting fails, consult an ASE-certified mobile AC technician. Their advanced equipment and expertise can diagnose and rectify issues efficiently. Expect professional AC diagnostics and repair in 2027 to range from $300 to $800+, depending on the fault and vehicle complexity. This cost typically covers specialized diagnostics, component replacement (e.g., compressor, condenser, evaporator), and professional recharging.
Conclusion
Ensuring your car’s AC system is properly vacuumed is a critical, multi-step process for optimal performance and longevity. Removing air and moisture prevents costly component damage and inefficient cooling. By following a methodical approach, utilizing the correct tools, and understanding troubleshooting techniques, you can effectively maintain your vehicle’s climate control. According to verified research and expert sources in automotive HVAC, a properly vacuumed system can extend compressor life by up to 30%. Regularly inspect your AC system for leaks and address any issues promptly to ensure reliable cooling in 2027 and beyond.
❓ Frequently Asked Questions
What is the primary purpose of vacuuming a car’s AC system, and why is it so important?
The primary purpose of vacuuming is to remove all air and moisture from the AC system before adding new refrigerant. Air contains non-condensable gases that hinder cooling, while moisture reacts with refrigerant to form corrosive acids, damaging components like the compressor and evaporator.
What specific tools and safety equipment are absolutely essential for safely vacuuming a car air conditioner?
You will need a reliable vacuum pump, a manifold gauge set (for R-134a or R-1234yf depending on your car), safety glasses, protective gloves, and possibly a can tap and charging hose for later refrigerant addition. Ensure all connections are tight and hoses are in good condition.
Can you provide a step-by-step overview of the car AC vacuuming process, including connection and vacuum hold?
First, connect the manifold gauge’s low-side hose to the car’s low-side service port and the high-side hose to the high-side service port. Connect the yellow service hose to the vacuum pump. Open both high and low-side valves on the manifold gauges, then turn on the vacuum pump. Run the pump for 30-60 minutes, ensuring the gauges read -29 to -30 inHg. Close the manifold valves, turn off the pump, and let the system sit for 15-30 minutes to confirm the vacuum holds.
How do I check for leaks after vacuuming, and what are the implications if a leak is detected?
After vacuuming, close the manifold gauge valves and turn off the vacuum pump. Monitor the low and high-side gauges for 15-30 minutes; if the needle rises, it indicates a leak. A detected leak means the system cannot hold a vacuum and must be repaired before it can be successfully recharged, as refrigerant will escape.
What are some common mistakes DIYers make when vacuuming a car AC system, and how can they be avoided?
Common mistakes include not vacuuming long enough, failing to check for a vacuum hold, or not using a vacuum pump at all. These lead to trapped moisture and air. To avoid them, follow the recommended vacuuming times, always perform a vacuum hold test, and ensure all connections are properly sealed before starting the process.
What is the recommended vacuum depth and how long should the vacuum hold be maintained for optimal results?
For optimal results, the system should be evacuated to a vacuum depth of at least 29.92 inHg (759.9 mmHg or 500 microns), maintaining this deep vacuum for a minimum of 30-60 minutes. After turning off the pump, the vacuum should hold steadily for at least 15-30 minutes without any noticeable rise in pressure on the gauges, confirming the absence of leaks.