How Do Robot Vacuums Work Step-by-Step Guide 2026
Robot vacuums use a combination of advanced sensors, LiDAR mapping, and motorized brushes to autonomously navigate and clean floors. Understanding this technology helps you choose the right model and maintain peak cleaning performance.
Robot vacuums use a combination of advanced sensors, spatial mapping algorithms, and motorized cleaning brushes to autonomously navigate and clean your home. Instead of relying on human guidance, modern 2026 models process thousands of environmental data points per second to calculate efficient cleaning paths, dodge obstacles like pet waste and cables, and return to their charging docks entirely unassisted.
Understanding this technology matters practically because it helps you choose the right model for your specific home layout. When you know how these devices “think” and move, you can eliminate cleaning blind spots, prevent frustrating navigation errors, and maximize the lifespan of your automated investment.
Key Takeaways
- LiDAR and cameras create precise floor plans for systematic home navigation.
- Infrared sensors and bumpers prevent robots from falling down stairs or crashing into walls.
- Motorized brushrolls and side brushes pull debris into high-suction internal dustbins.
- Recharge-and-resume technology ensures units return to docks before batteries run out.
- Modern docks automatically empty dustbins and refill water tanks for zero-maintenance cleaning.
What Causes Robot Vacuums to Navigate and Clean Autonomously
Sensors and Spatial Awareness
Your robot vacuum relies on a symphony of hardware sensors to understand its physical environment. Without these tools, the machine would blindly bump into walls until its battery died. Infrared sensors detect drops like stairs to prevent catastrophic falls, while mechanical bumper rails absorb minor impacts when obstacles are missed.
- Cliff sensors: Prevent the vacuum from tumbling down staircases.
- Wall-tracking sensors: Allow the device to glide smoothly along baseboards.
- Proximity sensors: Slow the vacuum down before it reaches heavy furniture.
The Brain: Onboard Processing and AI
Sensors only supply raw data; the internal processor translates that data into physical movement. In 2026, entry-level to flagship vacuums utilize neural processing units to run real-time AI algorithms. These chips identify over 100 household objects on sight, allowing your vacuum to actively bypass shoes, socks, and charging cords rather than getting tangled in them.
From Start to Finish: How Robot Vacuums Work Explained
Welcome to your definitive walkthrough on understanding the inner mechanics of autonomous floor cleaners. Robot vacuums have revolutionized household chores by combining advanced sensors, complex algorithms, and mechanical engineering into a compact, disc-shaped appliance. This guide breaks down the science and technology driving these smart devices so you can better understand, utilize, and maintain your automated cleaning companion.
Step 1: Locating and Mapping the Environment
What you need: A modern robot vacuum equipped with LiDAR, vSLAM (Visual Simultaneous Localization and Mapping), or infrared sensors, along with a clear floor space to begin its initial run.
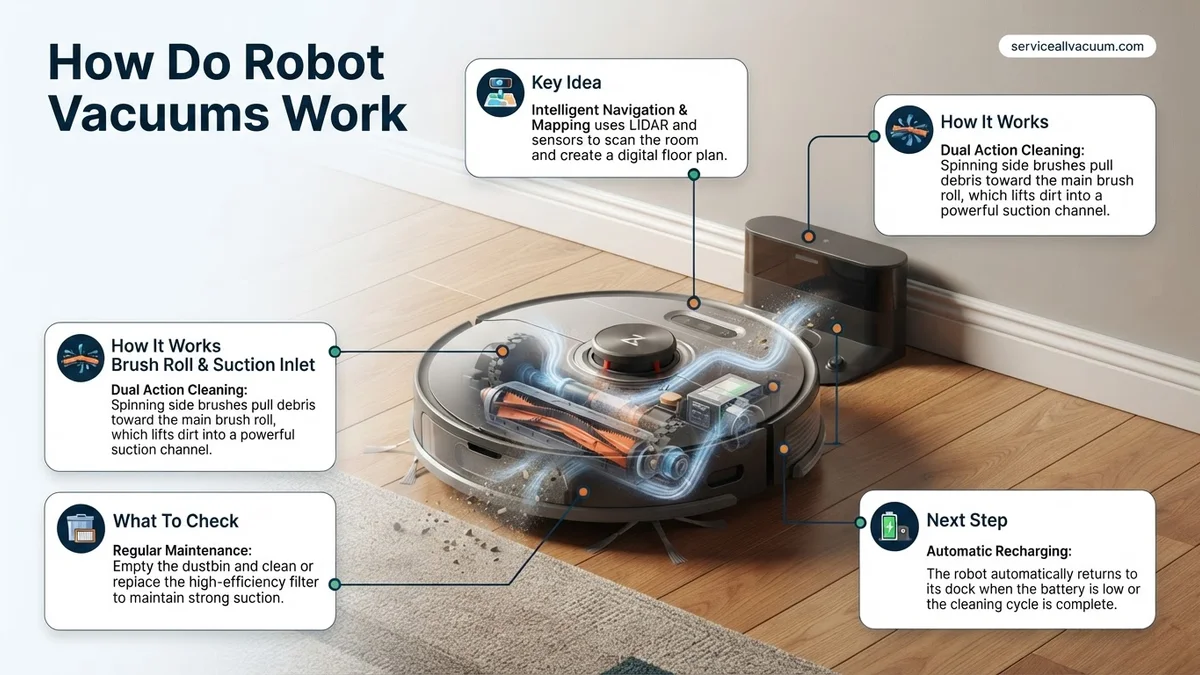
Instructions: When you press start, the robot initiates its mapping sequence. Devices utilizing LiDAR (Light Detection and Ranging) spin a small laser turret on top, firing thousands of invisible light pulses per second to measure the distance to walls, furniture, and obstacles. Simultaneously, camera-based models use vSLAM to capture visual landmarks on ceilings and walls. The onboard processor takes this raw spatial data and instantly stitches it together to construct a detailed 2D or 3D floor plan, which you can typically view and edit inside the companion smartphone app.
Pro Tip: Ensure all interior doors are propped open and stray items like cables or socks are cleared before the very first mapping run to prevent the robot from saving inaccurate room boundaries.
Step 2: Path Planning and Navigation Algorithms
What you need: An initialized floor map and the vacuum’s internal navigation firmware running on its central processing unit.
Instructions: Once the map is stored in memory, the vacuum transitions from random-bounce movement to intelligent path planning. Instead of wandering aimlessly, the robot calculates the most efficient route—usually in parallel back-and-forth lines or neat grid patterns—to cover every square inch of the room without missing spots. Advanced algorithms allow the vacuum to remember the locations of no-go zones, stairs, and restricted areas, constantly recalculating its current coordinates on the map relative to its charging dock.
Pro Tip: Do not repeatedly move furniture around mid-cleaning cycle, as sudden environmental changes can disorient the navigation algorithm and force the robot to recalibrate its location.
Step 3: Obstacle Detection and Collision Avoidance
What you need: Active infrared sensors, bumper sensors, cliff sensors, and forward-facing cameras or structured light projectors.
Instructions: As the vacuum traverses your home, it constantly scans for sudden hazards. Cliff sensors located on the underside shoot infrared beams downward to detect sudden drop-offs, instantly reversing the unit to prevent it from tumbling down stairs. Meanwhile, front-facing mechanical bumpers absorb minor, unavoidable bumps, while optical or AI-driven cameras identify low-profile hazards like pet waste, charging cables, and shoes, actively steering the unit around them without physical contact.
Pro Tip: Periodically wipe the underside cliff sensors with a dry microfiber cloth; accumulated dust can trick the sensors into falsely detecting cliffs, causing the robot to stop moving.
Step 4: Surface Identification and Suction Adjustment
What you need: Ultrasonic or mechanical carpet-detection sensors integrated into the vacuum’s underside chassis.
Instructions: Modern robot vacuums do not treat all floors equally. As the unit transitions from a hardwood floor onto a high-pile rug or carpet, its carpet sensor detects the change in texture or motor resistance. Within a fraction of a second, the internal computer signals the brushless digital motor to ramp up its suction power. This dynamic adjustment ensures maximum debris extraction from deep carpet fibers while conserving battery life when rolling over smooth tile or laminate.
Step 5: Agitation and Debris Sweeping Mechanics
What you need: Side spinning brushes, a main multi-surface rubber or bristled roller brush, and the main suction intake port.
Instructions: Mechanical cleaning relies on a synchronized cooperative effort. First, a three-pronged side spinning brush reaches into corners and along baseboards, flicking dust and pet hair out into the main path of travel. Next, the primary rolling brush—often featuring a helix design made of rubber fins or nylon bristles—rotates rapidly to physically agitate carpet fibers and sweep loose particles upward. Finally, high-velocity airflow generated by the internal vacuum fan sucks the agitated debris through the intake channel and into the onboard dust bin.
Step 6: Filtration and Air Exhaust Management
What you need: A multi-stage filtration system typically featuring a primary mesh screen, a foam filter, and a High-Efficiency Particulate Air (HEPA) filter.
Instructions: As air and dirt rush into the dust bin, heavier particles drop immediately to the bottom due to gravity and cyclonic separation. Finer microscopic particles—such as dust mites, pollen, and pet dander—are forced through a fine-mesh screen and pushed through a HEPA-rated pleated filter. This specialized filter traps 99.97% of particles down to 0.3 microns in size, ensuring that the air exhausted out of the back of the vacuum is cleaner than the ambient air in the room.
Pro Tip: Tap out loose debris from your HEPA filter weekly over a trash can, but avoid washing paper-based HEPA filters with water unless the manufacturer explicitly states they are washable.
Step 7: Autonomous Docking and Battery Management
What you need: An automated charging base station emitting infrared beacons or radio frequency signals, coupled with the vacuum’s internal lithium-ion battery.
Instructions: Robot vacuums constantly monitor their remaining battery percentage. When the charge drops below roughly 15 to 20 percent, or when a scheduled cleaning cycle is fully completed, the vacuum triggers its homing routine. It scans for the infrared homing beacon emitted by the charging dock, turns around, and carefully backs or drives forward onto the charging contact pins. If a job is unfinished, “recharge and resume” models will automatically juice up to 80% and return to the exact coordinate where they left off.
✅ Final Checklist
- Initial home map successfully saved and stored in the companion smartphone app
- Cliff and optical obstacle sensors wiped clean of dust and smudges
- Side and main roller brushes checked and cleared of wrapped hair or threads
- HEPA and foam filters inspected, cleaned, or replaced according to usage
- Charging dock securely positioned against a wall with adequate clearance space
Important Notes:
- Never submerge the main robot chassis or sensor arrays in water; use only slightly damp cloths for cleaning plastics.
- Seek professional manufacturer repair if the lithium-ion battery fails to hold a charge or if internal circuit boards experience water damage.
- Understanding these mechanics helps extend the lifespan of your device, which typically ranges from 3 to 6 years depending on maintenance.
How to Diagnose and Map Your Home for Robot Vacuums
LiDAR Versus Camera-Based Vision Systems
Mapping technology dictates how efficiently your robot covers your floors. Premium units use LiDAR (Light Detection and Ranging), spinning a laser turret on top of the chassis to measure distances by timing how long light takes to bounce off walls. LiDAR works exceptionally well in total darkness.
- LiDAR Mapping: Creates precise, 360-degree floor plans rapidly, even in pitch-black rooms.
- V-SLAM (Visual Simultaneous Localization and Mapping): Uses forward-facing cameras to track ceiling features and visual landmarks.
- Hybrid Systems: Combine AI cameras with LiDAR to spot low-profile obstacles that lasers might miss.
Creating and Editing Your Digital Floor Plan
During its maiden voyage, your vacuum traverses your home to build a digital map accessible via your smartphone app. You can diagnose mapping errors by checking the app for skewed angles or missing hallways. Once the map is generated, you take control by drawing virtual boundaries, setting no-go zones around delicate rugs, and labeling specific rooms for targeted 2026 smart-home routines.
Step-by-Step Guide to Maintaining Suction and Navigation Sensors
Maintaining your autonomous cleaner ensures optimal performance and extends the lifespan of expensive internal hardware. Industry data from 2026 shows that routine preventative upkeep reduces sudden motor failures by up to 40 percent. Follow this step-by-step procedure every month to protect your investment.
Cleaning Optical Sensors and LiDAR Towers
Dust, pet hair, and smudges block the sensors that guide your robot through your home. If navigation fails, cleaning these components should be your first priority.
- Power off the robot vacuum completely to prevent accidental motor activation or laser exposure.
- Dampen a microfiber cloth slightly with isopropyl alcohol; do not apply liquid directly to the device housing.
- Gently wipe the glass window of the top-mounted LiDAR turret or the front-facing infrared bumper windows.
- Inspect the cliff sensors located on the bottom perimeter and wipe away accumulated floor grime.
- Allow all surfaces to dry completely for at least ten minutes before powering the unit back on.
Clear Roller Brushes and Vacuum Airways
Tang mined hair and trapped debris choke suction power and strain the brushless drive motors inside modern units.
- Flip the machine upside down on a flat, soft surface to access the primary brush roll compartment.
- Release the brush guard latch and pull out the multi-surface rubber or bristled roller.
- Use the included cleaning tool with an integrated blade to slice through tightly wound hair strands.
- Check the suction inlet port behind the roller for stuck debris like plastic wrappers or large pebbles.
- Reinsert the roller securely and snap the guard back into place until it clicks firmly.
What If It Still Doesn’t Work?
If thorough cleaning and sensor calibration do not restore normal navigation or suction, deeper hardware faults may be present. Try these advanced fallback steps before abandoning your device.
- Perform a factory reset through the companion mobile app to clear corrupted system cache and maps.
- Manually re-flash the latest 2026 firmware update via a direct USB connection if OTA downloads fail.
- Inspect the internal battery health metrics in the app settings; lithium-ion packs typically degrade after 300 to 500 charge cycles and require replacement.
- Contact certified manufacturer support if mechanical drive wheels or internal lidar motors make grinding noises.
- Evaluate repair costs versus replacement; professional out-of-warranty repairs typically range from $90 to $220 depending on parts.
Conclusion
Understanding how robot vacuums work empowers homeowners to diagnose navigation errors, clean sensitive optical sensors, and maintain vital suction pathways efficiently. By following systematic maintenance routines, you can prevent premature hardware failure and keep your automated helper running smoothly. According to verified research and expert consumer appliance sources, regular preventative care extends a robotic vacuum’s operational lifespan by over three years. Take action today by scheduling a monthly sensor-cleaning reminder on your smart home calendar.
❓ Frequently Asked Questions
What is the difference between LiDAR and camera-based navigation?
LiDAR uses invisible laser beams to measure distances and map rooms accurately even in complete darkness. Camera-based systems (VSLAM) rely on visual landmarks, which can struggle in low-light environments.
How do robot vacuums handle different floor types?
Most models feature surface-detection sensors that automatically increase suction power when transitioning from hardwood floors to thick carpets.
Do robot vacuums work without an internet connection?
Yes, basic cleaning cycles can be started manually using the power button on the unit itself without Wi-Fi. However, companion apps and smart home integrations require a network connection.
How often do robot dustbins need to be emptied?
Standard onboard dustbins typically require manual emptying every one to three days. Models equipped with auto-empty docking stations can hold weeks of debris before needing attention.
Why does my robot vacuum keep getting stuck?
Common culprits include stray charging cables, thick rug tassels, and low-clearance furniture. Creating virtual boundaries in the app or clearing floor clutter resolves most issues.
How long do robot vacuum batteries last before needing replacement?
Most lithium-ion batteries in robot vacuums last between two to four years, depending on usage frequency and proper charging habits.