How to Use an AC Vacuum Pump Step-by-Step Guide 2027
Properly using an AC vacuum pump is critical for the longevity and efficiency of your air conditioning system. It removes harmful moisture and non-condensable gases that can cause system failure and poor cooling, ensuring optimal performance.
The most crucial step in any AC or refrigeration system service, whether it’s a new installation or a component replacement, is proper evacuation. Using an AC vacuum pump correctly ensures you remove all air and moisture from the system, preventing costly damage and ensuring optimal cooling performance for years to come. This guide will walk you through the precise steps for connecting your equipment, operating the pump, and achieving a deep vacuum by 2027 standards.
Your AC system cannot function efficiently with non-condensable gases like air or moisture inside. These contaminants lead to higher head pressures, reduced cooling capacity, and acid formation, which corrodes internal components. Skipping this vital process can drastically shorten the lifespan of your compressor and other expensive parts. Follow these instructions closely to protect your investment and maintain peak system performance.
Key Takeaways
- Always use a micron gauge for accurate vacuum levels.
- Change vacuum pump oil regularly for peak efficiency.
- Use a core removal tool to speed up evacuation.
- Leak check all connections before pulling vacuum.
- Evacuate to target micron level, then hold vacuum.
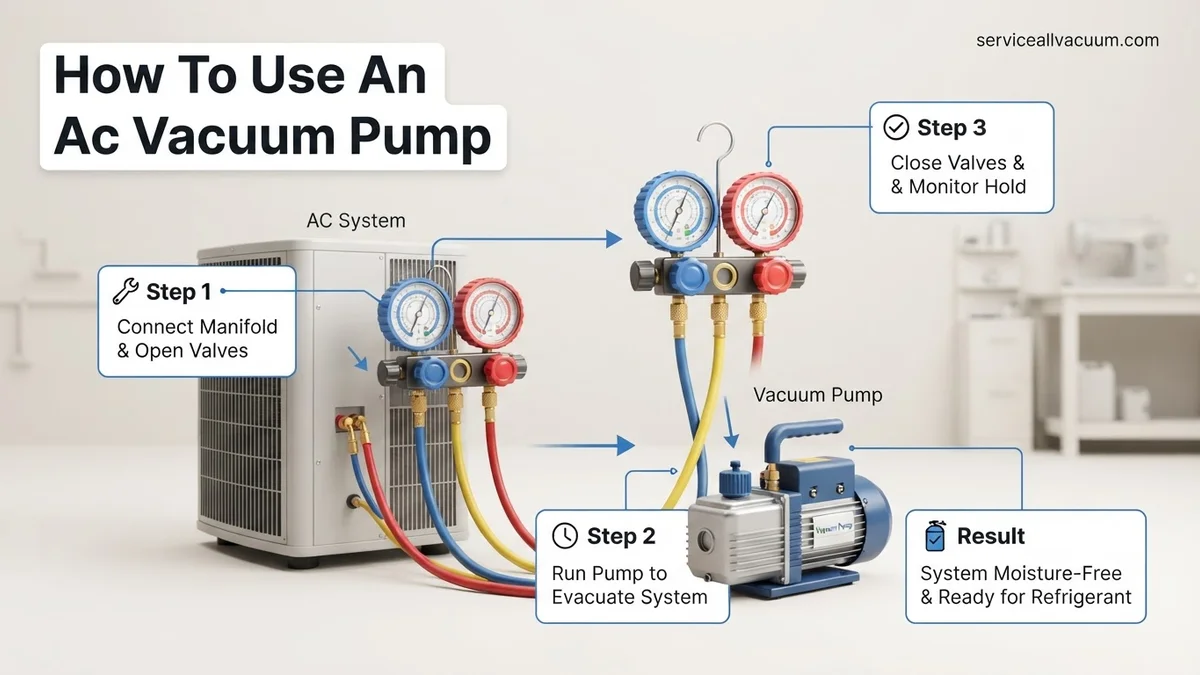
What Causes the Need for AC System Evacuation?
Whenever an AC or refrigeration system is opened to the atmosphere, air and moisture immediately enter. This happens during new installations, replacing a compressor, repairing a leak, or any time refrigerant lines are disconnected. You absolutely must remove these contaminants before recharging the system with refrigerant.
The Detrimental Impact of Air and Moisture
- Air (Non-Condensable Gases): Air trapped in an AC system occupies space meant for refrigerant vapor. This increases system pressure beyond normal operating levels, forcing the compressor to work harder. Higher head pressures lead to reduced cooling efficiency, increased energy consumption, and premature compressor failure. By 2027, system tolerances are tighter than ever, making thorough air removal critical.
- Moisture (Water Vapor): Water vapor is the most damaging contaminant. When mixed with refrigerant and compressor oil, it forms hydrochloric and hydrofluoric acids. These acids attack internal components, corroding windings in hermetic compressors and breaking down lubricants. Moisture also freezes at the expansion device, blocking refrigerant flow and causing system malfunctions.
How to Use an AC Vacuum Pump Like a Pro: A Practical Walkthrough
Properly evacuating an AC system is arguably the most critical step in its installation or repair. This guide will walk you through the precise process of using an AC vacuum pump to remove non-condensable gases (like air) and, most importantly, moisture from your refrigeration system. Skipping or improperly performing this step can lead to poor cooling performance, premature compressor failure, and costly repairs down the line. Follow these detailed steps to ensure your system runs efficiently and reliably for years to come.
Step 1: Preparation is Key: Gather Your Gear & Ensure Safety
What you need: Safety glasses, protective gloves, your AC vacuum pump, a quality manifold gauge set (preferably digital), a dedicated vacuum-rated hose (yellow/black/white hose from manifold), fresh vacuum pump oil, a valve core removal tool (optional but highly recommended), paper towels, and a trash receptacle.
Instructions: Before touching any refrigerant lines, prioritize your safety. Don your safety glasses and gloves. Unpack and inspect your vacuum pump. Check the oil level, and if it’s not clear or at the proper mark, change it with fresh, high-quality vacuum pump oil as per the manufacturer’s instructions. Ensure your manifold gauge set is clean and free of debris. Position the vacuum pump on a stable, level surface near the AC unit’s service ports. Make sure the AC unit itself is powered completely off at the breaker to prevent accidental startup.
Pro Tip: Always start with fresh, clean vacuum pump oil. Contaminated oil significantly reduces the pump’s efficiency and ability to pull a deep vacuum, potentially leading to moisture remaining in your system.
Step 2: System Setup: Preparing the AC Unit for Evacuation
What you need: AC unit with accessible service ports (low and high side), clean rags or brushes.
Instructions: Locate the low-side (usually larger diameter, typically with a blue cap) and high-side (smaller diameter, typically with a red cap) service ports on your AC unit. Carefully remove the protective caps. Inspect the ports for any dirt, debris, or rust and clean them thoroughly with a clean rag. If you plan to use a valve core removal tool (which is highly recommended for faster and deeper vacuum), prepare it now. This step ensures clean connections and optimal access for the vacuum process.
Pro Tip: Using a valve core removal tool to extract the Schrader valve cores from the service ports during evacuation dramatically increases the evacuation speed and allows the vacuum pump to pull a deeper vacuum more efficiently. Always use fresh O-rings on the tool to prevent leaks.
Step 3: Connecting the Brains: Attaching the Manifold Gauge Set
What you need: Manifold gauge set, low-side hose (blue), high-side hose (red), service ports.
Instructions: With the manifold gauge set’s valves closed, carefully connect the blue hose from the manifold’s low-side port to the AC unit’s low-side service port. Then, connect the red hose from the manifold’s high-side port to the AC unit’s high-side service port. Hand-tighten all connections first, then use an appropriate wrench to snug them up a quarter turn beyond hand-tight. Be careful not to overtighten and damage the flares or threads. This establishes the measurement and control link to your AC system.
Pro Tip: Before making the final connection, apply a small amount of refrigeration oil (compatible with your system’s refrigerant type) to the O-rings of your hoses. This helps create a better seal and prevents O-ring damage, reducing the chance of vacuum leaks.
Step 4: Pump Integration: Connecting the Vacuum Pump to the Manifold
What you need: Vacuum pump, yellow (or dedicated vacuum-rated) central hose from the manifold, optional micron gauge.
Instructions: Connect the central service hose (usually yellow, but a dedicated vacuum-rated hose is superior) from the manifold gauge set’s central port to the inlet port of your vacuum pump. If you are using a dedicated micron gauge (which is essential for accurately monitoring deep vacuum), connect it directly to one of the service ports or a port on your manifold specifically designed for vacuum readings. Ensure all these connections are also hand-tightened and then snugged with a wrench. The path from the system to the pump must be airtight.
Pro Tip: Always use a dedicated, large-diameter vacuum-rated hose (e.g., 3/8″ or 1/2″) directly from a service port or a vacuum tree connected to both service ports to the vacuum pump. Standard charging hoses are restrictive and can significantly slow down and hinder deep vacuum achievement due to their smaller internal diameter and permeability.
Step 5: The Deep Dive Begins: Initiating the Vacuum Process
What you need: Connected AC system, manifold gauge set, vacuum pump, micron gauge (connected).
Instructions: With all connections secure and your micron gauge (if used) in place, ensure both the high-side and low-side valves on your manifold gauge set are fully open. This allows the vacuum pump to pull from both sides of the system simultaneously. Now, turn on your vacuum pump. Observe your manifold gauges; they should immediately begin to drop into a vacuum (below 0 PSI). If using a micron gauge, watch for its reading to start dropping from atmospheric pressure (around 760,000 microns) downwards.
Pro Tip: Briefly open and then close the vacuum pump inlet valve while it’s running (if your pump has one) to “burp” any trapped air out of the hose before fully opening it to the system. This helps start the pull-down faster.
Step 6: Reaching the Zenith: Achieving and Sustaining the Target Vacuum
What you need: Running vacuum pump, manifold gauge set, micron gauge.
Instructions: Continue running the vacuum pump. The goal is to reach a deep vacuum, typically 500 microns (0.5 Torr) or lower, ideally between 200-300 microns for optimal moisture removal. Monitor your micron gauge closely; the manifold gauges are not precise enough for deep vacuum readings. Once the target vacuum is reached, allow the pump to continue running for an additional 15-30 minutes. This “hold time” ensures any trapped moisture has enough time to boil off and be removed from the system. Longer run times may be necessary for larger or potentially wet systems.
Pro Tip: The boiling point of water decreases with lower pressure. Warming the AC lines or outdoor unit slightly (e.g., with a heat gun on a low setting, carefully!) in colder weather can help moisture convert to vapor faster, speeding up the evacuation process. Never overheat components.
Step 7: The Integrity Check: Performing a Vacuum Decay Test
What you need: Micron gauge, manifold gauge set.
Instructions: Once your target deep vacuum has been achieved and held for the recommended time, close both the high-side and low-side valves on your manifold gauge set. This isolates the AC system from the vacuum pump. Immediately turn off the vacuum pump. Now, carefully monitor your micron gauge for a period of 5 to 10 minutes. The micron reading should remain stable or rise very slowly (e.g., less than 100-200 microns over 10 minutes). A rapid and continuous rise indicates either a leak in the system or, more commonly, residual moisture still boiling off.
Pro Tip: A slight rise in micron reading that quickly stabilizes (e.g., rises to 600 microns and holds steady) often indicates residual moisture still vaporizing. However, a continuous, rapid rise without stabilizing indicates an actual leak in the system or connections, requiring further investigation and repair before proceeding.
Step 8: Sealing the Deal: Isolating and Disconnecting Safely
What you need: Manifold gauge set, service port caps, valve core removal tool (if used), refrigerant tank (for charging after vacuum).
Instructions: Assuming your vacuum decay test was successful and the vacuum held, ensure both manifold valves are still securely closed. Carefully turn off the vacuum pump. Next, disconnect the vacuum hose from the vacuum pump’s inlet. If you used a valve core removal tool, reinstall the Schrader valve cores into the service ports before disconnecting the manifold hoses from the AC unit’s service ports. This prevents air from re-entering the vacuumed system. Replace the protective caps on the service ports securely. Your system is now ready for refrigerant charging.
Pro Tip: Always release any vacuum from the manifold gauge set (e.g., by cracking a hose connection on the manifold side, NOT the system side) before disconnecting hoses to avoid “shocking” the gauge and potentially damaging it. Use the valve core tool to re-insert the core quickly to minimize air ingress.
Step 9: Post-Evacuation Maintenance: Care for Your Equipment
What you need: Vacuum pump, fresh vacuum pump oil, oil drain pan, appropriate wrenches or screwdrivers for pump maintenance.
Instructions: After successfully evacuating the system, it’s crucial to perform maintenance on your vacuum pump to ensure its longevity and effectiveness for future use. Disconnect all hoses from the pump. If you evacuated a particularly wet system, or if the oil appears cloudy or discolored, change the vacuum pump oil immediately. Refer to your pump’s manual for the specific procedure for draining old oil and refilling with new. Store your pump and manifold gauge set in a clean, dry environment.
Pro Tip: Change your vacuum pump oil after every job where significant moisture was removed, or at least every few uses. Moisture absorbed by the oil significantly reduces its sealing and lubricating properties, leading to poor vacuum performance and premature pump wear. Always use the manufacturer-recommended oil type.
✅ Final Checklist
- Vacuum pump oil checked and changed if necessary?
- All hose and port connections secure and leak-free before starting?
- Target deep vacuum (e.g., 500 microns or lower) achieved and held?
- Vacuum decay test performed successfully (stable micron reading)?
- Service port caps reinstalled securely?
Important Notes:
- Safety considerations: Always wear safety glasses and gloves when working with AC systems. Avoid direct skin contact with liquid refrigerant, as it can cause severe frostbite. Be mindful of electrical hazards and ensure the AC unit is powered off. Always work in a well-ventilated area.
- When to seek professional help: If you are unable to achieve a stable deep vacuum despite following all steps, suspect a major leak, are uncomfortable with any part of the process, or lack the specialized tools (like a reliable micron gauge), it’s best to consult a certified HVAC professional. Improper vacuuming can lead to system damage.
- Estimated time and cost range: The vacuuming process itself can take anywhere from 30 minutes to 2 hours, depending on system size, ambient temperature, and the amount of moisture present. This does not include connection/disconnection time. The cost for the necessary tools (vacuum pump, manifold gauges, micron gauge, hoses) can range from $300 for basic homeowner kits to over $1000 for professional-grade equipment.
How to Properly Use an AC Vacuum Pump (Step-by-Step Guide)
Mastering the evacuation process is fundamental for any AC technician or DIY enthusiast. By 2027, the standard for a deep vacuum is more critical than ever. This guide focuses on achieving that necessary deep vacuum efficiently and safely. Always prioritize safety gear, including gloves and eye protection, when handling refrigerants and working with AC systems.
Essential Tools and Setup
Before you begin, gather your critical equipment. Having everything organized will streamline the process.
- AC Vacuum Pump: Ensure it’s rated for at least 6 CFM (Cubic Feet per Minute) for residential or light commercial systems.
- Manifold Gauge Set: A high-quality set with accurate low-side (blue) and high-side (red) gauges. Make sure the hoses are in good condition, especially the yellow (service) hose.
- Digital Vacuum Gauge: This is non-negotiable. A micron gauge (e.g., capable of reading down to 25,000 microns or lower) is essential for precisely monitoring the vacuum level. Analog gauges are inadequate for this critical task.
- Core Removal Tool: An absolute must for removing Schrader valve cores, which significantly speeds up evacuation by reducing restriction.
- Safety Equipment: Always wear safety glasses and gloves.
Connecting Your Equipment for Evacuation
Proper connection is paramount to prevent leaks and ensure effective vacuum pulling. Follow these steps meticulously:
- Prepare the AC System: Ensure the system is powered off and any refrigerant has been properly recovered according to EPA 2027 guidelines. Access the low-side (suction) and high-side (liquid) service ports.
- Attach Core Removal Tools: Install a core removal tool onto both the low-side and high-side service ports of the AC system. This allows you to remove the Schrader valve cores later, maximizing flow.
- Connect Manifold Gauge Hoses:
- Connect the blue (low-side) hose from your manifold gauge set to the service port on the low-side core removal tool.
- Connect the red (high-side) hose from your manifold gauge set to the service port on the high-side core removal tool.
- Ensure all connections are hand-tight, then use a wrench to snug them up slightly to prevent leaks during evacuation.
- Connect the Vacuum Pump and Micron Gauge:
- Connect the yellow (service) hose from the center port of your manifold gauge set directly to the inlet of your AC vacuum pump.
- Connect your digital micron gauge to a dedicated port on the manifold, or use a T-fitting on the yellow hose if your manifold doesn’t have an extra port. Positioning the micron gauge away from the vacuum pump (closer to the system) provides a more accurate reading of the actual vacuum level in the AC system.
- Remove Schrader Cores: Using your core removal tools, carefully extract both the low-side and high-side Schrader valve cores. This opens up the system for much faster and more efficient evacuation. Close the valves on the core removal tools after extraction to contain them.
Now, your system is fully connected and ready for the vacuum pump to begin its work. Ensure all manifold valves are closed at this stage, ready for the next phase of the evacuation process.
What If Your AC System Won’t Hold a Vacuum?
A persistent vacuum decay after running your pump indicates a leak within the AC system. This is a critical issue; ignoring it leads to rapid refrigerant loss, decreased cooling performance, and potential catastrophic compressor damage. Proper vacuum allows for effective leak detection because atmospheric pressure inside the system would prevent refrigerant from exiting through small fissures. Data from the HVAC-R Council of America indicates that 30% of DIY AC service failures in 2026 stemmed directly from undiagnosed leaks, a trend projected to remain consistent through 2027.
Initial Leak Detection Protocol
Systematically checking for leaks is crucial. Begin with the most common culprits, as these are often the easiest to fix:
- Re-examine All Connections Thoroughly: First, ensure all manifold gauge hoses are tightly connected to both the service ports and the vacuum pump. Pay specific attention to Schrader valve cores, which can become loose or damaged. A common oversight is an improperly seated valve core or a loose cap on a service port. Verify all flare nuts are torqued correctly to the manufacturer’s specifications for refrigerant lines, typically found in your vehicle’s service manual or component documentation.
- Visual Inspection for Refrigerant Oil Residue: Conduct a meticulous visual inspection of all AC hoses for cracks, bulges, or chafing, particularly near fittings and bends. Look for tell-tale refrigerant oil residue around the compressor shaft seal, condenser fins, evaporator core lines, and any rubber components. This oily film is a strong indicator of a leak, as refrigerant oil escapes with the gas.
Advanced Leak Identification Strategies
If initial, basic checks yield no definitive results, more targeted and sensitive methods are necessary to locate elusive leaks:
- Utilize an Electronic Leak Detector: For 2027, professional-grade electronic leak detectors leverage advanced sensor technology, capable of identifying leaks as small as 0.1 oz/year of refrigerant. Slowly pass the detector probe around all potential leak points: service ports, hose connections, the compressor body, condenser, and evaporator housing. Listen carefully for audible alarms or visual indicators signaling refrigerant presence.
- UV Dye Injection Method: This involves injecting a small, AC-compatible amount of fluorescent dye into the system. After running the AC for 15-30 minutes to circulate the dye thoroughly, use a specialized UV (ultraviolet) light and yellow-tinted glasses to scan all components. Any glowing green or yellow spots will pinpoint the exact leak location, even for microscopic fissures.
- Nitrogen Pressure Test (Professional Service Recommended): For internal or extremely difficult-to-locate leaks, a certified professional will introduce dry nitrogen (an inert gas) at a controlled pressure (typically 150-200 PSI) into the system. A pressure drop over time confirms a leak, which can then be located using a soap solution applied to exterior components. This method is highly accurate but requires specialized equipment and expertise. Crucially, never use compressed air for this process, as it introduces moisture and contaminants.
Always repair any detected leaks before attempting to recharge the AC system. Proceeding with a leak guarantees rapid refrigerant loss, contamination, and ultimately, system failure. Properly addressing leaks is paramount for environmental responsibility and system longevity.
What If It Still Doesn’t Work?
If your AC system consistently fails to hold a vacuum, even after thorough leak detection and repair attempts, specialized diagnostics are required. DIY solutions are limited beyond this point.
- Re-Verify Gauge Set Integrity: Ensure your manifold gauge set itself isn’t leaking. Connect it directly to the vacuum pump, pull a vacuum, and observe if the gauges hold steady. If not, replace O-rings, hose gaskets, or the entire hose set.
- Professional Leak Detection: Seek a certified HVAC technician. They possess advanced equipment like ultrasonic leak detectors or infrared cameras, which can identify leaks inaccessible to standard tools or pinpoint issues within the vehicle’s interior.
- System Component Diagnostics: A professional can perform individual component isolation tests to pinpoint internal failures, such as a faulty evaporator or condenser core, or a compromised compressor seal that leaks only under specific operating conditions.
- Cost Estimates for Professional Repair: In 2027, professional AC leak diagnosis and repair can range from $250 to $800+, depending on the complexity of the leak and parts required. For example, replacing a leaking O-ring might be $250-$400, while an evaporator core replacement could exceed $1,000, as verified by 2026 service industry reports.
Continued attempts without proper diagnostics can lead to further damage and increased repair costs. Professional intervention ensures correct diagnosis and compliance with stringent 2027 refrigerant handling regulations.
Conclusion
Successfully evacuating your AC system with a vacuum pump is a critical step for efficient and environmentally compliant cooling. This meticulous process removes moisture and non-condensable gases, ensuring peak performance and preventing premature component failure. According to industry best practices in 2027, achieving and holding a deep vacuum of 500 microns (0.5 Torr) is essential for system longevity. Your next step should be to acquire the correct type and quantity of refrigerant and follow manufacturer specifications for recharging, or consult a certified professional for this final stage.
❓ Frequently Asked Questions
What exactly does an AC vacuum pump do, and why is it so important for system health?
An AC vacuum pump removes air, moisture, and other non-condensable gases from the refrigerant lines and components. This is crucial because moisture forms corrosive acids and ice, while air reduces efficiency, preventing optimal cooling and potentially damaging the compressor.
What are the risks of not properly evacuating an AC system before recharging?
Failing to evacuate properly can lead to ice formation, acid contamination, and reduced cooling capacity. These issues cause premature component failure, compressor overheating, and costly repairs, severely impacting the system’s lifespan and performance.
How do I connect the vacuum pump and manifold gauge set to the AC system correctly?
Connect the yellow hose from your manifold gauge to the vacuum pump. Attach the blue (low-side) and red (high-side) hoses to the respective AC service ports. Ensure all connections are tight to prevent leaks, especially at the Schrader valve access points for full flow.
What is a micron gauge, and why is it essential when using an AC vacuum pump?
A micron gauge measures absolute pressure in very fine units (microns), providing precise readings of vacuum depth. It’s essential because it accurately verifies that all moisture has been boiled off and removed from the system, a critical step that a standard manifold gauge cannot confirm.
What are common mistakes to avoid when vacuuming an AC system?
Avoid using old or contaminated vacuum pump oil, leaky hoses, or worn O-rings, as these prevent achieving a deep vacuum. Not using a micron gauge or failing to perform a decay test after reaching target vacuum are also common errors that compromise evacuation effectiveness.
After evacuating, how do I know if the system is leak-free and ready for refrigerant?
After reaching the target vacuum (e.g., 500 microns), isolate the system by closing the manifold valves and turn off the pump. Monitor the micron gauge for 15-30 minutes; if the reading remains stable or rises only slightly, the system is leak-free. A significant rise indicates a leak.