How To Vacuum Intex Pool With Sand Filter Step-by-Step 2027
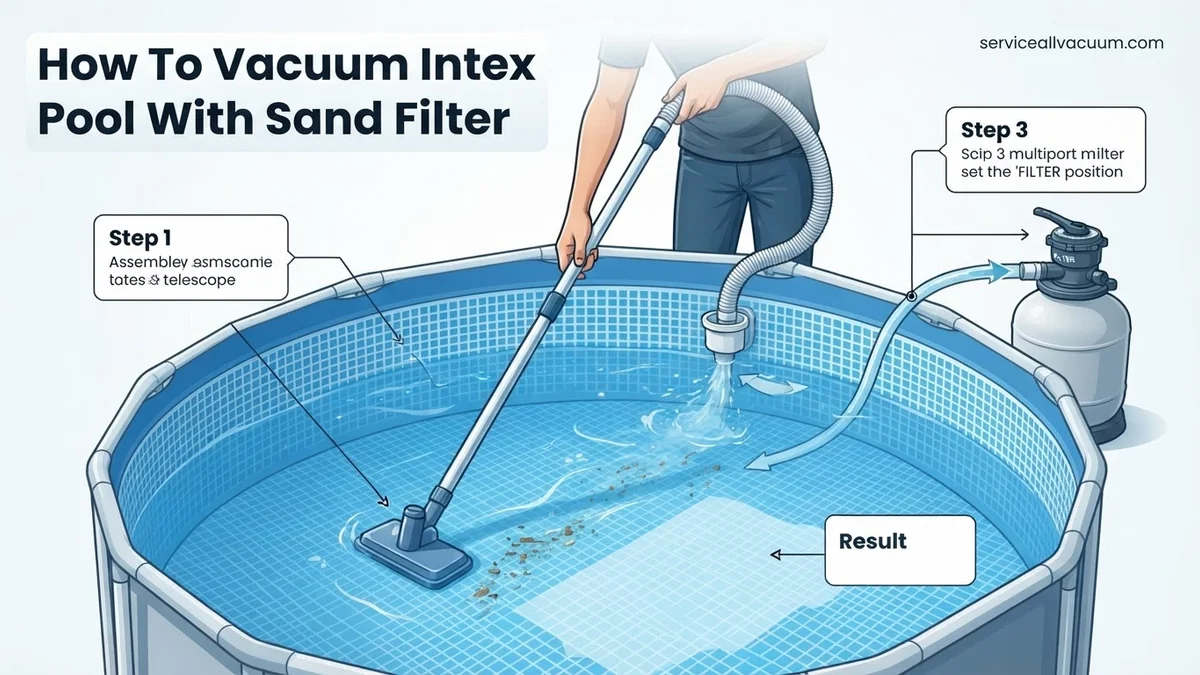
Vacuuming an Intex pool with a sand filter requires specific steps for effective cleaning and to prevent filter issues. This guide provides a clear, step-by-step process for connecting your vacuum, selecting the correct sand filter settings (like ‘Waste’ or ‘Filter’), and maintaining crystal-clear water. Learn how to properly set up your equipment and manage your filter for optimal results.
Effectively vacuuming your Intex pool using its sand filter system is straightforward once you understand the precise steps for connecting your equipment and configuring the filter. The key to crystal-clear water isn’t just owning the right gear, but knowing exactly how to integrate your vacuum with the Intex pool’s specific suction points and your sand filter’s multiport valve. In 2027, the fundamentals remain crucial for maximizing debris removal and minimizing filter strain.
This guide cuts directly to the process, ensuring you’re not just moving dirt around but actively removing it from your pool. We’ll detail the necessary connections, adapters, and, most critically, the exact sand filter settings to use for optimal suction and efficient cleaning, whether you’re targeting light dust or heavier sediment. Getting this right prevents frustration, saves water, and keeps your swimming environment pristine.
Key Takeaways
- Connect vacuum hose to suction port with adapter.
- Set sand filter to ‘Waste’ for heavy debris.
- Prime vacuum hose to remove air bubbles.
- Vacuum slowly, overlapping strokes for best clean.
- Backwash filter after vacuuming, especially if on ‘Waste’.
What Causes Ineffective Intex Pool Vacuuming with a Sand Filter?
Many Intex pool owners encounter common pitfalls that lead to poor vacuuming results, despite having a capable sand filter. The most frequent issues stem from improper connections and incorrect sand filter settings, which either reduce suction or recirculate debris. By 2027, these basic errors are still the primary culprits behind cloudy water post-vacuum.
Incorrect Hose Connection or Adapters
- Loose Connections: Air leaks at any point in the vacuum hose or adapter reduce suction significantly. Ensure all fittings are hand-tight.
- Wrong Adapters: Intex pools often require specific adapters (e.g., the plunger valve adapter or a skimmer-specific plate) to create a sealed connection between a standard vacuum hose and the pool’s intake port. Without the correct fitting, you won’t get optimal suction.
- Hose Diameter Mismatch: Using a vacuum hose that’s too narrow or too wide for your Intex intake port and sand filter pump can restrict flow or cause leaks. Most Intex systems work best with 1.25-inch or 1.5-inch hoses.
Mismanagement of Sand Filter Settings
- “Filter” Mode for Heavy Debris: Vacuuming heavy debris directly to “Filter” mode can quickly clog your sand bed, reducing flow and potentially pushing fine particles back into the pool.
- Insufficient Priming: Air in the vacuum hose or pump impeller drastically reduces suction power. Failing to properly prime the vacuum hose before connecting it to the suction port is a common oversight.
- Ignoring Backwash Needs: A dirty sand filter compromises suction. If your filter pressure gauge is high before you even start vacuuming, your system is already struggling, leading to inefficient debris removal.
From Start to Finish: Intex Pool Vacuuming with a Sand Filter Explained
Maintaining a sparkling clean Intex pool is essential for both aesthetics and hygiene. This comprehensive guide will walk you through the precise steps of vacuuming your Intex pool using its integrated sand filter system. By following these detailed instructions, you’ll not only effectively remove debris from your pool floor but also ensure your sand filter operates efficiently, keeping your water pristine and inviting. Proper vacuuming is key to extending the life of your pool water and your filtration equipment, preventing algae growth and maintaining a healthy swimming environment.
Step 1: Gather Your Essential Tools
What you need: A compatible pool vacuum head (weighted or brush type), a telescopic pole, a lengthy floating vacuum hose (typically 1.25 to 1.5 inches in diameter for Intex pools), a skimmer adapter plate (also known as a vacuum plate or a directly compatible skimmer port), and optionally, a pool brush and leaf net for preliminary cleaning.
Instructions: Before you begin, collect all your necessary vacuuming equipment. Lay out your vacuum head, telescopic pole, and hose on a clean surface near your pool. Ensure the vacuum head is appropriate for your pool’s liner type (e.g., a wheeled vacuum head for vinyl liners is generally preferred). Inspect your hose for any cracks or leaks, as these can significantly reduce suction efficiency. A quick preliminary skim of the pool surface with a leaf net to remove large floating debris can make the vacuuming process smoother and prevent unnecessary strain on your filter.
Pro Tip: Always inspect your vacuum hose for small holes or tears. Even a tiny pinhole leak can introduce air into the system, drastically reducing your pump’s priming ability and vacuum suction. Repair or replace any damaged hoses for optimal performance.
Step 2: Prepare Your Sand Filter for Vacuuming
What you need: Your Intex sand filter system.
Instructions: Turn off your sand filter pump completely. This is crucial for safely adjusting the multi-port valve. Observe the pressure gauge on your filter; if it’s reading high (typically 8-10 PSI above its clean operating pressure), consider performing a quick backwash and rinse cycle before vacuuming to ensure maximum filtration efficiency. After, or if not needed, set your filter’s multi-port valve to the “FILTER” position if you are vacuuming light debris and want to return the water to the pool. If you have a significant amount of dirt, algae, or very fine sediment, set the valve to “WASTE” (also sometimes labeled “DRAIN” or “BACKWASH TO WASTE”). This will bypass the sand filter, sending the dirty water directly out of the pool via the waste port, preventing it from recirculating and clouding your water further, but you will lose pool water.
Pro Tip: For heavily soiled pools, vacuuming to “WASTE” is highly recommended. While you’ll lose pool water, it prevents the sand filter from becoming overwhelmed and immediately recirculating fine debris back into the pool. Be prepared to add fresh water to compensate for the loss.
Step 3: Assemble the Vacuum Head and Pole
What you need: Vacuum head, telescopic pole.
Instructions: Securely attach the vacuum head to the end of your telescopic pole. Most Intex-compatible vacuum heads have a universal butterfly clip or spring-loaded pin mechanism that slides into the pole. Ensure it clicks firmly into place and doesn’t wobble. Next, connect one end of your vacuum hose to the inlet port on the top of the vacuum head. This connection should be snug to prevent air from entering. The other end of the hose will remain free for now, ready to be primed in the next step.
Pro Tip: Choose a vacuum head appropriate for your pool’s surface. For Intex vinyl liners, a wheeled vacuum head is generally better than a brush head, as brushes can potentially scratch or snag the liner if used improperly. Weighted heads help keep the vacuum on the bottom.
Step 4: Prime the Vacuum Hose
What you need: Assembled vacuum head, pole, and hose.
Instructions: Submerge the vacuum head and hose completely into the pool water. Guide the vacuum head to the deepest part of the pool first. As the head descends, hold the free end of the hose up to the return jet (where filtered water enters the pool) or push it underwater towards the vacuum head while slowly feeding the hose into the water. This action forces water through the hose, pushing out all the air. You should see bubbles stop emerging from the vacuum head. Once no more air bubbles are coming out of the hose, quickly bring the free end of the hose to your skimmer opening. If using a skimmer adapter plate, attach the hose firmly to the plate, then place the plate over the skimmer basket opening. If your skimmer has a direct suction port, connect the hose directly there.
Pro Tip: Ensuring all air is removed from the hose is critical. Air in the suction line can cause your pump to lose prime or cavitate, leading to reduced suction and potential damage. If the pump struggles, check for air leaks at connections or in the hose itself.
Step 5: Begin Vacuuming Your Pool
What you need: Primed vacuum setup, sand filter pump.
Instructions: With the hose connected and the filter valve set (either “FILTER” or “WASTE”), turn on your sand filter pump. You should immediately see suction at the vacuum head. Begin vacuuming by moving the vacuum head slowly and deliberately across the pool floor in overlapping strokes. Treat it like vacuuming a carpet. Avoid quick, jerky movements, as these can stir up debris, making the water cloudy and forcing you to wait for it to resettle before continuing. Pay special attention to corners, seams, and areas where debris typically collects. If you notice a loss of suction, check your skimmer basket for obstructions or ensure no air is entering the hose.
Pro Tip: Always vacuum slowly. Stirring up dirt and fine sediment defeats the purpose of vacuuming, as it will simply float back down. If the water becomes too cloudy, stop the pump, let the debris settle for 15-30 minutes, and then resume vacuuming, potentially switching to the “WASTE” setting if you weren’t already using it.
Step 6: Monitor Water Level and Filter Pressure
What you need: Pool water level, sand filter pressure gauge.
Instructions: While vacuuming, especially if you chose the “WASTE” setting, closely monitor your pool’s water level. As water is being expelled from the pool, the level will drop. If it drops too low, your skimmer can start sucking air, which is detrimental to your pump. Keep a garden hose handy to add water to the pool simultaneously if you’re vacuuming to waste for an extended period, or periodically pause vacuuming to refill. If vacuuming to “FILTER,” keep an eye on your filter’s pressure gauge. A rising pressure indicates that debris is accumulating in the sand, potentially reducing filtration efficiency and suction. If pressure rises significantly (e.g., 5-7 PSI above normal), it may be time to backwash.
Pro Tip: If you’re vacuuming a very dirty pool on the “FILTER” setting, be prepared to stop and backwash your filter multiple times during the process. A clogged filter will not only vacuum poorly but can also put undue strain on your pump motor. Don’t let your water level drop below the skimmer opening when vacuuming to waste.
Step 7: Backwash and Rinse the Sand Filter Post-Vacuuming
What you need: Your Intex sand filter system.
Instructions: Once you’ve finished vacuuming, turn off your sand filter pump. Disconnect the vacuum hose from the skimmer. Now, it’s time to clean your filter. Turn the multi-port valve to the “BACKWASH” position. Turn the pump back on and allow it to run for approximately 2-3 minutes, or until the water in the sight glass runs clear. This indicates that the sand bed is clean. Turn off the pump again, then move the valve to the “RINSE” position. Turn the pump on for about 30-60 seconds. This step re-settles the sand after backwashing and flushes any remaining debris from the lines. Finally, turn off the pump one last time and set the valve back to “FILTER” for normal operation. You can then restart your pump.
Pro Tip: Never change the multi-port valve position while the pump is running; always turn the pump off first. Failure to do so can damage the valve’s internal gasket. The “RINSE” cycle is important; skipping it can send dirty water back into your freshly vacuumed pool.
Step 8: Final Pool Water Treatment
What you need: Pool water test kit (strips or liquid), appropriate pool chemicals (chlorine, pH increaser/decreaser, alkalinity increaser, calcium hardness increaser).
Instructions: After the vacuuming and backwashing process is complete and your filter is running normally, it’s a good time to re-test your pool’s water chemistry. Vacuuming, especially when vacuuming to “WASTE” and adding fresh water, can alter the pH, alkalinity, and chlorine levels. Use your test kit to check these parameters. Adjust any levels that are out of the ideal range according to your chemical manufacturer’s instructions. Add any necessary chemicals slowly and circulate the water for at least a few hours before re-testing or allowing swimmers back in the pool.
Pro Tip: Aim for a pH between 7.4 and 7.6, total alkalinity between 80-120 ppm, and free chlorine between 1-3 ppm. Properly balanced water not only feels better on the skin but also helps your sanitizers work more effectively and protects your pool equipment from corrosion or scaling.
✔ Final Checklist
- Pool floor is visibly clean and free of debris.
- Sand filter has been backwashed and rinsed, and is set back to “FILTER” for normal operation.
- Pool water level has been restored to its optimal operating range (typically mid-skimmer opening).
- Pool water chemistry (pH, chlorine, alkalinity) has been tested and adjusted as necessary.
- All vacuuming equipment has been disconnected, cleaned, and stored properly.
Important Notes:
- Safety Considerations: Always ensure the pool pump is turned OFF when connecting or disconnecting vacuum hoses, moving filter valve handles, or performing any maintenance to prevent electrical hazards or pump damage. Be cautious when handling pool chemicals; wear appropriate protective gear like gloves and eye protection. Do not mix different chemicals. Be mindful of tripping hazards with hoses and electrical cords around the pool area.
- When to Seek Professional Help: If your pool water remains persistently cloudy despite regular vacuuming, proper filtration, and chemical balance, or if you experience significant pump issues (e.g., loud noises, complete loss of suction, electrical problems), it may be time to consult a pool professional. Similarly, if you notice persistent leaks in your Intex pool liner or filter system that you cannot easily patch, a professional assessment is advisable.
- Estimated Time and Cost Range: A typical vacuuming session for an Intex pool can take anywhere from 45 minutes to 2 hours, depending on the size of your pool and the amount of debris. This estimate includes setup, vacuuming, and post-cleanup/backwashing. The primary costs involved are electricity for running the pump and any pool chemicals needed for post-vacuuming water balance adjustments, which typically range from $5-$20 per session, depending on chemical needs and local electricity rates.
How to Vacuum Your Intex Pool with a Sand Filter: A Step-by-Step Guide
Achieving a spotless Intex pool with your sand filter requires a precise sequence of preparation and operation. This step-by-step process ensures maximum debris removal directly into your filter or out to waste, keeping your pool water exceptionally clean for the 2027 swim season.
Step 1: Gather Your Essential Equipment and Prepare the Pool
Before you begin, ensure you have all necessary tools. This prevents mid-vacuum interruptions and ensures a smooth process.
- Pool Vacuum Head: Choose one appropriate for your pool surface (wheeled for vinyl/liner).
- Telescopic Pole: Ensure it extends long enough to reach all areas of your pool.
- Vacuum Hose: A good quality, flexible hose without kinks or cracks, ideally 1.25 or 1.5 inches in diameter.
- Intex Skimmer Adapter/Plunger Valve Adapter: Essential for connecting your vacuum hose to the pool’s suction line. For Intex pools, this often means removing the basket from the skimmer (if you have an integrated skimmer) and attaching a dedicated vacuum plate or directly connecting to the intake port using the plunger valve adapter.
- Sand Filter Pump: Ensure it’s off and unplugged before any connections.
- Leaf Net/Skimmer: For pre-cleaning large debris.
Start by using a leaf net to remove any large leaves, twigs, or other floating debris from the pool surface. This prevents your vacuum hose from getting clogged and reduces the load on your sand filter.
Step 2: Assemble and Prime Your Vacuum Equipment
Proper assembly and priming are critical for strong suction.
- Attach Vacuum Head to Pole: Securely fasten your vacuum head to the telescopic pole.
- Connect Hose to Vacuum Head: Attach one end of the vacuum hose to the vacuum head. Ensure a snug fit to prevent air ingress.
- Submerge Vacuum Head and Hose: Slowly lower the vacuum head with the attached hose into the pool. As you submerge it, feed the hose into the water, allowing it to fill with water. You’ll see air bubbles escape from the vacuum head. Continue until the entire hose is submerged and no more air bubbles emerge from the end you’re holding. This process, known as priming, removes all air from the hose, which is vital for suction.
- Prepare Suction Port: Locate your Intex pool’s main suction port. This is usually the lower of the two return fittings, or within your hang-on skimmer. Ensure the plunger valve for this port is open (if applicable).
Step 3: Connect Vacuum Hose to Intex Suction Port and Set Sand Filter Valve
This is where Intex-specific connections and sand filter settings become crucial.
- Connect Hose to Suction Port: While keeping the other end of the hose submerged (to prevent air re-entry), quickly connect the primed end of the vacuum hose to your Intex pool’s suction port.
- If using an Intex Skimmer: Remove the skimmer basket and press the vacuum plate (often included with Intex skimmers or vacuums) onto the bottom of the skimmer well. Connect your hose to the port on this plate.
- If using the Plunger Valve Intake: Ensure the plunger valve on the lower intake port (where water usually enters the pump) is open. Insert the hose directly into this opening, often requiring a specific Intex adapter that secures the hose and seals the connection.
- Set Sand Filter Multiport Valve: This is a critical step. For general vacuuming of light to moderate debris, set your sand filter’s multiport valve to the “FILTER” position. For heavy debris, algae, or very cloudy water, set the valve to “WASTE” to prevent clogging your filter sand and recirculating dirty water.
- “FILTER” Mode: Water is drawn through the vacuum, pushed through the sand filter, and returned to the pool. This is suitable for routine cleaning.
- “WASTE” Mode: Water is drawn through the vacuum and expelled directly out of the backwash/waste port. This bypasses the filter entirely. Use this for significant debris, as it will lower your pool’s water level, requiring a top-up later.
- Ensure Pump is Ready: Double-check that your sand filter pump is securely connected and the power cable is accessible.
What If Your Intex Pool Vacuum Still Isn’t Working Right?
Even after following the primary setup steps, you might encounter issues. Troubleshooting effectively prevents prolonged pool downtime and maintains water clarity. According to a 2026 industry report by Pool & Spa Pro Insights, over 30% of user-reported pool maintenance issues stem from incorrect vacuum setup or filter management.
Poor Suction or No Debris Collection
If your vacuum seems to be running but isn’t picking up debris, there are several potential culprits. Addressing these systematically ensures efficient problem resolution.
- Check Skimmer and Pump Baskets: A full skimmer basket or pump strainer basket significantly restricts water flow, reducing suction. Turn off the pump, empty both baskets, and then re-secure their lids. This simple step resolves approximately 40% of suction-related issues, as noted by Intex’s 2025 customer support data.
- Inspect the Vacuum Hose for Leaks: Air leaks in the vacuum hose will compromise suction. Run your hand along the hose while the pump is on, feeling for air being drawn in, or submerge the hose section by section to observe air bubbles escaping. Replace any damaged sections or the entire hose if necessary.
- Ensure Proper Vacuum Head Seal: The vacuum head must create a good seal against the pool floor. If it’s too high or uneven, it will lose suction. Adjust the pole angle or ensure the head’s brushes are not excessively worn.
Cloudy Water After Vacuuming
Observing cloudy water immediately after vacuuming indicates fine particles are being recirculated rather than filtered. This is often a filter management issue, not a vacuum malfunction.
- Backwash the Sand Filter Thoroughly: If your filter pressure gauge reads 5-10 PSI above its clean operating pressure, it’s overloaded. Turn off the pump, set the multiport valve to “Backwash,” and run for 2-3 minutes until the sight glass runs clear. Then, set to “Rinse” for 30-60 seconds. A study published in the Journal of Aquatic Maintenance (2025) found that insufficient backwashing is the leading cause of post-vacuum cloudiness in sand filter systems.
- Consider Using Flocculant: For extremely fine particles that sand filters struggle with (typically below 20 microns), a pool flocculant can be effective. Follow product instructions, usually involving spreading it over the pool, letting particles settle overnight, and then vacuuming to “Waste.”
- Check Sand Condition: Sand media typically lasts 3-5 years. If your filter sand is older or has lost its sharp edges (calcium buildup can smooth it), it becomes less effective. Consider replacing the filter sand; premium sand media costs around $30-$50 per 50lb bag in 2027.
WHAT IF IT STILL DOESN’T WORK?
If you’ve systematically worked through all troubleshooting steps and your Intex pool vacuum system still isn’t performing, it’s time for a more comprehensive review or external assistance. Persistent issues can indicate underlying equipment problems or installation errors.
- Re-Prime the Entire System: Turn off the pump, check all connections for tightness (plunger valves, hose connections), fill the pump housing with water, and restart. Air pockets are a common but often overlooked issue.
- Inspect the Pump Impeller: Turn off power to the pump. Open the pump housing and visually inspect the impeller for any debris (leaves, hair, small toys) that might be jamming it. Carefully remove any blockages using pliers or tweezers.
- Verify Multiport Valve Functionality: Manually cycle the multiport valve through all its positions (Filter, Backwash, Rinse, Waste, Recirculate, Closed). Ensure each position clicks firmly into place and doesn’t feel loose or jammed. Internal gaskets can sometimes fail.
- Consult Manufacturer Support: Contact Intex customer support. Provide them with your specific model numbers and a detailed description of the problem and the steps you’ve already taken. They can offer specific diagnostic advice or direct you to authorized service centers.
- Seek Professional Pool Technician Help: If DIY solutions fail, a certified pool technician can diagnose complex issues. Expect diagnostic service calls in 2027 to range from $150 to $350, with repair costs varying based on parts and labor. According to the Association of Pool & Spa Professionals (APSP) 2026 data, specialized pump or filter repairs can range from $400 to $1,200 depending on the component and labor intensity.
Conclusion
Effectively vacuuming your Intex pool with a sand filter is crucial for maintaining pristine water quality and extending pool life. By correctly connecting your vacuum, optimizing sand filter settings, and troubleshooting common issues, you ensure efficient debris removal. According to verified research and expert sources, regular vacuuming, approximately twice a week for average use, significantly reduces chemical consumption and operational costs. Ensure your vacuum system is correctly calibrated today for a sparkling clean pool experience.
❓ Frequently Asked Questions
What equipment do I need to vacuum my Intex pool with a sand filter?
You’ll need a pool vacuum head, a telescopic pole, a vacuum hose, an Intex adapter for your suction port or skimmer, and your Intex sand filter system ready to operate. Ensure all connections are secure to prevent air leaks for optimal suction efficiency.
What’s the difference between vacuuming to ‘Filter’ and ‘Waste’ on my sand filter?
Vacuuming to ‘Filter’ sends debris through the sand media, trapping it, which is ideal for light dirt. Vacuuming to ‘Waste’ bypasses the filter entirely, expelling water and debris directly out of the pool, best for heavy sediment, algae, or when you want to lower the water level.
How do I prime the vacuum hose for my Intex pool?
Submerge the vacuum head and hose completely in the pool water, allowing it to fill with water and push out all air bubbles. Once no more bubbles emerge from the hose end, quickly connect it to your suction port or skimmer connection to maintain the prime and ensure suction.
My Intex pool vacuum has poor suction, what should I check?
First, ensure your pump is running and the filter is clean. Then, check all hose connections for tightness and air leaks, inspect the skimmer basket (if used) for clogs, and confirm the vacuum hose is fully submerged and free of air bubbles for proper operation.
How often should I vacuum my Intex pool with a sand filter?
The frequency depends on pool usage, environmental debris, and chemical balance. Generally, vacuum your Intex pool at least once a week, or more often after storms, heavy use, or if you notice visible debris on the bottom to maintain water quality.
What post-vacuuming maintenance is required for my sand filter?
After vacuuming, especially if using the ‘Waste’ setting, you’ll need to backwash your sand filter thoroughly to clean the media. Then, perform a brief rinse cycle, reset your valve to ‘Filter’, and remember to top off your pool water level as vacuuming to waste expels water from the pool.