How to Vacuum a Car AC Expert Step-by-Step Guide 2027
Properly vacuuming your car’s AC system is crucial for its longevity and performance, as it removes damaging moisture and non-condensable gases. This guide outlines the essential tools, safety precautions, and a detailed, sequential process to effectively vacuum your AC, preventing future costly repairs and ensuring optimal cooling efficiency.
Successfully vacuuming your car’s AC system is a critical step for efficient cooling and system longevity in 2027. This precise process removes all moisture and non-condensable gases from the system, preventing internal corrosion and ensuring your new refrigerant performs optimally. Getting this fundamental step right directly impacts your comfort and helps avoid costly repairs down the line.
Knowing how to properly pull a deep vacuum saves you money and gives you full control over your vehicle’s AC maintenance. This guide will walk you through the exact steps, necessary tool requirements, and essential safety measures to ensure your car’s AC is prepped perfectly for recharging.
Key Takeaways
- Always use a dedicated AC vacuum pump.
- Wear safety glasses and gloves always.
- Vacuuming removes moisture and detects leaks.
- Achieve and hold 29.5-30 inHg vacuum level.
- Improper vacuuming leads to AC system failure.
Why Your Car AC Needs Vacuuming & What Causes System Failure
Successfully vacuuming your car’s AC system is paramount for its long-term health and peak performance. When an AC system is opened for repairs or a component replacement, atmospheric air, along with its inherent moisture, inevitably enters. This isn’t just harmless air; moisture is the primary enemy of an AC system. If not meticulously removed, it reacts with the refrigerant and lubricant to form highly corrosive acids, which relentlessly attack vital internal components such as your compressor, condenser, and evaporator.
The Critical Role of Vacuuming for System Longevity
Beyond corrosion, moisture can freeze within the expansion valve, creating blockages and stopping refrigerant flow entirely. Non-condensable gases, primarily nitrogen and oxygen from the air, also compromise efficiency. These gases take up valuable space that should be occupied by refrigerant, leading to reduced cooling capacity and abnormally high system pressures. This forces your compressor to work harder, accelerating wear and increasing fuel consumption.
- Moisture Elimination: A deep vacuum boils off moisture at low pressure, transforming it into a vapor that is then extracted, preventing acid formation and ice blockages.
- Non-Condensable Removal: Evacuates all air, ensuring the system contains only pure refrigerant vapor, maximizing cooling performance and component lifespan.
- Leak Detection: Holding a vacuum for an extended period confirms the system is sealed before expensive refrigerant is introduced.
In 2027, neglecting proper vacuuming is a sure path to premature AC system failure, turning a simple repair into a much larger, costlier overhaul. It’s the essential foundation for any successful AC service.
How to Diagnose and Fix a Car AC Vacuum Like an Expert
Welcome to this expert guide on vacuuming your car’s AC system. This critical process is essential after any AC repair or whenever the system has been opened to the atmosphere. It involves evacuating all air and moisture, which are detrimental to AC performance and longevity, leading to corrosive acids and system failure. By following these detailed steps, you’ll ensure your AC system is prepped for optimal cooling and extended life, avoiding common pitfalls and achieving professional results right in your garage.
Step 1: Understand the ‘Why’ and Prioritize Safety
What you need: Safety glasses (ANSI Z87.1 rated), chemical-resistant gloves, a basic understanding of automotive AC systems.
Instructions: Before touching any equipment, grasp the fundamental reason for vacuuming: to remove all non-condensable gases (like air) and moisture from the AC system. Air takes up space that refrigerant should occupy, reducing cooling efficiency. Moisture, when mixed with refrigerant and compressor oil, forms corrosive acids that can destroy internal components over time. Always wear safety glasses to protect against refrigerant splashes and gloves to prevent frostbite or chemical contact. Ensure you’re working in a well-ventilated area.
Pro Tip: Never work on a pressurized AC system without proper training and tools, as refrigerant can cause severe injury. If your system still has refrigerant, it must be properly recovered by a certified technician before proceeding with vacuuming.
Step 2: Gather Your Essential Tools
What you need: Vacuum pump (2-stage, minimum 3 CFM, preferably 5 CFM or higher), manifold gauge set (specific to your vehicle’s refrigerant, e.g., R-134a or R-1234yf), AC service port adapters (if not integrated with gauges), basic wrench set, safety glasses, chemical-resistant gloves, shop rags.
Instructions: Lay out all your tools. Ensure your vacuum pump has fresh oil and is capable of reaching at least 29.5 inHg (inches of mercury) or 750 microns. Your manifold gauge set must match the refrigerant type of your vehicle (usually R-134a for cars pre-2015, R-1234yf for newer models). Confirm the hoses are in good condition with no cracks or damage. Having everything readily accessible will streamline the process.
Pro Tip: Investing in or renting a higher CFM (Cubic Feet per Minute) vacuum pump will significantly reduce evacuation time, especially for larger or older systems. A micron gauge, while not strictly required for basic vacuuming, provides precise readings and is ideal for verifying deep vacuum levels.
Step 3: Locate and Prepare AC Service Ports
What you need: Shop rags, appropriate AC service port caps.
Instructions: Pop your vehicle’s hood and locate the AC service ports. There are typically two: a low-pressure port (usually labeled “L”, smaller in diameter) and a high-pressure port (labeled “H”, larger in diameter). The low-side port is generally found near the accumulator or compressor, while the high-side is often closer to the condenser or drier. Unscrew their protective caps. Use a clean shop rag to wipe any dirt or debris from around the ports to ensure a clean connection for your gauges.
Pro Tip: Refer to your vehicle’s service manual if you’re having trouble locating the ports. They are usually positioned to be easily accessible, but their exact location can vary by make and model. Keep the caps in a safe place, as they’re vital for sealing the system after service.
Step 4: Connect the Manifold Gauge Set
What you need: Manifold gauge set, AC service port adapters.
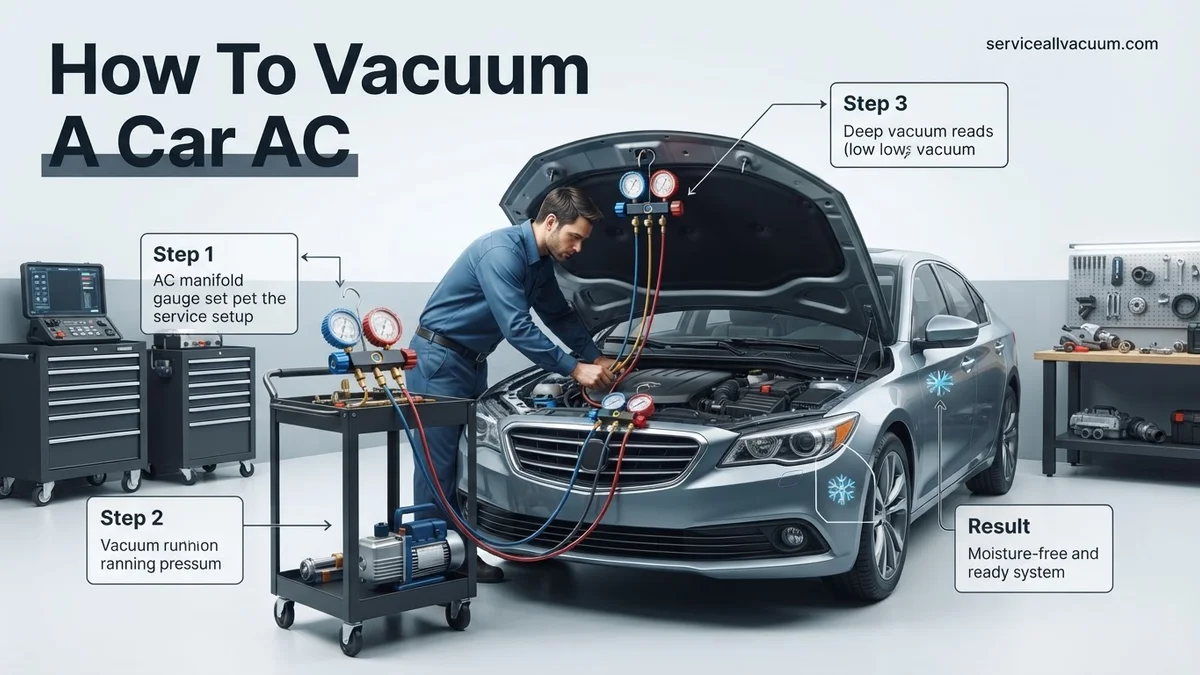
Instructions: Connect the blue hose from your manifold gauge set to the low-pressure service port on your vehicle. Then, connect the red hose to the high-pressure service port. Ensure these connections are snug, but do not overtighten, which can damage the O-rings. Finally, connect the yellow (center) service hose from your manifold gauge set to the inlet port of your vacuum pump. Make sure all manifold gauge valves (red and blue knobs) are fully closed before connecting.
Pro Tip: Always connect the vehicle-side hoses first, then the vacuum pump hose. This prevents any accidental release of residual pressure if you were to connect the vacuum pump first and then fumble with the vehicle connections. Double-check that your quick-disconnect fittings are fully seated onto the service ports.
Step 5: Initiate the Vacuum Process
What you need: Connected manifold gauge set and vacuum pump.
Instructions: With all hoses connected and snug, plug in and turn on your vacuum pump. Once the pump is running, slowly open both the blue (low-side) and red (high-side) valves on your manifold gauge set completely counter-clockwise. You should immediately see both pressure gauges drop, moving past 0 PSI into the vacuum range. The goal is to pull a deep vacuum, ideally past -29 inHg on the low-side gauge.
Pro Tip: Listen for any unusual noises from the pump or hissing from connections, which might indicate a loose fitting or a significant leak. If the gauges don’t drop quickly, re-check all your connections. A slight hum from the pump is normal, but loud grinding or sputtering suggests an issue.
Step 6: Monitor Vacuum and Perform an Initial Leak Check
What you need: Manifold gauge set, vacuum pump, timer.
Instructions: Allow the vacuum pump to run for an initial 15-20 minutes, observing the low-side gauge. It should steadily drop and eventually stabilize at or below -29 inHg (often represented as -74 cmHg or -100 kPa on metric gauges). If the gauge needle stops dropping significantly before reaching this deep vacuum or starts to rise, it strongly suggests a substantial leak in your AC system. You must locate and repair this leak before proceeding.
Pro Tip: A rapid rise in pressure (e.g., from -25 inHg to -10 inHg in a few minutes) indicates a significant leak, often at a component connection or a damaged hose. Use electronic leak detectors or UV dye (if already in the system) to pinpoint the source. Do not attempt to charge a system with a known leak.
Step 7: Achieve a Deep Vacuum for Moisture Removal
What you need: Vacuum pump, manifold gauge set, timer.
Instructions: To effectively boil off and remove all moisture, the system needs to be subjected to a deep vacuum for an adequate duration. Continue running the vacuum pump for a minimum of 45-60 minutes after the gauges have stabilized at their lowest point. For systems that have been open to the atmosphere for an extended period, or for larger AC systems (like those in SUVs), extend this time to 90-120 minutes. The deeper the vacuum and the longer it’s held, the more thoroughly moisture is removed.
Pro Tip: Moisture boils at a lower temperature under vacuum. A deeper vacuum (e.g., 500 microns or -29.7 inHg) pulls out moisture more efficiently. If you live in a humid climate, or if the system has been opened for days, aim for the longer end of the vacuuming duration.
Step 8: Isolate the System and Turn Off Pump
What you need: Manifold gauge set, vacuum pump.
Instructions: Once the deep vacuum duration is complete, the sequence of operations is crucial. First, fully close the blue (low-side) valve on your manifold gauge set by turning it clockwise. Then, immediately close the red (high-side) valve. Only after both valves are completely shut should you turn off the vacuum pump. This traps the deep vacuum within the AC system and prevents atmospheric air from rushing back in or the pump’s oil from being drawn into the system.
Pro Tip: Always close the manifold valves before turning off the pump. Failing to do so can contaminate your AC system with vacuum pump oil, leading to system damage and costly repairs down the line. A quick and decisive action here is key.
Step 9: Perform the Vacuum Hold Test
What you need: Manifold gauge set, timer.
Instructions: With the manifold gauge set still connected and its valves closed, observe the low-side gauge for at least 30 minutes. The needle should remain perfectly steady at the deep vacuum level you achieved in Step 7. A pressure rise, even a small one (e.g., 1-2 inHg), indicates that there is still a leak in the system, no matter how tiny. If a leak is detected, you must repeat the leak detection process and repair it before attempting to recharge.
Pro Tip: If the gauge rises quickly, it’s a large leak. If it rises slowly over 30 minutes, it’s a small leak. Both scenarios require troubleshooting and repair. Do not proceed to recharge until the system can hold a stable vacuum for the full duration of the test.
Step 10: Disconnect Equipment Safely
What you need: Manifold gauge set, service port caps.
Instructions: Assuming your system successfully passed the vacuum hold test, it’s time to disconnect. Quickly and carefully disconnect the blue (low-side) hose from the vehicle’s service port, followed by the red (high-side) hose. You will hear a brief hiss as the atmospheric pressure enters the disconnected hose, but this does not affect the vacuum inside the vehicle’s AC system. Immediately reinstall the protective service port caps onto both the low- and high-side ports and tighten them securely to prevent any future ingress of contaminants.
Pro Tip: Minimize the time the service ports are open to the atmosphere. The quicker you reinstall the caps, the better. Ensure the caps are fully threaded and tight; they act as a secondary seal to prevent minor refrigerant leaks over time.
✅ Final Checklist
- Vacuum Pump Duration: Was the vacuum pump run for the recommended 45-120 minutes based on system conditions?
- Deep Vacuum Achieved: Did the low-side gauge reach at least -29.5 inHg (or equivalent) during evacuation?
- Vacuum Hold Test Passed: Did the system hold a stable vacuum (no pressure rise) for a minimum of 30 minutes?
- Service Port Caps Secured: Were both high- and low-side service port caps reinstalled and tightened?
- Tools Cleaned & Stored: Was vacuum pump oil checked/changed, and all tools properly cleaned and stored?
Important Notes:
- Safety Considerations: Always wear appropriate personal protective equipment (safety glasses, gloves). Never expose skin to liquid refrigerant. Work in a well-ventilated area to prevent accumulation of refrigerant vapors.
- When to Seek Professional Help: If you cannot achieve or hold a deep vacuum, indicating a persistent leak, or if you are uncomfortable performing any of these steps, it is best to consult a certified automotive AC technician. They have specialized leak detection equipment and knowledge to diagnose complex issues. Recharging a leaking system is illegal and environmentally irresponsible.
- Estimated Time and Cost Range: The entire vacuuming process typically takes 1.5 to 3 hours, depending on system size and how long the vacuum pump needs to run. If you need to purchase tools, a vacuum pump and manifold gauge set can range from $150-$400. Tool rental (if available) might be $50-$100 per day. Professional service for vacuum and recharge usually ranges from $150-$400+, not including major leak repairs.
Step-by-Step Guide: How to Properly Vacuum Your Car AC System
Vacuuming your car’s AC system is a precise process. It demands the right tools and strict adherence to safety protocols. Do not rush this critical step; it directly impacts your AC’s performance and durability. Always ensure your vehicle’s engine is off and cool before beginning.
Essential Tools & Critical Safety Precautions
Before connecting any equipment, gather your tools and prioritize safety.
- Vacuum Pump: Dedicated automotive AC vacuum pump (minimum 2.5 CFM, 5 CFM or higher is better for efficiency).
- Manifold Gauge Set: Automotive-specific R-134a or R-1234yf manifold gauge set, matching your vehicle’s refrigerant. Ensure hoses are in good condition.
- Service Port Adapters: If necessary for your vehicle’s ports.
- Safety Glasses: Essential eye protection.
- Gloves: Protect your hands from potential refrigerant contact.
- Digital Vacuum Gauge (Micron Gauge): Highly recommended for precise vacuum level measurement, crucial for proper moisture removal in 2027 systems.
Safety First: Refrigerants are under pressure and can cause frostbite or eye injury. Always wear eye protection and gloves. Never release refrigerant into the atmosphere. Any existing refrigerant must be recovered by a certified professional before you start.
Connecting the Equipment and Pulling the Vacuum
- Locate Service Ports: Find your car’s AC high-side (smaller line, ‘H’) and low-side (larger line, ‘L’) service ports. They usually have caps.
- Connect Manifold Gauges:
- Connect the blue hose to the low-side service port.
- Connect the red hose to the high-side service port.
- Connect the yellow/utility hose to the vacuum pump’s inlet port.
Ensure all connections are hand-tight and secure.
- Open Manifold Valves: Fully open both the high-side (red) and low-side (blue) valves on your manifold gauge set. This allows the vacuum pump to pull from both sides of the system.
- Start Vacuum Pump: Turn on your vacuum pump. You should hear it working, and the gauge needles will drop rapidly, indicating vacuum is being pulled.
- Monitor Vacuum Level:
- Aim for at least 500 microns (0.5 Torr) for effective moisture removal.
- While analog gauges show 29.5-30 inHg, a digital micron gauge offers the precision needed for complete moisture evaporation.
- Run the pump for a minimum of 30 minutes. For systems open longer or suspected of moisture ingress, 60-90 minutes is ideal. R-1234yf systems especially benefit from a deep, stable vacuum.
- Close Manifold Valves: Once your target vacuum is reached and held, first close both the high-side (red) and low-side (blue) valves on your manifold gauge set.
- Turn Off Vacuum Pump: After closing the manifold valves, turn off the vacuum pump.
- Perform a Vacuum Hold Test: Let the system sit under vacuum for at least 15-30 minutes. Watch your gauges closely. Any rise in pressure signifies a leak in the AC system or your connections. If the vacuum holds steady, your system is sealed and ready for the next step: refrigerant recharging. If it drops, you must locate and repair the leak before proceeding.
Troubleshooting: When Your AC Vacuum Won’t Hold or What If It Still Doesn’t Work
A vacuum that fails to hold pressure indicates a leak within your car’s AC system. Addressing this immediately is crucial, as even small leaks can lead to compressor damage over time due to air and moisture ingress. Modern AC systems, particularly those using R-1234yf refrigerant prevalent in 2027 vehicles, are highly sensitive to contamination.
Identifying Leaks After a Failed Vacuum
- Re-check Connections: Ensure all manifold gauge set hoses are tightly secured to the service ports and the vacuum pump. Loose connections are a common, easily fixable cause of vacuum loss.
- Electronic Leak Detector: Utilize an electronic refrigerant leak detector. High-quality models in 2027 are designed to detect minute traces of R-1234yf or R-134a, offering sensitivity down to 0.1 oz/year. Systematically scan all AC components, connections, and lines.
- UV Dye Method: If an electronic detector doesn’t pinpoint the leak, inject a small amount of UV dye into the system (after a partial recharge, if necessary, to circulate the dye). Run the AC for 15-30 minutes, then inspect all components with a UV light and yellow glasses.
- Soapy Water Test: For accessible components like the compressor, condenser, or easily reachable line connections, spray a solution of soapy water. Bubbles will form at the leak point when the system is under slight pressure (e.g., from a partial refrigerant charge or nitrogen).
According to verified automotive service data from 2026, the most common leak points in modern AC systems are compressor shaft seals, O-rings at line connections, and micro-leaks in the condenser, accounting for over 60% of reported AC leaks.
Next Steps After Vacuuming: Recharging and Maintenance Tips
Once your AC system successfully holds a vacuum, it’s ready for the final step: recharging with the correct amount and type of refrigerant. This ensures optimal cooling performance and protects the compressor.
Recharging Your AC System
- Determine Refrigerant Type: Crucially, identify whether your vehicle uses R-134a or the newer R-1234yf refrigerant, which is standard in most new vehicles by 2027. Check the under-hood label for the specific refrigerant type and the precise charge weight in ounces or grams.
- Connect Refrigerant Can: Attach the correct refrigerant can (with the appropriate adapter for R-1234yf if applicable) to the manifold gauge set’s yellow service hose. Ensure the can tap is properly sealed.
- Add Refrigerant Slowly: With the engine running and AC on maximum cool, slowly open the low-side valve on the manifold gauge set to allow refrigerant to enter the system. Monitor the low-side pressure gauge and the can’s weight (if using a scale) to avoid overcharging.
- Check Vent Temperature: Once the specified charge weight is reached, close the valve. Check the air temperature at the vents; a properly charged system should deliver air between 40-45°F (4-7°C) at the center vents.
Expert sources from the Automotive Refrigeration Institute (ARI) emphasize that overcharging is a common mistake that significantly reduces AC efficiency and can lead to premature compressor failure. Always adhere to manufacturer-specified charge weights.
Proactive AC Maintenance for Longevity
- Run AC Weekly: Even in cooler months, run your AC for 10-15 minutes once a week. This circulates refrigerant and oil, keeping seals lubricated and preventing them from drying out and cracking.
- Regular Cabin Air Filter Replacement: Replace your cabin air filter every 12,000-15,000 miles or annually. A clogged filter restricts airflow, making the AC system work harder and reducing cooling efficiency.
- Inspect Belts and Hoses: Periodically check the AC compressor belt for cracks or fraying and inspect refrigerant lines for any signs of wear, chafing, or leaks.
What If It Still Doesn’t Work?
If you’ve followed all steps, addressed potential leaks, and the AC still isn’t cooling effectively after recharging, further investigation is necessary. The issue might extend beyond simple vacuuming and recharging.
- Re-evaluate Vacuum Duration: Ensure the vacuum pump ran for the recommended 30-60 minutes, especially in humid conditions. Insufficient vacuuming leaves moisture, which can cause system blockages.
- Professional Leak Detection: If you suspect an elusive leak, a professional technician has access to advanced leak detection equipment, such as nitrogen pressure testing or highly sensitive sniffers, which can pinpoint leaks that DIY methods might miss.
- Component Inspection: Issues with internal components like a faulty compressor clutch, a stuck expansion valve, or a malfunctioning pressure switch can prevent proper cooling. These often require specialized diagnostic tools.
- Seek Professional Diagnosis: If all DIY efforts fail, it’s time to consult a certified automotive AC technician. They possess the specialized tools, training, and diagnostic software to accurately identify complex AC system faults.
Professional AC diagnostics in 2027 typically range from $120-$250, excluding any repair costs. Major component replacements, such as a compressor or evaporator, can range from $500-$2000+, depending on the vehicle model and parts required.
Conclusion
Effectively vacuuming your car’s AC system is a critical procedure that removes harmful moisture and air, ensuring optimal performance and longevity. By following these expert steps, from proper equipment setup to meticulous leak detection and recharging, you can restore your vehicle’s cooling capabilities. A successful vacuum and proper recharge are fundamental to maintaining an efficient and reliable AC system. According to verified automotive HVAC research and manufacturer guidelines, a properly vacuumed and recharged AC system can operate at peak efficiency for 5-7 years before requiring further attention, assuming no leaks develop.
❓ Frequently Asked Questions
What are the primary dangers of not vacuuming a car’s AC system before recharging?
Not vacuuming leaves moisture and non-condensable gases in the AC system. Moisture reacts with refrigerant to form corrosive acids, which can severely damage internal components like the compressor, expansion valve, and lines, leading to expensive repairs and inefficient cooling.
How do I correctly connect a manifold gauge set and vacuum pump to my car’s AC system?
First, ensure the manifold gauges are closed. Connect the blue service hose to the low-side AC port (usually marked ‘L’), the red service hose to the high-side AC port (marked ‘H’), and the yellow (utility) hose to the vacuum pump’s inlet. Double-check all connections for tightness to prevent leaks.
What vacuum level should I aim for, and how long should I hold it to ensure proper moisture removal?
You should aim for at least 29.5-30 inches of mercury (inHg) or below 500 microns, ensuring a deep vacuum. Once this level is achieved, close the manifold gauge valves, shut off the vacuum pump, and monitor the gauges for at least 30 minutes to confirm the vacuum holds steady, indicating no leaks and complete moisture removal.
What critical safety precautions should I take when working on my car’s AC system and performing a vacuum?
Always wear ANSI-approved safety glasses and chemical-resistant gloves to protect against refrigerant contact. Work in a well-ventilated area to avoid inhaling refrigerant vapors. Ensure the vehicle’s engine is off and cool, and never expose AC components to open flames or excessive heat.
My vacuum won’t hold after running the pump; what does that mean, and what should be my next steps?
If your vacuum doesn’t hold and the gauge pressure rises, it definitively indicates a leak within the AC system. Your next step is to locate and repair the leak using methods like UV dye, an electronic leak detector, or a soapy water solution before attempting to re-vacuum and recharge the system.
Can I use a regular shop vacuum or air compressor to vacuum my car’s AC system?
No, a regular shop vacuum or air compressor is completely unsuitable for vacuuming an AC system. These tools cannot pull the deep vacuum (near absolute zero pressure) required to boil off and remove moisture from the system, and using them will leave contaminants that will damage your AC.