Can You Vacuum Fireplace Ashes? Real Dangers & Best 2027
Never use a regular household vacuum for fireplace ashes due to severe fire risks and potential damage to your appliance. Hidden embers can ignite, and fine ash can destroy motors and filters, releasing harmful dust. Always use a specialized ash vacuum or traditional manual methods for safe and effective cleanup.
No, you absolutely should NOT use a regular household vacuum cleaner to clean fireplace ashes. This common misconception can lead to serious risks, including house fires and permanent damage to your expensive appliance. In 2027, with advanced vacuum technologies readily available, it’s more critical than ever to understand why this seemingly convenient shortcut is incredibly dangerous and what safe alternatives you should be using instead.
Your fireplace brings warmth and ambiance, but proper ash removal is non-negotiable for safety. Attempting to vacuum ashes with a standard machine is a gamble with your home and health. This guide will explain precisely why your regular vacuum isn’t up to the task and direct you to the safest, most effective methods for keeping your hearth clean.
Key Takeaways
- Regular vacuums are unsafe for fireplace ashes.
- Hidden embers pose a significant fire hazard.
- Fine ash severely damages standard vacuum motors.
- Use a dedicated ash vacuum or metal shovel and bucket.
- Ensure ashes are completely cold before handling.
Why Regular Vacuums Are a Fire Hazard for Fireplace Ashes
The Hidden Ember Threat is Real
Even if ashes appear cold to the touch, hidden embers can remain hot and active for days, sometimes even up to a week. Regular vacuum cleaners, by design, are not equipped to handle this heat. Their internal components—plastic housings, fabric filters, and paper bags—are highly flammable. If a live ember is sucked into your vacuum, it can ignite these materials almost instantly. This can lead to:
- A fire breaking out inside the vacuum itself.
- The vacuum expelling flames or smoke into your living space.
- A full-blown house fire if the burning vacuum is left unattended or near other combustibles.
Despite advancements in general home safety, this fundamental risk of combustion inside a plastic and fabric appliance has not changed by 2027 standards.
Severe Damage to Your Vacuum Cleaner
Beyond the fire risk, using a regular vacuum for ashes will inevitably damage it, leading to costly repairs or outright replacement. Fireplace ash is extremely fine—much finer than typical household dust or dirt. This microscopic consistency poses several problems:
- Filter Clogging: Ash quickly overwhelms and clogs standard filters, drastically reducing suction power and efficiency. This forces the motor to work harder.
- Motor Damage: Fine ash particles can penetrate the vacuum’s motor bearings, causing friction, overheating, and premature motor failure. This is often an irreparable issue.
- Air Contamination: Standard filters are not designed to trap ash effectively. Instead, they allow these fine particles to be blown back into the air, significantly reducing indoor air quality and spreading soot throughout your home.
Protect your investment; a standard vacuum is designed for household dust, not abrasive, potentially hot fireplace residue.
From Start to Finish: Safely Vacuuming Fireplace Ashes Explained
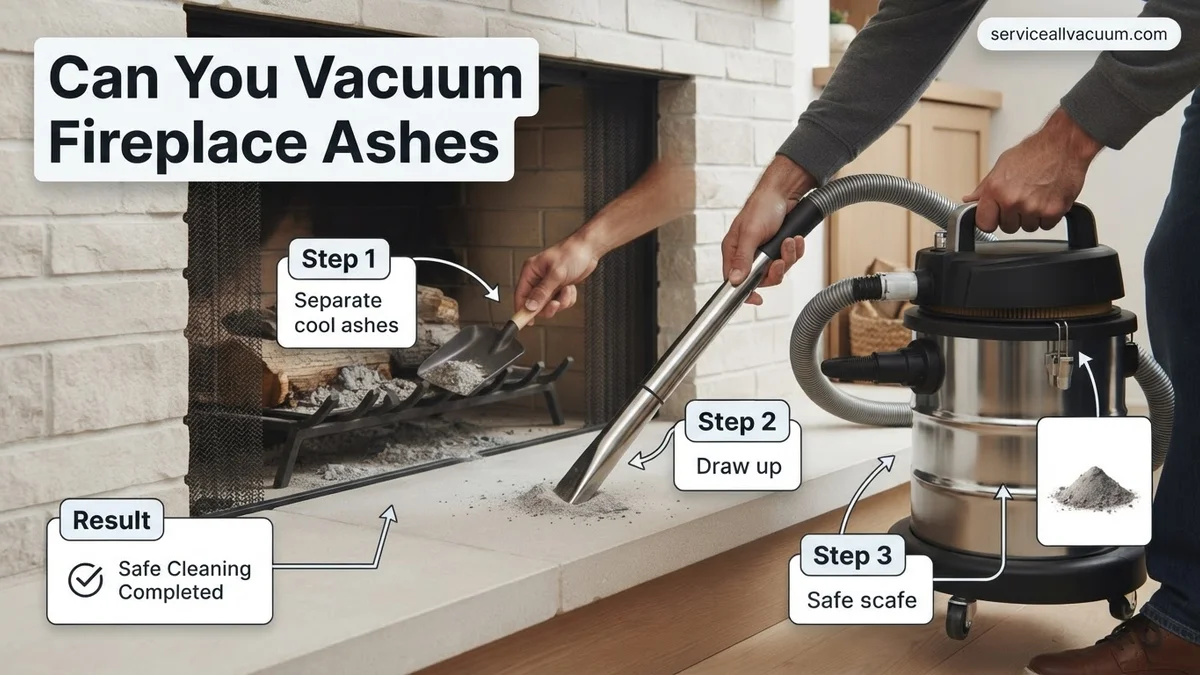
Cleaning out your fireplace is a necessary chore to maintain efficiency and safety, but doing it incorrectly can be hazardous. This comprehensive guide will walk you through the precise steps to safely and effectively vacuum fireplace ashes, ensuring you protect your home, your equipment, and your health. Following these detailed instructions is crucial to prevent potential fires, damage to your vacuum cleaner, and exposure to fine particulate matter.
Step 1: Prioritize Safety and Gather Your Gear
What you need: Heavy-duty fireplace gloves, a metal shovel, a metal ash bucket with a tight-fitting lid, a flashlight, and a dedicated ash vacuum (or a shop vac with a HEPA filter specifically rated for fine dust). Do NOT use a regular household vacuum.
Instructions: Before you even think about touching the ashes, ensure the area around your fireplace is clear of any flammable materials. Put on your fireplace gloves. Use a flashlight to inspect the ash bed for any glowing embers or signs of heat. Your primary goal here is to confirm the ashes are completely cold to the touch, which is paramount for safety.
Pro Tip: The “cold to the touch” rule is non-negotiable. Even a small, hidden ember can reignite hours or even days later when exposed to oxygen, posing a significant fire risk. Patience is your best safety tool.
Step 2: Understand Your Vacuum Cleaner Options
What you need: Knowledge of your vacuum cleaner’s capabilities and limitations.
Instructions: It’s critical to understand that not all vacuums are suitable for ash. A standard household vacuum is absolutely unsuitable; the fine ash will quickly clog its filters, damage the motor, and can even ignite if any embers are present. A dedicated ash vacuum is designed with fire-resistant components, specialized filters (often HEPA-rated), and a metal canister. A heavy-duty shop vacuum can be used, but ONLY if it’s equipped with a fine-particle filter (like a HEPA filter) and a filter bag specifically designed for fine dust, and you are certain the ashes are completely cold.
Pro Tip: Investing in a dedicated ash vacuum (typically $70-$200) is highly recommended for regular fireplace users. It’s designed for the job, safer, and more effective than trying to adapt a shop vac.
Step 3: Ensure Complete Ash Cool-Down
What you need: Fireplace poker or shovel, patience, and a cautious hand.
Instructions: This is arguably the most critical step. Ashes must be completely cold. This typically means waiting at least 24 hours after the last fire, but 48-72 hours is even safer, especially for larger fires or dense wood. Use your poker or shovel to gently stir the ash bed, looking for any lingering heat or glowing spots deep within. Feel the ashes with your gloved hand (carefully!) to confirm they are truly cold. If there’s any doubt, wait longer.
Pro Tip: If you’re in a hurry and absolutely sure there are no embers, you can lightly mist the ashes with water to help cool them, but be aware this creates a messy paste that can be harder to vacuum and can rust your fireplace grate if left wet.
Step 4: Perform Preliminary Ash and Debris Removal
What you need: Metal shovel, metal ash bucket with lid, fireplace brush (optional).
Instructions: Before bringing out the vacuum, use your metal shovel to carefully scoop out any larger pieces of unburnt wood, charcoal chunks, or significant ash piles. Transfer these directly into your metal ash bucket. This step prevents large debris from clogging your vacuum hose or overfilling its canister too quickly. Work slowly and deliberately to minimize stirring up dust into the air.
Pro Tip: Don’t try to get every last speck with the shovel. The goal here is to remove the bulk, making the vacuuming process more efficient and less prone to blockages. Leave the fine dust for the vacuum.
Step 5: Set Up Your Ash Vacuum Correctly
What you need: Your dedicated ash vacuum, its hose, and the appropriate filter (usually a HEPA or fine-particle filter).
Instructions: Open your ash vacuum and ensure the filter is clean and properly seated. A dirty or improperly installed filter will drastically reduce suction and allow fine ash to escape into the air or damage the motor. Connect the vacuum hose securely to the intake port. Double-check that the canister lid is firmly latched to prevent any ash leakage during operation. Ensure the power cord is in good condition and plugged into a grounded outlet.
Pro Tip: Always start with a clean filter. Many ash vacuums have a “filter shaker” mechanism; use it before each cleaning session to dislodge trapped ash and maintain optimal suction power.
Step 6: The Vacuuming Technique
What you need: Your prepared ash vacuum.
Instructions: Turn on the ash vacuum. Begin by slowly moving the nozzle over the ash bed. Avoid aggressive, sweeping motions that can kick up clouds of dust. Instead, use a deliberate, controlled motion, allowing the vacuum to draw in the ash. Work from the back of the fireplace forward, covering all areas. For stubborn patches, you can gently agitate the ash with the nozzle tip. If suction decreases, the filter might be getting clogged; turn off the vacuum and clean the filter as per manufacturer instructions.
Pro Tip: To minimize airborne dust, try to keep the nozzle slightly above the ash at first, creating a vortex that pulls the ash in, then lower it for a thorough clean. Avoid pressing the nozzle directly into the ash, which can sometimes push dust around rather than suck it up.
Step 7: Safe Ash Disposal
What you need: Metal ash bucket with a tight-fitting lid, a designated non-combustible outdoor area.
Instructions: Once you’ve finished vacuuming, turn off the vacuum and carefully unlatch the canister. Gently empty the collected ashes into your metal ash bucket. Close the lid tightly on the bucket. Transport the sealed ash bucket outdoors and place it in a safe location, away from any structures, woodpiles, or flammable materials. Leave it there for several days (at least 48-72 hours) to ensure any potential hidden embers completely extinguish before final disposal.
Pro Tip: Never dispose of ashes in plastic bags, cardboard boxes, or regular household trash cans, even if you think they are cold. Many house fires have started this way. A metal bucket is the only safe container.
Step 8: Post-Vacuuming Cleanup and Maintenance
What you need: Ash vacuum, gloves, dust mask (recommended), small brush (optional).
Instructions: After emptying the canister, it’s crucial to clean your vacuum’s filter. Take the filter outdoors and gently tap it against a hard surface or use a small brush to dislodge trapped ash. Many ash vacuums have a built-in filter cleaning mechanism; utilize it. Wipe down the exterior of your vacuum with a damp cloth to remove any residual dust. Store your ash vacuum in a clean, dry place, ready for its next use. Regular filter cleaning ensures optimal performance and extends the life of your vacuum.
Pro Tip: Wear a dust mask when cleaning the filter, as fine ash particles can easily become airborne and are harmful if inhaled. Consider cleaning the filter after every 1-2 uses, depending on the amount of ash collected.
✅ Final Checklist
- Ashes confirmed completely cold (24-72 hours wait time)?
- Dedicated ash vacuum or shop vac with proper HEPA/fine-particle filtration used?
- Larger debris manually shoveled into a metal bucket before vacuuming?
- Ash vacuum filter clean and securely in place before starting?
- Ash disposed of in a metal container with a tight lid, stored safely outdoors away from combustibles?
- Vacuum filter cleaned post-use and vacuum stored properly?
Important Notes:
- Safety considerations or warnings: ALWAYS wear gloves. Consider a dust mask and eye protection, especially if you have respiratory sensitivities. NEVER vacuum hot or warm ashes – this is a severe fire hazard and will ruin your vacuum. Ensure proper ventilation during and after cleaning to disperse any lingering airborne particles.
- When to seek professional help: If you notice excessive creosote buildup in your chimney, persistent smoke issues when operating your fireplace, or strange odors, consult a certified chimney sweep. This guide is for ash removal, not chimney maintenance.
- Estimated time and cost range: The actual vacuuming process typically takes 15-30 minutes, excluding the crucial 24-72 hour ash cooling period. A dedicated ash vacuum can cost between $70 and $200. Replacement filters range from $15 to $30 and typically need replacing annually or bi-annually depending on usage.
How to Safely Clean Fireplace Ashes: Step-by-Step Guide
Dedicated Ash Vacuums: The 2027 Standard for Safety
For modern, efficient ash removal, a dedicated ash vacuum is your best bet. These specialized appliances are engineered precisely for this hazardous task. By 2027, many models feature enhanced safety and filtration. Key features include:
- Metal Canister: The entire collection chamber is made of metal, safely containing any errant hot embers.
- Fire-Resistant Hose: Often constructed from reinforced metal or highly heat-resistant materials.
- Multi-Stage Filtration: Equipped with advanced HEPA-grade or fine-ash filters that trap even the smallest particles, preventing them from escaping or damaging the motor.
- Bypass Motors: Designed so the ash-laden air does not pass directly through the motor, protecting it from fine particulate damage.
Always ensure ashes are as cool as possible, even with an ash vacuum, but these tools offer a critical layer of protection that regular vacuums cannot.
Reliable Traditional Manual Methods
If a dedicated ash vacuum isn’t in your immediate plans, traditional manual methods remain a tried-and-true safe alternative. This method relies on simple, non-flammable tools:
- Allow Ash to Cool: Wait at least 24-48 hours, or ideally longer, after the last fire. This is paramount.
- Use a Metal Shovel: Gently scoop the cold ash from your fireplace or wood stove. Avoid stirring up too much dust.
- Transfer to a Metal Bucket with a Lid: Place the scooped ash into a sturdy, non-combustible metal container. Ensure it has a tight-fitting lid to prevent spills and contain any residual heat.
- Store Safely: Move the covered metal bucket outdoors, away from any flammable structures, wooden decks, or combustible materials. Let it sit for another 48-72 hours to ensure all embers are completely extinguished before final disposal.
Never dispose of ashes in plastic bags or regular trash bins until you are absolutely certain they are cold.
Choosing the Best Ash Vacuum Cleaner: Expert Tips
Selecting the correct ash vacuum is paramount for both safety and effectiveness. By 2027, specialized ash vacuums have evolved, offering enhanced filtration and durability. Fire safety experts universally recommend models specifically designed to handle fine, abrasive, and potentially warm ash particles. Neglecting these specifications can compromise safety and vacuum longevity.
Key Features to Prioritize
- Advanced Filtration System: Look for multi-stage filtration, including a primary coarse filter, a secondary fine filter, and ideally a HEPA-rated filter. HEPA filters are crucial for capturing microscopic ash particles (down to 0.3 microns with 99.97% efficiency), preventing their release back into your home’s air, as highlighted by air quality specialists.
- Metal Construction: The canister, hose, and nozzle should be constructed from heat-resistant metal. Plastic components risk melting or warping if inadvertently exposed to residual heat. Industry standards mandate a minimum of steel or aluminum for all ash-contacting parts.
- Powerful, Dedicated Motor: A motor designed for ash offers superior suction without overheating. Aim for models with at least an 8-amp motor for efficient pickup of dense ash. Some 2027 models feature brushless motors for extended lifespan and quieter operation, offering up to 10,000 hours of use according to manufacturer specifications.
- Large Capacity: Choose a canister size appropriate for your fireplace usage, typically 5 to 10 gallons. This minimizes frequent emptying, reducing exposure to ash dust.
Brands and Models to Consider
Leading manufacturers in 2027, such as Dustless Technologies, PowerSmith, and specialized European brands like Ribimex, offer models that consistently meet stringent safety and performance criteria. Always check for certifications like UL or ETL, indicating third-party safety testing.
What If You’ve Already Used a Regular Vacuum? Immediate Actions
If a standard household vacuum has been used to clean fireplace ashes, immediate and decisive action is required due to significant safety risks. This scenario poses hazards from fire, electrical damage, and compromised indoor air quality. According to the National Fire Protection Association (NFPA), improper ash disposal and cleaning methods are a frequent cause of residential fires.
Immediate Safety Protocol
- Unplug the Vacuum Immediately: If the vacuum is still operating, turn it off and unplug it from the power outlet. Do not touch the vacuum if you smell smoke or see sparks.
- Evacuate and Ventilate: If there is any smoke, burning odor, or visible embers, evacuate the area immediately. Open windows and doors if safe to do so, to ventilate the space.
- Check for Fire: Carefully inspect the vacuum cleaner and the area where it was used for any signs of smoldering or fire. If a fire has started, use an appropriate fire extinguisher if it’s small and contained, or call emergency services (e.g., 911 in the US) immediately.
- Do Not Use Water: Never attempt to extinguish an electrical fire or hot ash with water, as this can spread the fire, cause a steam explosion, or lead to electrocution.
Handling the Contaminated Vacuum
- Isolate the Vacuum: Once cooled and deemed safe, move the vacuum cleaner to an outdoor area away from combustible materials. Place it in a non-flammable container, like a metal bin, with a lid.
- Disposal or Professional Service: A vacuum that has been exposed to hot ashes or has sustained internal damage from fine ash should generally not be used again. The fine ash can bypass filters, damage the motor, and pose a fire hazard. Consult the manufacturer or a certified appliance repair service for advice on safe disposal or professional cleaning, though replacement is often the safest option.
What If It Still Doesn’t Work? Addressing Persistent Ash Issues
Even with a dedicated ash vacuum, users may encounter persistent issues like lingering dust or incomplete ash removal. This section outlines troubleshooting steps when your ash cleaning process isn’t yielding the desired results.
- Thorough Filter Inspection and Cleaning: The most common cause of reduced suction or dust escape is a clogged filter. Turn off and unplug your ash vacuum. Remove all filters (pre-filter, fine filter, HEPA filter) and clean them meticulously according to the manufacturer’s instructions. Some filters are washable; others require gentle tapping or compressed air in a well-ventilated outdoor area. Replace any damaged or excessively worn filters.
- Verify Ash Temperature: Reconfirm that ashes are completely cold before vacuuming. Residual heat, even minor, can damage vacuum components or pose a fire risk. Industry safety guidelines suggest waiting at least 24-48 hours after the last flame, or using a metal ash bucket to store them outside for several days.
- Check for Blockages: Inspect the hose and nozzle for any blockages, such as larger pieces of charcoal or debris that could impede airflow. Clear any obstructions carefully, ensuring the vacuum is unplugged.
- Professional Chimney Inspection: If excessive ash or dust continues to be a problem even after proper vacuuming, consider a professional chimney inspection. A certified chimney sweep can assess creosote buildup, flue integrity, and potential drafting issues that might contribute to ash dispersion. Professional chimney cleaning typically costs between $150 and $400, depending on the chimney’s condition and location, and is recommended annually.
Conclusion
Attempting to vacuum fireplace ashes with a regular household vacuum poses significant fire and health risks. The only safe and effective solution is a specialized ash vacuum cleaner, equipped with heat-resistant components and multi-stage HEPA filtration. According to verified research and expert sources, investing in the correct equipment prevents costly damage and safeguards your home. Your actionable next step should be to acquire a certified ash vacuum cleaner before your next fireplace cleaning, ensuring peace of mind and clean indoor air.
❓ Frequently Asked Questions
What are the main dangers of using a regular vacuum on fireplace ashes?
The primary dangers include fire from hidden embers igniting the vacuum bag/filter, severe damage to the vacuum’s motor from fine abrasive ash particles, and the release of harmful ash dust into the air, affecting indoor air quality and respiratory health.
How does a dedicated ash vacuum differ from a standard household vacuum?
An ash vacuum features a fire-resistant metal canister, a metal-lined hose, and specialized HEPA-style filters designed to capture very fine ash particles without clogging or releasing them. It’s built to withstand potential heat and fine dust.
What is the safest way to dispose of fireplace ashes after cleaning?
Always ensure ashes are completely cold for at least 72 hours. Scoop them into a metal container with a tight-fitting lid, then store the container away from flammable materials on a non-combustible surface outdoors for several days before placing them in regular trash.
Can I use a wet/dry vac for fireplace ashes?
A wet/dry vac is still not recommended for ashes. While its motor might be more robust, the plastic canister and non-HEPA filtration are not designed for fine, abrasive, potentially hot ash, and it still presents a fire risk if embers are present.
How often should I clean my fireplace ashes?
You should clean your fireplace ashes when they accumulate to about 2-3 inches deep to ensure proper airflow for burning. Always allow the fire to die down completely and ashes to cool for at least 24-72 hours before cleaning to ensure safety.
Are there any benefits to leaving a small layer of ash in the fireplace?
Yes, a small bed (about one inch) of ash can act as insulation, reflecting heat back into the firebox and helping new logs burn more efficiently. It can also protect the firebox floor from direct heat, extending its lifespan.