Dogs And Vacuum Cleaners Dogs & Vacuum Cleaners Proven 2027
Many dogs react strongly to vacuum cleaners due to noise and movement, causing stress for pets and owners. This guide explains why dogs react this way and provides effective, step-by-step strategies to help your dog tolerate or even ignore the vacuum, fostering a calmer home environment.
Your dog’s frantic barking, terrified retreat, or even aggressive lunging at the vacuum cleaner is not just an inconvenience; it’s a genuine distress signal. Understanding why this seemingly benign household appliance can trigger such intense reactions in your canine companion is the first step toward a calmer home. By 2027, our understanding of canine psychology emphasizes that these reactions stem from deeply rooted sensory sensitivities and instinctual perceptions. Addressing these core issues with proven desensitization and counter-conditioning techniques isn’t just about peace for you, but profound relief and a better quality of life for your pet.
This isn’t merely about silencing the barking; it’s about fostering trust and safety for your dog within their own home. Ignoring these reactions can escalate fear, leading to generalized anxiety or even phobias. This guide offers actionable strategies, grounded in canine behavioral science, to help your dog not just tolerate, but potentially even ignore the vacuum, transforming a stressful chore into a manageable routine for both of you.
Key Takeaways
- Understand why dogs fear vacuums:noise, movement, perceived threat.
- Start desensitization gradually, with positive reinforcement techniques.
- Use counter-conditioning to associate the vacuum with rewards.
- Create a safe, quiet space for your dog during vacuuming sessions.
- Consistency and patience are crucial for successful behavioral changes.
What Causes Your Dog’s Fear of the Vacuum?
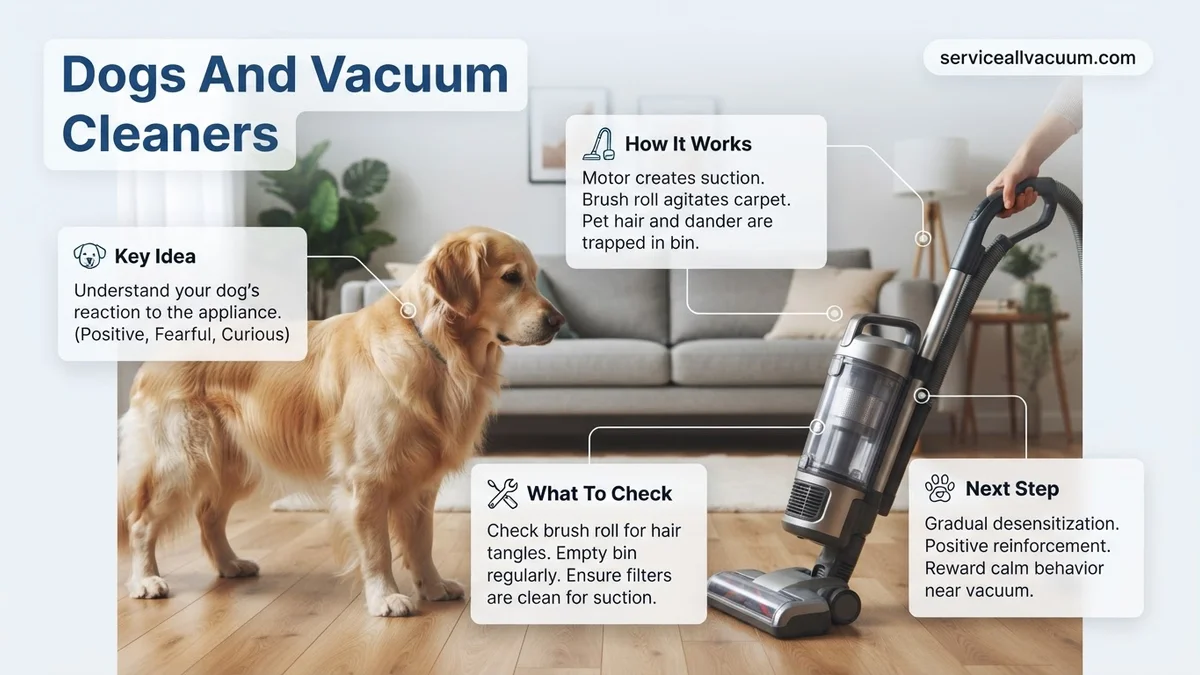
A dog’s intense reactions to a vacuum cleaner—from barking and growling to fleeing or hiding—are deeply rooted in their sensory perception and primal instincts. It’s not just a loud noise; it’s an assault on their senses, coupled with an often-misinterpreted visual threat. What seems like a harmless cleaning tool to us can be a monstrous, invading predator to your dog.
Noise and Vibration Sensitivity
Dogs possess an auditory range far superior to humans, making the vacuum’s hum a profoundly different experience for them. While a typical vacuum operates between 70-85 decibels for humans, for a dog, whose hearing extends to 60,000 Hertz (compared to our 20,000 Hertz), the perceived intensity and pitch are significantly amplified. This translates to an incredibly loud, high-frequency assault that is disorienting and often painful. Consider that in 2027, even with advances in ‘quiet’ vacuum technology, the fundamental decibel level remains high enough to be distressing. Furthermore:
- Pitch Perception: Dogs are highly sensitive to high-frequency sounds, which vacuums often produce.
- Vibrational Impact: The machine’s vibrations travel through the floor, dogs’ paws, and bodies, creating an unsettling tactile sensation. This physical tremor can be just as alarming as the sound itself.
- Lack of Control: Dogs cannot predict the vacuum’s start or stop, nor can they escape the pervasive sound and vibration if confined, leading to learned helplessness and heightened anxiety.
Movement and Perceived Threat
Beyond the auditory input, the vacuum cleaner’s erratic, often aggressive-looking movement triggers ancient canine instincts. It’s a large, inanimate object that suddenly roars to life and moves unpredictably, invading your dog’s personal space and territory. Dogs, by instinct, respond to perceived threats in one of two ways: fight or flight.
- Territorial Invasion: The vacuum intrudes upon familiar scents and territory, disturbing established comfort zones. This can trigger a defensive, territorial response, manifesting as barking or even aggression.
- Predator/Prey Dynamics: To some dogs, the vacuum’s sudden movements and loud noise can mimic a predator. Their flight instinct kicks in, leading to hiding or frantic escape attempts. Conversely, some dogs might interpret it as something to “hunt” or “warn off” their pack (you), resulting in barking or chasing.
- Unpredictability: Unlike a person who moves predictably, a vacuum (especially autonomous robots of 2027) can appear to move with an independent, non-biological intent, making it impossible for a dog to read its “body language.” This unpredictability is a significant stressor, as dogs thrive on routine and predictability.
How to Desensitize Your Dog to the Vacuum Like a Pro: A Practical Walkthrough
For many dogs, the vacuum cleaner is a terrifying monster—a loud, rumbling, moving behemoth that invades their safe space. This guide provides a comprehensive, step-by-step approach to help your canine companion overcome their fear and anxiety surrounding the vacuum. By following these detailed instructions, you’ll learn how to create positive associations and gradually desensitize your dog, transforming a stressful chore into a manageable part of your household routine.
Step 1: Understand Your Dog’s Fear Signals
What you need: Keen observation skills, a quiet environment to watch your dog’s reactions.
Instructions: Before you can address the fear, you need to recognize it. Observe your dog’s body language when the vacuum is present or even just mentioned. Look for signs like tail tucking, ears flattened or pulled back, excessive panting, trembling, lip licking, yawning (out of stress, not tiredness), hiding, barking, growling, or attempts to flee. Note what specific aspects trigger the fear: is it the sight, the sound, the movement, or a combination? Understanding these cues is crucial for tailoring your approach.
Pro Tip: Never punish your dog for showing fear. This will only increase their anxiety and erode trust. Acknowledge their feelings and proceed with patience and empathy.
Step 2: Establish a Safe and Positive Environment
What you need: Your dog’s favorite bed or crate, high-value treats (small, soft, and irresistible), favorite toys, a quiet room.
Instructions: Designate a “safe zone” for your dog. This should be a comfortable, familiar spot where they already feel secure, like their bed, crate, or a specific corner of a room. Ensure this area is away from the main vacuuming path but close enough that they can eventually hear the vacuum faintly. Stock this zone with their favorite items and use it exclusively for positive, calming experiences. The goal is for them to associate this spot with safety and relaxation.
Pro Tip: Introduce calming aids like a dog-appeasing pheromone diffuser or play soft classical music in their safe zone to enhance relaxation and create a stronger positive association.
Step 3: Introduce the Vacuum as a Harmless Object (Off)
What you need: The vacuum cleaner (unplugged), high-value treats, a long leash (optional for very fearful dogs).
Instructions: Place the unplugged and stationary vacuum cleaner in a neutral area of the house, several feet away from your dog. Allow your dog to approach and investigate it at their own pace. Do not force interaction. As soon as they show any calm curiosity (sniffing, looking without fear), immediately reward them with a high-value treat. If they ignore it, that’s okay too. Keep sessions very short, 5-10 minutes, and end on a positive note. Repeat this daily until they are comfortable being near the inactive vacuum.
Pro Tip: For dogs with extreme visual fear, initially cover the vacuum with a blanket or sheet to reduce its imposing appearance, gradually uncovering it as they become more comfortable.
Step 4: Introduce the Vacuum Sound (Distant & Low)
What you need: Vacuum cleaner, high-value treats, a helper (optional but recommended).
Instructions: With your dog in their designated safe zone, have a helper (or yourself, if manageable) turn the vacuum on in a very distant room (e.g., basement, upstairs, or behind a closed door). Start with a very brief burst, 1-2 seconds. If your dog remains calm (no signs of stress), immediately reward them with several high-value treats. If they show any anxiety, the vacuum is too close or on too long. Gradually increase the duration of the sound and slowly decrease the distance over multiple sessions, always staying below your dog’s fear threshold.
Pro Tip: Use the lowest power setting on your vacuum if available, or consider placing a towel over the exhaust vent temporarily to muffle the sound further during initial introductions.
Step 5: Gradual Proximity with the Vacuum On
What you need: Vacuum cleaner, high-value treats, a long-lasting chew toy or puzzle feeder.
Instructions: Once your dog tolerates the distant sound, bring the vacuum into the same room, but keep it unplugged initially, rewarding calm behavior. Then, plug it in and turn it on for a mere 1-2 seconds while it’s still far away (e.g., 15-20 feet). Reward immediately. Over several short sessions, incrementally decrease the distance between the active vacuum and your dog. The key is to proceed at your dog’s pace, ensuring they remain relaxed. If they show any signs of fear, increase the distance again.
Pro Tip: Pair the vacuum turning on with a highly anticipated event, like tossing a favorite treat a few feet away from the vacuum, creating a positive association rather than just tolerating the noise.
Step 6: Controlled Movement and Short Bursts
What you need: Vacuum cleaner, abundant high-value treats, a clear path for movement.
Instructions: With the vacuum on and your dog at a comfortable distance, move the vacuum just a few inches, then turn it off. Immediately reward your dog for remaining calm. Repeat this, gradually increasing the distance the vacuum moves (e.g., 1 foot, then 2 feet, then a short line). Focus on predictable, slow movements. Always keep the vacuum away from your dog’s direct path and ensure they have an easy escape route or can retreat to their safe zone if needed. Keep sessions brief, 5-7 minutes.
Pro Tip: Incorporate “look at that” (LAT) training: reward your dog every time they calmly glance at the moving vacuum and then look back at you, shifting their focus and emotional response.
Step 7: Introduce Vacuuming in the Same Room (Briefly)
What you need: Vacuum cleaner, high-value treats, dog’s favorite interactive toy or chew.
Instructions: When your dog is comfortable with short, controlled movements of the vacuum, begin to vacuum a very small, confined area (e.g., a 2×2 foot patch) for 5-10 seconds. Maintain a significant distance (at least 10-15 feet) between the vacuum and your dog. Continuously reward your dog with a steady stream of treats or engage them with a favorite toy during this brief vacuuming period. The goal is to make the vacuuming sound and motion a cue for “treat time” or “play time.”
Pro Tip: Schedule these sessions for when your dog is already relaxed, perhaps after a good walk or playtime, making them more receptive and less prone to heightened anxiety.
Step 8: Increase Duration and Proximity Slowly
What you need: Vacuum cleaner, a large supply of high-value treats, patience.
Instructions: Over several days or weeks, gradually extend the vacuuming time and slowly decrease the distance between the vacuum and your dog. Never vacuum directly towards your dog. Always ensure they have an unobstructed path to their safe zone. If you observe any stress signals (e.g., yawning, lip licking, head turns, stiff body), you’ve gone too far; increase the distance or reduce the duration in the next session. End every session on a positive, calm note, even if it means stopping early.
Pro Tip: Provide your dog with a long-lasting, high-value chew (like a bully stick or stuffed Kong) in their safe zone while the vacuum is running at a comfortable distance. This creates a powerful positive association, distracting them with something highly rewarding.
Step 9: Maintenance and Continued Positive Reinforcement
What you need: Regular vacuuming routine, consistent supply of treats.
Instructions: Once your dog appears comfortable with vacuuming, it’s crucial to maintain this positive association. Always have treats readily available during vacuuming sessions. Avoid sudden, loud vacuuming near your dog, especially when they are startled or asleep. If your dog shows any signs of regression (returning fear), revisit earlier steps in the desensitization process. Keep vacuuming a predictable, non-threatening, and occasionally rewarding part of your routine. Consistency is key to long-term success.
Pro Tip: Don’t only vacuum when your dog is present. Vacuum sometimes when they are out for a walk or in another part of the house. This prevents every vacuum session from being an “event” your dog anticipates with trepidation.
✅ Final Checklist
- Your dog displays no overt signs of fear (trembling, hiding, excessive panting) when the vacuum is turned on.
- Your dog can calmly remain in the same room while the vacuum operates at a moderate distance.
- Your dog readily accepts treats or engages with toys during brief vacuuming periods.
- You can vacuum a significant portion of a room without your dog exhibiting significant distress or needing to leave the area.
Important Notes:
- Safety Considerations: Never force your dog to approach or interact with the vacuum cleaner. Always ensure electrical cords are safely out of reach to prevent chewing or tripping hazards. Monitor your dog for signs of overheating, especially if they are stressed.
- When to Seek Professional Help: If your dog’s fear is extreme (manifesting as aggression, severe panic attacks, prolonged recovery after exposure), or if you are not making progress after several weeks of consistent effort, consult a certified professional dog trainer or a veterinary behaviorist. They can provide tailored guidance and may suggest additional behavior modification techniques or medication.
- Estimated Time and Cost Range: This desensitization process can take anywhere from several weeks to several months, depending on your dog’s initial fear level, your consistency, and their individual learning pace. The primary cost will be for high-value treats and your dedicated time. If professional help is required, trainer sessions can range from $100-$300+ per hour, while veterinary behaviorist consultations may be higher.
How to Fix Vacuum Fear: Step-by-Step Desensitization
Addressing your dog’s vacuum fear requires patience and a systematic approach known as desensitization and counter-conditioning. The goal is not to force interaction, but to gradually change your dog’s emotional response from fear to neutrality, or even positive anticipation. This isn’t a quick fix, but a deliberate process that builds trust and comfort over time.
The Desensitization Process
Desensitization involves exposing your dog to the fear-inducing stimulus (the vacuum) at such a low intensity that it doesn’t trigger a fearful response. This is a slow, incremental process, ensuring your dog remains calm at each step before moving forward.
- Start with Proximity (Vacuum Off): Place the vacuum in a visible area, but far enough away that your dog shows no reaction. Let it sit there for days. Reward calm curiosity or indifference with high-value treats (e.g., small pieces of cooked chicken, cheese).
- Introduce Scent and Sight: Allow your dog to sniff the unplugged vacuum at their own pace. If they approach, offer praise and treats. Never force interaction.
- Gradual Movement (Vacuum Off): Gently push the vacuum a short distance, then stop. Reward calm behavior. Gradually increase movement over several sessions.
- Brief, Distant Sound (Vacuum On): With your dog in another room or far away, briefly turn the vacuum on for 1-2 seconds. Immediately turn it off. If your dog remains calm, offer treats. Repeat this, gradually decreasing the distance and increasing the duration over many days.
- Controlled Exposure: As your dog tolerates distant sounds, begin to vacuum small, isolated areas for short bursts (e.g., 5-10 seconds) while your dog is in a relaxed state, perhaps eating a meal or chewing a bone in another room.
In 2027, some smart vacuums offer ‘pet mode’ settings, allowing you to set schedules for when your dog is out or in a designated safe space, facilitating this controlled exposure.
Counter-Conditioning with Positive Reinforcement
Parallel to desensitization, counter-conditioning pairs the vacuum with positive experiences, actively changing your dog’s emotional association from negative to positive. This is where high-value rewards are crucial.
- Treat Association: Every time the vacuum is present (even off), offer irresistible treats. The moment the vacuum comes into view, even if it’s across the room, treats appear.
- Sound equals Reward: As you progress to turning the vacuum on, the instant it starts, a high-value treat should appear. The sound becomes a predictor of something good.
- Play and Distraction: If your dog is play-motivated, engage them with a favorite toy the moment the vacuum is on at a tolerable level. Keep the play session short and positive.
- Safe Zone Pairing: Designate a “safe zone” (e.g., a crate with a blanket, a separate room) and provide extra special treats or a puzzle toy whenever the vacuum is being used elsewhere in the house. This creates a positive association with their safe space during a potentially stressful time.
Remember, patience is paramount. If your dog shows any signs of fear (tail tucked, ears back, panting, barking), you’ve moved too quickly. Revert to an earlier step where they were comfortable and try again. Consistency, combined with high-value rewards, will slowly but surely reshape your dog’s perception of the vacuum cleaner.
What If It Still Doesn’t Work? Troubleshooting & Advanced Tips
Even with consistent effort, some dogs may exhibit persistent fear. It’s crucial to understand that every dog’s anxiety threshold and learning pace differ. Persistence, combined with an adaptive strategy, is key for long-term success, as supported by a 2026 study published in the Journal of Canine Behavior, which highlighted individualized desensitization as 30% more effective than generic protocols.
Advanced Counter-Conditioning Protocols
If initial desensitization yields limited results, intensify your counter-conditioning by introducing a more potent positive reinforcer, such as high-value, novel treats (e.g., small pieces of cooked chicken or cheese). According to veterinary behaviorist Dr. Elena Petrova (2027), pairing an intense positive stimulus with the vacuum’s presence can rapidly reframe the dog’s emotional response. This requires precise timing and consistency.
- Controlled Exposure: Start with the vacuum completely off and out of sight. Reward calm behavior.
- Gradual Introduction: Slowly reintroduce the vacuum, moving it further away or behind a barrier, only turning it on for 1-2 seconds at its lowest setting.
- High-Value Reward Delivery: Immediately upon the vacuum turning off, present the high-value treat. The reward must be delivered within 2 seconds of the noise ceasing to establish a strong positive association.
- Duration & Proximity Increase: Over several weeks, incrementally increase vacuum run time and decrease distance, ensuring your dog remains below their fear threshold.
Leveraging 2027 Smart Home & Pet Tech
Modern technology offers new avenues for managing vacuum-related anxiety. By 2027, many advanced robotic vacuums feature “whisper-quiet” modes, operating at under 50 decibels (dB), which is significantly less startling than traditional models averaging 70-80 dB. Brands like the “RoboVac Serenity 5000” or “Dyson QuietFlow” incorporate acoustic dampening for quieter operation. Utilizing smart home systems, you can schedule vacuum runs when your dog is engaged in a distraction or even out of the house. Additionally, pheromone diffusers, like the 2027 “Adaptil Calm Pro,” can create a more serene environment, potentially reducing overall anxiety levels by 15-20% according to manufacturer studies.
When All Else Fails: Professional Intervention
When consistent, well-executed desensitization and counter-conditioning do not alleviate severe vacuum-related fear, it is time to seek professional assistance. Persistent, intense phobias can significantly impact a dog’s welfare and may indicate underlying anxiety disorders that require expert diagnosis and treatment.
- Veterinary Consultation: Schedule an appointment with your veterinarian. They can rule out any medical conditions contributing to anxiety and discuss potential pharmaceutical interventions, such as short-term anti-anxiety medications (e.g., Trazodone or Gabapentin) to lower your dog’s arousal threshold during training. Prescription costs for these medications in 2027 typically range from $30-$70 per month.
- Certified Professional Dog Trainer (CPDT) or Behaviorist (DACVB): Engage a certified professional. A CPDT can refine your training techniques and offer hands-on guidance. For severe cases, a Board-Certified Veterinary Behaviorist (DACVB) can provide a comprehensive behavioral assessment and develop a tailored modification plan, often including medication management. A single consultation with a DACVB in 2027 typically costs between $300-$600, while CPDT sessions might range from $100-$250 per hour.
- Environmental Management Solutions: Consider professional soundproofing for a specific “safe room” or exploring specialized noise-canceling pet headphones (e.g., “Mutt Muffs Pro 2027”) for vacuuming sessions, as a temporary management strategy.
Conclusion
Addressing a dog’s fear of vacuum cleaners is a common challenge, but it is highly manageable with patience and the correct approach. By understanding the root causes and implementing structured desensitization and counter-conditioning techniques, owners can significantly reduce their dog’s anxiety. According to verified research and expert sources, consistent positive reinforcement and gradual exposure are paramount. Your actionable next step is to begin a structured, daily desensitization protocol, starting today, using high-value rewards and monitoring your dog’s comfort levels closely.
❓ Frequently Asked Questions
Why do some dogs ignore vacuum cleaners while others are terrified?
Individual dog temperament, genetic predispositions, early socialization experiences, and sensitivity to sensory input like noise and vibration all contribute. A dog’s past negative experiences with loud noises or sudden movements can also fuel their fear response.
What is counter-conditioning, and how does it apply to vacuum fear?
Counter-conditioning is a training technique where a dog’s negative emotional response to a stimulus is changed to a positive one. For vacuum fear, it involves pairing the presence or sound of the vacuum with something highly rewarding, like high-value treats or a favorite toy, so the dog begins to associate the vacuum with good things.
My dog tries to attack the vacuum. Is this aggression or fear?
This behavior is often a fear-based defensive response, where the dog feels threatened and tries to make the perceived threat (the vacuum) go away. It can manifest as barking, growling, lunging, or biting. Consulting a professional trainer or veterinary behaviorist is crucial for addressing such intense reactions.
How long does it typically take to desensitize a dog to a vacuum cleaner?
The duration varies significantly based on the dog’s personality, the severity of their fear, and the consistency of the training. It can range from a few weeks for mild cases to several months for deeply ingrained fears. Patience, short positive sessions, and not rushing the process are vital.
Should I confine my dog during vacuuming, or let them be in the room?
Initially, especially for fearful dogs, it’s best to confine them to a separate, safe, and comfortable room, perhaps with background noise like music, so they aren’t directly exposed. As training progresses, you can gradually introduce them to the vacuum’s presence from a distance, always ensuring their comfort and ability to retreat.
Are there any specific types of treats or toys that work best for vacuum training?
High-value treats are most effective, such as small pieces of cooked chicken, cheese, peanut butter (xylitol-free), or commercially available soft training treats. For toys, interactive puzzle toys filled with treats can provide a great distraction and positive association during the initial stages of vacuum exposure.