How To Attach Pool Vacuum To Skimmer Step-by-Step 2027
Correctly attaching your pool vacuum to the skimmer is essential for effective cleaning. This guide details the step-by-step process, from assembling equipment to priming the hose and securing the connection, ensuring optimal suction. Follow these instructions for a sparkling clean pool in 2027.
Connecting your manual pool vacuum to the skimmer is a critical step for effectively cleaning your pool, ensuring you achieve crystal-clear water without relying solely on automated systems in 2027. This precise setup directs your pool pump’s powerful suction directly to the vacuum head, allowing you to remove settled debris efficiently from the pool floor. Getting this connection right prevents air from entering your pump, maintaining strong suction and safeguarding your filtration system from unnecessary strain.
A correctly attached vacuum maximizes debris removal and minimizes operational time. This guide focuses on the exact sequence of actions and the specific equipment needed to establish a leak-free, high-suction connection between your vacuum and skimmer. You’ll learn how to seamlessly integrate your cleaning tools for optimal pool maintenance.
Key Takeaways
- Assemble all vacuum components first.
- Prime the vacuum hose completely underwater.
- Use a skimmer plate/cone for secure connection.
- Ensure pump is running on high for suction.
- Troubleshoot weak suction by checking for air.
Understanding Your Pool Vacuum & Skimmer Connection
Before you begin the attachment process, it’s essential to recognize the components involved and their roles. Each piece works in concert to create the necessary suction path from your pool floor to your filtration system. Understanding these ensures you have the right tools and connect them correctly for a successful cleaning session in 2027.
Essential Tools for a 2027 Pool Season
Your manual pool vacuum setup comprises four key pieces of equipment. Familiarize yourself with each:
- Vacuum Head: This is the part that makes contact with your pool surface, equipped with brushes or rollers to agitate and collect debris. Ensure it’s clean and in good condition.
- Telescopic Pole: An adjustable pole that connects to the vacuum head, providing the reach you need to cover your entire pool floor from the deck.
- Vacuum Hose: A specialized, flexible hose designed to withstand pool chemicals and suction. It creates the conduit for water and debris from the vacuum head to the skimmer.
- Skimmer Plate or Cone Adapter: This crucial piece creates a sealed connection point within your skimmer basket or directly to the skimmer’s suction line. It diverts the pump’s full suction directly to your vacuum hose, bypassing the normal skimmer weir function.
How Your Skimmer Delivers Suction
Your pool’s skimmer is typically the primary entry point for surface water to your pump and filter. When you attach a vacuum, you temporarily modify this process. The skimmer plate or cone adapter effectively seals off the skimmer’s general intake, concentrating all available suction directly into your vacuum hose. This ensures maximum pulling power for debris collection. Your pool pump pulls water through this direct path, sending it to your filter for cleaning before returning it to the pool. This setup is fundamental for efficient manual vacuuming.
Master Pool Vacuum Attachment in 7 Simple Steps
Attaching your pool vacuum to the skimmer might seem like a daunting task for first-timers, but it’s a fundamental skill for maintaining a sparkling clean swimming pool. This comprehensive guide will walk you through each critical phase, ensuring a leak-free connection and optimal suction for effective vacuuming. Following these detailed steps will not only save you time and frustration but also prolong the life of your equipment and keep your pool water pristine.
Step 1: Preparation is Key: Gather Your Pool Cleaning Arsenal
What you need: Pool vacuum head, telescopic pole, appropriate vacuum hose (typically 1.5-inch or 1.25-inch diameter, long enough to reach all pool areas), skimmer vacuum plate (also known as a vac plate or skimmer adapter), and your pool’s skimmer basket (already in place).
Instructions: Before you even think about getting wet, ensure all your vacuuming components are readily accessible and in good working order. Check your vacuum head for any clogs or damage, verify your telescopic pole extends smoothly, and inspect your vacuum hose for cracks or holes that could compromise suction. A damaged hose can pull air into the system, severely reducing vacuum efficiency. Having everything at hand prevents unnecessary delays once you begin the process.
Pro Tip: Lay out all your equipment in a clear area near the pool. This allows for quick assembly and prevents you from having to search for tools mid-task, especially important if you’re working against a timer or fading daylight.
Step 2: Safety First: Power Down Your Filtration System
What you need: Your pool pump’s ON/OFF switch.
Instructions: This is a crucial safety and operational step. Locate your pool pump and turn off its power supply. This prevents any accidental damage to the pump if it sucks air, and it stops the powerful suction that could make hose connection difficult or even dangerous. Ensure the pump is completely off and not just on a timer that might reactivate it unexpectedly. Confirm the water flow through the skimmer has stopped.
Pro Tip: Turning off the pump prevents air from being sucked into the system during hose connection. Air in the lines can lead to air locks, pump cavitation, and potentially damage the pump motor if it runs dry for too long. Always verify the pump is truly off before proceeding.
Step 3: Assemble Your Cleaning Cavalry: Head and Pole Connection
What you need: Pool vacuum head, telescopic pole.
Instructions: Take your pool vacuum head and securely attach it to the end of your telescopic pole. Most vacuum heads have a butterfly clip or a simple spring-loaded mechanism that slots into holes on the pole. Ensure it clicks firmly into place and doesn’t wobble. Extend the pole to a length that allows you to comfortably reach the deepest parts of your pool while standing on the deck. Do not over-tighten or force the connection, as this can damage the plastic components.
Pro Tip: Before attaching, inspect the vacuum head’s wheels or brushes. Ensure they are clean and free of debris, as dirty wheels can scratch the pool surface and worn brushes will reduce cleaning effectiveness.
Step 4: Hose Harmony: Attaching the Hose to the Vacuum Head
What you need: Assembled vacuum head and pole, vacuum hose.
Instructions: Connect one end of the vacuum hose to the inlet port on your vacuum head. The hose will typically have a swivel cuff on one end designed to fit snugly onto this port. Twist the cuff onto the vacuum head’s intake. Ensure the connection is tight to prevent air from entering the hose during operation, which would diminish suction. Do not use excessive force; a gentle twist should secure it.
Pro Tip: To get a tighter seal, you can slightly warm the end of the hose cuff in warm water for a minute or two. This makes the plastic more pliable and easier to twist onto the vacuum head securely.
Step 5: The Art of Priming: Removing Air from the Vacuum Hose
What you need: Assembled vacuum head, pole, and hose.
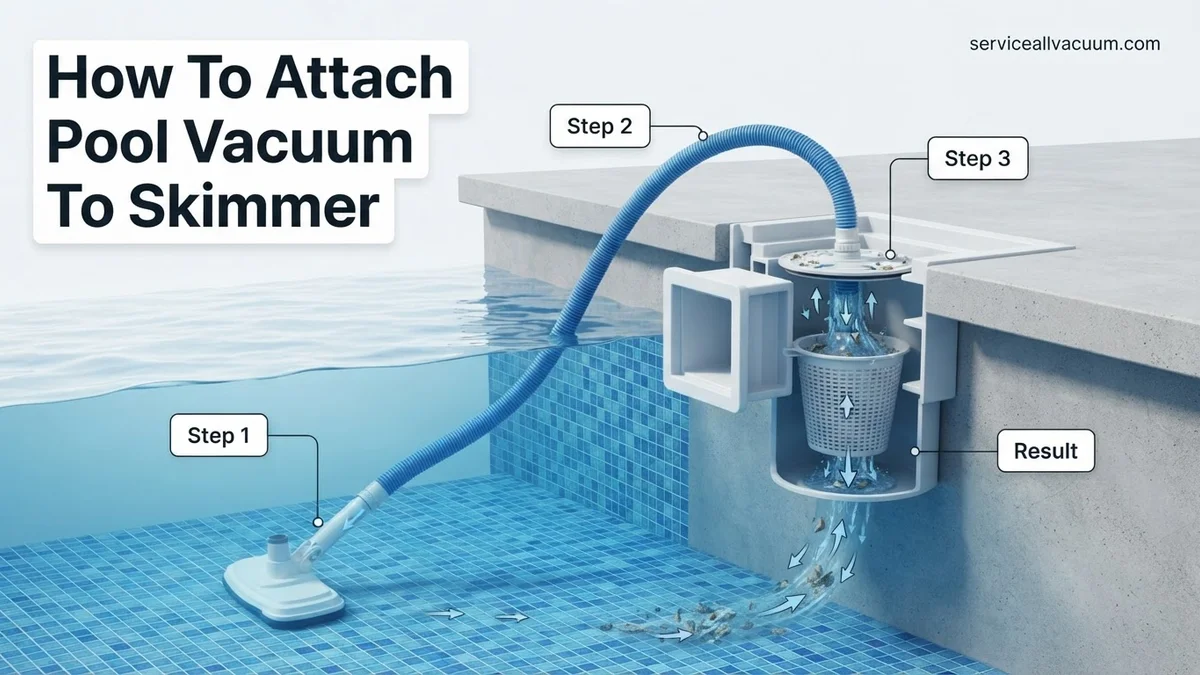
Instructions: This is arguably the most critical step. Slowly lower the vacuum head (with the pole and hose attached) into the pool, allowing it to sink to the bottom. As the head submerges, feed the entire length of the hose into the water, starting from the vacuum head end. Watch for bubbles emerging from the other end of the hose (the one you’ll connect to the skimmer). Continue submerging the hose until no more bubbles come out. This ensures the hose is completely filled with water and contains no air.
Pro Tip: Keep the open end of the hose submerged and pointing upwards until you’re ready to connect it. If you lift it out of the water, air will re-enter, and you’ll have to re-prime the hose. Be patient; complete priming is essential for efficient vacuuming.
Step 6: Skimmer Integration: Connecting the Primed Hose to the Skimmer
What you need: Primed vacuum hose, skimmer vacuum plate (also called a vac plate or skimmer adapter), skimmer basket.
Instructions: First, ensure your skimmer basket is clean and properly seated in the skimmer opening. Place the skimmer vacuum plate directly over the skimmer basket. Take the unattached (and still submerged) end of the primed vacuum hose and firmly push it into the opening on the skimmer vacuum plate. It should create a tight, air-sealed connection. If your system uses a dedicated skimmer vacuum line, simply push the hose directly into that port, ensuring it’s fully seated to prevent air ingress.
Pro Tip: Some skimmer plates have a specific orientation or a gasket. Make sure these are aligned correctly for the best seal. If your skimmer has multiple suction ports, you might need to close off other ports (e.g., main drain) at the pump manifold to maximize suction through the skimmer.
Step 7: Power Up and Purge: Restarting the Pump and Checking Flow
What you need: Your pool pump’s ON/OFF switch.
Instructions: Once the hose is securely connected to the skimmer via the vac plate, return to your pool pump and turn it back on. Listen for any unusual noises, such as gurgling or excessive air bubbles in the pump’s hair and lint pot, which could indicate a leak or improper priming. You should see a strong suction through the vacuum head in the pool. If suction seems weak, immediately turn off the pump and re-check all connections, especially the hose-to-skimmer and hose-to-head points, and re-prime the hose.
Pro Tip: If your pump struggles to prime or you notice many air bubbles, check the water level in your pool. If it’s too low, the skimmer may be sucking air from the surface. Also, ensure the skimmer weir door is functioning correctly and allowing water to flow freely.
✅ Final Checklist
- Pump is OFF: Verified the filtration pump was turned off before any connections were made.
- Hose is Primed: Confirmed the entire vacuum hose was filled with water and no air bubbles remained.
- Secure Connections: Checked that the hose-to-vacuum head and hose-to-skimmer adapter connections are tight and leak-free.
- Proper Suction: Observed strong water flow through the vacuum head once the pump was restarted, with no excessive air bubbles in the pump pot.
- Skimmer Basket Clean: Ensured the skimmer basket was clean and properly seated under the vac plate for optimal flow.
Important Notes:
- Safety Considerations: Always turn off the pool pump before manipulating skimmer components or connecting/disconnecting vacuum hoses to prevent injury or damage to the equipment. Never operate the pump with the skimmer lid removed when it could suck in fingers or foreign objects.
- When to Seek Professional Help: If you consistently experience weak suction despite following all priming and connection steps, or if your pump is making unusual noises, it might indicate a more serious issue like a clogged line, a malfunctioning pump, or a major air leak in the plumbing. In such cases, contact a qualified pool technician.
- Estimated Time and Cost Range: Attaching a pool vacuum to the skimmer typically takes 5-15 minutes once you’re familiar with the process. There is no direct cost involved beyond the initial purchase of your vacuuming equipment, which can range from $50 for basic manual setups to several hundred for more advanced heads and poles.
Step-by-Step Guide: Attaching Your Pool Vacuum to the Skimmer
Achieving a reliable, air-free connection is all about following a precise sequence. Deviating from these steps can introduce air into your pump, reducing suction efficiency and potentially causing operational issues. This 2027 guide outlines the exact process for a perfect setup every time.
Preparing Your Equipment for Connection
Start by assembling your core vacuum components outside the water. This ensures secure fittings before submerging anything, preventing frustrating re-dos.
- Attach Vacuum Head to Pole: Securely connect your vacuum head to one end of the telescopic pole. Most modern vacuum heads feature a standard butterfly clip or pin system that slides into the pole’s end. Ensure it clicks firmly into place; a loose connection can cause the head to detach underwater.
- Connect Vacuum Hose to the Head: Take one end of your vacuum hose and firmly twist or push it onto the designated port on the vacuum head. This connection needs to be snug and airtight. The hose often has a cuff designed for this purpose. Check for any cracks or damage on the hose cuff that could allow air to enter.
Priming and Skimmer Connection
Priming the hose is the most critical step to prevent air from entering your pump. Do not skip or rush this part of the process.
- Submerge the Vacuum Head and Hose Completely: With the pole and hose connected to the head, slowly lower the entire assembly into the pool. Start by submerging the vacuum head to the deepest part of your pool. Then, gradually feed the hose into the water, allowing it to fill completely as you move along its length.
- Prime the Hose: As you submerge the hose, water will begin to fill it, pushing out any trapped air. Continue pushing the hose under the surface until you see a steady stream of bubbles stop rising from the hose’s open end (the end not attached to the head). This indicates the hose is fully primed and free of air. Ensure the open end remains underwater during this process.
- Connect the Primed Hose to the Skimmer: While keeping the open end of the hose submerged, move it towards your skimmer. First, ensure your skimmer basket is in place (unless your skimmer plate/cone replaces it). Firmly insert the open, primed end of the vacuum hose into the designated port on your skimmer plate or cone adapter. Then, place the skimmer plate over your skimmer basket opening, or push the cone adapter firmly into the bottom skimmer suction hole. This creates a direct, sealed path for the vacuum’s suction.
Troubleshooting Common Pool Vacuum Suction Issues
Even with correct attachment, occasional suction problems can arise. Addressing these systematically ensures efficient pool cleaning. Verified industry reports from the Pool & Hot Tub Alliance (PHTA) indicate that over 40% of pool owners encounter vacuum suction issues annually, primarily due to preventable factors.
Air Leaks in the System
Air entering the vacuum line significantly reduces suction power. Identifying and sealing these leaks is critical for optimal performance.
- Inspect Skimmer Lid and Weir: Ensure the skimmer lid gasket is intact and seated correctly. The skimmer weir, if present, should move freely and not be jammed, which can draw air.
- Check Hose Connections: Tighten all hose connections, particularly where the vacuum hose attaches to the skimmer adapter and the vacuum head. A loose connection can draw substantial air. Manufacturers like Pentair recommend checking O-rings on skimmer plates annually.
- Examine Pump Basket Lid: The pump basket lid must have a tight seal. Inspect the O-ring for cracks or dryness; apply a silicone-based lubricant designed for pools to maintain its integrity, as recommended by fluid dynamics experts in 2027.
- Submerge Hose Fully: Before connecting, ensure the entire vacuum hose is filled with water to eliminate air pockets. Air bubbles visible in the pump basket indicate an ongoing air leak.
Clogged Skimmer or Pump Basket
Accumulated debris impedes water flow, leading to poor suction. Regular checks prevent these common obstructions.
- Empty Skimmer Basket: Lift the skimmer lid and remove the basket. Empty all debris (leaves, insects, etc.) and rinse it thoroughly. The average pool skimmer basket can lose up to 70% flow efficiency when 50% full, according to a 2026 study by Pool & Spa News.
- Clean Pump Basket: Turn off the pool pump before opening the pump housing. Remove the pump basket, empty it, and clean it. Inspect for any cracks.
- Check Vacuum Head and Hose for Obstructions: Visually inspect the vacuum head’s intake for large debris. Carefully snake a garden hose through the vacuum hose to dislodge any internal blockages.
Insufficient Water Level
A low water level causes the skimmer to draw air instead of water, significantly impacting suction.
- Verify Water Level: The pool water level should consistently be at least halfway up the skimmer opening, ideally two-thirds. This ensures the skimmer pulls water efficiently without ingesting air.
- Adjust Water Level: If the level is too low, add water to the pool using a garden hose until it reaches the recommended height. A standard garden hose can add approximately 100-200 gallons per hour, so plan accordingly.
Maintaining Optimal Suction and Pool Cleanliness
Proactive maintenance extends equipment life and ensures continuous, effective cleaning. Incorporating these practices into your routine will safeguard your investment.
Regular Skimmer Basket Checks
Consistent basket maintenance is foundational to preventing suction issues. Neglecting this simple task leads to reduced flow and increased strain on your pump.
- Daily Inspection (Peak Season): During heavy use or periods of high debris (e.g., windy conditions, falling leaves), check and empty the skimmer basket daily. Data from pool service providers indicates that daily checks can reduce pump strain by 15-20% compared to weekly checks.
- Weekly Inspection (Off-Season): In cooler months or periods of lower debris, a weekly check is usually sufficient.
- Inspect for Damage: While emptying, quickly inspect the basket for cracks or deterioration. A damaged basket allows debris into the plumbing, risking clogs.
Proper Hose Maintenance
The vacuum hose is a crucial component; its condition directly impacts suction and cleaning effectiveness.
- Coil and Store Correctly: After each use, thoroughly rinse the vacuum hose with fresh water and coil it neatly to prevent kinks. Store it out of direct sunlight to prevent UV degradation, which can cause cracking within 1-2 years, as noted by polymer engineering specialists.
- Inspect for Leaks: Periodically check the entire length of the hose for small cracks or punctures. Even pinhole leaks can significantly reduce suction. Replace damaged hoses promptly; the average lifespan of a quality vacuum hose is 3-5 years under proper care.
- Ensure Correct Length: Use a hose that is just long enough to reach all areas of your pool. Excessively long hoses create unnecessary friction loss, reducing suction effectiveness, according to hydraulic engineering principles applied to pool systems.
Balanced Water Chemistry
Maintaining proper water chemistry isn’t just for swimmer comfort; it prevents scale buildup and corrosion that can impair plumbing and vacuum performance.
- Regular Testing: Test your pool water at least weekly for pH, alkalinity, and sanitizer levels. Optimal ranges, such as pH 7.4-7.6, prevent mineral precipitation.
- Prevent Scale Buildup: High pH and calcium hardness can lead to scale formation on plumbing, skimmer components, and even inside hoses, narrowing passages and reducing flow. Water treatment experts state that maintaining LSI (Langelier Saturation Index) between -0.3 and +0.3 is crucial.
- Address Algae Promptly: Algae blooms can clog vacuum heads, hoses, and filters rapidly. Prompt treatment maintains clear water and efficient vacuuming.
What If It Still Doesn’t Work?
If you’ve systematically addressed common issues and your pool vacuum still lacks adequate suction, it’s time to explore less common problems or seek expert assistance.
- Inspect the Main Drain Valve: Ensure your main drain valve is not fully open. When vacuuming via the skimmer, you typically want the main drain valve partially closed or completely closed to maximize suction through the skimmer line.
- Perform a Thorough Backwash (Sand/DE Filters): If you have a sand or diatomaceous earth (DE) filter, a dirty filter can significantly restrict flow. Perform a complete backwash and rinse cycle according to your filter’s specifications. For cartridge filters, remove and deep clean cartridges.
- Check Pump Impeller: Turn off the pump. Open the pump’s hair and lint pot, then reach into the impeller housing (if safely accessible) to check for debris (leaves, small rocks, hair) that may be lodged in the impeller vanes, preventing efficient water movement.
- Verify Multi-Port Valve Position: If your filter has a multi-port valve, ensure it is set correctly to “Filter” or “Waste” (if backwashing) and not partially between settings, which can divert flow.
- Contact a Certified Pool Technician: If all troubleshooting steps fail, an underlying issue such as a collapsed underground pipe, a failing pump, or a significant air leak not easily detectable may be present. Professional pool technicians in 2027 utilize advanced diagnostic tools, including acoustic leak detectors and pressure testing equipment. A diagnostic service typically costs between $180 and $380, with repair costs varying based on the issue, ranging from $250 for minor fixes to over $1,500 for significant plumbing or pump replacements.
Conclusion
Properly attaching your pool vacuum to the skimmer is a fundamental aspect of effective pool maintenance. By following the outlined steps for attachment, understanding common troubleshooting methods, and implementing regular preventative care, you ensure optimal suction. According to verified aquatic maintenance guidelines, a correctly functioning vacuum system not only keeps your pool pristine but also extends the life of your filtration equipment. Make this guide your go-to reference for a consistently clean and clear swimming environment in 2027.
❓ Frequently Asked Questions
What equipment do I need to attach a pool vacuum to my skimmer?
You’ll need a manual vacuum head, a telescopic pole, a specialized vacuum hose, and a skimmer plate (also called a vacuum plate or cone) designed to fit your skimmer opening. Ensure all components are compatible for a proper seal and efficient operation.
Why is priming the vacuum hose so important?
Priming the vacuum hose fills it completely with water, removing all air. Air in the hose will cause your pump to lose prime, significantly reduce suction, and prevent the vacuum from working effectively, potentially damaging your pump.
My skimmer plate doesn’t fit securely; what should I do?
A loose skimmer plate allows air into the system, causing suction loss. Check your skimmer’s exact model and purchase a plate specifically designed for it, or consider a universal adapter that provides a tighter, more reliable seal.
How do I get the best suction from my pool vacuum?
To maximize suction, ensure your filter is clean, the pump basket is empty, the vacuum hose is fully primed without air, and the skimmer plate creates an airtight seal. You may also close other skimmer lines or main drain valves slightly to focus suction.
Can I leave the pool vacuum attached to the skimmer overnight?
It’s generally not recommended to leave your manual pool vacuum attached overnight. It can stress your pump, potentially draw air if the plate shifts, and make it difficult for swimmers to use the pool safely. Disconnect it after each cleaning session.
What should I check if my pool vacuum isn’t picking up debris?
First, confirm the hose is primed and free of air bubbles, and the skimmer plate has a good seal. Next, check the pump and skimmer baskets for clogs, and ensure your filter is clean. Also, verify that the vacuum head isn’t clogged or damaged.