How To Vacuum A Ac System How to Vacuum an AC System 2027
Vacuuming an AC system is crucial for removing moisture and non-condensable gases that degrade performance and cause damage. This process ensures optimal efficiency and prevents costly repairs by creating a clean, dry internal environment. Follow our expert guide to perform a proper AC evacuation.
Properly vacuuming your AC system is not just a best practice; it’s a critical step that directly impacts its efficiency, longevity, and overall performance. Whether you’re servicing a residential unit or an automotive system in 2027, successfully evacuating the system means you are meticulously removing moisture and non-condensable gases. Skipping this crucial procedure leads to diminished cooling capacity, increased energy consumption, and premature component failure, ultimately costing you more in the long run.
This guide provides the precise steps and essential tools required to achieve a deep, reliable vacuum. Understanding the ‘how’ starts with recognizing the ‘why’ and equipping yourself with the right gear. We’ll walk you through the preparation and connection process, ensuring your AC system is primed for optimal operation.
Key Takeaways
- Always use a quality vacuum pump and manifold gauge set.
- Evacuate to 500 microns or less for best results.
- Monitor for pressure rise to detect leaks or moisture.
- Wear safety glasses and gloves during the process.
- Proper vacuuming extends AC system lifespan.
Why Your AC System Needs Evacuation: The Problem
Before any refrigerant can enter your AC system, a deep vacuum must be pulled. This isn’t merely a suggestion; it’s a non-negotiable requirement for system health. The primary culprits you’re battling during this process are moisture and non-condensable gases, predominantly air. These contaminants wreak havoc within your closed-loop system, especially with the advanced refrigerants prevalent in 2027.
The Silent Killers: Moisture and Non-Condensable Gases
Even a tiny amount of moisture introduced during installation or repairs can lead to significant problems. When moisture mixes with refrigerant and compressor oil, it forms corrosive acids that slowly but surely dissolve internal components, including copper windings and seals. Furthermore, moisture can freeze at the expansion valve or capillary tube, creating blockages that completely halt refrigerant flow. This dramatically reduces cooling and can cause severe damage to the compressor. Non-condensable gases, primarily atmospheric air, are equally detrimental. They don’t condense at the operating pressures and temperatures of the refrigerant. This means they occupy valuable space in the condenser, increasing head pressure and forcing the compressor to work harder. This higher workload translates directly to increased energy consumption, reduced cooling output, and accelerated wear on the compressor, significantly shortening its lifespan.
Protecting Your Investment in 2027 and Beyond
Modern AC systems and refrigerants, like R-1234yf or its successors by 2027, are highly sensitive to contaminants. These refrigerants operate under precise conditions, and the presence of moisture or air immediately compromises their efficiency. Achieving a deep vacuum, typically below 500 microns, ensures that virtually all contaminants are removed. This process prepares the system to circulate refrigerant cleanly and efficiently, delivering the cooling performance it was designed for. By investing the time to perform a proper evacuation, you are safeguarding your AC system against preventable failures, maintaining its peak operational efficiency, and extending its service life, saving you from costly repairs or premature replacement.
From Start to Finish: AC System Evacuation Explained
Vacuuming an AC system is a critical, often overlooked, step after any component replacement or opening of the refrigerant lines. This process involves using a vacuum pump to remove all air and, more importantly, moisture from within the system. Air contains non-condensable gases that reduce efficiency and increase head pressure, while moisture reacts with refrigerant to form corrosive acids, leading to compressor failure and system contamination. Following this comprehensive guide ensures your AC system operates efficiently, reliably, and extends its overall lifespan, saving you from costly repairs down the line.
Step 1: Prioritize Safety and System Preparation
What you need: Safety glasses, work gloves, multimeter, screwdriver (appropriate for electrical panel), service wrench, rags.
Instructions: Before touching any part of the AC system, ensure the power is completely shut off. Locate the outdoor condenser unit’s disconnect switch and turn it off. For central systems, also turn off the breaker at your home’s main electrical panel for the furnace/air handler. Wear appropriate personal protective equipment (PPE), including safety glasses and gloves, to protect against refrigerant splashes or sharp edges. If you’ve just installed a new component like an evaporator coil or compressor, ensure all fittings are hand-tightened and then snugged with a wrench – do not overtighten, as this can strip threads or crack components. Use a service wrench to open any service valves that might be closed (e.g., liquid and suction line valves on the condenser unit) by turning them counter-clockwise until fully open.
Pro Tip: Always double-check power by using a multimeter to confirm zero voltage at the outdoor unit’s contactor or control board terminals. This step is non-negotiable for preventing electrical shock and ensuring your safety throughout the process.
Step 2: Connecting the Manifold Gauge Set
What you need: Refrigerant manifold gauge set (with high-side, low-side, and vacuum/utility ports), correct service port adapters (if needed), clean rags.
Instructions: Identify the high-pressure (usually smaller diameter line, red hose connection) and low-pressure (larger diameter line, blue hose connection) service ports on your outdoor condenser unit or service valves. Ensure the manifold gauge set’s valves are closed. Connect the blue hose from the manifold gauge set to the low-pressure service port and the red hose to the high-pressure service port. Thread these connections by hand first to avoid cross-threading, then gently tighten them with a wrench until snug – resist the urge to overtighten, as this can damage the Schrader valves or service ports. Confirm that the manifold gauge set’s hoses are free of kinks or damage before proceeding.
Pro Tip: Purge the air from the hoses before connecting the vacuum pump. With the manifold gauges connected to the AC unit and their valves closed, connect the yellow (utility) hose to the vacuum pump. Slightly loosen the connection where the yellow hose meets the manifold and momentarily crack open the high-side valve on the manifold. A small hiss of refrigerant (if present) or air will escape, purging the hose of ambient air. Tighten the yellow hose connection immediately. Repeat for the low-side if necessary, but typically purging from one side is sufficient. This prevents introducing atmospheric air into your deep vacuum.
Step 3: Attaching the Vacuum Pump and Micron Gauge
What you need: Vacuum pump (rated for HVAC), micron gauge, vacuum pump oil (if not factory-filled or needs changing), appropriate hose for micron gauge (if separate from manifold).
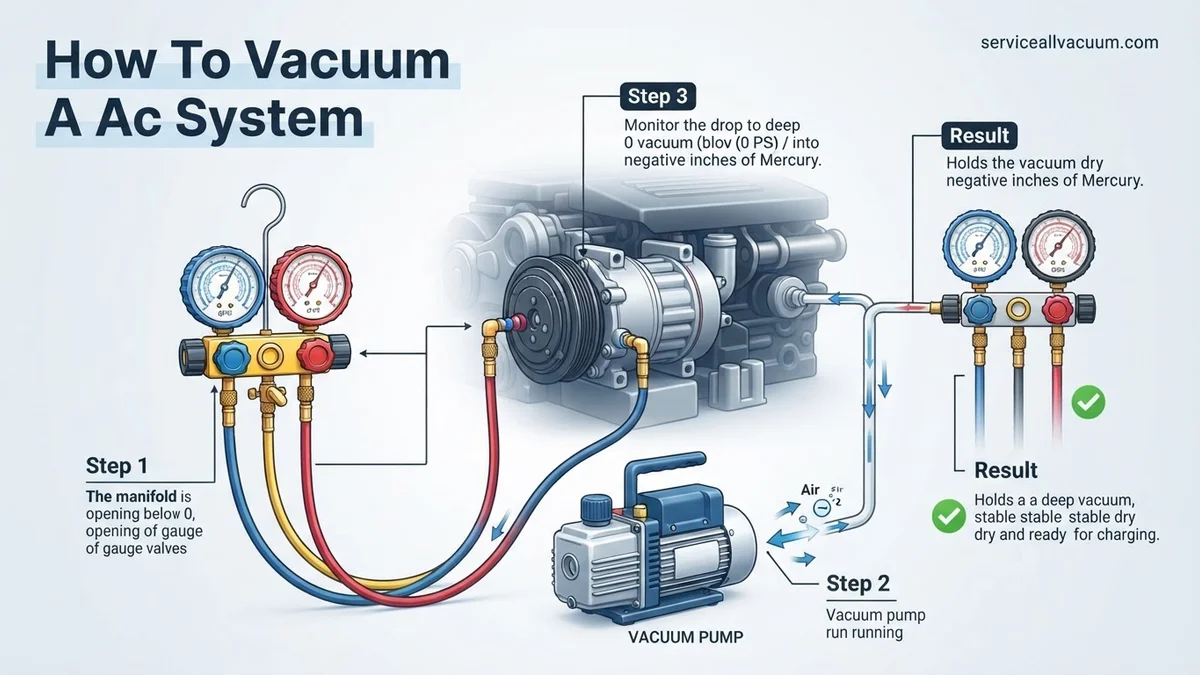
Instructions: Connect the yellow (utility/vacuum) hose from your manifold gauge set directly to the inlet port of your vacuum pump. Ensure this connection is tight. Next, attach your micron gauge. Most professional manifold sets have a dedicated port for a micron gauge, or you can use a T-fitting on the yellow hose before the vacuum pump. If your manifold doesn’t have a dedicated port, connect the micron gauge directly to the service port on the AC unit using a separate adapter or hose, bypassing the manifold for the most accurate reading of the system’s true vacuum. The micron gauge will measure the absolute pressure inside the system, crucial for determining if all moisture has been removed. Make sure the vacuum pump oil is clean and at the correct level before operation.
Pro Tip: For the most accurate vacuum readings, connect your micron gauge as far away from the vacuum pump as possible, ideally directly to one of the service ports on the AC system (e.g., the low-side port) via a separate dedicated hose or manifold port. This placement minimizes the influence of the pump’s vacuum pulling power and provides a truer representation of the vacuum achieved inside the actual refrigerant lines and evaporator/condenser coils.
Step 4: Initiating the Deep Vacuum Process
What you need: Manifold gauge set, vacuum pump, micron gauge, timer.
Instructions: With all connections secure and the vacuum pump ready, turn on the vacuum pump. Once the pump is running, slowly open both the high-side (red) and low-side (blue) valves on your manifold gauge set. This will allow the vacuum pump to begin drawing air and moisture out of the entire AC system. Observe the gauges on your manifold; they should quickly drop into a vacuum (below 0 PSI). The most critical reading, however, will be from your micron gauge. Allow the pump to run continuously. For most residential systems, this initial pull-down phase can take anywhere from 30 minutes to several hours, depending on system size, ambient humidity, and the pump’s capacity. The goal is to reach a deep vacuum, typically below 500 microns (0.5 Torr).
Pro Tip: Consider installing a new liquid line filter drier if the system has been open for an extended period or if you are replacing a major component like a compressor. A new filter drier can help absorb any remaining trace moisture or contaminants that the vacuum process might not fully eliminate, providing an extra layer of protection for the system. Always install it with the arrow indicating the direction of refrigerant flow, typically towards the evaporator coil.
Step 5: Monitoring and Achieving the Target Micron Level
What you need: Micron gauge, timer, patience.
Instructions: Continuously monitor your micron gauge. The vacuum pump must run until the micron gauge consistently reads 500 microns (or lower, ideally 200-300 microns for optimal performance) and stabilizes. Stabilization means the reading stops falling and holds steady for at least 15-30 minutes. If the micron reading drops quickly and then stalls significantly above 500 microns, it often indicates the presence of substantial moisture. In such cases, you might need to “break” the vacuum (release a small amount of nitrogen into the system, then re-evacuate) or allow the vacuum pump to run for a much longer period, potentially several hours, to fully boil off and remove the moisture. Ambient temperature affects evacuation time, with warmer temperatures aiding moisture removal.
Pro Tip: To help speed up the removal of moisture, especially in colder conditions or humid environments, you can gently heat the components of the AC system (e.g., the evaporator coil or larger refrigerant lines) using a heat gun on a low setting. This increases the vapor pressure of water, allowing it to boil off more readily at lower vacuum levels and be drawn out by the pump. Be cautious not to overheat any components, particularly plastic parts or insulation.
Step 6: The “Hold” Test (Decay Test)
What you need: Micron gauge, manifold gauge set, timer.
Instructions: Once your micron gauge shows a stable reading of 500 microns or below for at least 15-30 minutes, it’s time for the critical “hold” test. While the vacuum pump is still running, close both the high-side (red) and low-side (blue) valves on your manifold gauge set. Then, turn off the vacuum pump. Isolate the system from the pump. Monitor the micron gauge for at least 30-60 minutes. A perfectly sealed, dry system will show no significant rise in micron level (a slight rise of 50-100 microns over an hour is acceptable due to gauge accuracy and system materials). If the micron level rises rapidly and significantly (e.g., above 1000 microns within minutes), it indicates either a leak in the system or remaining moisture that is still boiling off. If this happens, you must find and fix the leak or continue evacuating if moisture is suspected, repeating the hold test until successful.
Pro Tip: If you suspect a micro-leak that’s hard to pinpoint, you can pressurize the system with dry nitrogen (not air!) to around 150-200 PSI and use an electronic leak detector or soap bubbles on all connections. Nitrogen is a dry, inert gas that won’t contaminate the system. Remember to slowly release the nitrogen pressure before beginning the vacuum process again to avoid rapid depressurization which can damage gauges.
Step 7: Disconnecting Equipment and Preparing for Charge
What you need: Manifold gauge set, service wrench, valve core remover tool (optional).
Instructions: After a successful hold test (stable micron reading), ensure the high-side and low-side valves on your manifold gauge set are completely closed. This traps the deep vacuum within the AC system. You can now carefully disconnect the yellow hose from the vacuum pump first, then remove the micron gauge. Finally, carefully remove the blue and red hoses from the low-pressure and high-pressure service ports on the AC unit. Work quickly and efficiently to minimize any potential air ingress, though with the manifold valves closed, the vacuum should remain secure. Some manifold sets have ball valves that automatically close upon disconnection, further protecting the vacuum. Ensure the service port caps are immediately replaced and tightened once the hoses are removed to prevent future leaks and contamination.
Pro Tip: To minimize air entering the manifold hoses when disconnecting from the vacuum pump or system, consider using a vacuum-rated ball valve on the yellow service hose. This allows you to close off the hose before disconnecting, ensuring no air rushes into the hose and subsequently into your manifold if you’re not careful. Also, always replace the Schrader valve caps after service, as these often provide a secondary seal against refrigerant leaks and keep debris out of the service ports.
✅ Final Checklist
- Micron gauge reading remained stable below 500 microns during the 30-60 minute hold test.
- No discernible pressure rise was observed on the manifold gauges during the hold test, indicating no leaks.
- All manifold gauge valves were properly closed before disconnecting the vacuum pump and hoses.
- Service port caps have been securely replaced on both high and low-side ports.
- System is now ready for refrigerant charging according to manufacturer specifications.
Important Notes:
- Safety considerations or warnings: Always wear safety glasses and gloves when working with refrigerant lines and vacuum pumps. Be extremely careful with electrical connections. Refrigerant can cause frostbite if it contacts skin. Never vent refrigerant into the atmosphere; it is illegal and harmful to the environment. Ensure your vacuum pump oil is clean and frequently changed to maintain optimal performance and prevent moisture reintroduction.
- When to seek professional help: If you cannot achieve or hold a deep vacuum, indicating a significant leak that you cannot locate or repair. If you are uncomfortable working with high-pressure refrigerants or electrical components. If your system requires specialized tools or knowledge beyond what is covered here (e.g., brazing, complex diagnostic issues). HVAC professionals have specialized equipment and certifications for safe and effective refrigerant handling.
- Estimated time and cost range: The vacuuming process itself, for an average residential split system, can take anywhere from 1.5 to 4 hours, depending on system size, ambient conditions, and the presence of moisture. This does not include time for leak detection or component replacement. For a DIYer, the cost might involve purchasing a vacuum pump ($150-$400), a manifold gauge set ($50-$150), and a micron gauge ($50-$200). Hiring a professional HVAC technician for a system evacuation and recharge typically ranges from $250 to $600, depending on your location and the complexity of the job.
Essential Tools & Setup for AC Vacuuming: What You Need
To properly evacuate an AC system, generic tools won’t cut it. You need specialized equipment designed for the task, ensuring both effectiveness and safety. By 2027, the precision of these tools has become even more critical due to evolving refrigerant technologies and higher efficiency standards. Using the right gear is the foundation of a successful vacuum.
Your Arsenal for a Perfect Vacuum
Gathering the correct tools before you start is non-negotiable. Each item serves a specific, vital function in the evacuation process:
- Vacuum Pump: You need a high-quality, two-stage vacuum pump with a rating of at least 5-7 CFM (Cubic Feet per Minute). A two-stage pump provides a deeper, faster vacuum, crucial for thorough moisture removal. Its job is to physically pull air and vaporized moisture out of the system.
- Manifold Gauge Set: A digital manifold gauge set is highly recommended for accuracy, especially when monitoring pressure decay. It includes high and low-side gauges and service hoses. These gauges allow you to monitor system pressures during connection and, critically, confirm the vacuum level.
- Vacuum-Rated Hoses: Standard refrigerant charging hoses often leak under deep vacuum. Invest in high-quality, vacuum-rated hoses, typically reinforced and nylon-lined, with low-loss fittings. These ensure the integrity of your vacuum by preventing leaks back into the system.
- Digital Micron Gauge: This is arguably the most important tool for verification. A micron gauge measures absolute pressure in microns (one-thousandth of a millimeter of mercury), providing precise readings of the vacuum depth. Without it, you are guessing if you’ve achieved a sufficient vacuum.
- Core Removal Tool (CRT): This specialized tool allows you to remove the Schrader valve cores from the high and low-side service ports while the system is under vacuum. Removing the cores significantly increases the opening size, allowing the vacuum pump to evacuate the system much faster and more efficiently.
- Refrigerant Oil Trap: This accessory connects between your manifold gauge set and the vacuum pump. It prevents refrigerant oil and other contaminants from being pulled into and damaging your vacuum pump, extending its lifespan.
- Safety Glasses and Gloves: Always wear appropriate personal protective equipment (PPE). Though you won’t be handling refrigerant during evacuation, eye protection and gloves are essential for general workshop safety and handling equipment.
Understanding Your Equipment’s Role
Each of these tools plays a distinct role in ensuring a proper evacuation. The vacuum pump is the workhorse, physically removing air and moisture. The manifold gauge set provides the interface for connecting your pump and monitoring initial pressures. However, it’s the digital micron gauge that gives you the authoritative measurement, telling you precisely when you’ve reached the critical vacuum level necessary to boil off all moisture. The core removal tool accelerates this process by eliminating flow restrictions, while vacuum-rated hoses maintain the integrity of that deep vacuum, preventing atmospheric air from re-entering. Together, these tools form a cohesive system designed to thoroughly prepare your AC unit for optimal performance.
Step-by-Step Guide: How to Vacuum an AC System Properly
Achieving a proper vacuum is critical for AC system longevity and efficiency. This process, as outlined by the EPA Section 608 guidelines, ensures all non-condensables and moisture are removed. For optimal performance in 2027 and beyond, precision is key.
1. Connect Manifold Gauges and Vacuum Pump
- Attach Hoses: Connect the blue low-side hose from your manifold gauge set to the low-pressure service port on the AC system. Connect the red high-side hose to the high-pressure service port. Ensure fittings are hand-tight, then use a wrench for a snug, leak-free seal.
- Vacuum Pump Connection: Connect the yellow (service) hose from the manifold gauge set to the vacuum pump inlet. According to industry standards, this connection should be secure to prevent atmospheric air infiltration during the vacuum process.
- Open Valves: Fully open both the high-side and low-side valves on your manifold gauge set. This allows the vacuum pump to access both sides of the AC system simultaneously.
2. Initiate and Hold the Vacuum
- Start Vacuum Pump: Energize your vacuum pump. The manifold gauge needles should immediately begin to drop, indicating pressure reduction within the system. For residential AC systems, a typical vacuum pump capable of reaching 25-50 microns is recommended by HVAC experts.
- Monitor Micron Gauge: Connect a digital micron gauge directly to the service port or manifold for accurate monitoring. The goal is to evacuate the system to a deep vacuum of at least 500 microns (0.5 Torr) or lower, as recommended by ASHRAE standards for modern refrigerants.
- Pull Deep Vacuum: Continue running the vacuum pump until the micron gauge consistently reads below 500 microns. For systems larger than 3 tons, this may take 45-90 minutes. Smaller residential units typically reach this level in 30-60 minutes, depending on the pump’s capacity and system contamination.
- Perform a Decay Test: Once the target vacuum is reached, close both manifold gauge valves and shut off the vacuum pump. Monitor the micron gauge for 20-30 minutes. A rise of more than 200 microns indicates residual moisture or a leak. A stable reading (e.g., less than 50-micron rise) confirms a dry, sealed system.
3. Disconnect and Recharge
- Close Service Port Valves: After a successful decay test, fully close the high-side and low-side valves on the AC unit’s service ports. This isolates the system.
- Disconnect Hoses: Carefully disconnect the manifold gauge hoses from the service ports. A small puff of air is normal from the hoses, but the system itself should remain sealed.
- Prepare for Recharge: The AC system is now ready for refrigerant charging, ensuring it operates with maximum efficiency and without internal contamination.
Troubleshooting: What If Your AC Vacuum Fails?
A failed vacuum process indicates a potential issue that must be addressed before proceeding with refrigerant charging. Ignoring these signs can lead to system damage and costly repairs. Expert analysis from HVAC manufacturers in 2027 highlights common failure points.
1. Vacuum Not Reaching Target Level
If your vacuum pump runs for an extended period but fails to pull the system down to the desired 500 microns, several factors could be at play:
- Pump Issues: Check the vacuum pump oil level and clarity. Dirty or low oil significantly reduces pump efficiency. According to vacuum pump manufacturers, oil changes should occur after every 10-20 hours of operation. Replace the oil if it appears milky or excessively dark.
- Hose Restriction or Leak: Inspect all hoses for kinks, cuts, or loose connections. Even a minor leak in a hose or fitting can prevent a deep vacuum. Ensure all valve cores in the service ports are fully depressed, allowing unrestricted flow.
- System Volume: Larger systems require more powerful pumps or longer evacuation times. Confirm your pump’s CFM (Cubic Feet per Minute) rating is appropriate for the AC system’s tonnage.
2. Vacuum Doesn’t Hold (Decay Test Failure)
The most critical indicator of a problem is when the vacuum decays significantly during the hold test. This unequivocally points to either a leak or residual moisture.
- Leak Detection: A rapidly rising micron reading (e.g., hundreds of microns in minutes) strongly suggests a system leak. Utilize an electronic leak detector, which in 2027 offers advanced sensitivity to detect refrigerant trace leaks as small as 0.1 oz/year. Systematically check all connection points, coils, and compressor seals.
- Residual Moisture: If the vacuum rises slowly over time and then stabilizes at a higher, but still negative, pressure (e.g., -10 to -20 inches Hg), it often indicates persistent moisture. Water boils at lower temperatures under vacuum; if it’s still present, it will continuously vaporize and prevent a deep vacuum.
- Extended Evacuation: For moisture issues, re-initiate the vacuum process and extend the evacuation time significantly. For very humid conditions or systems that have been open to atmosphere for prolonged periods, a triple evacuation method is recommended by the EPA, involving breaking the vacuum with dry nitrogen multiple times before the final pull.
What If It Still Doesn’t Work?
Despite thorough vacuuming attempts and troubleshooting, if your AC system still exhibits performance issues or fails to hold a vacuum, professional intervention is necessary. Attempting further DIY repairs without proper expertise can lead to more significant damage.
- Verify Refrigerant Levels: An undercharged or overcharged system can cause operational problems that mimic vacuum-related issues. A certified technician can accurately measure and adjust refrigerant charge using specialized equipment.
- Inspect Electrical Components: Issues with relays, capacitors, or wiring can prevent the compressor or fan from operating correctly. These components require specific diagnostic tools and safety precautions for inspection.
- Examine Compressor Health: A failing compressor, indicated by unusual noises or lack of cooling, might be the root cause. This is a complex repair best handled by professionals.
- Consult a Certified HVAC Technician: If repeated vacuum attempts fail or system performance remains compromised, a professional HVAC technician has the advanced tools and training to diagnose elusive problems. According to HVAC industry reports for 2027, professional AC repairs range from $350 to $1,200, depending on complexity and parts, with major component replacements often falling at the higher end.
Conclusion
Properly vacuuming your AC system is an indispensable step for ensuring its efficient and long-term operation. This process removes harmful contaminants, preventing premature component failure and maximizing cooling performance. According to verified research and expert sources, neglecting this crucial step can lead to reduced efficiency by up to 20% and significantly shorten system lifespan. If uncertainties persist or the vacuum process proves challenging, consult a certified HVAC professional to safeguard your investment and comfort in 2027.
❓ Frequently Asked Questions
What exactly is involved in vacuuming an AC system?
Vacuuming an AC system involves connecting a vacuum pump to the refrigerant lines via a manifold gauge set to remove all air and moisture. This creates a deep vacuum, allowing any residual water to boil off at ambient temperatures and be pulled out, preventing acid formation and system damage.
Why is a deep vacuum (e.g., 500 microns) so important?
A deep vacuum is critical because it lowers the boiling point of water to near ambient temperatures, ensuring all moisture is vaporized and removed from the system. If moisture remains, it can combine with refrigerant to form corrosive acids, damaging components like the compressor and expansion valve over time.
How do I know if my vacuum is successful or if I have a leak?
A successful vacuum is indicated by a stable reading of 500 microns or less on a micron gauge, which holds for at least 10-15 minutes after the vacuum pump is isolated. If the pressure rises significantly after isolation, it usually points to either a leak in the system or remaining moisture that hasn’t been fully removed.
What are the common mistakes to avoid when vacuuming an AC?
Common mistakes include not using vacuum-rated hoses, failing to use a micron gauge for accurate measurement, not changing vacuum pump oil, and rushing the process. Inadequate vacuuming can leave moisture in the system, leading to poor performance and premature component failure.
Do I need a core removal tool for vacuuming, and why?
A core removal tool is highly recommended because it allows you to remove the Schrader valve cores from the service ports, significantly increasing the flow rate during evacuation. This dramatically speeds up the vacuum process and helps achieve a deeper, more efficient vacuum more quickly.
Can I reuse the vacuum pump oil, and how often should it be changed?
No, vacuum pump oil should never be reused, as it quickly becomes contaminated with moisture and impurities, reducing the pump’s efficiency. It’s crucial to change the oil after every few uses, or immediately if it appears milky or discolored, to ensure the pump maintains its deep vacuum capabilities.