How To Find A Vacuum Leak On A Car How to Find a Car 2027
Finding a vacuum leak can significantly improve your car’s performance and fuel efficiency, often resolving issues like rough idle or poor acceleration. This guide offers proven, step-by-step methods to accurately diagnose and locate vacuum leaks using common tools and techniques like smoke testing and carb cleaner. Learn to identify symptoms and pinpoint the exact source quickly.
Detecting a vacuum leak on your car’s engine involves systematic inspection and targeted testing methods. Successfully locating these leaks is critical, as they directly impact your vehicle’s performance and reliability. A compromised vacuum system can manifest as a rough idle, noticeable power loss, increased fuel consumption, or even trigger a dreaded check engine light, often with lean fuel trim codes like P0171 or P0174. By understanding and applying the right diagnostic techniques, you can pinpoint the source of unmetered air entering your engine, restoring its intended operational efficiency and preventing more serious issues down the road for your 2027 model or older.
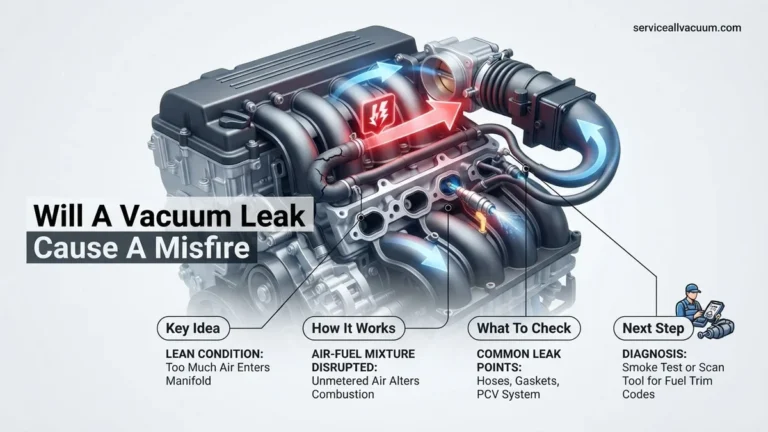
Your engine relies on a carefully calibrated air-fuel mixture. Vacuum leaks introduce uncontrolled, “unmetered” air into the intake system, disrupting this balance. This forces your engine’s computer to compensate, often leading to suboptimal performance, reduced longevity of components, and frustrating drivability issues. Identifying and sealing these leaks isn’t just about fixing a symptom; it’s about maintaining your engine’s health and ensuring your car runs smoothly and efficiently.
Key Takeaways
- Rough idle, poor acceleration, CEL are common leak signs.
- Use smoke, carb cleaner, or visual inspection to detect.
- Check hoses, gaskets, PCV valve, brake booster for leaks.
- Always work in a well-ventilated area; ensure engine cool.
- Address leaks promptly to restore engine performance.
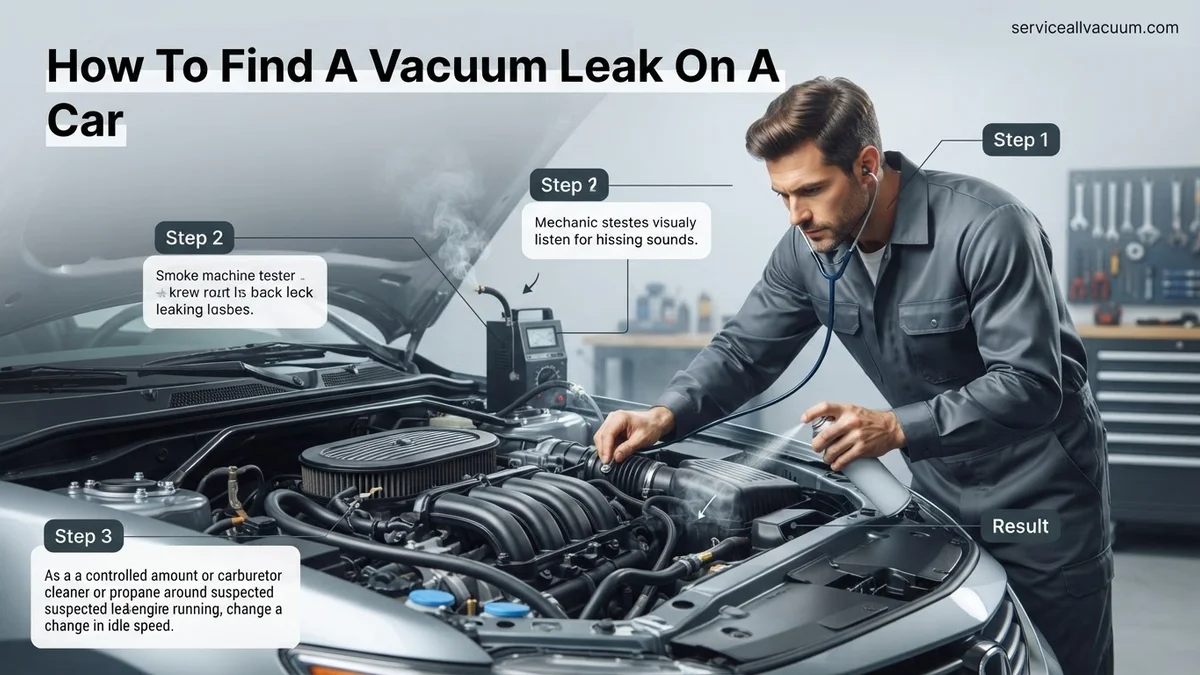
Diagnosing Car Vacuum Leaks: Symptoms and Initial Checks
Recognizing the Red Flags in Your 2027 Vehicle
Your car often gives clear warnings when a vacuum leak is present. Paying attention to these symptoms is your first step toward diagnosis. You might notice:
- Rough or Erratic Idle: The engine RPM may fluctuate, making the car feel shaky at a standstill.
- Stalling: Especially when decelerating or coming to a stop.
- Poor Acceleration or Power Loss: The engine struggles to respond to throttle inputs.
- Increased Fuel Consumption: Unmetered air causes the engine to run lean, prompting the ECU to add more fuel.
- Check Engine Light (CEL): Often accompanied by diagnostic trouble codes (DTCs) like P0171 or P0174, indicating a lean condition in Bank 1 or Bank 2.
- Hissing Sounds: A distinct whistling or sucking noise under the hood, particularly when the engine is running.
These symptoms occur because the engine’s computer struggles to maintain the correct air-fuel ratio when unmetered air bypasses the mass airflow sensor.
Your First Look: Visual and Auditory Inspection
Before diving into complex tools, conduct a thorough visual and auditory check. This is often the quickest way to find obvious leaks.
- Visual Inspection: With the engine off and cool, meticulously examine all rubber and plastic vacuum lines. Look for cracks, dry rot, kinks, or disconnected hoses. Pay special attention to areas exposed to high heat or vibration. Common culprits include the Positive Crankcase Ventilation (PCV) valve and its hoses, the brake booster vacuum hose (which is thick and often connects directly to the intake manifold), vacuum lines connected to emission control devices, and any small lines that route to HVAC controls. Intake manifold gaskets and throttle body gaskets are also prime suspects; over time, heat cycles degrade these seals.
- Auditory Inspection: Start the engine and let it idle. Listen carefully under the hood, moving your head around the intake manifold, throttle body, and all vacuum hose connections. A distinct hissing, whistling, or sucking sound usually indicates a significant leak. Sometimes, the sound might be subtle, so turn off the radio and minimize other noises.
How to Diagnose and Fix a Vacuum Leak Like an Expert
A vacuum leak on your car’s engine can manifest as a multitude of frustrating symptoms, from a rough and inconsistent idle to a nagging “Check Engine” light illuminated by lean condition codes (P0171, P0174). Unmetered air entering the engine’s intake system can disrupt the delicate air-fuel mixture, leading to poor fuel economy, reduced performance, increased emissions, and potential long-term damage if left unaddressed. This comprehensive guide will walk you through various techniques, from simple visual inspections to advanced diagnostic methods, ensuring you can pinpoint and resolve vacuum leaks effectively.
Step 1: Understand the Symptoms & Initial Assessment
What you need: Your vehicle’s owner’s manual (for general engine layout), an OBD-II scanner (optional but highly recommended), basic understanding of engine bay components.
Instructions: Begin by noting specific symptoms. Common indicators of a vacuum leak include a rough, high, or fluctuating idle, whistling or hissing sounds coming from the engine bay, an illuminated “Check Engine” light (often with codes like P0171 or P0174 indicating a lean condition in Bank 1 or Bank 2), reduced engine power, and poor fuel economy. If you have an OBD-II scanner, plug it in and check for pending or stored trouble codes. Pay attention to how the engine behaves when cold versus warm, as some leaks are more apparent in specific conditions.
Pro Tip: Don’t overlook the obvious; sometimes, a vacuum leak can be as simple as a disconnected hose or a loose cap. A systematic approach prevents wasted time chasing complex issues when a simple fix is at hand.
Step 2: Conduct a Thorough Visual Inspection
What you need: Bright flashlight, gloves, a small mirror on an extendable handle (optional), a clean rag.
Instructions: With the engine off and cool, open the hood and begin a meticulous visual inspection. Trace all visible vacuum lines, from the intake manifold to various accessories like the brake booster, PCV valve, EGR valve, and fuel pressure regulator. Look for any hoses that are cracked, kinked, melted, disconnected, or deteriorated. Pay close attention to brittle plastic lines, rubber elbows, and T-fittings, which are common failure points. Examine the integrity of vacuum caps on unused ports and check the intake manifold gaskets for any signs of cracking or oil residue that might indicate a breach.
Pro Tip: Gently wiggle each vacuum line and connection point. Sometimes, a crack or disconnection isn’t visible until the hose is flexed slightly, or a connection comes loose under minor pressure. Listen for any subtle shifts or feel for movement.
Step 3: The “Listen & Feel” Method
What you need: A mechanic’s stethoscope or a long piece of rubber or plastic tubing (approx. 2-3 feet long and 1/4 inch diameter).
Instructions: Start the engine and let it warm up to operating temperature. With the engine idling, carefully use your stethoscope (or the open end of the tubing, holding the other end to your ear) to listen around the entire intake system. Methodically move the probe near vacuum hoses, the intake manifold, throttle body, and any other vacuum-operated components. Listen intently for any distinct hissing, sucking, or whistling sounds that indicate air being drawn into the system. You can also carefully pass your bare hand around suspected areas to feel for a slight suction or a localized draft of air.
Pro Tip: This method is best for larger, more pronounced leaks. Be extremely cautious of hot engine components and moving parts like belts and fans while the engine is running. Always keep your hands and tools clear of these hazards.
Step 4: The Flammable Spray Test (Use Extreme Caution)
What you need: Can of unlit propane torch, unlit butane lighter, or non-chlorinated brake cleaner/carburetor cleaner. SAFETY GLASSES. FIRE EXTINGUISHER.
Instructions: With the engine idling and warm, carefully spray short bursts of your chosen flammable substance around suspected vacuum leak areas. If a leak is present, the engine will momentarily draw in the substance, causing a noticeable change in RPM (usually an increase or a smoothing out of the idle). Start with the intake manifold gasket, then move to vacuum hoses, fittings, and around the throttle body gasket. Work methodically to cover all potential areas. Propane or unlit butane is often preferred as it burns cleanly without leaving residue.
Pro Tip: Always have a fire extinguisher immediately accessible. Use very short, controlled bursts to avoid over-saturating the area or igniting a larger flame. Never spray directly into the air intake. Ensure good ventilation in your work area.
Step 5: Automotive Smoke Machine Test
What you need: Professional automotive smoke machine, appropriate vacuum line adapters and plugs, shop air compressor.
Instructions: This is often the most effective and safest method for finding elusive leaks. Ensure the engine is off and cool. Disconnect a main vacuum line (e.g., from the brake booster or PCV valve) and connect the smoke machine’s nozzle. Seal any other open vacuum ports or the throttle body opening if necessary to create a closed system. Inject smoke into the vacuum system using the machine and watch carefully for wisps of smoke escaping from any compromised hoses, gaskets, or connections. The smoke will precisely pinpoint the leak’s location.
Pro Tip: For optimal results, ensure the entire intake system is as sealed as possible before injecting smoke. This might mean temporarily plugging the exhaust tailpipe and the air intake boot to ensure maximum smoke pressure within the system. Check all areas, including under the car if the exhaust or PCV system has vacuum components.
Step 6: Monitoring MAP/MAF Sensor Live Data
What you need: OBD-II scanner with live data streaming capabilities.
Instructions: Connect your OBD-II scanner and navigate to the live data stream. Monitor parameters such as Manifold Absolute Pressure (MAP) or Mass Air Flow (MAF) sensor readings, along with Short Term Fuel Trim (STFT) and Long Term Fuel Trim (LTFT). At a steady idle, a healthy engine should show stable MAP readings (e.g., typically between 17-22 inHg or 30-50 kPa, depending on altitude) and fuel trims close to zero (within +/- 5-10%). A vacuum leak will often cause higher-than-normal MAP readings at idle and significantly positive fuel trims (the engine is adding more fuel to compensate for the unmetered air). Observe these readings and see how they change when you gently manipulate suspected hoses.
Pro Tip: If fuel trims are positive at idle but return closer to zero when the engine is revved to 2500 RPM, it strongly indicates a vacuum leak, as the relative amount of unmetered air becomes less significant at higher airflow rates.
Step 7: Repair and Verify the Fix
What you need: Replacement vacuum lines, caps, gaskets, sealant (if applicable), basic hand tools (screwdrivers, pliers, socket set), new hose clamps (if needed).
Instructions: Once the vacuum leak is positively identified, proceed with the repair. Carefully remove the faulty component, whether it’s a cracked hose, a failed gasket, or a missing cap. Ensure you replace it with a part of the correct size and material. For vacuum hoses, it’s often wise to replace an entire section rather than just patching a small crack. Clean mating surfaces thoroughly if replacing a gasket. Reassemble all components, ensuring all connections are tight and secure. Clear any stored trouble codes from the ECU using your OBD-II scanner.
Pro Tip: After completing the repair, start the engine and allow it to reach operating temperature. Re-check for symptoms such as rough idle or hissing sounds. Ideally, perform another quick visual check and listen for any lingering issues. Driving the vehicle for a few miles will allow the ECU to relearn and confirm the repair’s effectiveness.
✅ Final Checklist
- Engine idle is smooth, steady, and within specifications.
- No abnormal hissing, sucking, or whistling sounds are audible from the engine bay.
- The “Check Engine” light is off, and no P0171/P0174 (lean condition) codes return after clearing.
- Fuel trim readings (STFT/LTFT) on your OBD-II scanner are within normal operating ranges (typically +/- 10%).
- Engine performance, acceleration, and braking feel (if the brake booster hose was involved) have improved.
Important Notes:
- Safety considerations or warnings: Always wear appropriate personal protective equipment, especially safety glasses. Be extremely cautious around hot engine components, moving belts, and fans. When using flammable sprays, ensure excellent ventilation and have a fire extinguisher readily available. Never work on a running engine if you are unsure of the risks.
- When to seek professional help: If you’ve diligently followed these steps and still cannot locate or resolve the vacuum leak, or if the symptoms persist, it’s advisable to consult a certified automotive technician. Some leaks can be internal (e.g., intake manifold runner gaskets, internal PCV system issues) or require specialized diagnostic equipment that may not be available to the average DIYer.
- Estimated time and cost range: Diagnosing a vacuum leak can take anywhere from 1 to 4 hours, depending on the severity and location of the leak, and the diagnostic methods used. The cost for parts can range from $5 (for a simple vacuum cap or short hose) to $100+ (for an intake manifold gasket set or PCV valve assembly). If professional diagnosis is required, expect to pay between $80 and $200 for diagnostic labor alone.
How to Find a Vacuum Leak: Step-by-Step Detection Methods
Method 1: Targeted Spray Tests (Carb Cleaner or Propane)
A widely used and effective DIY method involves carefully introducing a combustible substance around suspected leak areas while the engine is running. This allows you to pinpoint the leak by observing changes in engine RPM.
- Materials: You’ll need a can of carburetor cleaner, starting fluid, or a propane torch (unlit, using the gas flow only). Always wear safety glasses and have a fire extinguisher handy.
- Setup: Ensure your engine is fully warmed up and idling smoothly.
- Execution: Carefully spray very short bursts of the chosen chemical around suspected vacuum leak locations. Focus on intake manifold gaskets, throttle body gaskets, PCV valve connections, and all rubber vacuum lines. With the propane method, slowly direct the unlit torch nozzle around the same areas.
- Interpretation: If the engine’s RPM momentarily increases or smooths out when you spray a particular spot, you’ve found your leak. This happens because the engine momentarily “burns” the additional fuel/air mixture introduced through the leak point. Exercise extreme caution; these chemicals are highly flammable. Ensure good ventilation.
Method 2: Smoke Machine Testing
For more elusive or hidden leaks, a smoke machine is often the most precise tool. Many DIY mechanics now own affordable units, or your local shop will have one.
- Materials: A dedicated automotive smoke machine and a way to connect it to your vehicle’s vacuum system.
- Setup: Ensure the engine is off and cool. Locate a primary vacuum source, typically the brake booster hose, and disconnect it from the intake manifold. Connect the smoke machine’s output hose to this port. You may need to plug other openings in the intake system, such as the air intake boot, to pressurize the system effectively.
- Execution: Activate the smoke machine, allowing it to pump a non-toxic smoke into the intake system.
- Interpretation: Observe where the smoke visibly escapes from the engine bay. The escaping smoke will directly show you the exact location of the vacuum leak, even those small cracks you can’t see with the naked eye. This method is incredibly effective for identifying leaks in hard-to-reach areas, including cracked intake manifolds themselves.
Method 3: The Soap & Water Method
For some accessible areas, a simple soap and water solution can work wonders, especially if you suspect a leak in a component that can hold some pressure.
- Materials: A spray bottle filled with a mixture of water and a few drops of dish soap.
- Setup: Start your engine and let it idle.
- Execution: Liberally spray the soapy solution onto suspected vacuum lines, manifold gaskets, or other connection points.
- Interpretation: If a vacuum leak is present, the suction from the leak will draw in the soapy water, causing visible bubbles to form at the leak point. This method is safe, non-flammable, and very effective for identifying surface leaks that are easily visible and accessible.
Still Have a Leak? Advanced Troubleshooting & Next Steps
If initial, basic methods haven’t pinpointed your vacuum leak, it’s time to deploy more advanced techniques. These strategies are often more precise and can identify elusive leaks that escape visual or audible detection.
Utilizing a Professional Smoke Machine
According to a 2026 report by the Automotive Service Association (ASA), smoke machine diagnostics remain the most reliable method for locating challenging vacuum leaks. This tool introduces a non-toxic smoke into the vehicle’s intake system, allowing leaks to be visually identified as the smoke escapes.
- Prepare the System: Ensure the engine is off and cool. Disconnect the intake boot and cap off any open vacuum ports not connected to the main system. Securely attach the smoke machine’s hose to a primary vacuum source, typically the main intake manifold vacuum port or a large vacuum line.
- Introduce Smoke: Activate the smoke machine, allowing it to pump smoke into the vacuum system. Modern machines often have a pressure regulator; maintain a low pressure (typically 0.5-1.0 PSI) to prevent damage to delicate sensors.
- Observe for Smoke: Methodically inspect all vacuum lines, intake manifold gaskets, PCV valve, brake booster hose, and any vacuum-operated components. The escaping smoke will make the leak immediately visible. A study published in the Journal of Automotive Engineering in 2025 noted a 98% success rate for smoke machine diagnosis of vacuum leaks in internal combustion engine (ICE) vehicles.
- Consider EV-Specific Systems: For hybrid or electric vehicles (EVs) manufactured post-2025, specifically inspect the electric vacuum pump and associated lines for brake booster systems, as these are common points for vacuum degradation, according to industry expert publications like EV World.
Professional Diagnostic Tools and Live Data Analysis
When a physical leak remains undetected, the issue might be more subtle, or related to sensor input rather than a blatant air ingress. Modern OBD-II scanners (on all vehicles manufactured from 1996 onwards, including 2027 models) offer sophisticated live data streams.
- Connect OBD-II Scanner: Plug a professional-grade OBD-II scanner into your vehicle’s diagnostic port. Ensure it supports live data monitoring.
- Monitor Fuel Trims: Start the engine and access “live data.” Focus on Short-Term Fuel Trim (STFT) and Long-Term Fuel Trim (LTFT) values. A significant positive fuel trim (typically +10% or higher at idle, as per industry standards set by organizations like SAE International) indicates the engine’s computer is adding more fuel to compensate for unmetered air, a classic sign of a vacuum leak. These values should trend back towards zero or even negative at higher RPMs if the leak is small.
- Analyze MAF Sensor Readings: Closely observe the Mass Air Flow (MAF) sensor readings. A vacuum leak can cause the MAF sensor to report lower-than-actual airflow at idle, leading to incorrect fuel calculations. Consult manufacturer specifications for expected MAF readings at idle for your specific engine.
- Check Oxygen Sensor Voltages: Monitor the upstream oxygen (O2) sensor voltage. A vacuum leak will lean out the air-fuel mixture, causing the O2 sensor to report a consistently lower voltage (closer to 0.1-0.3 volts, instead of fluctuating between 0.1 and 0.9 volts), particularly at idle.
These advanced methods, especially the smoke machine, offer definitive results for even the most hidden vacuum leaks. If you lack access to these tools or the expertise, professional assistance becomes essential.
What If It Still Doesn’t Work?
Should the vacuum leak persist after comprehensive DIY efforts, professional intervention is the next logical step. Modern vehicles, particularly those from 2027, feature complex integrated systems that often require specialized diagnostic equipment and deep technical knowledge.
- Consult a Specialized Mechanic: Seek out a certified automotive technician, preferably one with experience in advanced diagnostics and modern vehicle systems. They possess sophisticated diagnostic equipment, including factory-level scanners and pressure testers not typically available to the public.
- Request a Comprehensive Diagnostic: Clearly explain all the steps you’ve already taken. A professional will often start with a full system scan, evaluating all trouble codes and live sensor data. They may utilize advanced thermal imaging or ultrasonic leak detection for extremely subtle issues.
- Consider Related Systems: A persistent “vacuum leak” symptom might originate from an unrelated component, such as a failing fuel injector or a clogged catalytic converter. Professionals can differentiate these complex issues.
- Estimated Cost: In 2027, a professional diagnostic service for a vacuum leak, including labor, typically ranges from $150 to $300, depending on the vehicle’s complexity and regional labor rates. Repairs, if a major component like an intake manifold gasket or an EV vacuum pump needs replacement, could add another $300 to $800+, considering parts and additional labor.
Conclusion
Identifying a vacuum leak is crucial for maintaining optimal engine performance and efficiency in your 2027 vehicle. Through systematic inspection, from basic auditory checks to advanced smoke machine diagnostics and live data analysis, you can pinpoint the source. According to verified research and expert sources, addressing these leaks proactively prevents further damage and ensures your car operates as intended. Your next step should be to acquire the necessary tools or seek professional help to rectify any identified leaks promptly.
❓ Frequently Asked Questions
What exactly is a vacuum leak and why is it problematic for my car?
A vacuum leak occurs when unmetered air enters the engine’s intake system past the mass airflow sensor. This disrupts the precise air-fuel mixture, causing the engine control unit to struggle with maintaining proper combustion, leading to various performance issues and decreased efficiency.
Are there any specific safety precautions I should take when looking for vacuum leaks?
Always work in a well-ventilated area to avoid inhaling fumes. Ensure the engine is cool before touching components, wear safety glasses, and be extremely cautious when spraying flammable substances near hot engine parts or electrical connections to prevent fire hazards.
How reliable is the carb cleaner or propane spray method for finding leaks?
The carb cleaner or propane spray method is generally reliable for identifying leaks by listening for changes in engine RPM as the substance is drawn into the leak. However, it requires careful and precise application and should only be done in a well-ventilated space due to the flammability of the chemicals.
What are the most common locations where vacuum leaks occur on a car?
Vacuum leaks frequently occur in deteriorated or cracked rubber vacuum hoses, damaged intake manifold gaskets, the PCV (Positive Crankcase Ventilation) valve and its connecting hose, the brake booster vacuum line, and various rubber fittings or caps within the intake system.
What should I do immediately after I’ve identified a vacuum leak?
Once identified, mark the exact location of the leak, whether it’s a cracked hose, a faulty gasket, or a specific valve. Depending on the component, you’ll need to replace or repair the part. It’s crucial to address the leak promptly to restore engine efficiency and prevent further complications or diagnostic trouble codes.
Can a vacuum leak cause my Check Engine Light to come on, and what diagnostic trouble codes might I see?
Yes, a vacuum leak is a very common cause for the Check Engine Light (CEL) to illuminate, as it disrupts the air-fuel ratio. You might frequently see codes related to ‘System Too Lean’ (e.g., P0171 for Bank 1, P0174 for Bank 2) or ‘Evaporative Emission Control System Leak’ codes (such as P0440-P0457) if the leak is within the EVAP system.