How to Take Apart a Shark Vacuum Step-by-Step Guide 2026
Knowing how to take apart a Shark vacuum is essential for clearing clogs, cleaning filters, and maintaining peak suction performance. This guide walks you through locating all release latches, detaching major components safely, and reassembling your device correctly.
Taking apart a Shark vacuum is the most effective way to restore lost suction, eliminate foul odors, and clear stubborn clogs that standard maintenance misses. Whether you are troubleshooting a drop in performance or doing a deep annual refresh in 2026, breaking down your machine requires knowing the exact location of its release latches and disconnect points.
Most Shark models, from the classic Navigator to newer cordless stick iterations, feature color-coded buttons—usually light grey or bright red—that indicate modular breakaway zones. By pressing these specific buttons, you can separate the pod, wand, nozzle, and handle without reaching for any tools.
Key Takeaways
- Always unplug the vacuum or remove the battery before starting any disassembly.
- Press the designated red or light-grey release buttons to detach components without forcing them.
- Remove the dust cup first to prevent accidental spills and debris buildup.
- Check the flexible hose and wand connections thoroughly for hidden clogs and pet hair.
- Allow all washed filters to dry completely for at least 24 hours before reassembly.
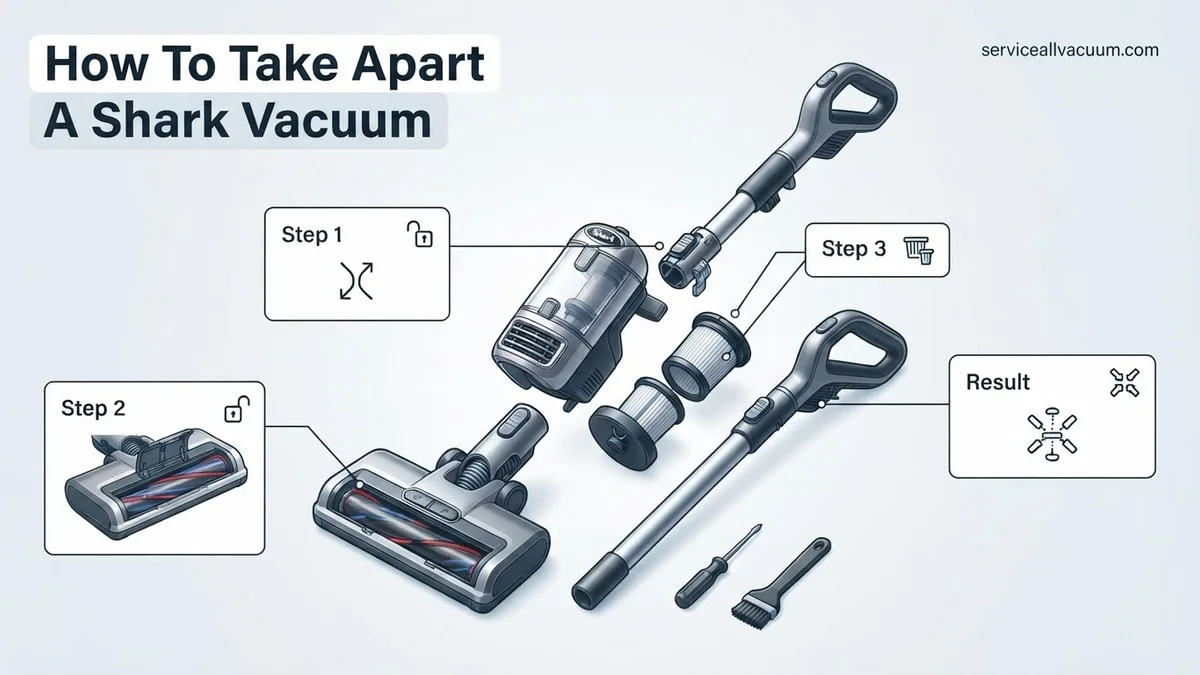
Why You Need to Disassemble Your Shark Vacuum
Spotting Loss of Suction and Hidden Blockages
Suction loss rarely happens because the motor fails. It usually occurs because fine dust, pet hair, and debris accumulate in narrow transition points between the floor nozzle and the dust cup. When you notice the vacuum getting louder or leaving dirt behind, a full teardown lets you inspect every millimeter of the airflow path.
- The Wand Neck: A common trap for bulky debris like paper clips or coins.
- The Dust Cup Inlet: Where pet hair frequently mats together and blocks entry.
- Hose Cuffs: Flexible joints that easily trap lint and thread.
Extending Appliance Lifespan
Motors burn out when they work too hard against a blocked airflow. Disassembling your vacuum every three to six months relieves pressure on the motor assembly. Keeping bearings, seals, and filters free of compacted grit prevents overheating and ensures your vacuum runs efficiently for years to come.
Master Shark Vacuum Disassembly in 8 Simple Steps
Taking apart your Shark vacuum is essential for deep cleaning, clearing stubborn clogs, and replacing worn-out parts like filters or roller brushes. Over time, hair wrap, fine dust, and debris accumulate in hidden crevices, reducing suction power and causing the motor to strain. This comprehensive walkthrough provides a methodical, component-by-component approach to safely breaking down your upright or stick Shark vacuum without damaging plastic latches, wiring, or internal seals. By following this protocol, you will restore your appliance to peak operating performance.
Step 1: Disconnect Power and Empty the Dust Cup
What you need: Your Shark vacuum, a clean trash can, and a dry microfiber cloth.
Instructions: Before touching any latches, ensure the vacuum is completely unplugged from the electrical outlet, or remove the lithium-ion battery if you are working on a cordless model. Locate the dust cup release latch—usually situated near the top front of the canister assembly—and press it to detach the dust cup from the main body. Hold the cup directly over your trash receptacle, and press the bottom release door latch to drop out the bulk of the collected dirt and hair. Use a microfiber cloth to wipe down the exterior and interior plastic walls of the canister to remove lingering fine dust.
Pro Tip: Never submerge the entire dust cup in water if it contains a built-in mechanical gear or electronic sensor, though most standard plastic cyclonic chambers can be rinsed thoroughly.
Step 2: Remove and Inspect the Pre-Motor and Post-Motor Filters
What you need: A well-lit workspace and access to a running sink faucet.
Instructions: With the dust cup removed, locate the filter housing compartment directly beneath it. Open the housing lid to reveal the foam and felt pre-motor filters. Pull these filters straight up and out of the housing. Next, look near the base or on the side of the vacuum body to find the HEPA post-motor filter cover; press the tab to release it and pull out the HEPA filter cartridge. Inspect all filters for discoloration, heavy caking, or foul odors. Tap them gently against the inside of a trash can to dislodge loose particulate matter before washing.
Pro Tip: Always allow washed filters to air dry completely in a well-ventilated area for at least 24 hours before reinstalling them to prevent motor damage from trapped moisture.
Step 3: Detach the Wand and Handle Assembly
What you need: No specialized tools required; just a firm grip and a flat surface.
Instructions: If your model features a detachable wand or handle, locate the wand release button positioned near the joint where the metal tube enters the motorized floor nozzle or pod. Press this button firmly while pulling the wand upward to disconnect it from the base. If your model is a “Lift-Away” style, press the Lift-Away button to separate the motor pod from the floor nozzle entirely. Once separated, look through the clear plastic tube of the wand using a flashlight to check for blockages caused by large items like coins, socks, or tightly bound hair clumps.
Pro Tip: If the wand is stuck due to compacted dirt around the locking collar, wiggle it gently from side to side while pressing the release button rather than pulling with excessive force.
Step 4: Access the Floor Nozzle and Brush Roll Garage
What you need: A flathead screwdriver or a coin for turning locking tabs.
Instructions: Flip the motorized floor nozzle upside down to access the underside where the cleaning path meets the floor. Locate the brush roll garage cover or release buttons, which are typically found on the top or sides of the nozzle housing. Slide or depress these locks to open the brush roll access door. Carefully lift out the primary bristle brush roll and the soft self-cleaning garage roller (if applicable). Inspect the cavity for tangled hair, thread, and carpet fibers wrapped tightly around the cylindrical core.
Pro Tip: Use a pair of sharp sewing scissors or a seam ripper to carefully slice through hair wrapped around the brush roll, sliding the blade along the designated groove to avoid cutting the bristles.
Step 5: Unclip the Hose and Check Internal Air Pathways
What you need: A long, flexible bottlebrush or a blunt broom handle.
Instructions: Locate the flexible cleaning hose that runs from the floor nozzle connection up to the dust cup intake. On most models, the hose can be unclipped at both ends by squeezing the cuff tabs and pulling outward. Once detached, stretch the hose out straight on the floor to inspect its entire length. Shine a light through one end to spot blockages. If you discover a clog, gently push a blunt-ended tool like a broom handle through the hose to push the debris out, taking care not to puncture the flexible plastic ribs.
Pro Tip: Never use sharp metal rods or coat hangers to clear hose blockages, as they can easily pierce the flexible vinyl and ruin the suction capability permanently.
Step 6: Disassemble the Swivel Steering Neck and Pivot Joint
What you need: A Phillips-head screwdriver (#2 size).
Instructions: If your vacuum is experiencing loss of movement in the swivel joint or a blockage at the base connection, you may need to remove the pivot cover. Turn the floor nozzle upright and locate the small screws securing the plastic neck housing near the pivot wheels. Carefully back out these screws using your Phillips-head screwdriver, keeping track of their exact locations as screw lengths often vary. Gently pry open the plastic neck shroud to expose the internal swivel duct and electrical wire harness, clearing out any accumulated dust bunnies or pet hair that restrict movement.
Pro Tip: Take clear photographs with your smartphone before removing any internal screws or wiring clips so you have a visual reference during reassembly.
Step 7: Inspect Electrical Connections and LED Headlights
What you need: A dry cotton swab and rubbing alcohol (optional).
Instructions: While the vacuum is partially disassembled, examine the metallic contact points and prong connectors located where the wand meets the pod and where the pod connects to the floor nozzle. These electrical pathways power the motorized brush roll and LED headlights. If you notice a buildup of carbon residue, dust, or grease on the metal pins, dip a cotton swab in a small amount of rubbing alcohol and gently clean the contacts. Ensure the area is completely dry before reconnecting any power sources to prevent short circuits.
Pro Tip: If your floor nozzle headlights flicker or stop working entirely, check these metal contact points first before assuming the LED board is burned out.
Step 8: Reassemble and Perform a Suction Test
What you need: Fully dried filters, all disassembled components, and an active power outlet.
Instructions: Begin putting your Shark vacuum back together in reverse order. Snap the swivel neck and base housing back into place and secure all screws tightly. Insert the clean, dry filters back into their respective housings and close the doors securely. Reattach the dust cup, connect the extension wand, and click the floor nozzle back onto the main unit. Plug the power cord into the wall outlet, turn the vacuum on, and place your hand near the cleaning head to verify that strong airflow and suction have been successfully restored.
Pro Tip: Listen closely for any whistling sounds or hissing noises during the test run, as these indicate an unsealed connection or a loose hose cuff that needs adjustment.
✅ Final Checklist
- Power cord is safely unplugged throughout the entire physical disassembly process.
- All foam, felt, and HEPA filters are 100% dry before being reinstalled into the housing.
- Brush roll is completely free of tangled hair, carpet threads, and wrapped debris.
- Flexible hose and extension wands are clear of internal blockages and securely clicked into place.
- All screws and plastic housing covers are tightened firmly without being stripped.
Important Notes:
- Always prioritize electrical safety by keeping moisture away from motor housings and wiring harnesses during cleaning.
- If you encounter damaged internal wiring, cracked structural housing, or a failing motor that overheats rapidly, cease DIY repairs and seek assistance from an authorized Shark service technician.
- Estimated time for complete disassembly, deep cleaning, and reassembly is approximately 45 to 60 minutes, with zero additional parts cost if standard household tools are used.
How to Fix Clogs and Clean Internal Shark Vacuum Components
Accessing and Cleaning the Brush Roll
Hair wraps around the brush roll and restricts its rotation, which triggers safety shutoffs and reduces cleaning efficiency. You can access this area easily by flipping the floor nozzle upside down.
- Locate the locking tabs or release buttons on the side or bottom plate of the nozzle cover.
- Remove the brush roll guard or slide out the brush roll entirely, depending on whether you have a standard self-cleaning brushroll or a traditional dual-brush model.
- Use a pair of scissors to cut along the designated groove where hair is trapped, pulling it away without damaging the bristles.
- Wipe down the housing interior with a dry microfiber cloth before snapping the components back into place.
Checking the Hose and Canister Path
The flexible hose and internal canister pathways are notorious for harboring stubborn clogs that resist surface suction.
- Disconnect the handle from the wand by pressing the release latch, then disconnect the wand from the floor nozzle.
- Shine a flashlight through both ends of the wand and hose to pinpoint obstructions.
- Use a blunt broom handle or a flexible cleaning brush to gently push stubborn clogs out—never use sharp metal objects that could puncture the flexible hose.
- Empty the dust cup completely, rinse the plastic cyclonic assembly if your manual permits, and ensure it is 100 percent dry before reassembling.
Step-by-Step Guide on How to Take Apart Major Shark Vacuum Parts
Disassembling specific components requires targeted steps to avoid cracking plastic latches or straining internal wires. Follow this structured walkthrough to isolate and inspect the major sections of your Shark vacuum safely in 2026.
1. How to Detach and Clean the Brush Roll Garage
Modern Shark upright and cordless models feature a brush roll garage for quick access to tangled hair and carpet fibers.
- Disconnect the vacuum from any power source or remove the lithium-ion battery pack.
- Locate the release buttons or sliders on both sides of the floor nozzle head.
- Slide or depress the buttons simultaneously to pop open the brush roll garage cover.
- Lift out the soft brush roll and the main bristled brush roll.
- Use scissors to cut away wrapped hair, and wipe down the interior housing with a dry microfiber cloth.
2. How to Disassemble the Motorized Pet Tool
Handheld accessories and pet multi-tools often accumulate pet dander and fine dust inside the turbine housing.
- Press the locking tab on the side of the pet tool attachment to release the neck.
- Use a coin or flathead screwdriver to unlock the plastic retaining plug on the side of the brush roll.
- Pull the brush roll out from the housing to expose the internal drive belt and bearing channels.
- Clear out trapped debris and snap the brush roll and retaining plug securely back into place.
What If It Still Doesn’t Work?
If you have fully disassembled, cleaned, and reassembled your Shark vacuum and notice a persistent lack of suction or strange motor noises, structural issues may be at play. Try these fallback steps before replacing the unit:
- Inspect for Micro-Crips in Flexible Hoses: Shine a flashlight through the stretch hose while flexing it to spot hidden punctures or tears that cause air leaks.
- Check the Thermal Cutoff Switch: If the motor shuts down automatically during use, a tripped thermal sensor due to severe clogs or aging components may require a reset or motor replacement.
- Test the Battery Health (Cordless Models): Voltage drops in aging lithium-ion packs can mimic suction failure. Verify battery output using a multimeter if runtime has degraded significantly.
- Seek Professional Repair: Take the unit to an authorized service center if internal wiring or the main suction motor is faulty. Out-of-warranty repairs typically range from $70 to $130, whereas replacement parts like motors cost between $40 and $90.
Conclusion
Taking apart a Shark vacuum systematically restores peak airflow and extends the operational lifespan of your appliance significantly. Regular disassembly prevents blockages from straining the motor and degrading cleaning performance. According to verified research and appliance maintenance experts, routine semi-annual deep cleaning of filters, brush rolls, and airways can preserve up to 90 percent of initial suction efficiency over a five-year period. Your next actionable step is to inspect your vacuum’s user manual for model-specific part numbers before ordering any necessary replacement filters or belts.
❓ Frequently Asked Questions
How do I know which Shark vacuum model I have to disassemble it correctly?
Your vacuum’s exact model number is printed on a rating label located on the back or bottom of the motor housing. You can reference this number on the Shark manufacturer website for model-specific diagrams.
What tools do I need to take apart a Shark vacuum?
Most Shark vacuums are designed for tool-free disassembly using quick-release buttons and latches. However, a flathead screwdriver or coin may be needed to turn locks on the floor nozzle brush roll cover.
Why is my Shark vacuum wand stuck and hard to pull apart?
Dust and fine debris can accumulate around the locking mechanisms over time. Press and hold the release button firmly while gently twisting the wand back and forth to break the seal.
How often should I take apart my Shark vacuum for deep cleaning?
It is recommended to empty the dust cup after every use and perform a thorough disassembly to clean filters, hoses, and the brush roll every one to three months.
Can I put Shark vacuum plastic parts in the dishwasher?
No, you should never put vacuum parts in the dishwasher or use harsh chemical detergents. Wash removable components like dust cups and foam filters by hand with lukewarm water only.
How do I properly reassemble my Shark vacuum after cleaning?
Ensure all washed filters and parts are completely dry. Click the dust cup securely back into place, attach the wand and hose firmly until you hear a click, and lock the floor nozzle back onto the main body.