How to Clean Shark Vacuum Step-by-Step Guide for 2027
Restoring your Shark vacuum’s suction requires regular maintenance, including emptying the dust cup, washing foam and felt filters, and cutting away tangled hair from the brush roll. Let all washed components dry completely for at least 24 hours before reassembly to prevent motor damage and mold growth. Proper routine cleaning extends the lifespan of your appliance and keeps it running like new.
Restoring your Shark vacuum to peak performance requires a straightforward routine of washing its multi-stage filters, clearing out the dust cup, and cutting away wrapped hair from the brush roll. When suction drops or a strange odor fills the room, trapped debris and clogged airflow are almost always to blame.
By 2027, modern vacuum maintenance has evolved to be simpler, but the core physics of airflow remain the same. If your machine is struggling to pick up everyday dirt, taking twenty minutes to perform a deep clean will instantly revive its suction and extend its lifespan without needing costly professional repairs.
Key Takeaways
- Empty the dust cup after every single vacuuming session to maintain strong suction power.
- Rinse foam and filter pads under cold water only until the water runs clear.
- Allow all washed filters to air dry for a minimum of 24 hours before reinstalling.
- Use scissors to carefully slice through wrapped hair and string trapped on the brush roll.
- Inspect the hose and wand periodically to clear out hidden clogs and debris.
Why Your Shark Vacuum Loses Suction and Power
Reduced airflow is the primary reason your vacuum stops performing the way it did out of the box. As you clean your home, microscopic dust particles bypass the main cyclone chamber and embed themselves deep inside the foam, felt, and HEPA filters. Over time, this creates an impenetrable barrier that chokes the motor.
The Filter Saturation Problem
Shark vacuums rely heavily on washable pre-motor foam and felt filters to protect the motor from fine dust. When you vacuum frequently, these filters become saturated within just two to four weeks. Once pores clog completely, suction drops by up to 50 percent, forcing the motor to work harder and run hotter than normal.
Airflow Restrictions in the Canister and Hose
Beyond the filters, blockages often hide in plain sight inside the dust cup assembly or the flexible wand. Compressed pet hair, lint, and large debris create a bottleneck right where the hose meets the main canister. If air cannot move freely through the system, the vacuum loses the lift needed to pull dirt from carpets.
Master Shark Vacuum Maintenance in 8 Simple Steps
Keeping your Shark vacuum clean is essential for maintaining strong suction power and prolonging the lifespan of your appliance. Over time, dust, pet hair, and fine debris accumulate in the dust cup, filters, and brush roll, forcing the motor to work harder and potentially causing unpleasant odors. This comprehensive walkthrough provides a clear, actionable roadmap to deep-cleaning your Shark vacuum safely and efficiently, ensuring it performs like the day you bought it.
Step 1: Safety First and Power Disconnection
What you need: Unplugged vacuum, well-lit workspace, and a flat surface.
Instructions: Before touching any latches, bristles, or filters, ensure your Shark vacuum is completely powered off and unplugged from the electrical outlet. If you own a cordless model, remove the lithium-ion battery pack entirely to prevent accidental startup. Lay the vacuum flat on a protected surface, such as a table covered with an old towel or outdoors on a patio, to catch any loose debris that might spill out during the initial inspection. Take a moment to visually inspect the entire body for any visible cracks, frayed cords, or heavy blockages before you begin disassembling the parts.
Pro Tip: Never submerge the main motorized body or the handle with electronic controls in water, as this will permanently damage the electrical components.
Step 2: Emptying and Washing the Dust Cup
What you need: Trash can, warm water, mild dish soap, and a microfiber cloth.
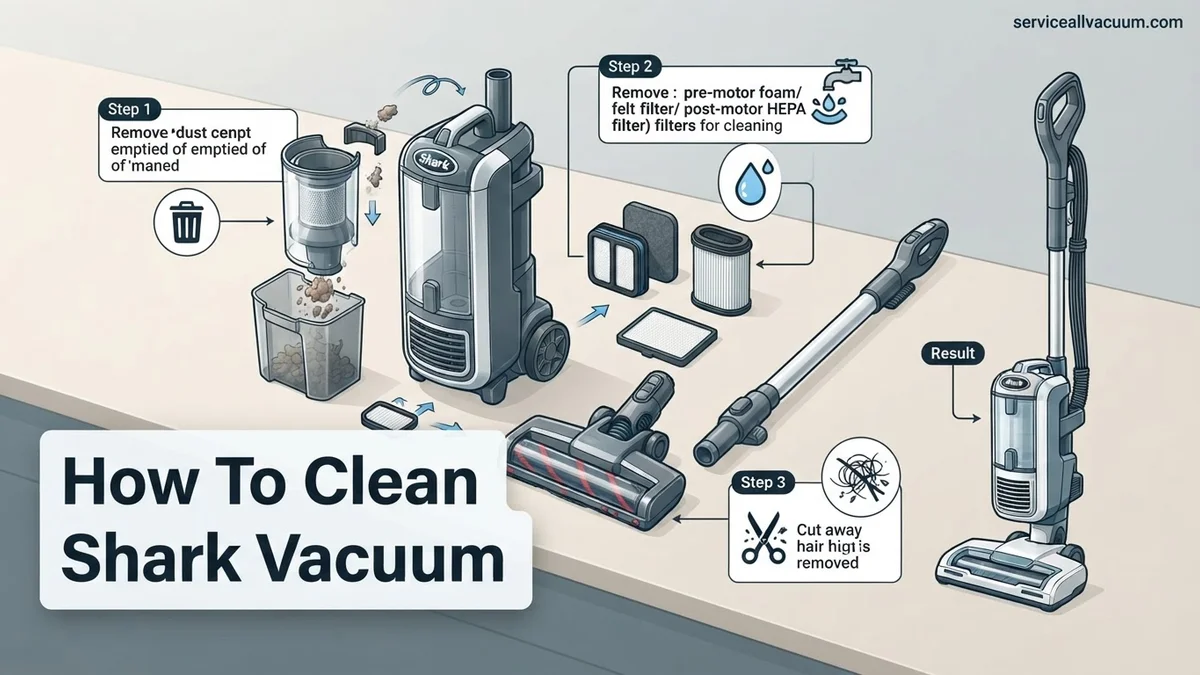
Instructions: Locate the release latch on the dust cup and detach it from the vacuum body. Hold the dust cup directly over your trash can and press the bottom release button to drop the collected dirt and debris. For stuck-on pet hair and fine dust, press the top release latch to open both ends of the canister. Once empty, wash the plastic canister thoroughly under warm running water. Use a few drops of mild dish soap if there is stubborn residue or grease. Dry the dust cup completely with a microfiber cloth and let it air dry upside down for at least 24 hours before reattaching it.
Pro Tip: Ensure the dust cup is 100% bone dry before reinstalling it; trapping moisture inside can cause mold growth and damage the motor.
Step 3: Accessing and Cleaning the Foam and Felt Filters
What you need: Access to a sink, mild dish soap (optional), and a clean drying rack.
Instructions: Locate the filter housing situated just beneath or behind the dust cup on your Shark vacuum. Pull out the filter frame and carefully remove the foam filter (the sponge-like piece) and the felt filter (the textured piece sitting right beneath it). Tap both filters gently against the inside of a trash can to dislodge loose dust particles. Rinse the foam filter thoroughly with warm water until the water runs completely clear. Rinse the felt filter gently as well, avoiding harsh scrubbing which can ruin the texture. Squeeze out excess water gently without wringing or twisting the materials.
Pro Tip: Wash your pre-motor filters every month under normal usage conditions, and allow them to air dry naturally for 24 to 48 hours away from direct sunlight.
Step 4: Inspecting and Cleaning the Post-Motor HEPA Filter
What you need: Flashlight, soft-bristled brush, and a trash can.
Instructions: Many Shark vacuums feature a secondary HEPA filter located near the base of the vacuum or behind a front door panel. Press the latch to open the HEPA filter cover and pull the filter straight out. Inspect the white or gray pleated material for heavy gray discoloration or trapped fine dust. If it is lightly soiled, tap it firmly against a hard surface over a trash can to shake out microscopic allergens. Do not wash HEPA filters unless your specific Shark model manual explicitly states they are washable, as water can ruin the specialized paper membrane. Replace non-washable HEPA filters every 12 months.
Pro Tip: Using a flashlight can help you spot hidden microscopic tears in the HEPA paper pleats, which means it is time for an immediate replacement.
Step 5: Taming the Brush Roll and Floor Nozzle
What you need: Pair of sharp scissors or a seam ripper, and a damp cloth.
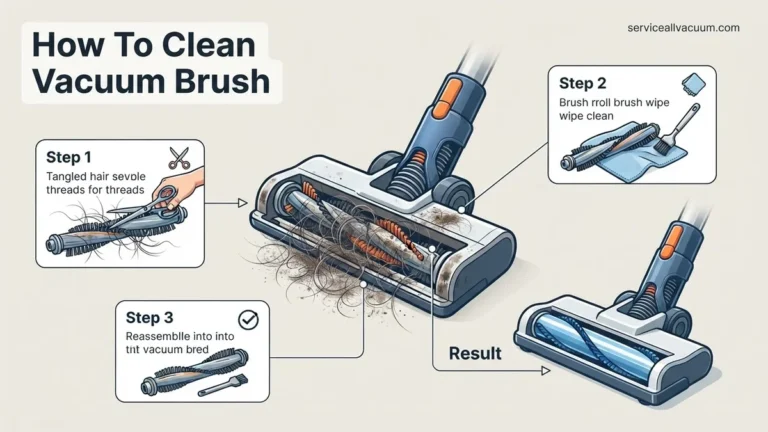
Instructions: Flip the vacuum floor nozzle upside down to access the brush roll. Depending on your Shark model, use a coin or flathead screwdriver to unlock the floorplate, or press the release buttons to open the brush roll garage. Take your scissors or seam ripper and carefully slide the blade underneath tangled threads, long human hair, and pet fur wrapped tightly around the cylinder. Lift the hair away in sections without cutting the actual bristles. Wipe down the interior housing of the nozzle with a damp cloth to remove built-up gray grime and fine dirt.
Pro Tip: Never pull hair off the brush roll with brute force, as this can bend the bristles; always slice through the hair wrap first with scissors.
Step 6: Clearing Hose and Wand Blockages
What you need: A long broom handle or flexible plastic plumbing snake, and a flashlight.
Instructions: Detach the extension wand and the flexible cleaning hose from the vacuum body. Shine a flashlight down one end of the wand and look through the other to check for hidden clogs, such as balled-up dust bunnies, coins, or small toys. If you spot a blockage, gently push it out using a broom handle or a flexible pipe cleaner—never use sharp metal objects that could puncture the plastic hose. Stretch out the flexible hose and inspect it for any micro-tears or holes that might cause a loss of suction performance during operation.
Pro Tip: Drop a small tissue paper ball through the hose; if it gets stuck, you know precisely where the internal blockage is located.
Step 7: Wiping Down Exterior Surfaces and Sensors
What you need: All-purpose surface cleaner, microfiber cloth, and cotton swabs.
Instructions: Spray a small amount of mild all-purpose cleaner onto a microfiber cloth (never spray directly onto the vacuum). Wipe down the outer plastic housing, the handle grip, and the main spine of the vacuum to remove fingerprints, scuff marks, and sticky residue. Pay special attention to any charging contacts on cordless models or robotic vacuum cliff sensors, wiping them gently with a dry cotton swab to ensure proper dock connectivity. Clean the wheels at the base of the nozzle, removing any embedded hair or dirt trapped in the axels that might hinder smooth rolling.
Pro Tip: Avoid using harsh chemical solvents, bleach, or abrasive scouring pads, as these will scratch the glossy plastic finish of your vacuum.
Step 8: Reassembly and Suction Performance Testing
What you need: Fully dried vacuum components and an electrical outlet.
Instructions: Once every single component—especially the dust cup and foam filters—is 100% dry, begin reassembly in reverse order. Snap the HEPA and foam filters securely back into their housing slots. Click the dust cup firmly into place on the main body until you hear a distinct latch click. Reattach the wand and flexible hose, ensuring all locking buttons engage properly. Plug the power cord into the wall or insert the fully charged battery pack. Turn the vacuum on and listen closely to the motor pitch; a smooth, high-pitched hum indicates proper airflow and sealing.
Pro Tip: Test the suction power by placing your hand over the end of the wand; you should feel an immediate, strong pull confirming everything is sealed correctly.
✅ Final Checklist
- Power cord is completely disconnected or the battery pack is removed before starting.
- Foam, felt, and dust cup components are completely dry before reassembly.
- Brush roll is entirely free of tangled hair, strings, and wrapped debris.
- Extension wand and flexible hose are clear of internal clogs and blockages.
- All latches, filters, and dust cup assemblies click securely into their locked positions.
Important Notes:
- Never operate your Shark vacuum without all filters and the dust cup securely installed to prevent permanent motor burnout.
- Seek professional appliance repair help if you notice burning odors, electrical sparks, or grinding noises originating from the motor housing.
- Estimated maintenance time is 30 to 45 minutes; cost range is $0 (using household items) to $25 if replacement filters are required.
What Causes Dirt and Hair Buildup Inside the Vacuum
Modern households generate a complex mix of fine dust, long human hair, and tightly wound pet fur. As this mixture travels through the intake nozzle at high speeds, it interacts with static electricity and mechanical parts, creating stubborn clogs that standard vacuuming cannot clear on its own.
The Mechanics of Brush Roll Tangling
Long hairs and sewing threads are notorious for wrapping tightly around the cylindrical brush roll. Each pass adds another microscopic layer until a dense, felt-like mat forms over the bristles. This friction slows down the rotation speed of the brush roll, preventing it from agitating carpet fibers effectively.
Debris Accumulation Zones
Certain areas inside your Shark vacuum naturally collect more waste than others. You will typically find heavy buildup in these specific zones:
- The Cyclone Vents: Fine dust cakes around the metal shroud inside the dust cup.
- The Brush Roll End Caps: Hair slips past the main bristles and binds tightly around the bearings.
- The Wand Inlet: Large objects like paper clips or food wrappers wedge sideways in the elbow joints.
Step-by-Step Instructions to Clean Your Shark Vacuum
Executing a deep clean requires a systematic approach to protect your investment and maintain optimal airflow. Manufacturers recommend following a structured process every 30 days of standard household use.
Step 1: Empty the Dust Cup and Wash Filters
- Release the dust cup from the vacuum body and empty all debris into a household waste bin.
- Remove both the foam and felt pre-filters from the housing above the dust cup.
- Take out the post-filter, typically located behind a grill near the motor base.
- Rinse the foam and felt filters under lukewarm water until the runoff flows completely clear.
- Allow all filter components to air-dry for a strict minimum of 24 to 48 hours before reinstallation.
Step 2: Clear the Brush Roll and Wand
- Disconnect the floor nozzle from the wand and inspect the interior metal tube for trapped blockages.
- Access the brush roll compartment by releasing the locking tabs on the bottom plate of the nozzle.
- Use a pair of blunt-tipped scissors to carefully slice away tangled human hair, pet fur, and thread.
- Wipe down the interior of the brush roll housing with a microfiber cloth dampened lightly with warm water.
- Reassemble the floor nozzle components securely, ensuring all latches click firmly into place.
What If Your Vacuum Still Lacks Suction After Cleaning
If thorough maintenance fails to restore baseline airflow, deeper hardware issues are likely responsible. Verified appliance repair data indicates that persistent suction failure usually stems from hidden component degradation rather than surface clogs.
- Inspect all flexible hose segments for microscopic tears, punctures, or loose cuff connections that cause pressure loss.
- Examine the motorized floor nozzle electrical connection points for corrosion, dirt buildup, or bent contact pins.
- Test the motor assembly independently by removing all attachments to check if the unit produces standard suction directly from the intake port.
- Verify that the primary thermal fuse has not tripped due to historical overheating, which permanently reduces motor output.
- Consult an authorized service center for professional diagnosis if internal motor failure is suspected, with repair costs typically ranging from $75 to $150 depending on the exact model.
Conclusion
Maintaining peak cleaning performance requires routine filter washing, debris removal, and prompt block clearance. According to verified research and appliance maintenance experts, regular upkeep prevents premature motor burnout and extends device lifespan by up to four years. Take action today by removing your vacuum filters and placing them out to dry for the next 24 hours.
❓ Frequently Asked Questions
Can I use soap when washing my Shark vacuum foam filters?
No, manufacturers recommend washing foam and felt filters with plain water only. Soap residue can leave a film that traps dirt and reduces airflow.
What should I do if my Shark vacuum is still shutting off after cleaning?
If the vacuum shuts off automatically, it is likely overheating due to a severe clog or an extremely dirty HEPA filter. Check the hose, wand, and floor nozzle for blockages.
How do I clean the self-cleaning brush roll on newer Shark models?
Even with self-cleaning technology, long pet hair can wrap around the ends. Open the brush roll garage cover and use a coin or tool to manually clear any tangled debris.
Is it safe to submerge the main vacuum motor housing in water?
Never submerge the main motorized body or handle assembly in water. Wipe the exterior clean with a damp microfiber cloth instead.
How often should I replace my Shark vacuum filters?
Even with regular washing, foam and felt filters wear out over time. Replace the pre-filters every 6 to 12 months and the HEPA filter every 1 to 3 years.
Why is my Shark vacuum leaking dust while I use it?
Dust leaking out of the body usually means the dust cup is overfilled, the filter is missing or incorrectly installed, or the rubber seals are damaged.