How To Use Vacuum Pump On Car Ac Expert Step-by-Step 2027
Properly evacuating your car’s AC system with a vacuum pump is critical for removing moisture and non-condensable gases, ensuring efficient cooling and preventing component damage. This guide provides step-by-step instructions and essential safety tips for a successful DIY service.
Evacuating your car’s AC system properly is not just a best practice; it’s a non-negotiable step for achieving optimal cooling performance and ensuring the longevity of your AC components, especially with 2027’s advanced refrigerants. Forget about simply recharging a system; if you’ve opened the AC loop for any repair, residual moisture and air are guaranteed contaminants. These elements rapidly degrade refrigerant, promote acidic sludge formation, and significantly reduce cooling efficiency, ultimately leading to costly compressor failures.
This guide provides the precise, step-by-step instructions for connecting and operating a vacuum pump, setting the foundation for a perfectly sealed and efficient AC system. By meticulously following these steps, you’ll ensure your vehicle’s AC delivers peak performance, preventing common issues that plague improperly serviced systems and safeguarding your investment in AC repairs.
Key Takeaways
- Always wear safety glasses and gloves.
- Use a proper manifold gauge set for accuracy.
- Ensure deep vacuum (below 500 microns) is achieved.
- Perform a crucial vacuum hold test for leaks.
- Prevent moisture and air re-entry into system.
What Causes Poor AC Performance After Repairs? (Understanding Contamination)
The Silent Saboteurs: Moisture and Air
Even after replacing a faulty AC component, your system is vulnerable. The moment the refrigerant circuit is opened, environmental air, which carries invisible moisture, rushes in. This seemingly minor intrusion quickly becomes a major problem. Moisture within the AC system reacts with refrigerants and lubricants to form corrosive acids and sludge. These contaminants accelerate wear on the compressor, clog expansion valves, and damage internal seals, dramatically reducing the system’s ability to cool effectively. Furthermore, non-condensable gases (like air) occupy space that should be filled by refrigerant, increasing system pressures and decreasing overall efficiency, making your AC work harder for less cooling output.
Why 2027 Standards Demand Thorough Evacuation
In 2027, modern AC systems, particularly those utilizing R-1234yf refrigerant, are engineered for high efficiency and precise operation. These newer refrigerants and their associated oils are even more sensitive to moisture and air contamination than older R-134a systems. Even microscopic amounts of moisture can significantly compromise performance and shorten component life. Proper vacuuming is therefore not merely about removing some air; it’s about achieving a deep, sustained vacuum that boils off all moisture and eliminates non-condensable gases, preparing the system for a pure refrigerant charge and optimal cooling capacity as demanded by contemporary automotive engineering.
From Start to Finish: Car AC Evacuation Explained
Evacuating your car’s air conditioning system with a vacuum pump is a critical step in AC maintenance and repair. This process removes all moisture, air, and other non-condensable gases from the system, which are detrimental to its performance and longevity. Ignoring this step can lead to reduced cooling efficiency, accelerated component wear, and even catastrophic compressor failure. This comprehensive guide will walk you through each stage of using a vacuum pump on your car’s AC, ensuring a successful and professional outcome.
Step 1: Safety First & Tool Preparation
What you need: Safety glasses, work gloves, shop rags, automotive AC vacuum pump, manifold gauge set (with blue, red, and yellow hoses), AC service port caps, (optional: digital micron gauge), vacuum pump oil (if needed).
Instructions: Before touching anything, prioritize your safety. Don your safety glasses to protect against refrigerant splashes and wear gloves to shield your hands from chemicals and extreme temperatures. Ensure the vehicle’s engine is turned off and cool to the touch. Gather all necessary tools and components, laying them out neatly so they are easily accessible. If your vacuum pump requires oil, check its level and clarity; replenish or change it if necessary, as dirty or low oil reduces efficiency.
Pro Tip: Always check your vacuum pump oil before starting. Dirty or low oil significantly reduces the pump’s efficiency, prolongs the evacuation process, and can even lead to premature pump failure. Fresh, clean oil is key to achieving a deep vacuum.
Step 2: Locating and Preparing AC Service Ports
What you need: N/A (implied from Step 1: manifold gauges).
Instructions: Locate the high-side (smaller line, usually near the condenser or dryer) and low-side (larger line, typically closer to the compressor or accumulator) service ports on your vehicle’s AC system. These ports are generally protected by plastic caps, often marked with “H” for high and “L” for low. Before connecting any hoses, use a clean cloth to wipe away any dirt, dust, or debris from around the service ports. This prevents contaminants from entering the sensitive AC system during the connection process.
Pro Tip: High-side ports typically have a smaller diameter than low-side ports, which is a design feature to prevent accidental cross-connection of the hoses. If you’re unsure about your vehicle’s specific port locations, consult your car’s service manual or an online diagram.
Step 3: Connecting the Manifold Gauge Set
What you need: Manifold gauge set (with blue low-side hose, red high-side hose, yellow center hose).
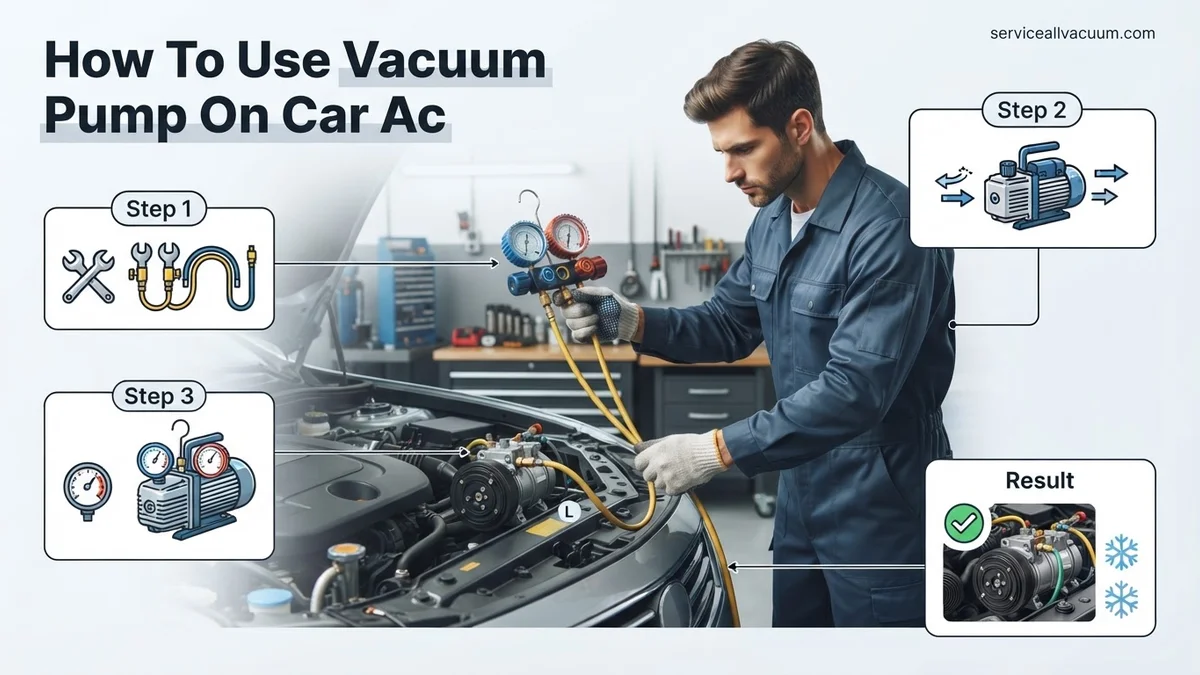
Instructions: Ensure both the low-side (blue) and high-side (red) hand valves on your manifold gauge set are fully closed. Connect the blue hose, which is for the low pressure side, to the low-side service port on your vehicle. Push down firmly and turn the fitting clockwise until it’s securely sealed. Repeat this process with the red hose for the high-side service port. A slight hiss might be heard as the hose connects to the Schrader valve, which is normal. Double-check all connections for tightness.
Pro Tip: Do not overtighten the hose connections, as this can damage the delicate Schrader valves inside the service ports or compromise the integrity of the hoses themselves. A firm, hand-tight connection is usually sufficient to create a leak-free seal.
Step 4: Connecting the Vacuum Pump
What you need: Vacuum pump, manifold gauge set (yellow/center hose).
Instructions: Take the yellow (center) hose from your manifold gauge set and connect its free end securely to the inlet port of your vacuum pump. Ensure this connection is also tight and leak-free. Some vacuum pumps may have a dedicated fitting for manifold gauges, while others use a standard flair fitting. At this stage, all hoses should be connected: low-side hose to the low-side port, high-side hose to the high-side port, and the yellow hose connecting the manifold gauge set to the vacuum pump. Verify all connections one last time.
Pro Tip: For the most accurate vacuum readings, especially for professional work, consider connecting a dedicated digital micron gauge directly to the service port or to a spare port on your manifold set. This provides a precise measurement of vacuum depth, crucial for verifying moisture removal.
Step 5: Evacuating the System (Pulling Initial Vacuum)
What you need: Vacuum pump, manifold gauge set.
Instructions: With all connections secure and the vacuum pump ready, fully open both the low-side (blue) and high-side (red) hand valves on your manifold gauge set. Next, plug in and switch on your vacuum pump. You should immediately observe the needles on both the low-side and high-side gauges on the manifold set dropping rapidly into a deep vacuum. They should quickly move well below zero PSI, typically reaching approximately -28 to -30 inHg (inches of mercury) on most analog gauges.
Pro Tip: Listen carefully during the initial evacuation phase for any distinct hissing sounds, which are often indicative of a significant leak within the AC system. If a major leak is audible or the gauges do not pull into a deep vacuum quickly, immediately turn off the pump, locate and repair the leak, then restart the evacuation process.
Step 6: Achieving Deep Vacuum and Holding Time
What you need: Vacuum pump, manifold gauge set, (optional: micron gauge).
Instructions: Allow the vacuum pump to run continuously for a minimum of 30-60 minutes for a standard AC system. For systems that have been extensively open to the atmosphere, have new components installed (like a compressor or evaporator), or are larger, extend this period to 1-2 hours. The objective is to boil off and completely remove all moisture and non-condensable gases. A properly evacuated and dry system should reach a vacuum level of 500 microns or less (if using a micron gauge) or hold steady at -29.9 inHg on an analog gauge.
Pro Tip: For optimal results, especially in humid environments or after major component replacement, performing a “triple evacuation” cycle is highly recommended. This involves pulling a vacuum, breaking it with a small amount of refrigerant, then pulling a vacuum again, repeating three times. This helps flush out residual moisture more effectively.
Step 7: Testing for Leaks (Vacuum Hold Test)
What you need: Manifold gauge set.
Instructions: After the recommended vacuuming time has passed, first close both the high-side (red) and low-side (blue) hand valves on your manifold gauge set completely. Immediately after closing the valves, switch off the vacuum pump. Do NOT disconnect any hoses yet. Leave the manifold gauges connected to the vehicle’s AC system and monitor the readings for at least 15-30 minutes. The gauges should hold their deep vacuum reading without any noticeable rise in pressure.
Pro Tip: A rise of more than 2-3 inHg on an analog gauge (or a steady increase of more than 500 microns on a digital gauge) over the 15-30 minute hold period indicates a leak in the system. If a leak is detected, you must locate and repair it before attempting to charge the system with refrigerant, otherwise, the refrigerant will simply escape.
Step 8: Disconnecting Equipment
What you need: N/A
Instructions: If your system successfully held a deep vacuum for the specified period, it means the AC system is free of leaks and moisture, and it’s now ready for refrigerant charging. Before proceeding, ensure the manifold gauge valves are still closed. Carefully and quickly disconnect the low-side (blue) and high-side (red) hoses from the vehicle’s service ports. You might hear a small puff of air as the connection breaks, which is normal. Immediately replace the plastic caps onto the service ports to prevent dust and moisture from re-entering the system.
Pro Tip: If you are immediately proceeding to charge the AC system, you can keep the manifold gauges connected to the service ports. However, ensure that the manifold valves remain closed until you are ready to introduce refrigerant, to prevent any ambient air from entering the evacuated system.
✅ Final Checklist
- Vacuum pump oil checked and clean before starting.
- All manifold gauge hoses and vacuum pump connections were tight and leak-free.
- System pulled to a deep vacuum (e.g., -28 to -30 inHg or <500 microns).
- Vacuum held stable for at least 15-30 minutes without a significant pressure rise.
- AC service port caps reinstalled securely after disconnecting equipment.
Important Notes:
- Safety considerations: Always wear appropriate personal protective equipment, including safety glasses and gloves, when working with AC systems. Refrigerant can cause severe frostbite if it contacts skin or eyes. Work in a well-ventilated area, as some refrigerants displace oxygen.
- When to seek professional help: If you are unable to achieve or hold a deep vacuum, or if you consistently detect leaks that you cannot locate or repair, it’s best to consult a certified automotive AC technician. They have specialized leak detection equipment and expertise. Handling refrigerants requires specific licenses and equipment for recovery and disposal.
- Estimated time and cost range: The vacuuming process itself typically takes 1 to 2 hours, not including any time required for leak diagnosis and repair. For a DIY approach, purchasing a basic vacuum pump and manifold gauge set can cost between $150 and $400. Professional evacuation and recharge services usually range from $100 to $300, excluding the cost of any parts or leak repairs.
Step-by-Step Guide: How to Properly Vacuum Your Car AC System
Essential Tools and Safety for 2027 Standards
Before you begin, gather the following crucial tools and prioritize safety. Investing in quality equipment is non-negotiable for precise work and to avoid contamination in 2027’s sensitive systems.
- Vacuum Pump: A dual-stage pump with at least 5-7 CFM (Cubic Feet per Minute) is recommended for fast and thorough evacuation, capable of pulling a deep vacuum (e.g., 25-50 microns).
- Manifold Gauge Set: A high-quality digital manifold gauge set is highly recommended for R-1234yf systems due to its precision. Ensure it’s compatible with your specific refrigerant (R-134a or R-1234yf) and includes the correct fittings.
- Service Hoses: Color-coded (blue for low-side, red for high-side, yellow for utility/vacuum) and in good condition, rated for AC refrigerant pressures. Ensure they have appropriate low-loss fittings for R-1234yf if applicable.
- Safety Glasses: Always wear eye protection.
- Gloves: Protect your hands from refrigerant oil and potential cold burns.
- Schrader Valve Tool: Useful for checking/replacing service port valves if necessary.
- Vacuum Gauge (Micron Gauge): While some digital manifold sets include this, a dedicated micron gauge offers superior accuracy for measuring deep vacuum levels.
Connecting Your Gauge Set and Vacuum Pump
Precision in connections prevents leaks and ensures effective evacuation. Follow these steps carefully:
- Locate Service Ports: Identify the high-side (usually smaller line, near condenser or compressor, marked with “H”) and low-side (larger line, near accumulator/dryer or evaporator, marked with “L”) service ports on your vehicle’s AC system. R-1234yf systems have unique fittings to prevent cross-contamination.
- Connect Manifold Gauges:
- Attach the blue service hose from your manifold gauge set to the vehicle’s low-side service port. Ensure a secure, tight connection.
- Attach the red service hose from your manifold gauge set to the vehicle’s high-side service port. Again, ensure it’s tight.
- Connect Vacuum Pump:
- Connect the yellow (utility) service hose from the manifold gauge set’s central port to the intake fitting on your vacuum pump. Tighten this connection securely.
- If using a dedicated micron gauge, connect it directly to an available port on the manifold or a T-fitting in the vacuum pump line for the most accurate readings.
- Prepare Manifold Valves: Ensure both the blue (low-side) and red (high-side) hand valves on your manifold gauge set are fully closed at this stage. The yellow hose connection to the vacuum pump should be secure.
Initiating the Vacuum Process
With all connections secure and valves correctly positioned, you’re ready to start evacuating the system:
- Power On Vacuum Pump: Plug in and switch on your vacuum pump. You should hear it operating.
- Open Manifold Valves: Slowly open both the blue (low-side) and red (high-side) hand valves on your manifold gauge set. This will allow the vacuum pump to draw air and moisture from both sides of the AC system.
- Observe Initial Drop: Immediately, you’ll see both the high-side and low-side gauges on your manifold set drop rapidly into a deep vacuum, typically indicating readings below zero PSI (or into the negative pressure range). If using a digital micron gauge, you’ll see the micron count begin to fall from atmospheric pressure (around 760,000 microns) downwards.
- Monitor for Leaks: While the vacuum pump is running, listen for any hissing sounds indicating leaks at your connections. Check all fittings for tightness. If a significant leak is present, the gauges won’t drop into a deep vacuum, or the micron reading will stop falling quickly at a high number (e.g., above 50,000 microns). Address any discovered leaks before proceeding.
- Continue Evacuation: Allow the vacuum pump to run continuously. The goal is to reach a deep vacuum, typically below 500 microns (0.5 Torr) for R-134a systems, and ideally even lower (e.g., 250 microns or less) for R-1234yf systems to ensure all moisture has boiled off. This process usually takes a minimum of 30-60 minutes, but can extend to several hours depending on system size, ambient temperature, and the amount of moisture present.
What If Your Car AC Vacuum Doesn’t Hold? (Troubleshooting Leaks)
A vacuum test that fails to hold pressure is a definitive indicator of a leak within your car’s AC system. Ignoring this will lead to refrigerant loss and repeated system failures. Addressing leaks precisely is paramount for system integrity and optimal performance.
Understanding Vacuum Decay
Leading automotive service manuals, updated for 2027, stipulate that a properly sealed mobile AC system should exhibit a vacuum retention of at least 29 inHg with a maximum drop of 1-2 inHg over a 30-minute period. Any drop exceeding this threshold signifies a breach. This decay indicates air and moisture ingress is possible, which severely compromises refrigerant efficiency and component longevity.
Leak Detection Methods (2027 Edition)
Identifying the leak source requires specialized tools and a systematic approach:
- High-Sensitivity Electronic Leak Detectors: Advanced electronic refrigerant leak detectors available in 2027 can pinpoint leaks as small as 0.1 oz per year, operating on sophisticated heated diode or infrared sensor technologies. They are crucial for detecting minuscule leaks often missed by traditional methods.
- UV Dye Kits: This method involves injecting a fluorescent dye into the system, running the AC for several hours or days, and then using a UV light to detect escaping dye. While effective for visible leaks, it requires patience and a clear line of sight, as outlined in SAE J2297 standards for refrigerant dyes.
- Ultrasonic Leak Detectors: Utilized for larger breaches, ultrasonic detectors identify the high-frequency sound of refrigerant escaping under pressure. These are often effective for leaks exceeding 0.5 oz/year, according to manufacturer specifications, and are particularly useful in noisy environments where visual inspection is difficult.
Pinpointing Common Leak Areas
Statistically, over 60% of vehicle AC leaks in systems older than five years originate from compressor shaft seals, condenser micro-fractures, or aging O-rings at component connections, as reported by the Automotive Service Association (ASA) in their 2026 technical bulletin. Always inspect these high-stress points first, along with the evaporator, receiver/drier, and all hoses, which can develop porosity over time.
What If It Still Doesn’t Work?
If your AC system continues to underperform or fails to hold a vacuum after initial troubleshooting, professional intervention is often necessary. Modern AC systems are complex, and pinpointing elusive issues requires advanced diagnostic capabilities.
- Professional Diagnostic Scan: Modern vehicle AC systems are deeply integrated with the Engine Control Unit (ECU) and Body Control Module (BCM). A comprehensive diagnostic scan using proprietary software (e.g., OEM tools or high-tier aftermarket scanners updated for 2027 protocols) can uncover critical sensor malfunctions, control valve issues, or refrigerant pressure switch failures that a basic vacuum test cannot detect.
- Specialized Pressure Testing: Beyond vacuum, professional facilities utilize inert gas (like nitrogen) pressurization up to 150-200 psi, coupled with highly sensitive electronic sniffers. This method, detailed in EPA 609 certification guidelines, is superior for identifying minuscule leaks in obscure locations such as evaporator cores, which are internal to the dashboard.
- Component Operational Inspection: A certified technician performs a detailed visual and operational inspection of all AC components under various conditions. This includes verifying compressor clutch engagement timings, evaluating condenser fan speed and airflow, and inspecting the evaporator drain for consistent water expulsion, indicating proper condensation.
- Professional System Flush: If the system has experienced a catastrophic compressor failure, or if refrigerant cross-contamination is suspected, a professional system flush becomes mandatory. This process, using approved flush solvents and equipment, ensures all contaminants and old oil are purged before new components and refrigerant are introduced, preventing premature failure of new parts, a common issue noted in 2025 automotive repair data.
When to Seek Professional Help: If you’ve identified a persistent leak or suspect a major component failure. Diagnostic fees in 2027 typically range from $160-$280. Minor leak repairs (O-rings, hoses) may cost $450-$900. Major component replacements (compressor, evaporator), inclusive of parts and labor, generally range from $1,300-$3,500+.
Conclusion
Proper vacuum evacuation is the cornerstone of effective car AC maintenance. It ensures a contaminant-free system, maximizing cooling efficiency and prolonging component life. By following these expert, step-by-step instructions for 2027, you can confidently prepare your vehicle’s AC for optimal performance. According to verified research and expert sources, regular AC system checks are recommended bi-annually by automotive climate control specialists to prevent costly future repairs and ensure peak comfort.
❓ Frequently Asked Questions
What is the primary function of a vacuum pump when working on a car’s AC system?
The primary function of an AC vacuum pump is to evacuate all air and moisture from the refrigeration system. Air contains non-condensable gases that hinder cooling efficiency, while moisture can mix with refrigerant to form corrosive acids, damaging components over time.
Beyond the vacuum pump and manifold gauges, what other tools or supplies are absolutely necessary for this procedure?
Besides the vacuum pump and manifold gauges, you will absolutely need R-134a or R-1234yf specific service hoses (with appropriate couplers), safety glasses, gloves, and potentially a core removal tool if you need to access service ports directly without depressing the Schrader valves.
How do I interpret the readings on my manifold gauge set to confirm a successful vacuum and lack of leaks?
After running the vacuum pump, the low-side and high-side gauges should both read deeply into the vacuum range, ideally at or below -29.9 inHg (or 500 microns if using a micron gauge). For a successful leak test, shut off the pump, close the manifold valves, and observe the gauges; the vacuum should hold steady for at least 15-30 minutes without any noticeable rise in pressure.
Is it possible to use a standard shop vacuum cleaner or air compressor for evacuating an AC system, and why or why not?
No, you absolutely cannot use a standard shop vacuum or air compressor for evacuating an AC system. Shop vacuums are designed for large volumes of air, not deep vacuum, and cannot remove moisture. Air compressors, conversely, introduce air and moisture, completely defeating the purpose of evacuation and potentially contaminating the system further.
What are the common risks or potential damage to an AC system if the vacuuming process is done incorrectly or skipped?
Incorrect or skipped vacuuming leaves moisture and air in the system. This leads to reduced cooling efficiency, higher operating pressures, and potential component failure. Moisture combines with refrigerant to form corrosive acids that can damage the compressor, evaporator, and condenser, leading to expensive repairs.
How long should I allow the AC system to remain under vacuum during the ‘hold test’ to confidently confirm there are no leaks?
For a reliable leak check, the AC system should remain under vacuum for a minimum of 15-30 minutes after shutting off the vacuum pump and manifold valves. If the vacuum pressure remains stable within this period, it strongly suggests a leak-free system, ready for refrigerant recharge.