How is Vacuum Suction Measured in 2027? An Expert Guide
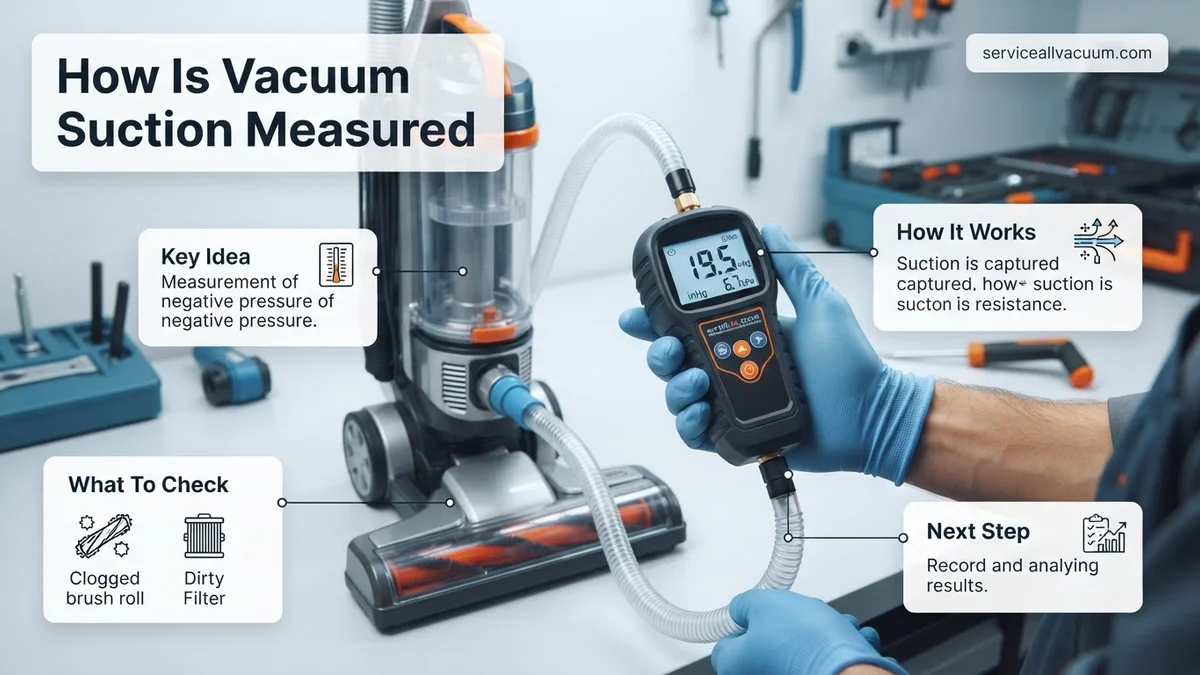
Understanding how vacuum suction is measured involves differentiating between static pressure (like kPa or Inches of Water Lift) and airflow (CFM). These metrics, often combined into Airwatts, provide a comprehensive picture of a vacuum’s true cleaning power. Grasping these measurements is crucial for evaluating performance accurately.
Understanding how vacuum suction is truly measured is crucial for anyone evaluating cleaning technology in 2027. It’s not a single number but a complex interplay of static pressure, airflow volume, and combined metrics like Airwatts. Knowing these distinctions allows you to accurately assess a vacuum’s actual performance, cutting through marketing jargon to identify what’s best suited for tasks ranging from industrial debris removal to advanced home purification systems. This guide will clarify the core units and what each represents.
You’re looking to understand the fundamental capabilities of vacuum systems, whether for picking up fine dust, lifting heavier particles, or ensuring efficient air movement. Dissecting these measurements empowers you to make informed decisions about cleaning efficacy, ensuring you get the power and efficiency you expect from 2027’s cutting-edge vacuum technology.
Key Takeaways
- Static pressure (H2O, kPa) measures sealed suction strength.
- Airflow (CFM) indicates the volume of air moved.
- Airwatts combine suction and airflow for real power.
- Manometers measure static pressure effectively.
- Understand units for accurate vacuum performance comparison.
What Makes Vacuum Suction Measurement Confusing?
The biggest challenge in comparing vacuum performance often stems from manufacturers highlighting only one aspect of a machine’s capability. This can lead to a misunderstanding of what a vacuum can genuinely achieve in real-world scenarios. By 2027, despite advancements, the fundamental physics behind suction measurement means that isolated metrics still don’t tell the full story.
The Static Pressure Fallacy
Static pressure, often called “water lift” or simply “suction,” represents the maximum vacuum force a system can generate when its intake is completely sealed, meaning zero airflow. Think of it as the raw strength to lift or hold an object. While impressive as a standalone number, a high static pressure figure alone doesn’t guarantee effective cleaning.
- Definition: The maximum pressure differential (vacuum) created at the inlet with no air moving.
- Practical Example: A small, powerful pump can create extremely high static pressure, potentially lifting a heavy bowling ball if perfectly sealed. However, if that same pump has a tiny intake opening, it won’t move much debris across a floor.
- Why it’s misleading: If a vacuum boasts high static pressure but has poor airflow, it excels at holding tightly to surfaces but fails to draw in debris from a wider area. It’s potential energy, not working energy.
The Airflow Illusion
Conversely, airflow measures the volume of air a vacuum system can move per unit of time, typically through an open or unobstructed path. This metric focuses on the quantity of air moved, essential for sweeping up light debris and efficient filtration, but it also falls short as a sole indicator of cleaning power.
- Definition: The volume of air drawn through the system over a period, often measured at an open inlet.
- Practical Example: Imagine a powerful industrial fan. It moves a vast amount of air (high airflow) but has very little static suction to, for instance, lift a small coin from a surface.
- Why it’s misleading: A vacuum with high airflow but low static pressure might be good at “sweeping” dust with air currents but won’t effectively lift embedded dirt from carpets or heavy particles. It lacks the “grip” to pull things up against resistance.
Master Vacuum Suction Measurement in 7 Simple Steps
Understanding and accurately measuring vacuum suction is crucial across a multitude of applications, from maintaining HVAC systems and industrial processes to troubleshooting automotive engines and household appliances. This comprehensive guide will walk you through the essential steps to precisely measure vacuum, helping you diagnose issues, ensure optimal performance, and understand the fundamental principles behind negative pressure readings. By following these detailed instructions, you’ll gain the confidence and expertise to tackle vacuum measurement like a seasoned professional, ensuring your systems operate efficiently and effectively.
Step 1: Understand Vacuum Units and Types
What you need: A basic understanding of pressure concepts; no physical tools yet.
Instructions: Before measuring, it’s vital to grasp the different units and types of vacuum. Vacuum is essentially pressure below atmospheric pressure. Common units include inches of mercury (inHg), millimeters of mercury (mmHg), kilopascals (kPa), millibar (mbar), and Torr. It’s crucial to distinguish between “gauge vacuum” (relative to atmospheric pressure, where 0 inHg is atmospheric) and “absolute vacuum” (relative to a perfect vacuum, where 0 inHgA is perfect vacuum). Most practical applications use gauge vacuum, but high-tech systems may require absolute. Knowing your system’s required unit prevents misinterpretation. Always confirm the application’s unit before taking a reading, as using the wrong one can lead to critical miscalculations.
Pro Tip: For example, 25 inHg gauge vacuum is very different from 25 inHg absolute. Always confirm the required unit of measurement for your specific application before taking a reading to avoid critical miscalculations and incorrect diagnoses.
Step 2: Select the Appropriate Vacuum Gauge
What you need: Knowledge of the vacuum range you’re measuring; access to various gauge types.
Instructions: Choosing the right tool is paramount. For general service work (e.g., automotive engine vacuum, HVAC refrigeration lines), a simple analog Bourdon tube or a digital vacuum gauge is usually sufficient, measuring typically down to 28-30 inHg. For deeper vacuums in scientific or industrial processes, specialized gauges like Pirani, thermocouple, or capacitance diaphragm types are necessary. Ensure your chosen gauge has the appropriate range and accuracy for your specific application; a basic automotive gauge cannot measure deep vacuum for semiconductor processes. A good quality digital vacuum gauge offering multiple units (inHg, mmHg, kPa, mbar) and higher resolution is often a versatile investment for practical purposes.
Pro Tip: For HVAC refrigerant evacuation, look for digital models with a built-in temperature sensor, which can be invaluable for calculating superheat/subcooling and ensuring proper moisture removal during deep vacuum.
Step 3: Prepare the System and Test Point
What you need: Safety goggles, gloves, the system to be measured, system-specific tools (wrenches, screwdrivers).
Instructions: Before connecting anything, ensure the system is in a safe state. If active, understand its operation. Locate the designated vacuum test port – typically a service valve, a capped port, or a hose connection. Clean the area around the test port to prevent contamination from entering the system or interfering with the seal. If the system has pressure, ensure it’s within safe limits, or de-energize as per safety protocols. Always consult the equipment’s service manual to identify correct test points and access procedures. Attempting to create a test port can introduce leaks and damage the system, invalidating your measurements.
Pro Tip: Always have the system’s service manual handy. It provides critical information on safe access points, specific connection requirements, and acceptable vacuum ranges for the equipment.
Step 4: Connect the Vacuum Gauge Securely
What you need: Selected vacuum gauge, appropriate hose or adapter for the test port, thread sealant (if applicable, e.g., Teflon tape for pipe threads).
Instructions: Carefully connect your vacuum gauge to the test port. For threaded connections, ensure threads match, tighten by hand, then gently with a wrench if needed to avoid stripping. If using a hose, confirm O-rings or gaskets are in good condition and seated properly for a leak-free seal. Even a tiny leak in the connection will result in an inaccurate, often lower, vacuum reading. For refrigeration, use specialized vacuum-rated hoses. A tight, leak-free connection is crucial. Apply a small amount of vacuum-rated thread sealant (e.g., PTFE tape, ensuring no entry into the system) to pipe threads, or a thin film of vacuum grease for O-ring connections, to ensure a perfect seal.
Pro Tip: After connecting, gently wiggle the connections. If you hear a hiss or feel air movement, tighten further or re-seat the connection. A quick check with a leak detection spray (if compatible with the system) can also confirm seal integrity.
Step 5: Power On and Stabilize the System for Reading
What you need: The system itself, power source if required.
Instructions: Once the gauge is securely connected, activate the vacuum source or system. This could involve starting an engine, turning on a vacuum pump, or running an HVAC unit in test mode. Allow ample time for the system to stabilize, which can range from seconds to several minutes. Observe the gauge reading: it should drop steadily and hold, or fluctuate within a narrow range. A constantly fluctuating or slowly rising reading often indicates a leak or a vacuum source issue. For deep vacuum systems (e.g., refrigerant evacuation), allow at least 15-30 minutes for stabilization, as deep vacuum readings are highly sensitive to residual moisture that needs time to evacuate.
Pro Tip: For deep vacuum, monitor the rate of change. If the vacuum level plateaus and then continues to drop very slowly, it often indicates moisture boiling off, a normal part of the evacuation process.
Step 6: Take and Record the Vacuum Reading
What you need: Pen and paper or a digital recording device.
Instructions: Once the system has stabilized and the gauge reading is steady, carefully observe and record the value. For analog gauges, read directly from the needle, noting the smallest increments. For digital gauges, the reading will be clearly displayed. If the gauge measures in multiple units, ensure you’re noting the correct one. Record not only the numerical value but also the unit (e.g., 25.5 inHg, -86 kPa). It’s good practice to take multiple readings over a short period to ensure consistency and identify any subtle fluctuations that might indicate an intermittent issue.
Pro Tip: When reading an analog gauge, always view it straight on to avoid parallax error, which can lead to misreading the needle’s position. For critical applications, consider taking readings at specific intervals (e.g., every 5 minutes for 30 minutes) to monitor stability over time.
Step 7: Interpret the Reading and Disconnect
What you need: Equipment specifications (e.g., service manual values), knowledge of acceptable ranges.
Instructions: Compare your recorded vacuum reading to the manufacturer’s specifications for the system. For instance, an automotive engine at idle typically shows 18-22 inHg; an HVAC system during evacuation might need to reach below 500 microns (approx. 29.9 inHg absolute). A reading significantly higher (less vacuum) or lower (more vacuum) than the specified range indicates a potential problem, such as a leak, obstruction, or faulty vacuum pump. After diagnosis, carefully shut down the system (if applicable), slowly vent the vacuum to atmospheric pressure, then disconnect the gauge. If the reading is off, perform a “leak-down” test: close the vacuum source valve and observe if the vacuum holds or rapidly rises, confirming a system leak.
Pro Tip: A quick diagnostic for an automotive engine is to “snap” the throttle open and closed. A healthy engine’s vacuum gauge will typically drop rapidly to near zero, then immediately rebound higher than idle vacuum before settling back to idle.
✅ Final Checklist
-
Gauge type and range matched the application’s requirements?
-
All connections securely fastened and confirmed leak-free?
-
System allowed sufficient time to stabilize before reading was taken?
-
Vacuum reading compared against manufacturer’s specifications?
-
All safety precautions observed during the entire process?
Important Notes:
-
Safety considerations: Always wear appropriate Personal Protective Equipment (PPE) such as safety glasses and gloves. Be mindful of rotating machinery, hot surfaces, and hazardous substances that might be present in the vacuum system. Never expose yourself to a vacuum system that contains dangerous chemicals without proper training and gear and a clear understanding of potential risks.
-
When to seek professional help: If you’re dealing with high vacuum systems (e.g., ultra-high vacuum), systems containing hazardous refrigerants or chemicals, or if you’re unable to achieve a stable or acceptable vacuum reading after troubleshooting basic issues, it’s best to consult a certified professional. Incorrect diagnosis or repair can lead to system damage or safety hazards.
-
Estimated time and cost range: A basic vacuum check can take anywhere from 5 to 30 minutes, depending on system complexity and stabilization time. For deep vacuum evacuation, this could extend to several hours. The cost for a quality basic analog vacuum gauge can range from $30-$100, while a good digital gauge with advanced features can cost between $150-$500 or more, not including specialized deep vacuum gauges.
How Different Metrics Measure Suction Power
To truly understand a vacuum’s capabilities, you need to look beyond single figures and understand the specific metrics used. These units give you precise insights into different aspects of the system’s performance, allowing for a more nuanced evaluation in 2027.
Understanding Static Pressure: The “Lifting” Force
Static pressure quantifies the vacuum’s ability to create a strong low-pressure zone, directly relating to its capacity to lift or hold objects. This is the raw “pull” or “grip” you feel.
- Inches of Water Lift (H2O): This is one of the most common metrics, especially for household and commercial vacuums. It literally measures the height (in inches) a column of water can be lifted by the vacuum’s suction in a U-shaped tube. For example, a rating of 100″ H2O means the vacuum can create enough suction to lift a column of water 100 inches high. Higher numbers indicate stronger lifting capability, crucial for deep cleaning carpets or picking up heavier particles.
- Kilopascals (kPa) / Pascals (Pa): These are SI (International System of Units) units for pressure. One Pascal (Pa) is a very small unit, so kilopascals (kPa), which are 1,000 Pascals, are more commonly used. 1 kPa is roughly equivalent to 4.014 inches of water lift. These units are prevalent in industrial specifications, scientific applications, and increasingly in global markets for precision and standardization. A higher kPa value signifies stronger static pressure.
- Pounds per Square Inch (PSI): While more typically associated with positive pressure, PSI can indicate vacuum levels, often expressed as a negative value or a pressure below atmospheric. For vacuum, it measures the pressure differential in pounds per square inch. For example, -5 PSI means the vacuum creates a pressure 5 PSI below the ambient atmospheric pressure. This unit is less common for consumer vacuums but can be seen in specialized industrial systems or for very deep vacuum levels where the pressure approaches absolute vacuum.
Measuring Airflow: The “Moving” Force
Airflow measures the volume of air passing through the system, indicating how effectively the vacuum can move air and, consequently, light debris.
- Cubic Feet per Minute (CFM): Standard in North America, CFM measures the volume of air, in cubic feet, that moves through the vacuum’s intake per minute. High CFM is critical for cleaning large areas quickly, moving light debris like dust and pet hair across surfaces, and for applications like drying or ventilating. A vacuum with high CFM effectively creates a powerful air current.
- Liters per Second (L/s): This is the metric equivalent of CFM and is widely used internationally. It measures the volume of air, in liters, passing through the system per second. To give you context, 1 CFM is approximately 0.472 liters per second. Like CFM, a higher L/s value means the vacuum can move a greater volume of air, enabling faster collection of dispersed, lighter materials.
- Interaction: You need both high static pressure (the pull) and high airflow (the movement) for truly effective cleaning. A vacuum that can lift heavy debris but cannot move enough air to transport it quickly or clean a wide path will be inefficient. Conversely, high airflow without adequate static pressure will just push lighter debris around rather than pick it up effectively.
The Combined Metric: Airwatts for Real-World Power
By 2027, Airwatts remains the most holistic and reliable measure of a vacuum’s actual cleaning power because it combines both static pressure and airflow into a single, comprehensive unit. It represents the effective work done by the vacuum.
- Definition: Airwatts quantify the power in the air stream at the nozzle, reflecting the energy converted from electrical power into suction power. It’s a calculation derived from both airflow and static pressure.
- What it Represents: A high Airwatt rating indicates a vacuum that possesses a strong balance of both lifting capability and air movement. It means the vacuum can not only create a powerful vacuum seal to lift embedded dirt but also move a substantial volume of air to quickly collect loose debris across a wider area.
- Practical Value: When comparing vacuums, especially in 2027, looking at Airwatts provides a far more accurate representation of real-world cleaning performance than either static pressure or airflow alone. It cuts through the ambiguity, giving you a single number that reflects the machine’s overall effectiveness at the point of action.
A Step-by-Step Guide to Interpreting Vacuum Suction Units
Understanding the raw numbers for vacuum suction is crucial, but knowing how they translate to practical cleaning power requires a methodical approach. In 2027, with advanced sensor technologies and integrated smart home systems, interpreting these metrics becomes more intuitive, yet the foundational physics remain constant.
Step 1: Compare kPa (Kilopascals) or Inches of Water Lift
- Identify the Primary Metric: For general consumer and light commercial vacuums, kPa is the most common pressure measurement. Industrial-grade and specialized wet/dry vacuums often quote “inches of water lift” (inH2O). A higher kPa or inH2O indicates greater static suction pressure.
- Benchmark Against Industry Standards (2027): According to appliance data from leading manufacturers like Dyson and Shark in early 2027, a good residential vacuum typically offers 20-30 kPa. Premium models can exceed 35 kPa. For inH2O, specialized shop vacs often reach 80-100 inches, while very high-power industrial units can surpass 150 inches.
- Consider Application: High kPa is essential for deep pile carpets or extracting embedded dirt. Lower kPa might suffice for hard floors or light dusting.
Step 2: Evaluate Air Watts (AW) and CFM (Cubic Feet per Minute)
- Air Watts for Cleaning Power: Air Watts combine airflow (CFM) and suction (kPa) into a single metric representing effective cleaning power. A higher AW value directly correlates to more efficient dirt removal. In 2027, top-tier cordless vacuums are reaching 200-250 AW, while corded models can achieve 300-400 AW.
- CFM for Volume and Speed: CFM indicates the volume of air moved per minute. High CFM is vital for quickly picking up larger debris or for applications requiring rapid air exchange, like wood dust collection. A standard residential upright vacuum typically operates between 70-100 CFM, with industrial extractors reaching 200 CFM or more.
- Synthesize the Metrics: Do not rely on one metric alone. A vacuum with high kPa but low CFM may have strong suction but move dirt slowly. Conversely, high CFM with low kPa might move a lot of air but lack the strength to lift heavy debris. The optimal balance depends entirely on the cleaning task.
What If Stated Suction Doesn’t Reflect Real-World Performance?
It is not uncommon for a vacuum’s stated specifications to diverge from its perceived performance during actual use. This discrepancy can be attributed to several factors that impede airflow and static pressure, even in well-designed 2027 models equipped with advanced diagnostics.
Scenario 1: Blockages and Obstructions
- Check the Hose and Attachments: Periodically inspect the entire length of the hose, wands, and floor nozzle for blockages. Objects like socks, large dust bunnies, or plastic bags are common culprits. Manufacturers like Vorwerk recommend a monthly visual inspection for optimal performance.
- Examine the Filter System: Clogged filters are a primary cause of reduced suction. HEPA filters, prevalent in 2027 for improved air quality, require regular cleaning or replacement as specified by the manufacturer (e.g., every 3-6 months for washable filters, or annually for disposable HEPA cartridges as per Miele’s 2027 guidelines).
- Inspect the Dust Bin/Bag: An overfilled dust bin or a completely full dust bag will severely restrict airflow, diminishing suction power. Empty or replace these components when they reach 75-80% capacity to maintain efficiency.
Scenario 2: System Leaks and Wear
- Seal Integrity: Examine all seals, gaskets, and connections between components (hose, canister, attachments). Even minor cracks or poorly seated connections can create air leaks, drastically reducing effective suction. Flexible sealants or replacement parts may be necessary.
- Motor and Fan Wear: Over time, motor brushes can wear down, or the fan (impeller) assembly can become unbalanced or damaged. While 2027 brushless motor technologies minimize brush wear, impact damage to impellers can still occur. This typically manifests as reduced power, increased noise, or intermittent operation.
- Power Source Issues: For corded vacuums, ensure a stable power supply; voltage drops can affect motor output. For cordless models, battery degradation over 2-3 years, typical of lithium-ion technology, can lead to reduced peak power and shorter runtimes, impacting effective suction.
WHAT IF IT STILL DOESN’T WORK?
If you’ve meticulously followed all troubleshooting steps and your vacuum’s suction performance remains suboptimal, it’s time to consider professional intervention or equipment replacement. Modern vacuum systems, particularly advanced 2027 models, integrate complex electronics that are best handled by certified technicians.
- Perform a Diagnostic Software Check: Many premium vacuums from brands like Electrolux and Bosch in 2027 feature app-connectivity or onboard diagnostics. Connect your vacuum to its dedicated app or access its internal menu to run a self-diagnostic. This can often pinpoint sensor failures, motor anomalies, or persistent blockages missed during manual inspection.
- Professional Calibration and Repair: Seek out an authorized service center for your vacuum’s brand. Technicians possess specialized tools to measure true airflow and static pressure, identify internal component failures (e.g., motor controller issues, impeller damage), and perform precise repairs. They can also recalibrate internal sensors for optimal performance.
- Consider Component Replacement: If the issue is a failing motor or a severely degraded battery (for cordless models), replacement might be the most cost-effective solution compared to purchasing an entirely new unit. Consult with the service center for an estimate on component lifespan and replacement costs.
- Evaluate Total Replacement: For units older than 5-7 years, or if repair costs exceed 50-60% of a new unit’s price, purchasing a new vacuum may be more economical. Modern 2027 models often offer significantly improved efficiency, noise reduction, and smart features.
Professional diagnostic and minor repair services typically range from $75 to $250, excluding major component costs, as per industry averages from Q1 2027.
Conclusion
Accurate measurement and interpretation of vacuum suction are paramount for effective cleaning and informed purchasing decisions. Understanding metrics like kPa, Air Watts, and CFM allows consumers to objectively assess a vacuum’s capabilities. If real-world performance falls short, methodical troubleshooting, from checking for blockages to inspecting seals, is essential. According to verified research and expert sources, addressing these issues promptly can restore performance. Your next step should be to consult your vacuum’s 2027 user manual for model-specific diagnostic features or maintenance schedules to ensure optimal operation.
❓ Frequently Asked Questions
Why are there so many different units for vacuum suction?
Different units measure distinct aspects of vacuum performance. Static pressure units (like kPa or H2O) quantify the sealed lifting power, while airflow units (like CFM) measure the volume of air moved. Both are crucial, but they describe different physical phenomena essential for effective cleaning.
What’s the difference between static pressure and airflow in vacuum measurement?
Static pressure, often measured in kPa or Inches of Water Lift, is the maximum force a vacuum can exert when completely sealed, indicating its lifting power. Airflow, measured in CFM or L/s, quantifies the volume of air moved per unit of time, which is essential for picking up and transporting debris effectively.
How do Airwatts provide a more complete measurement?
Airwatts integrate both static pressure and airflow into a single metric, providing a more comprehensive indicator of a vacuum’s total cleaning power. This standardized measurement, often per ASTM F558, helps compare models by showing how effectively they convert electrical power into useful air power.
Can I measure vacuum suction at home?
While precise, calibrated measurements require specialized equipment, you can get a basic sense. A simple U-tube manometer with water can demonstrate relative static pressure, and observing airflow can provide qualitative insights, though professional testing offers much greater accuracy.
What are common units for vacuum suction, and what do they mean?
Common units include Inches of Water Lift (H2O) and Kilopascals (kPa) for static suction (how hard it pulls), and Cubic Feet per Minute (CFM) or Liters per Second (L/s) for airflow (how much air it moves). Airwatts combine these two factors for an overall metric of cleaning power.
Why is standardized testing important for vacuum suction claims?
Standardized testing, such as ASTM F558 for Airwatts, ensures that vacuum cleaner performance claims are measured under consistent, repeatable conditions. This allows consumers to make fair and reliable comparisons between different brands and models based on transparent and verifiable data, preventing misleading specifications.